The key to gaining a competitive edge for modern WordPress agencies no longer lies in writing great code. Growth-oriented agencies automate repetitive tasks, reduce operational costs and time-to-market, and offer clients more tailored services.
Integrating AI tools into production processes is crucial for agencies looking to automate their workflows. In this context, Vibe Coding — the new AI-driven development paradigm — is gaining increasing traction every day.
Vibe Coding isn’t an easy way to write code, though. While it’s true that you don’t need years of experience to benefit from the Vibe Coding approach, a strong understanding of programming and the languages you use is crucial. And that’s not all. In addition to traditional coding skills, it’s now essential to develop a broader set of capabilities. Knowing how to use the most powerful AI-powered tools is definitely one of them.
Are you ready to vibe code your agency’s WordPress workflows? Keep reading.
Vibe Coding WordPress workflows
If you haven’t adopted it yet, Vibe Coding is a development methodology geared toward efficiency and resource optimization. With Vibe Coding, you stop physically writing lines of code and move to a higher level of abstraction: The level of intent. You, as a developer, define the architecture, logic, and technical and business requirements of a web project, delegating the actual coding to the AI agent.
Adopting the vibe approach to process automation brings significant advantages: reduced time-to-market, democratization of automation, and process flexibility and adaptability. These benefits translate into greater efficiency and scalability. With workflow automation and the introduction of Vibe Coding, WordPress agencies can scale more easily because onboarding new clients doesn’t increase the workload and overhead costs.
Before celebrating, however, you must be aware that Vibe Coding is not a panacea that magically delivers well-structured, maintainable code that always works as expected. Adopting this new paradigm requires an understanding of how AI agents work and must be architected according to principles and best practices that make it a reliable approach for a WordPress agency.
In the next sections, we will dive into creating an automation workflow for onboarding a new WordPress project, following a practical approach based on a real-world use case: we will look at how to clone a preconfigured WordPress site blueprint hosted on Kinsta using GitHub Copilot and the Kinsta API.
Hopefully, this article will help you understand the benefits of automation and how to effectively implement Vibe Coding in your agency’s development workflow.
Your automation toolkit
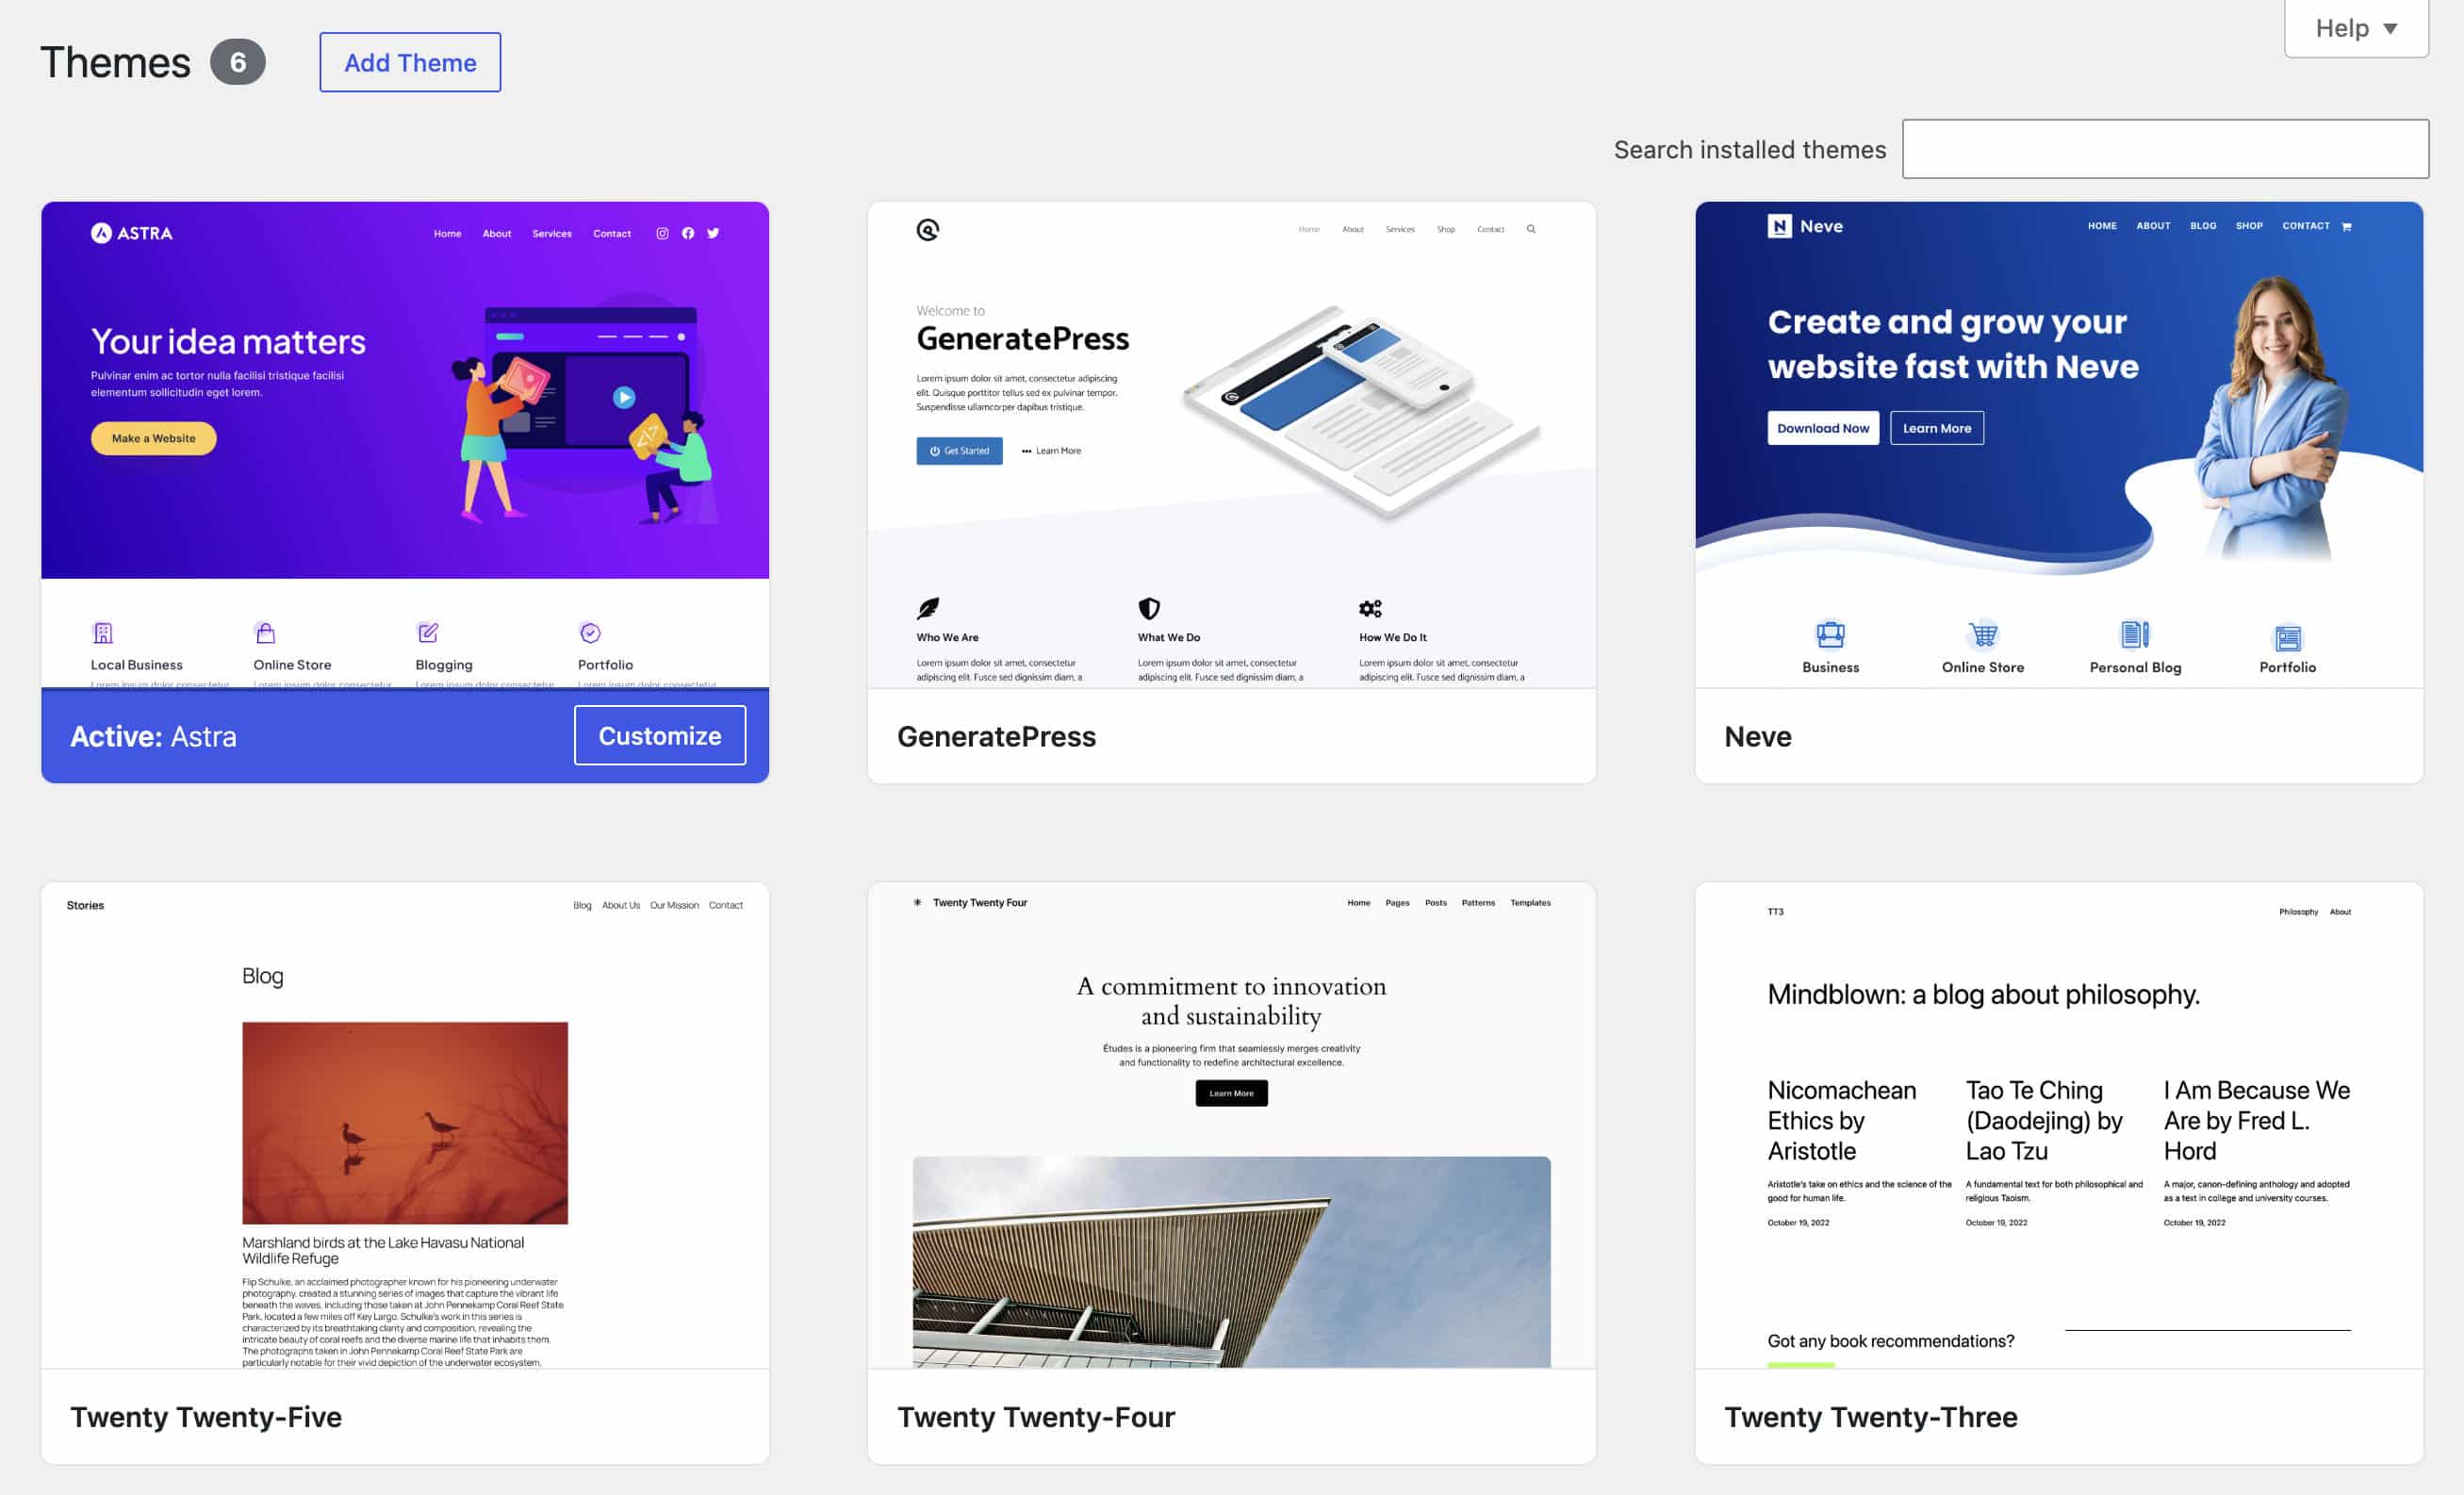
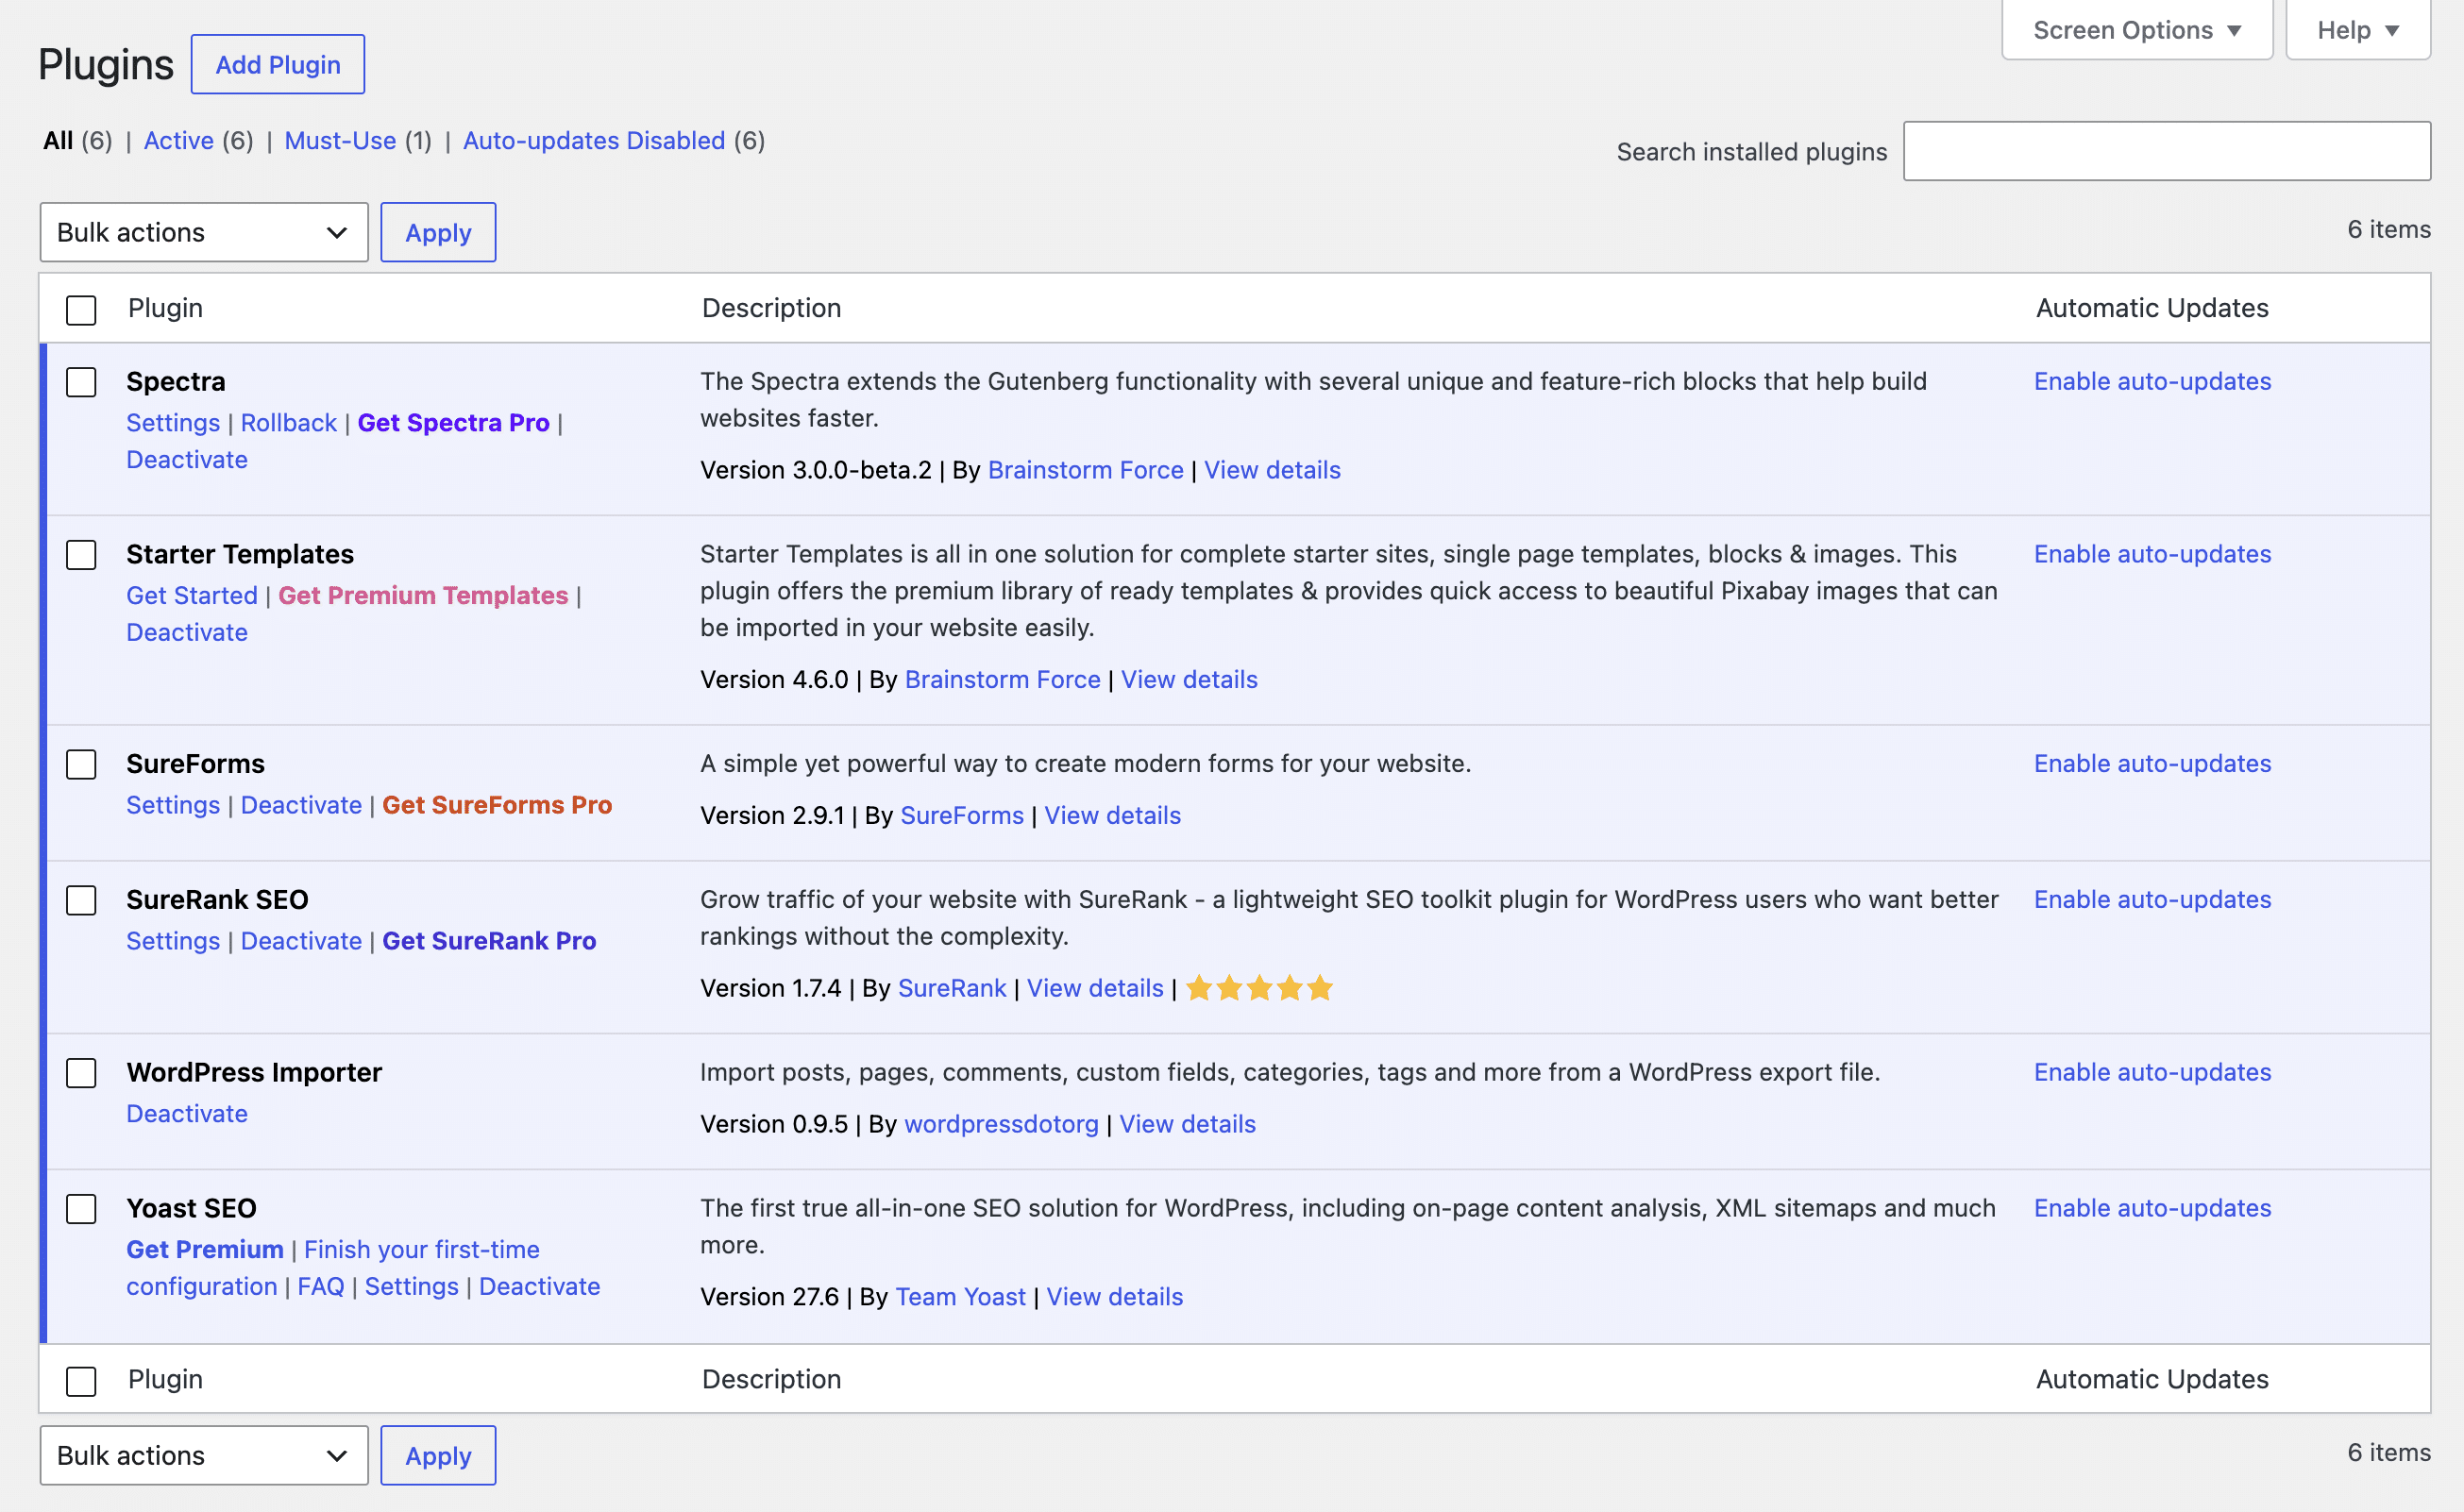
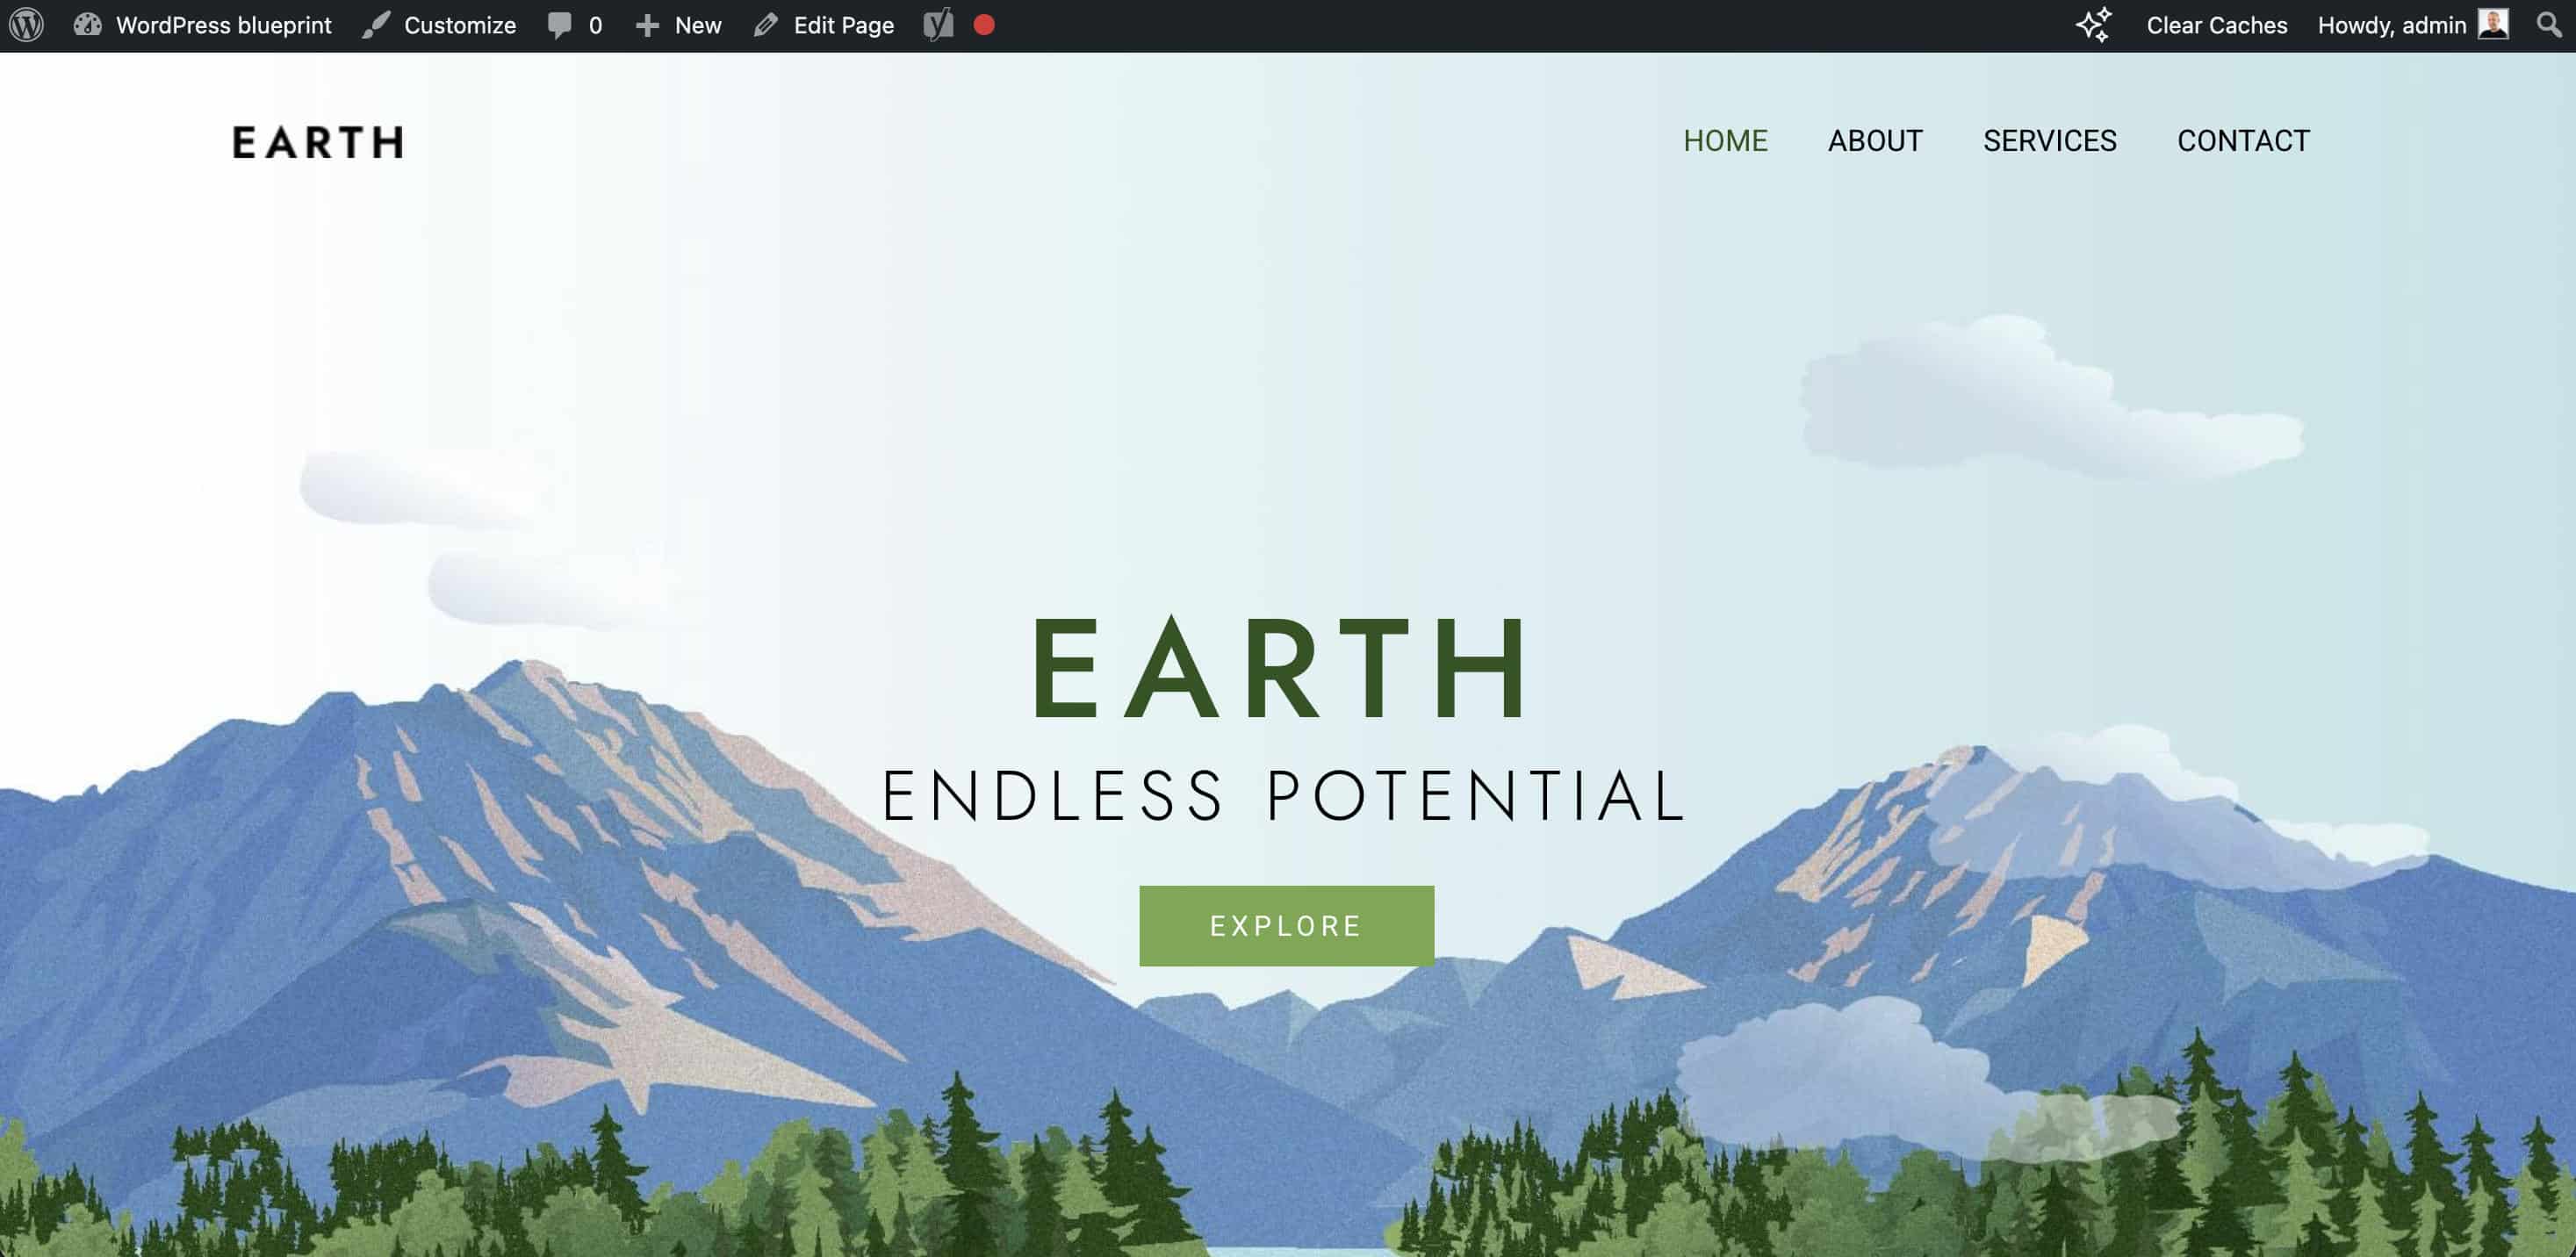
First off, you will need a blueprint site hosted on Kinsta. For this example, we created a new site and installed the Astra, GeneratePress, and Neve themes. We also installed Yoast SEO, Starter Templates, and other support plugins for the Astra theme.
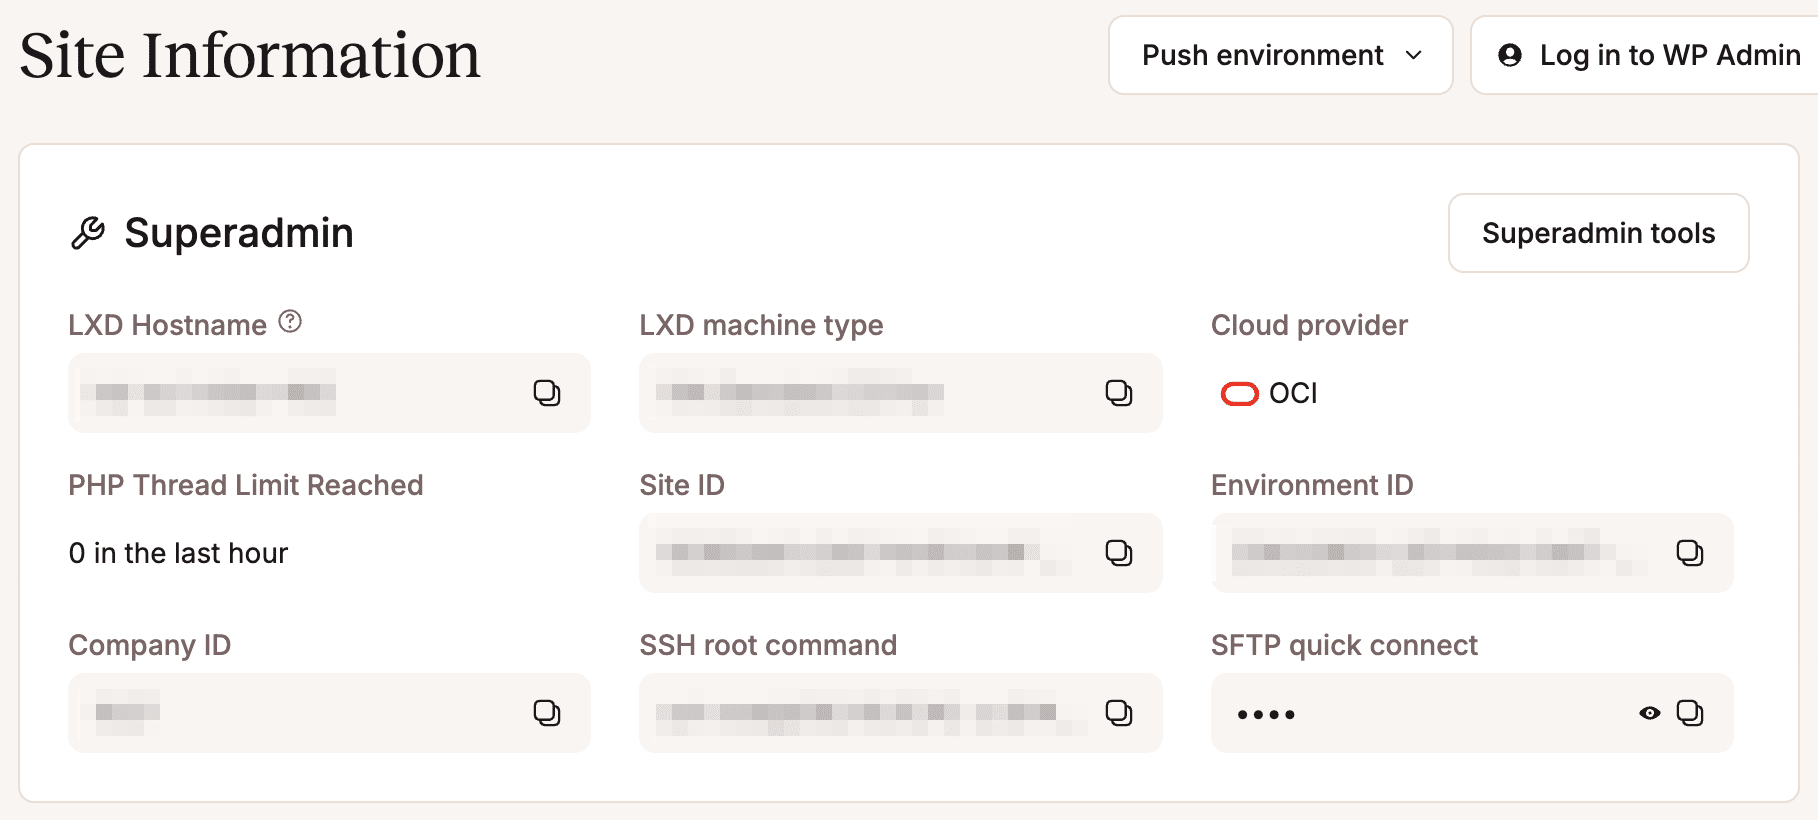
To create a clone of your site, you will need to access your Kinsta hosting environment via the Kinsta API. You will need a Kinsta API key, your company ID, and the ID of the environment you want to clone.
You can get your Company ID from the URL of your MyKinsta dashboard (the idCompany parameter) and in the Site Information section in MyKinsta, navigating to Sites > sitename > Info. In the same section, you will also find your Environment ID.
Finally, you’ll need an IDE to work in. The many available options include widely-used development environments like Visual Studio Code or Cursor, or AI-first development environments like Lovable. You could also use a web-based prototyping platform like Google AI Studio, which is ideal for testing prompts in an isolated playground before moving into actual development.
For this article, we used Google AI Studio for prompt building and GitHub Copilot in Visual Studio Code to build the app. Here’s why this setup works so well:
- Widespread adoption: GitHub Copilot is incredibly popular and is already a core part of the tech stack for many WordPress agencies. Leveraging it for a workflow automation project means your team won’t have to spend time getting familiar with new development tools.
- Direct file system access: Copilot has access to your project’s file system. This allows it to directly create the necessary files, including configuration assets, and write code based on your requests.
- Agent instructions: You can define global, project-level rules using a
.github/copilot-instructions.mdconfiguration file. The agent will strictly follow these system instructions, ensuring every file matches your project standards.
With these features in mind, let’s explore how GitHub Copilot works.
Vibe coding with GitHub Copilot: modes, context window, and agent instructions
Understanding how GitHub Copilot works is vital to unlocking its full potential. In this section, you’ll get familiar with Copilot’s basic concepts.
Copilot modes
There are three distinct modes you can use to interact with GitHub Copilot, each determining the type of conversation you have with the chatbot.

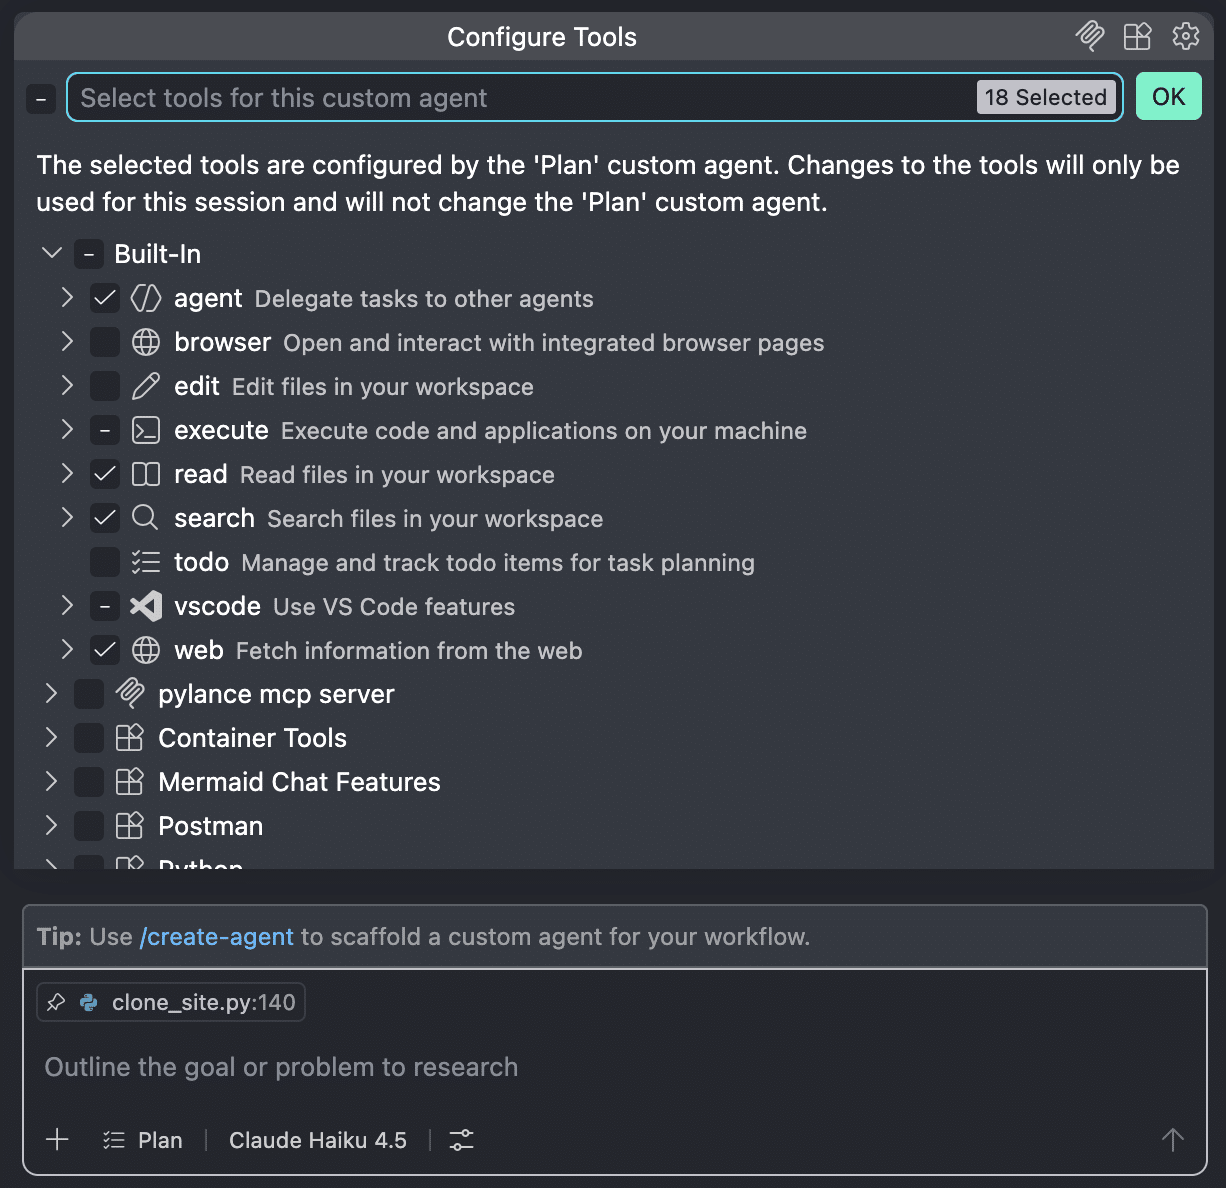
Plan: In Plan mode, Copilot generates a structured plan broken down into tasks, which is then handed over to Agent mode for execution (read below for more details). This keeps the agent sharply focused on the overall project goals and allows it to track progress effectively.
In Plan mode, Copilot provides a detailed roadmap, along with implementation and verification steps. After reviewing the proposal, you can submit your feedback to make any necessary adjustments. When the plan aligns with your needs, you can move on to implementation.
Plan mode features a comprehensive set of tools available under Configure Tools, right in the chat window.
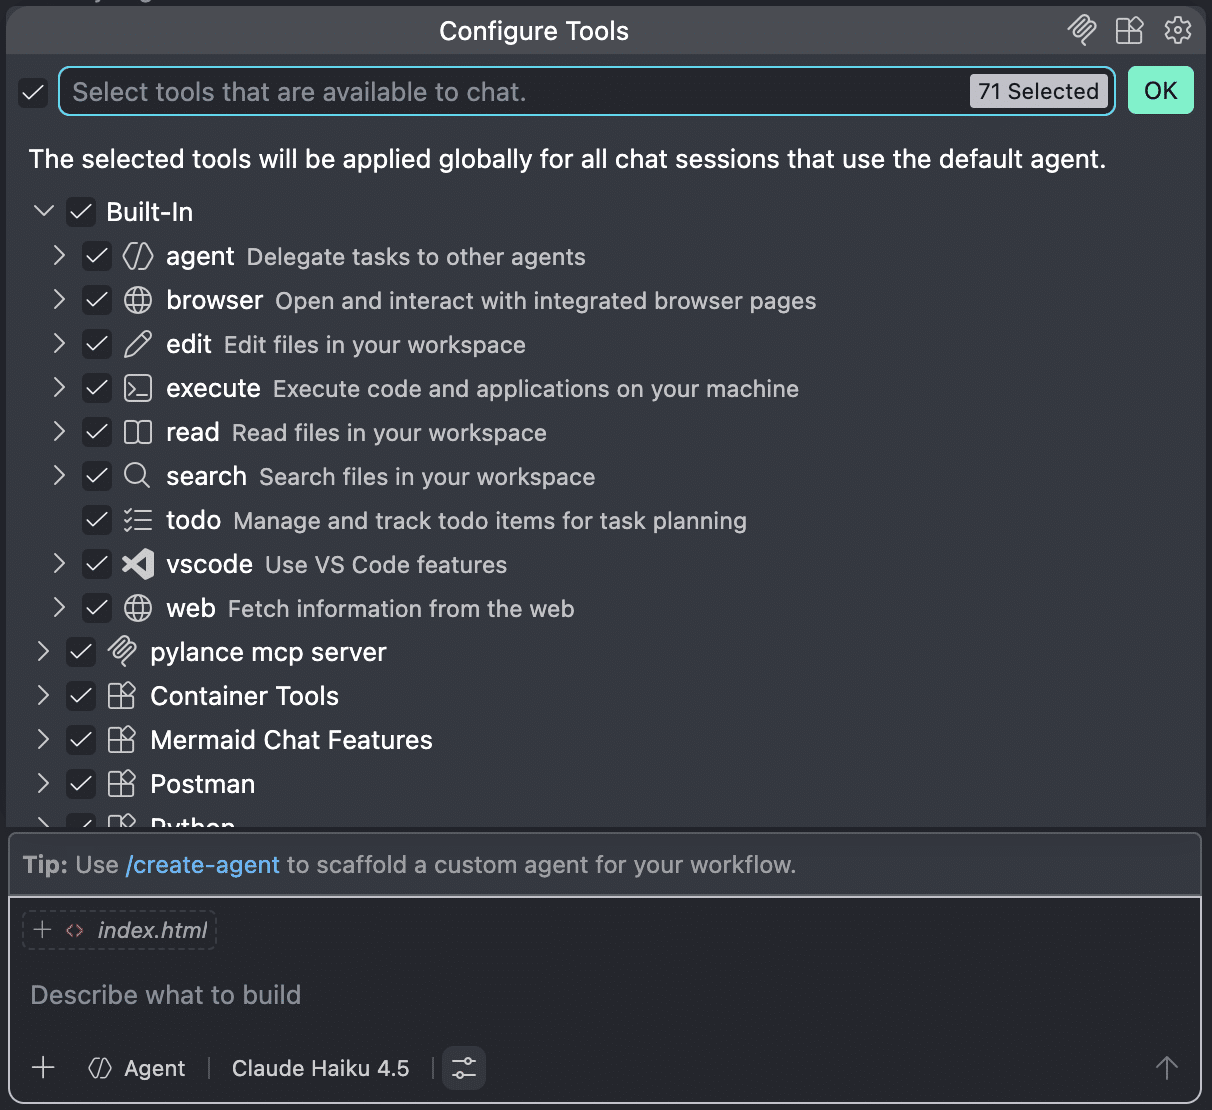
Agent: In Agent mode, Copilot analyzes your request, consults an AI model on how to solve the task, and goes to work. Once the first iteration is complete, Copilot runs a check to catch any potential errors and determines what fixes are needed – whether that involves code modifications, terminal commands, or tool calls.
By default, all available tools are pre-selected in Agent mode.
For more information on agents, please refer to the official VS Code documentation.
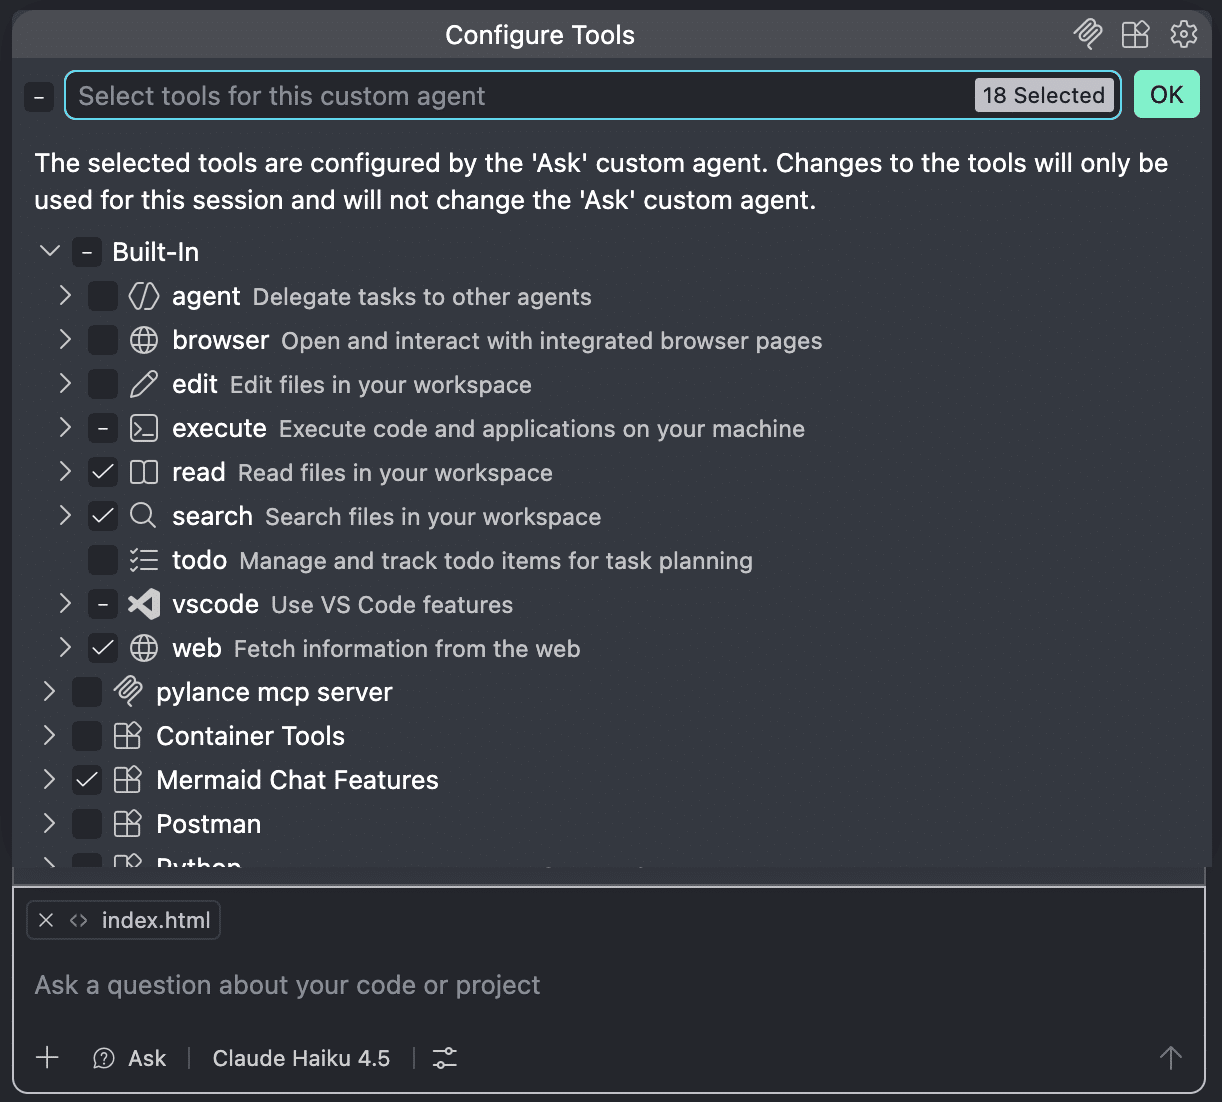
Ask: Ask mode is for asking questions through the chat window. This mode is recommended for help and general coding questions.
These three GitHub Copilot modes follow a precise chronological and logical sequence within an application’s development lifecycle.
During the initial project architecture phase, Plan mode helps you map out the logical steps of your roadmap – identifying the files to create, the dependencies to install, and the underlying architecture.
In the actual coding phase, Agent mode takes over file creation and code generation. At this stage, the agent becomes autonomous. Your role shifts to supervisor – you provide the necessary feedback to resolve blocks or refine specific parts of the codebase.
Ask mode comes in handy again during the debugging phase. In this mode, Copilot helps clear up doubts, handles exceptions, and documents your code.
Context Window
Context is everything the model can see when it is processing a response. It includes things like your chat history, the files in your local or remote workspace, system and custom instructions, tool outputs, and any references you explicitly add to the chat.
The quality of the responses depends on the context, making it vital to provide the model with the right, relevant information.
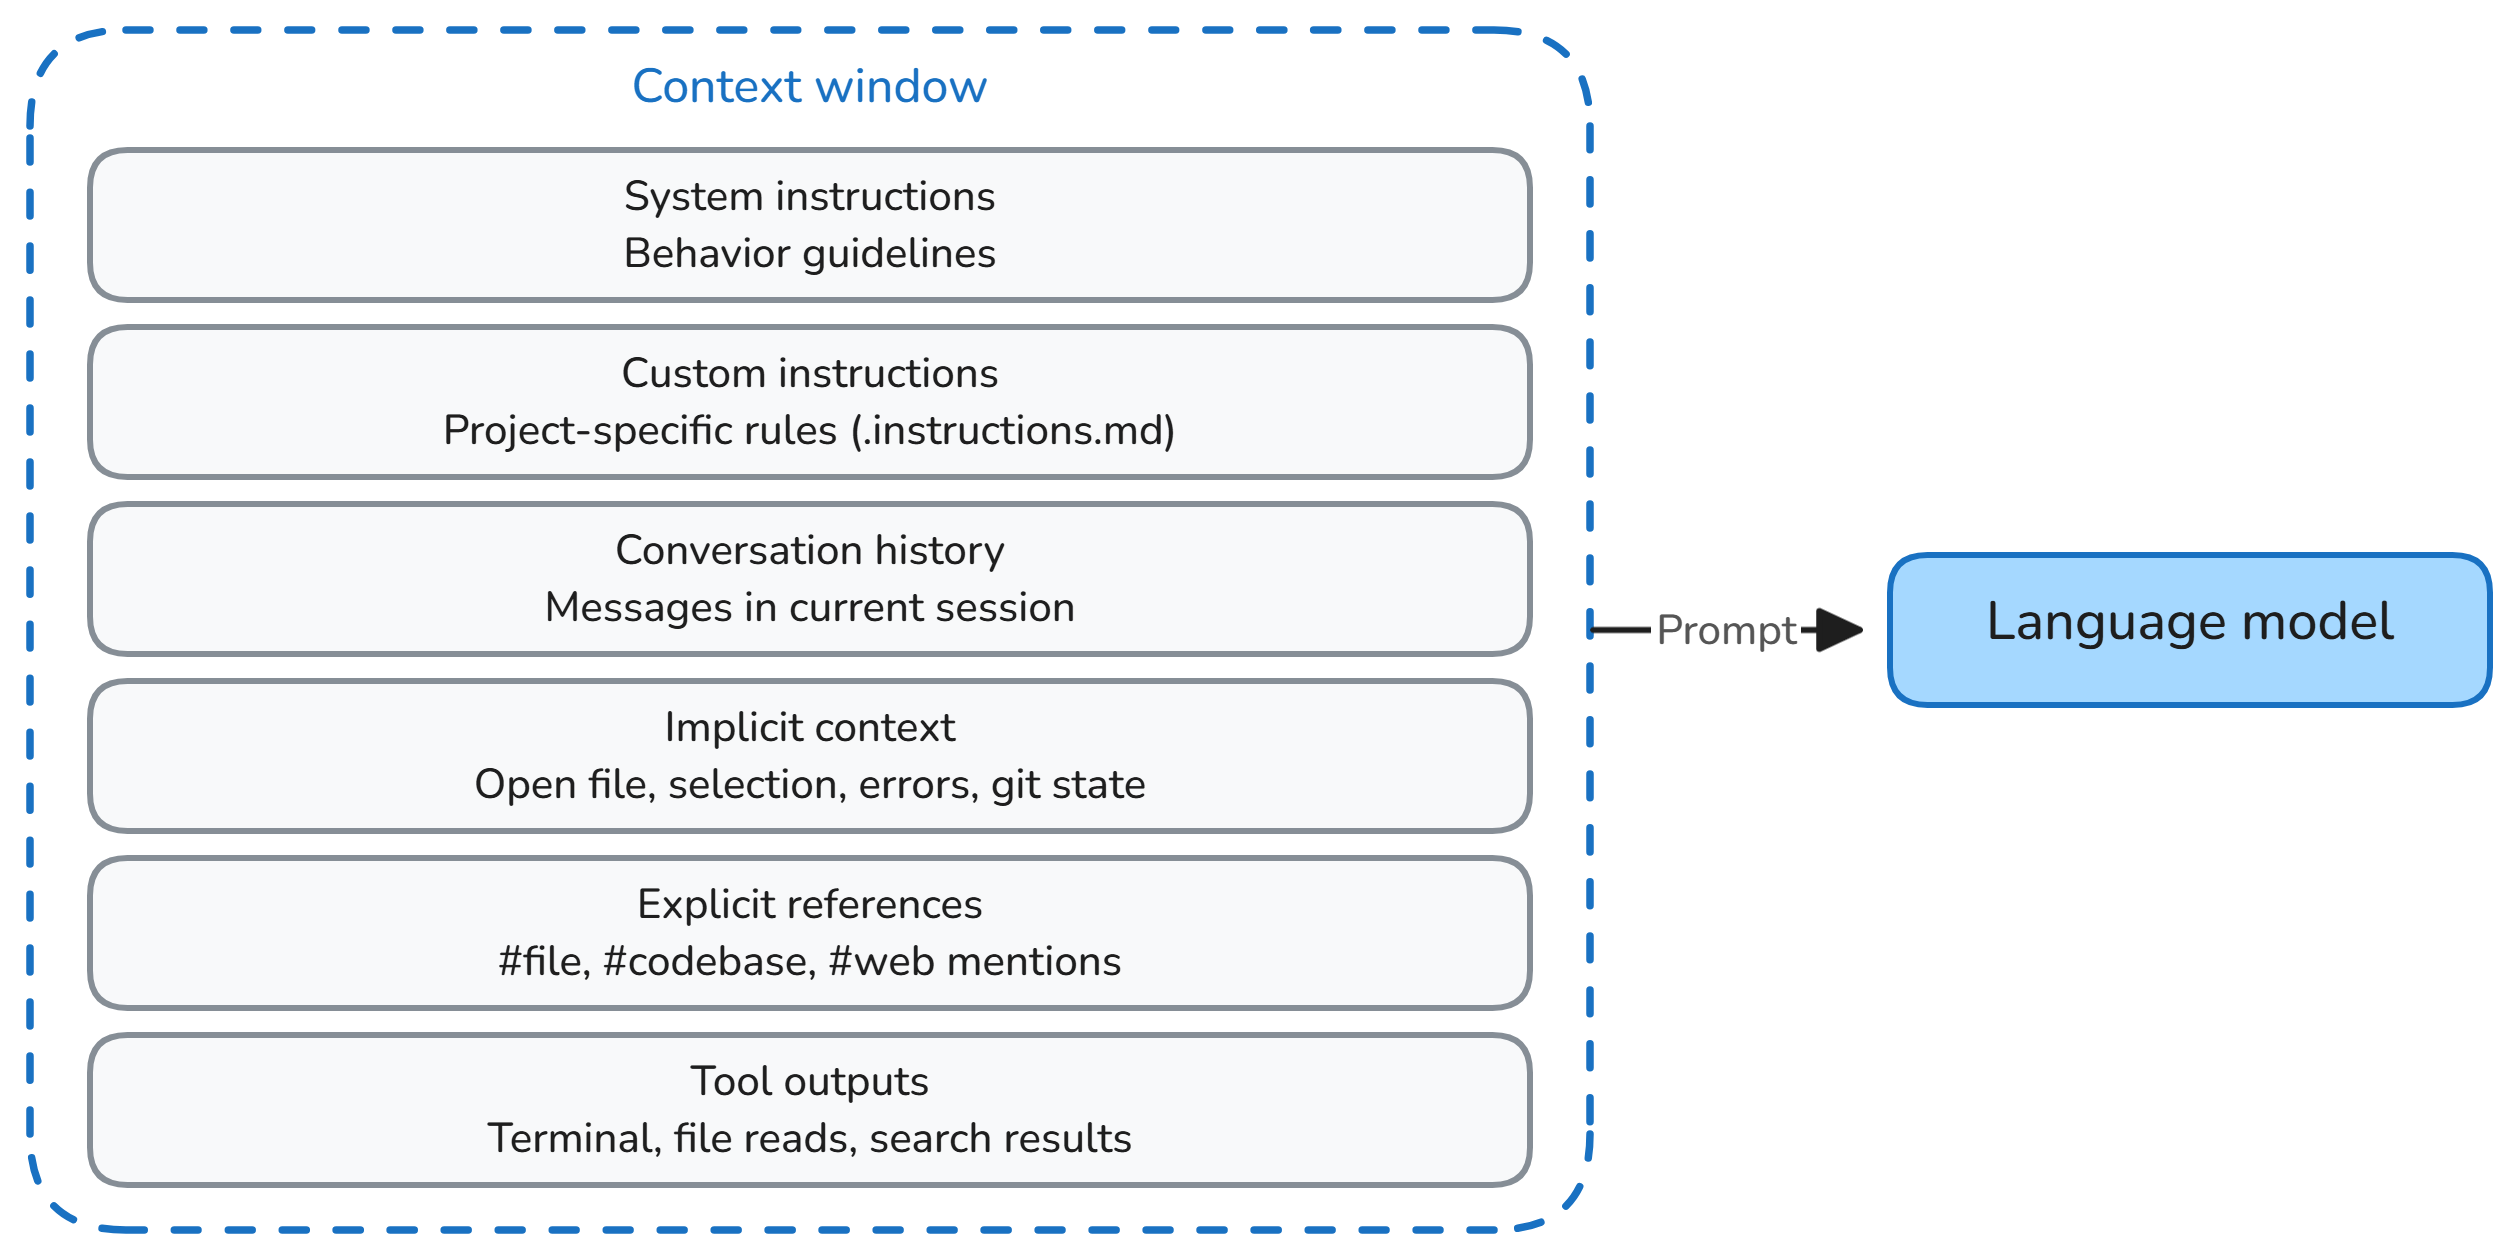
The model does not have unlimited memory. The Context Window is the maximum amount of data – measured in tokens (portions of words or code) – that an LLM can process and “hold in mind” at one time during a single request-and-response cycle. In VS Code, you can see how many tokens are available in your context window by clicking the icon in the bottom-right corner next to the chat window.
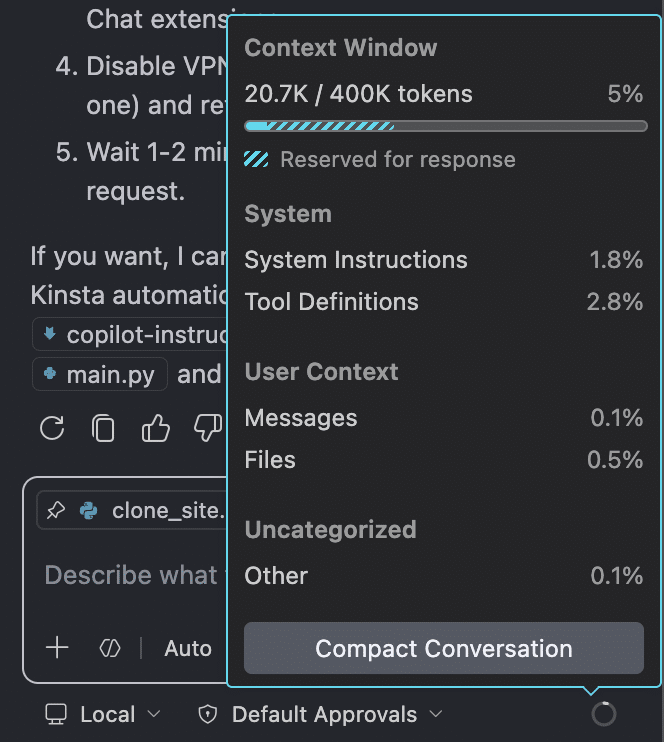
The context window represents the model’s short-term memory. If it gets saturated, the agent might return incorrect or inconsistent data. An even greater risk is Context Pollution, which happens when the context window gets filled with irrelevant information. In either case — whether through saturation or context pollution — Copilot can generate bugs, hallucinate, or produce unoptimized code.
To avoid spending hours trying to get clean, bug-free code, it is vital to maintain strict chat hygiene. You can do this by closing tabs you don’t strictly need, using explicit file references to add to the context, compacting your chat history with /compact, or simply opening a brand-new chat window to start fresh with a clean context.
Agent instructions
Agent instructions establish the behavioral rules that directly influence how the agent generates code and handles various development tasks. This ensures you get code that matches your company standards, uses exclusively authorized libraries, or keeps strategic data like API keys fully secure.
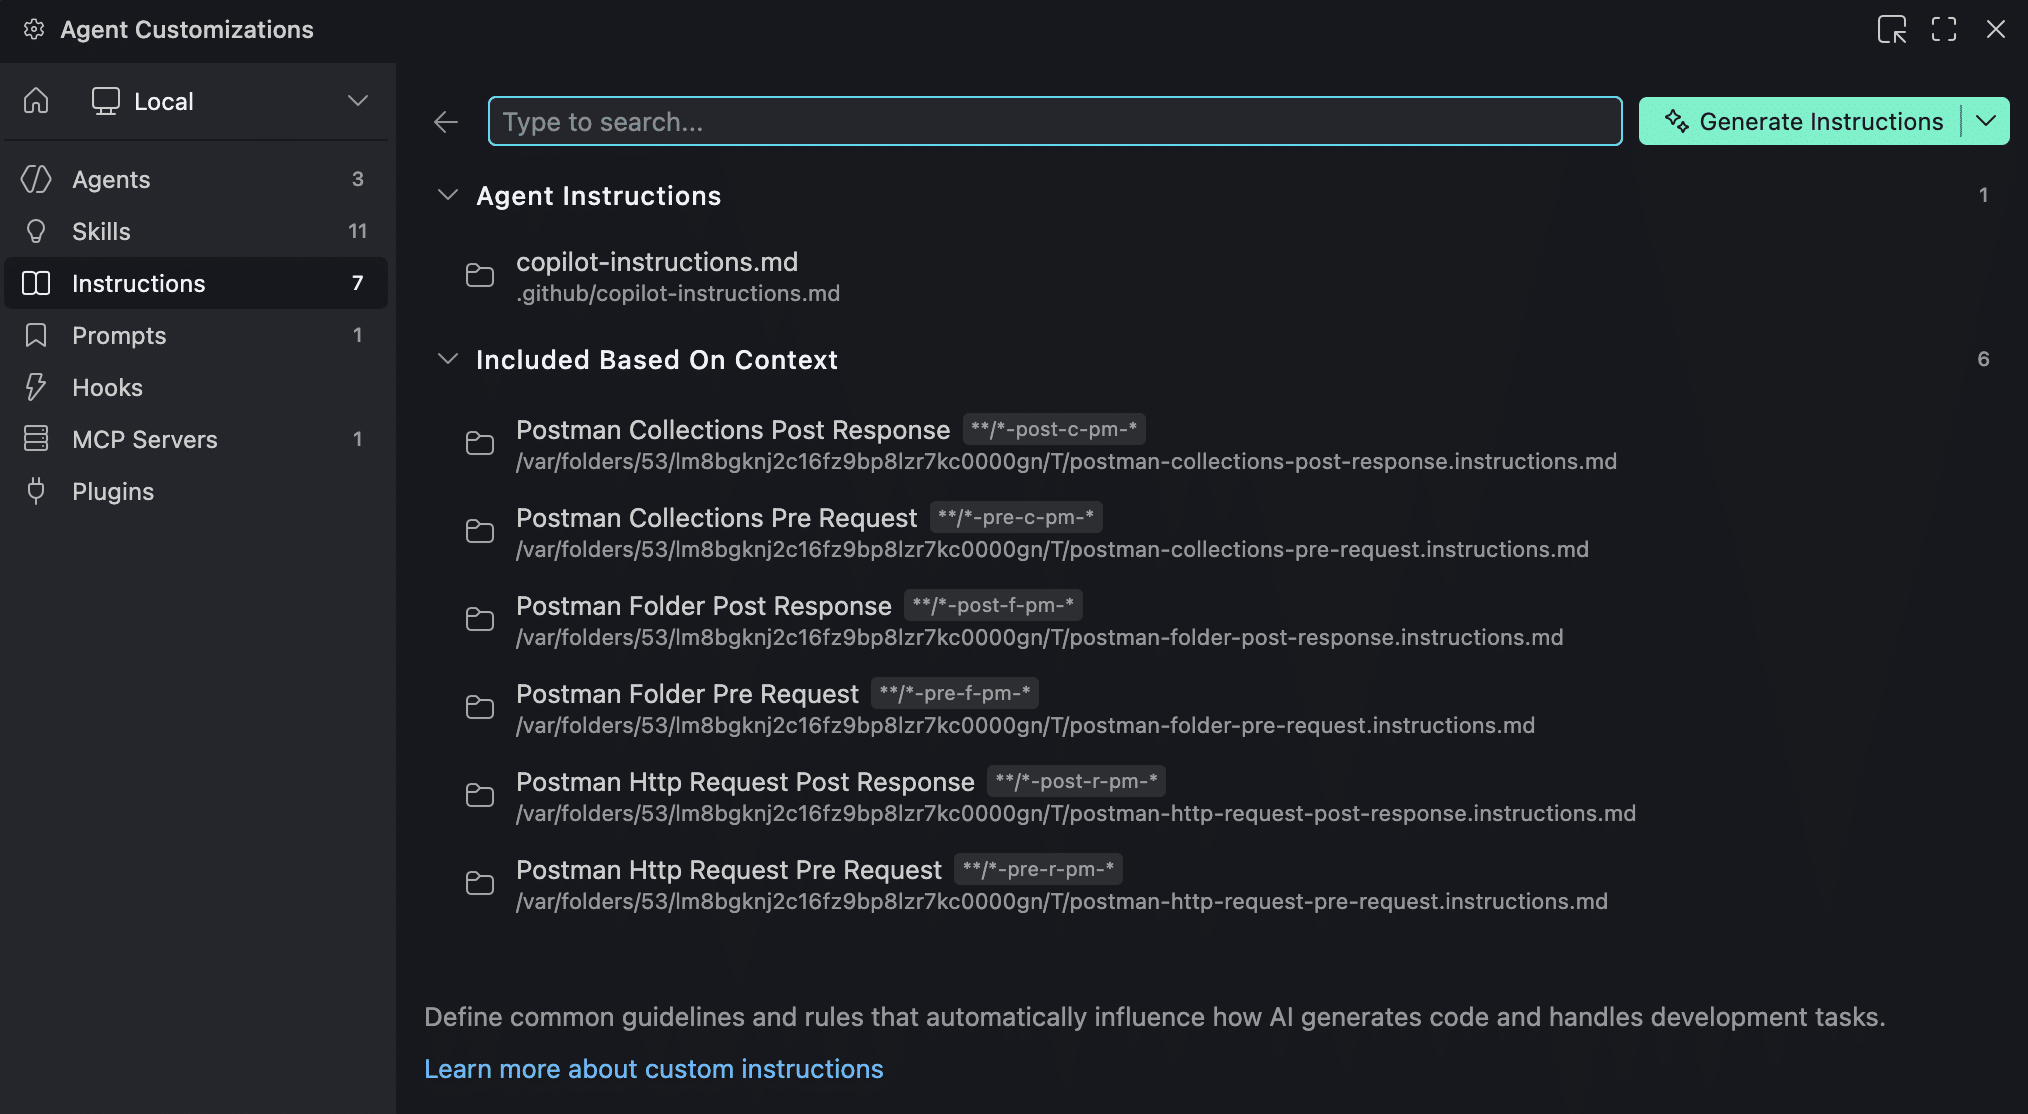
Instead of manually including these directives in every single prompt, you can specify your custom instructions in a Markdown file to ensure responses are consistently aligned with your business and project requirements. If you have multiple instruction files, VS Code automatically combines and adds them to the chat context.
By providing precise instructions, Copilot won’t mix up parameter names in API requests and won’t make mistakes when processing responses from an external service.
But don’t worry too much if this feels complicated. GitHub Copilot can actually generate an instructions file for you. Just follow the steps outlined in the official documentation.
Now that we have covered the basics, in the next section, you will learn to vibe code a WordPress workflow automation application based on the Kinsta API using GitHub Copilot in VS Code. It’s time to roll up your sleeves and get to work.
Vibe-Coding a real-world WordPress automation workflow
As with traditional coding, vibe coding an advanced project like a WordPress workflow automation involves a sequence of logical phases throughout the software development lifecycle.
This is why we have broken down the process of vibe coding a WordPress workflow automation project into a series of logical steps. Let’s dive into every phase and find out what changes with the Vibe Coding approach:
Rule definition
In this phase, you must define the general directives that establish the guardrails within which the agent will operate. This involves creating context files that set the tech stack, security guidelines, and structured logging patterns.
After creating a new project folder in VS Code, your first step is to open the Copilot chat and start a conversation with the agent to define the project blueprint. In this initial stage, you will mostly work in Ask mode to determine the most appropriate language for your project and architect your set of instructions for the agent.
Choose the language for the project
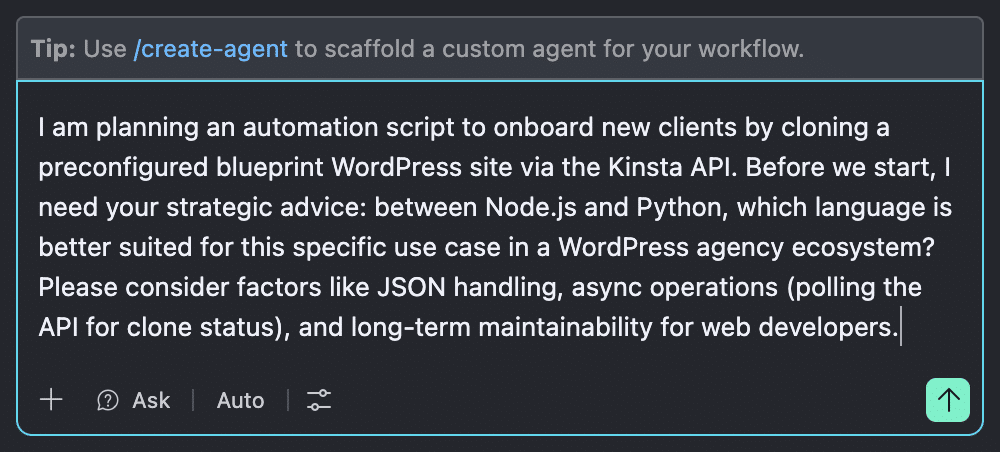
If you haven’t already decided on your tech stack, your first question should aim to find out the language that is most suitable for your project. For our automation workflow, we asked Copilot to list the pros and cons of Node.js versus Python:
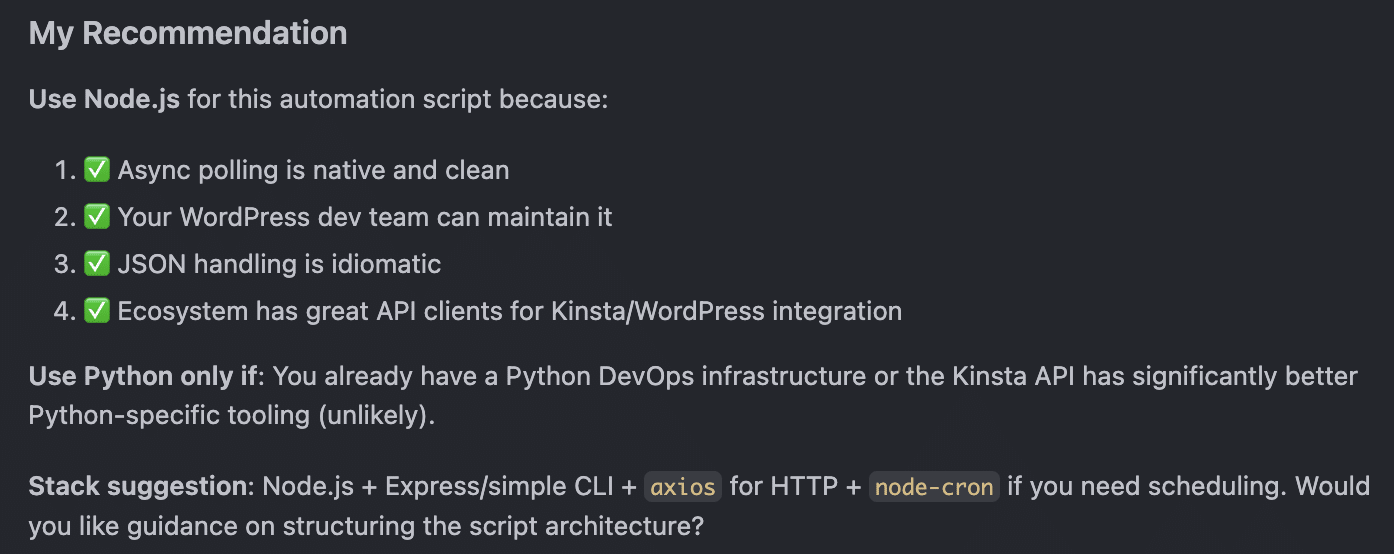
Copilot responded with a detailed breakdown of the pros and cons of both languages, and ultimately recommended Node.js:
Architect agent instructions
Next, we asked Copilot how to properly architect custom agent instructions to minimize hallucinations and prevent context loss:
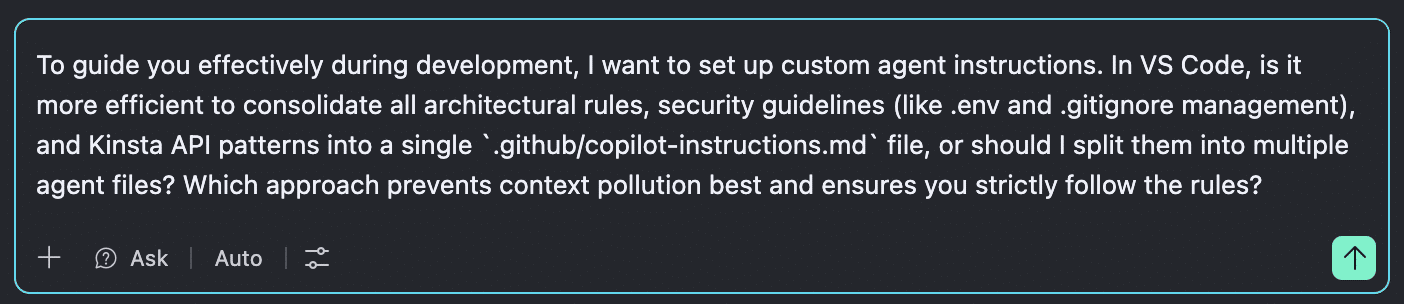
Copilot recommended splitting our agent instructions into multiple files. This would prevent context pollution.
With a solid understanding of Copilot’s recommendation, we moved on to planning the architecture of our agent instructions.
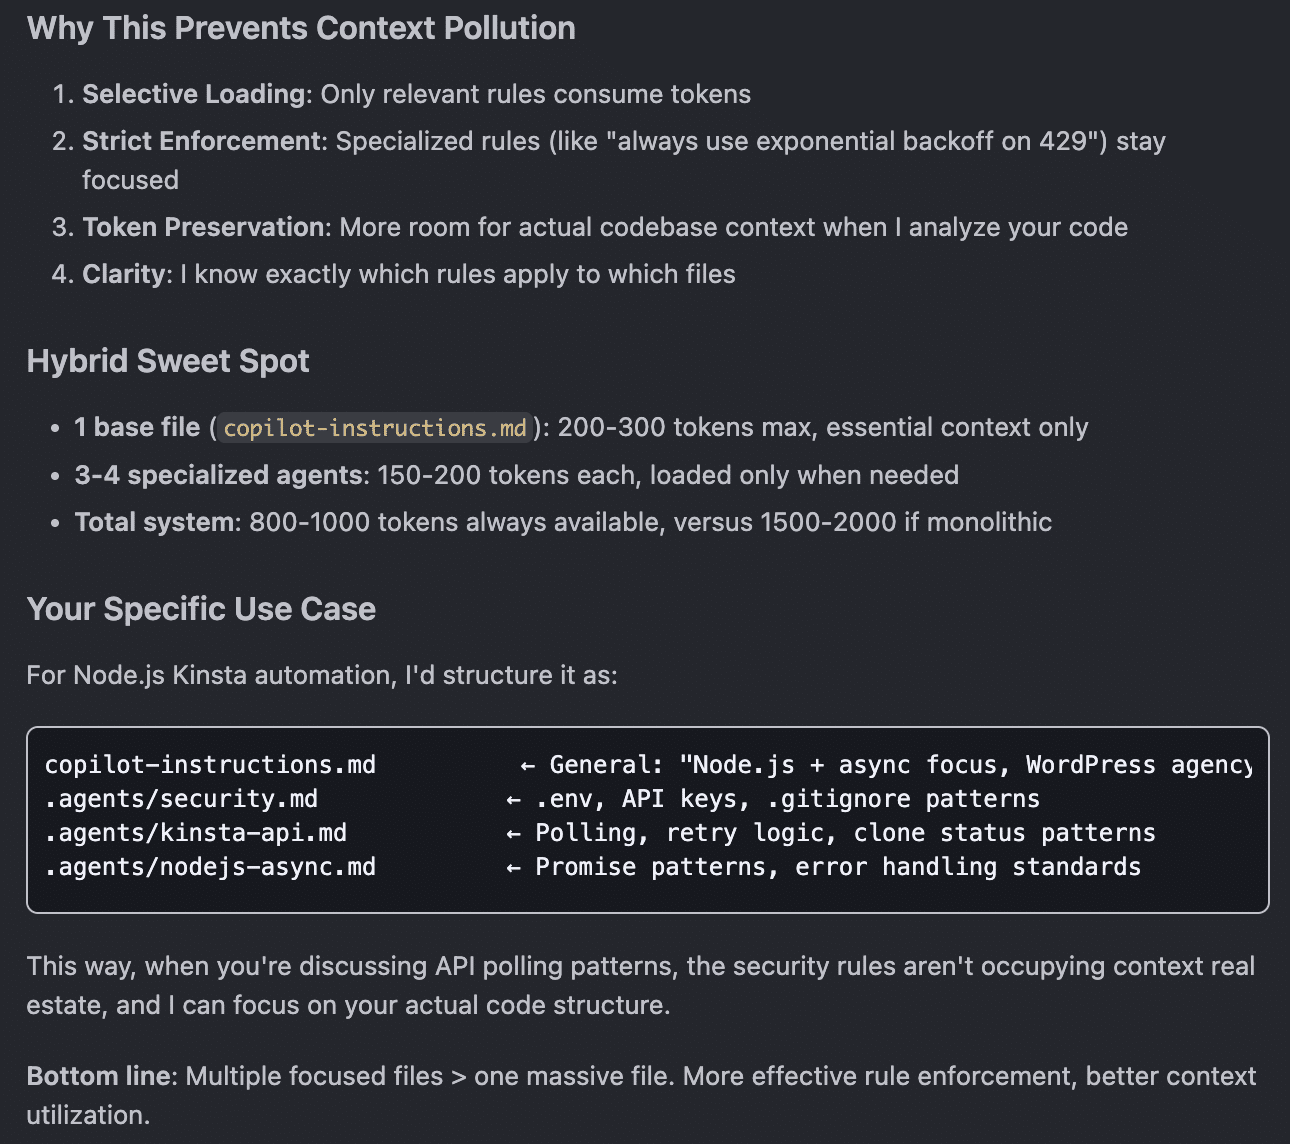
We switched Copilot from Ask to Plan mode, prompting it to outline the file structure for our modular instructions system with separate .md files:
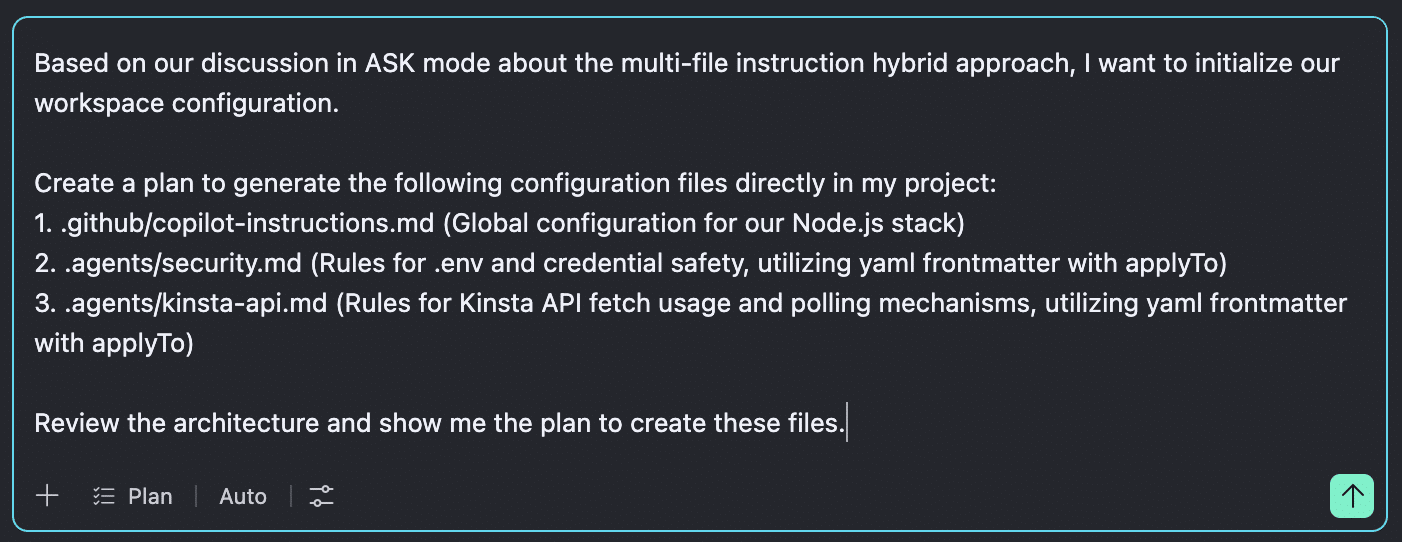
Copilot began mapping out the steps, providing clear reasoning while asking a series of questions to tailor the rules to our project setup.
We passed Copilot the following links:
https://api-docs.kinsta.com/api-reference/wordpress-sites/get-list-of-company-sites
https://api-docs.kinsta.com/api-reference/wordpress-sites/get-site-by-id
https://api-docs.kinsta.com/api-reference/wordpress-sites/clone-existing-site
Copilot broke down the execution phases, explained the technical rationale for its choices, and asked whether we were ready to apply the changes.
Approving the proposed plan automatically shifts Copilot’s mode from Plan to Agent. The AI agent then works directly on your local file system to build your agent instructions files.
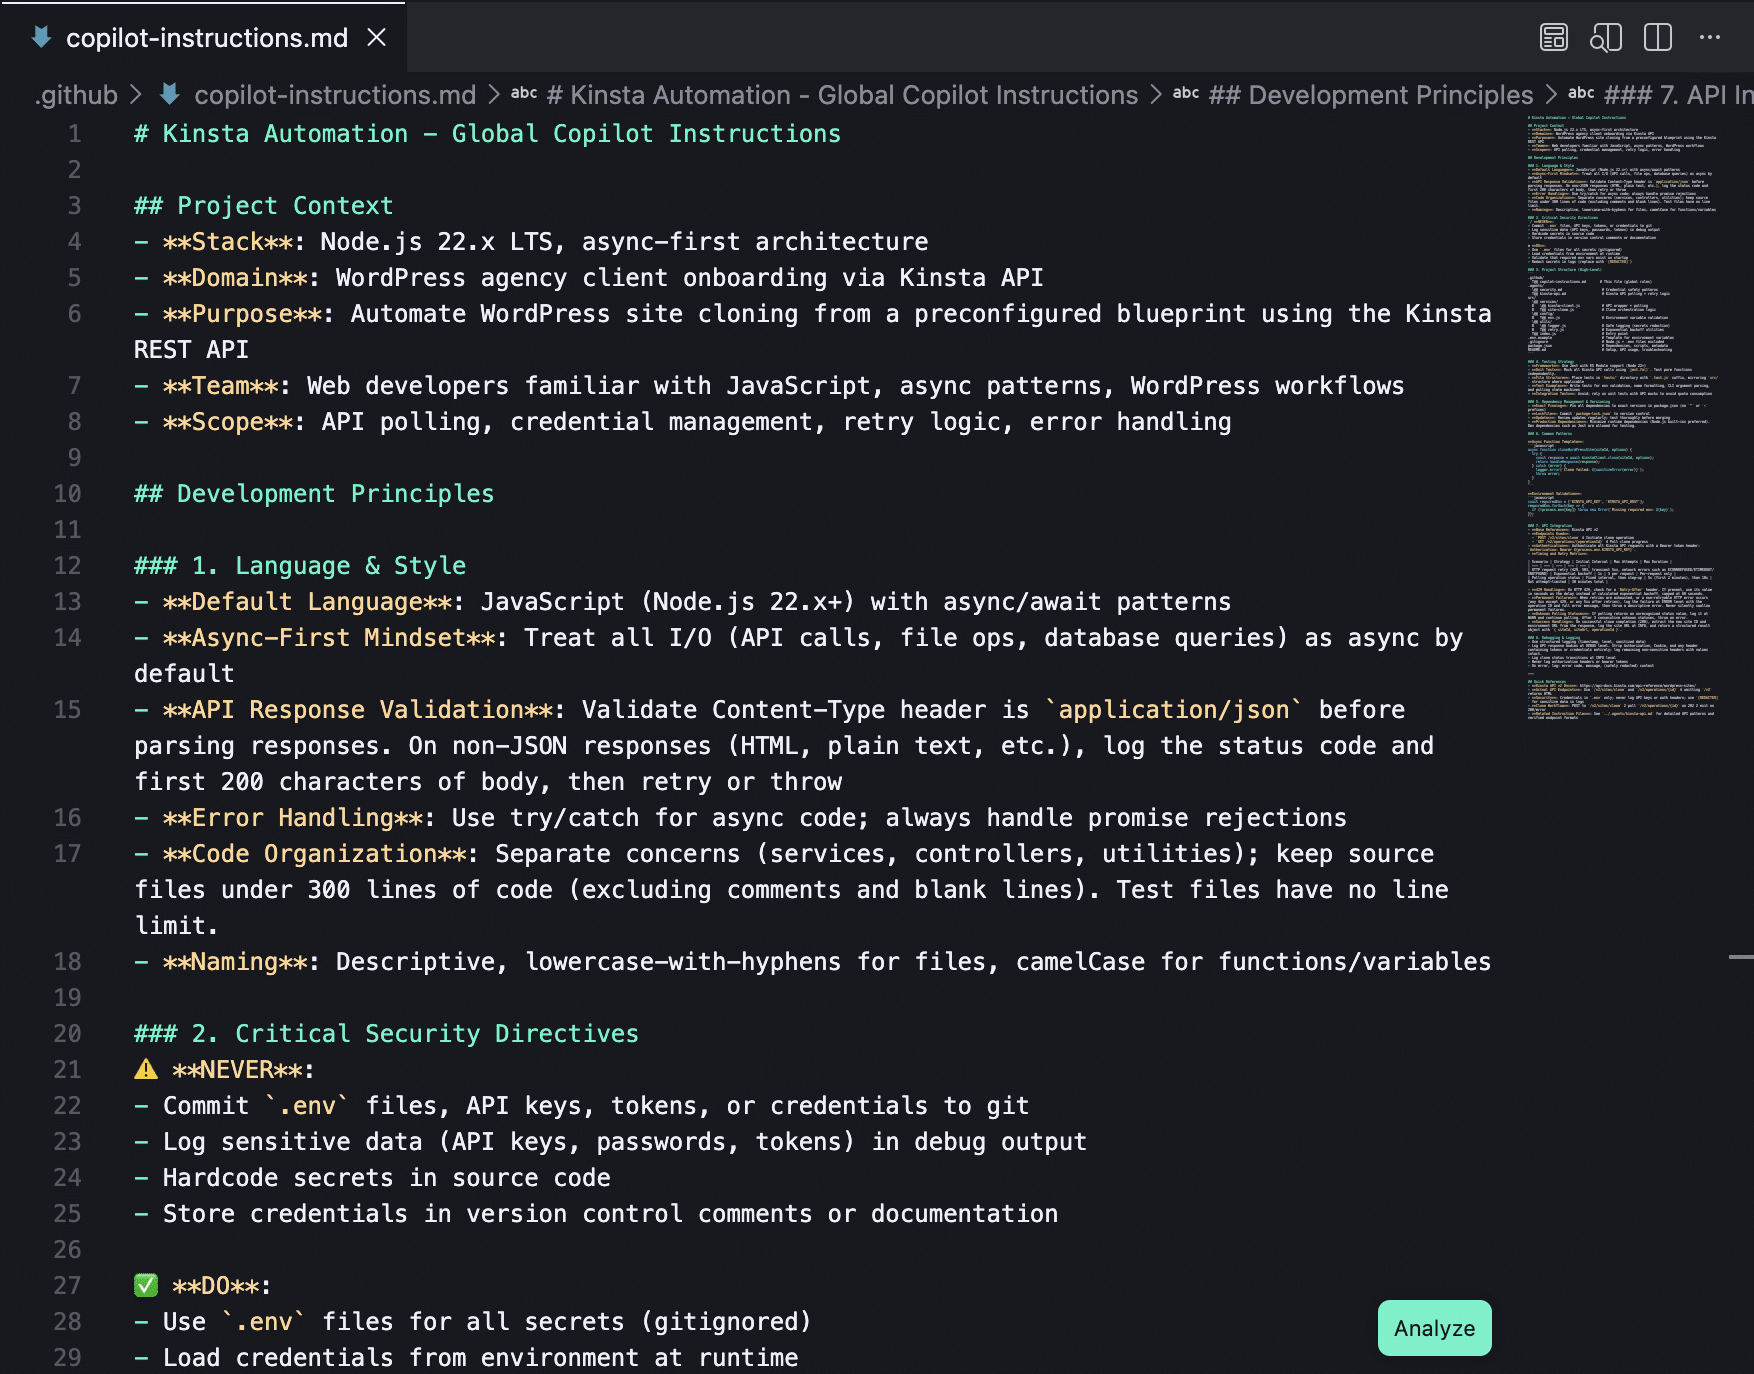
The image below shows a preview of the copilot-instructions.md file:
Iterative development
This is the code creation phase. The AI agent generates the project files and scripts, while the developer acts as the architect and director of the process. In other words, during this phase, you will ask Copilot to create the application structure and code, provide the required input and feedback, evaluate the available options, and make strategic decisions.
The next step in our WordPress workflow automation project is to initialize the Node.js project and define the file structure. We went back to Plan mode and asked Copilot to plan the next steps:
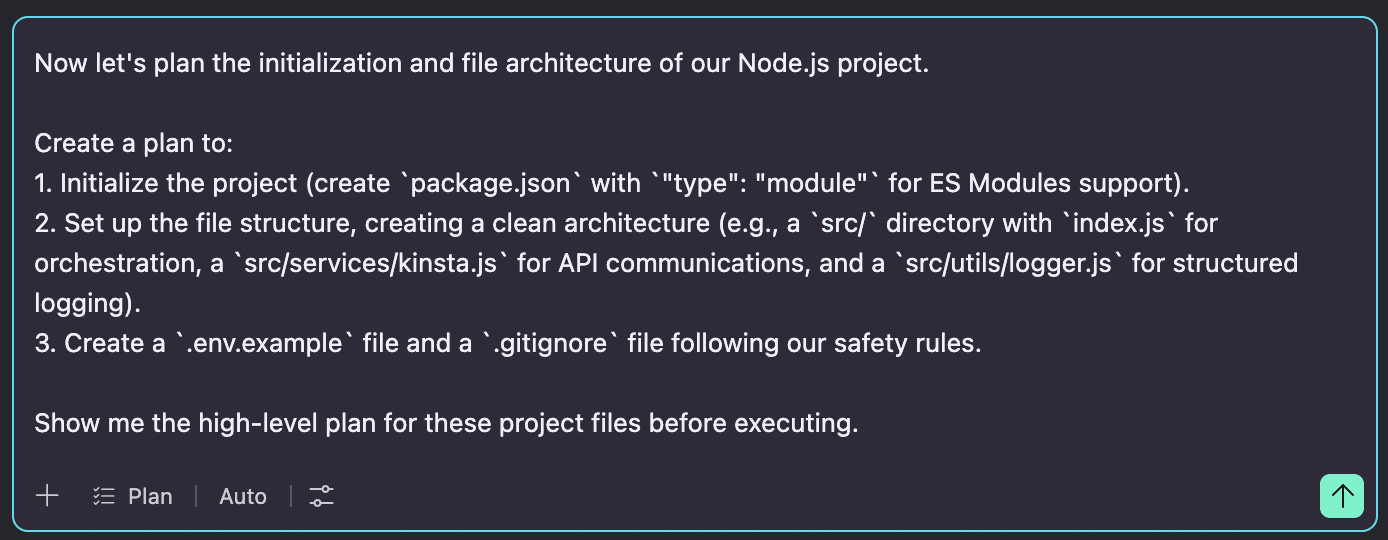
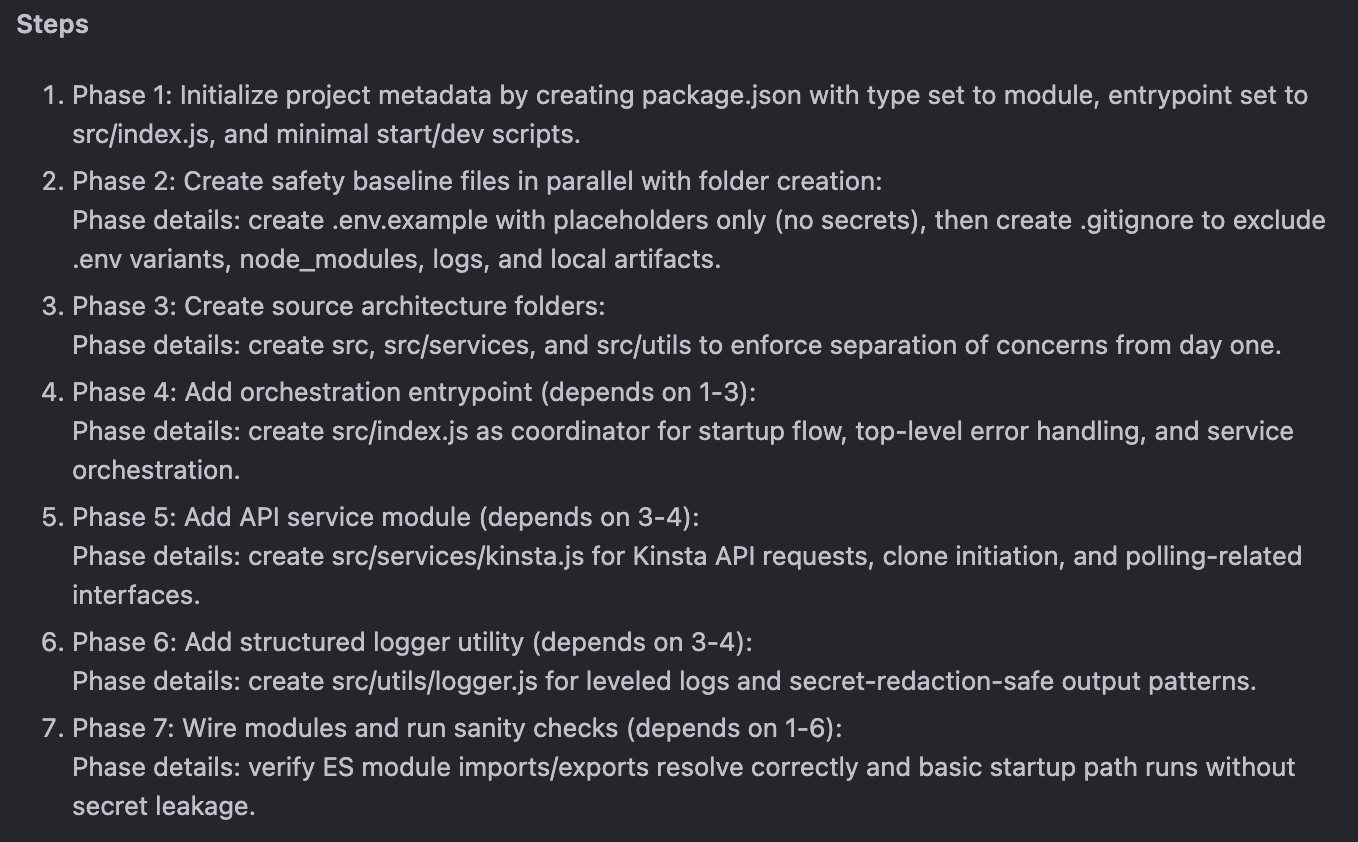
Copilot produced a detailed plan, along with additional information about relevant files, checks to perform, and decisions to make. After carefully reviewing the response, we started the implementation.
If this seems like a lot to do, don’t worry too much. You will ask Copilot to perform all the necessary operations for you.
While generating the files, Copilot will likely ask for your feedback on points that need clarification or for your permission before proceeding with specific operations. Review the requests and proceed accordingly.
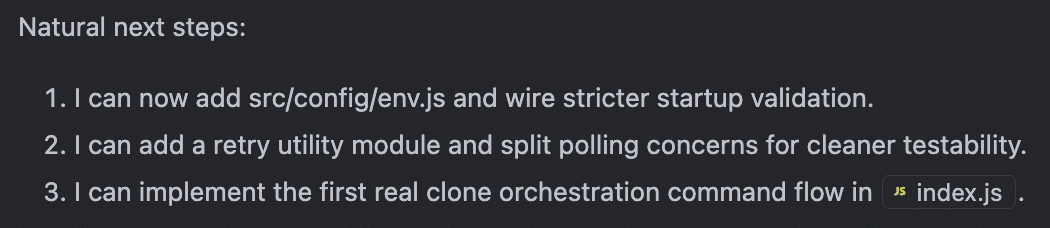
Once an operation is complete, Copilot will tell you what to do next:
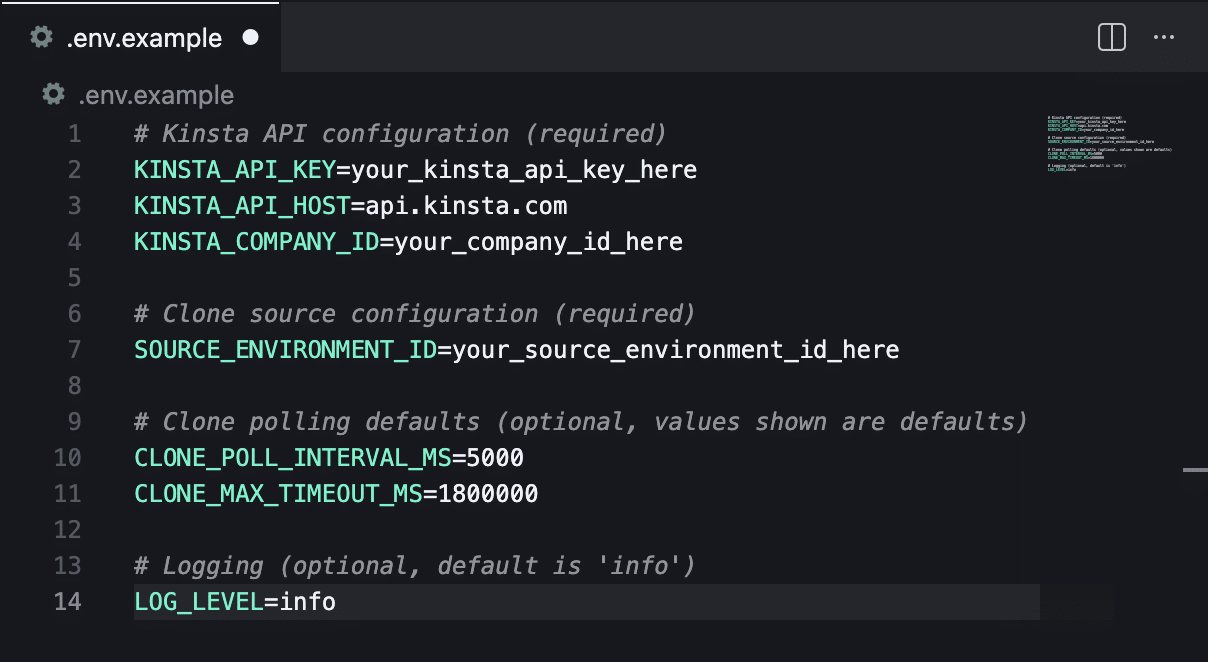
The conversation continues with questions and answers until Copilot has created all the files and code for your app. In the following prompt, we asked Copilot in Plan mode to generate a template for the .env file and set up the appropriate security checks (fail-fast).

The following image shows the .env.example file generated by Copilot:
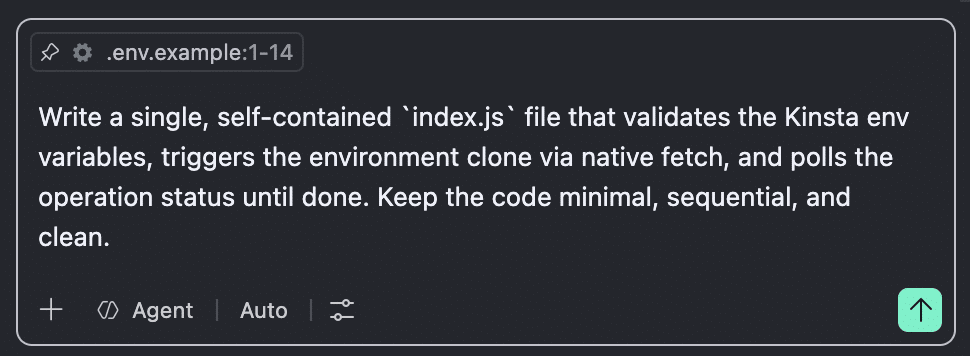
We then asked to generate an index.js file that encapsulated the entire app’s logic. For a more advanced application, it would have been preferable to split the script into multiple files; for this application, we preferred to keep all the logic in a single script.
Time to run our script. Before starting the site cloning, we created a .env file based on .env.example and replaced the placeholders with the actual values for KINSTA_API_KEY, KINSTA_COMPANY_ID, and SOURCE_ENVIRONMENT_ID.
Once you have done with the script and the environment variables, open the VS Code terminal and type npm start.
If everything works as expected, you will see a new site with a generic name appear in MyKinsta. If the prompt throws an error, simply copy the error from the terminal and paste it into the Copilot chat so the agent can evaluate it, identify the cause, and propose appropriate fixes. It might ask you for further feedback.
At this point, you might want to add improvements or new features to your app. For our use case, the generic site name generated by the script wasn’t ideal. So, we moved on to the second iteration.
Fine-tuning your application
After reaching our first milestone – automatically cloning a WordPress site hosted on Kinsta – we prompted Copilot to add a feature to allow users to specify a custom site name upon execution.
The /sites/clone endpoint of the Kinsta API requires 3 parameters: company, source_env_id, and display_name. While the first two parameters are locked down as environment variables in our .env file, the display_name parameter is generated automatically by the script.
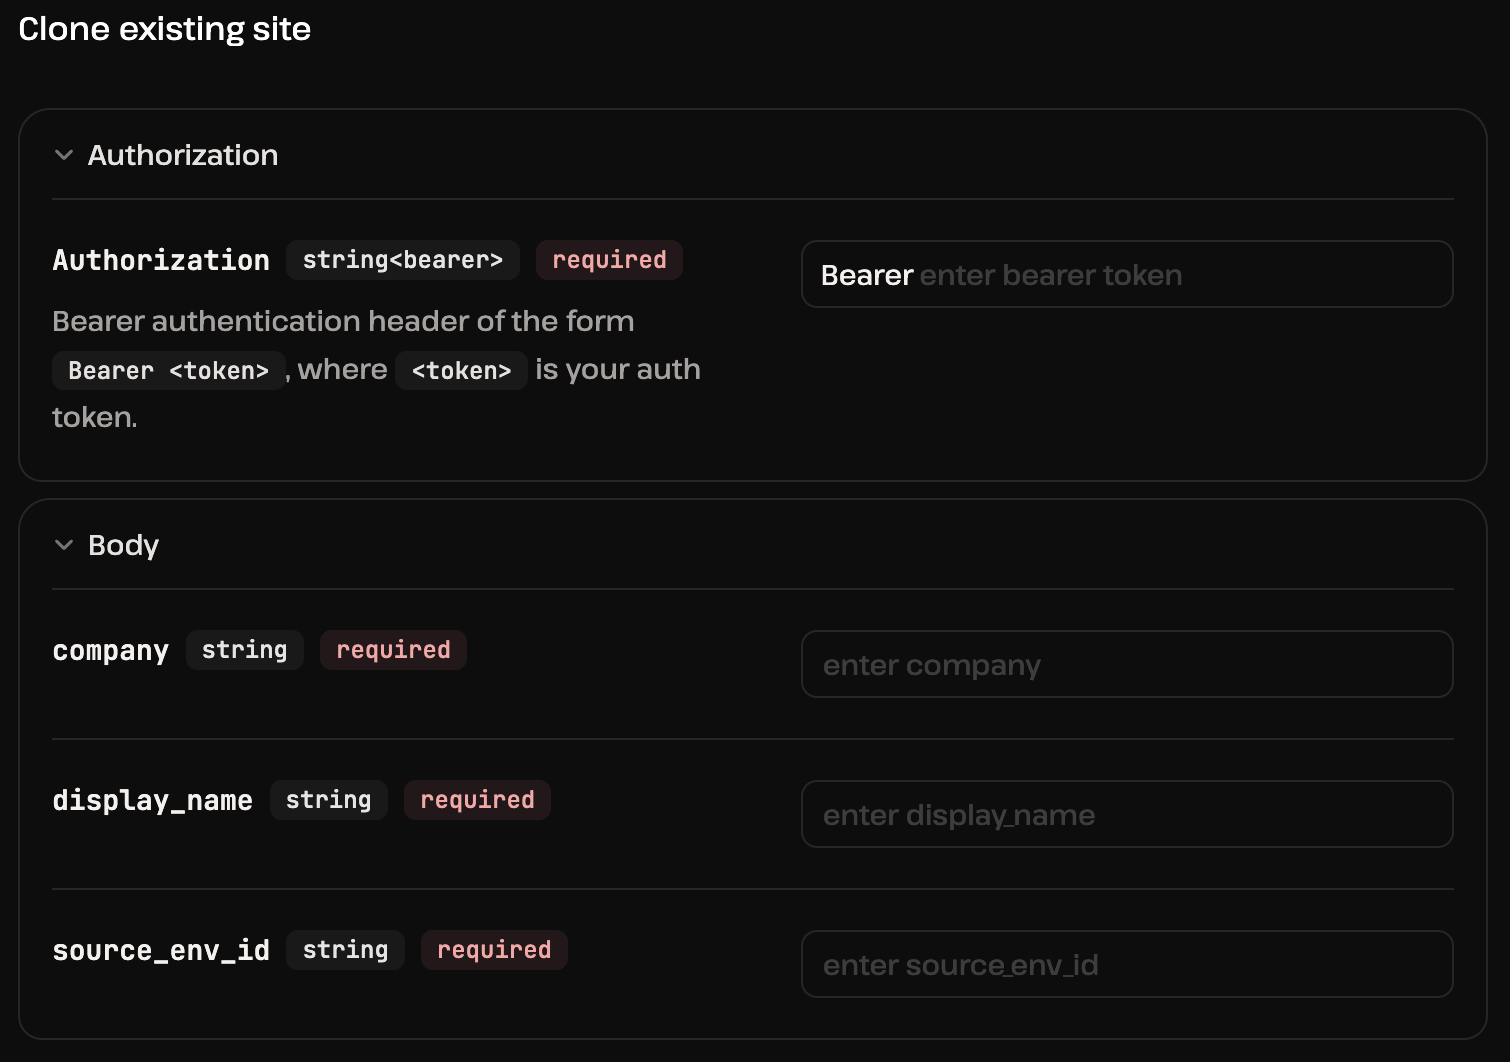
Providing users of the application with a fallback environment variable would have given them greater flexibility, while still allowing them to pass an additional parameter directly via the npm run command.
We handed this request over to Copilot. The agent implemented the required changes modifing both index.js and .env and delivered the following response:
Finally, we battle-tested our application under different conditions based on Copilot’s instructions:
- We ran
npm runwith no parameters. - We set a default value for the
SITE_NAMEconstant in the.envfile and rannpm runagain. - We manually appended the
SITE_NAME=your-site-nameparameter to thenpm runcommand. - We executed the script using both the
npm start -- --site-name your-site-nameandnpm start -- --site-name=your-site-namesyntaxes.
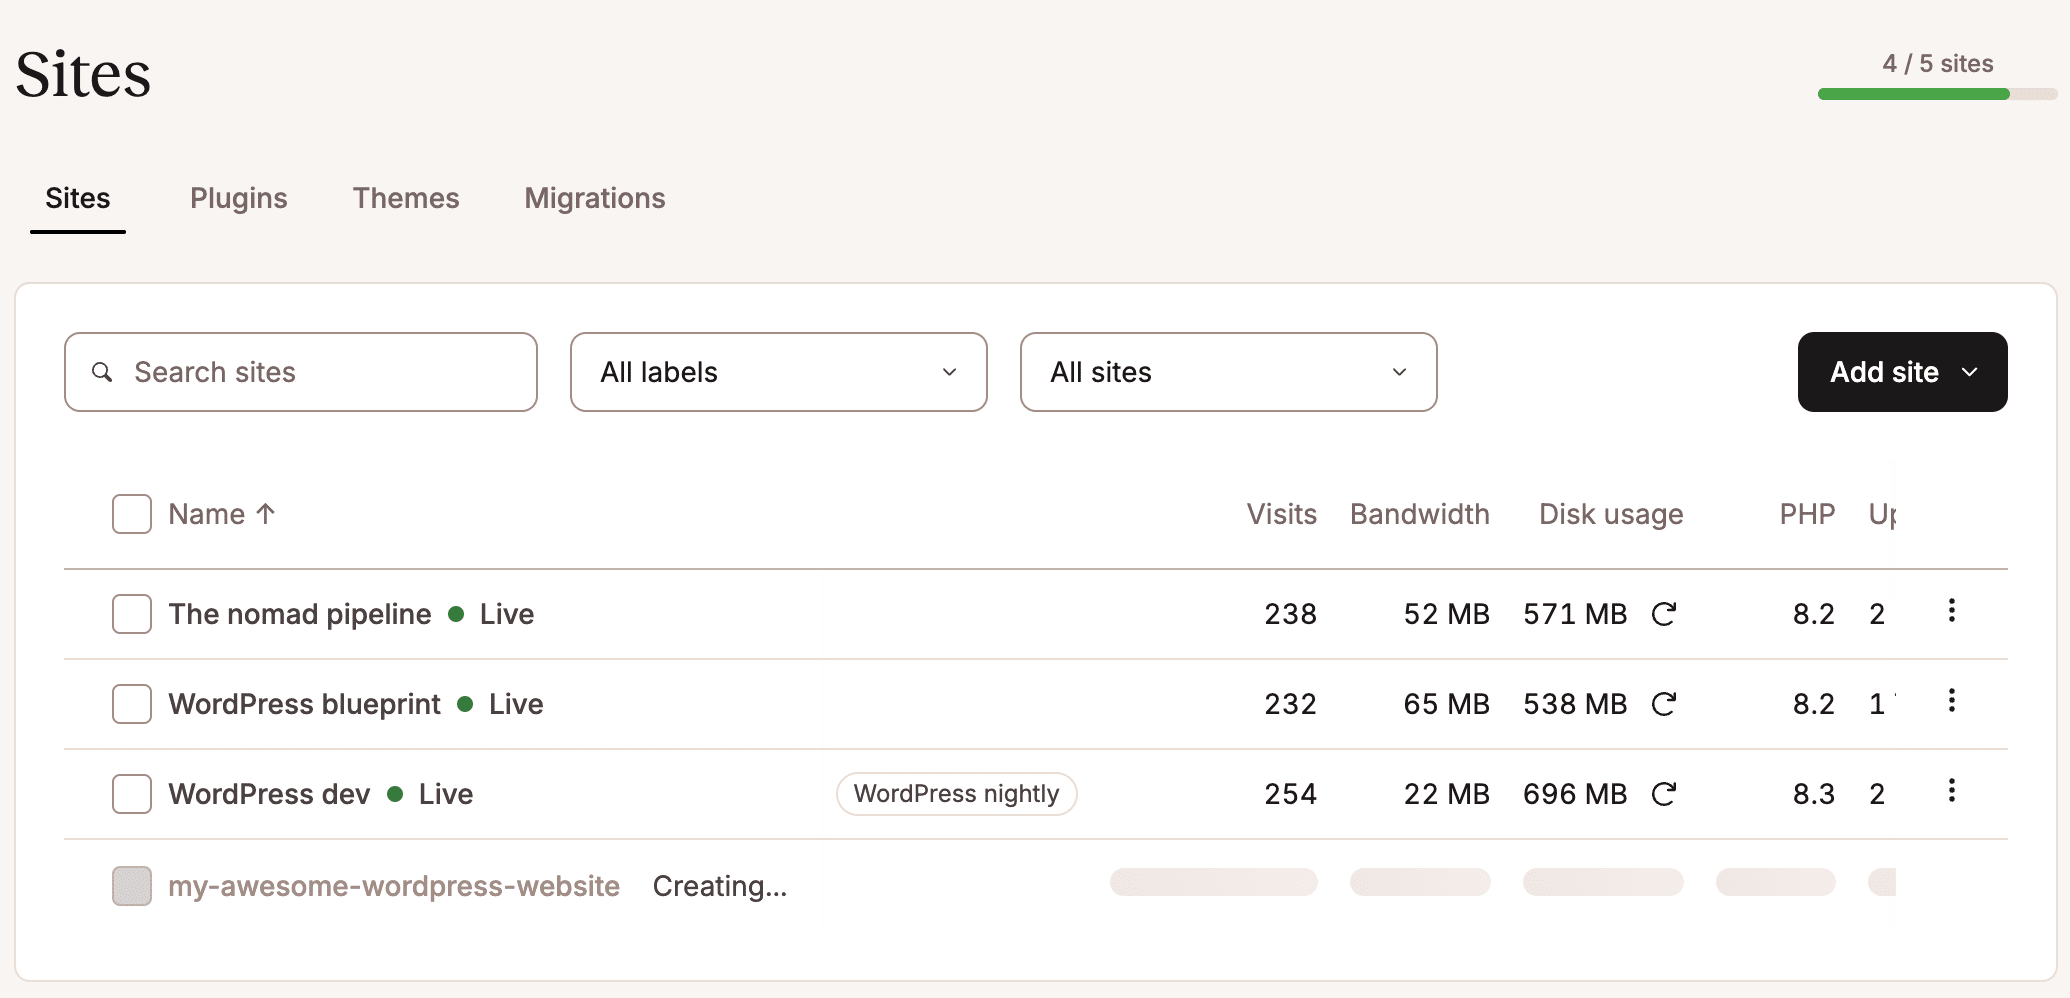
Driven by this cycle of continuous improvement, we also integrated a feature to normalize manual input into a readable display name while still seamlessly accepting slug-style values like my-awesome-wordpress-website.
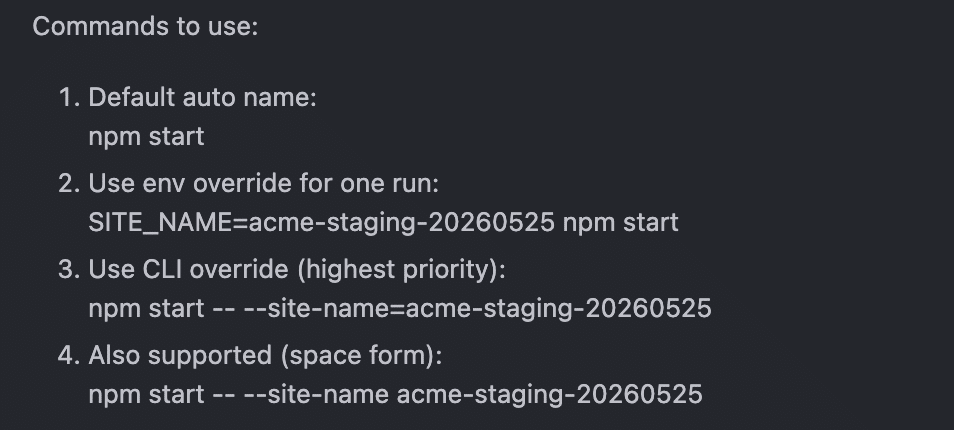
As a result, both of the following commands are supported:
npm start -- --site-name="My Awesome WordPress Website"
npm start -- --site-name=my-awesome-wordpress-website
If you’ve made it this far, congratulations, you have just vibe-coded your very first workflow automation app. Now check the plugins, themes, and frontend rendering. If you think of any additional features to enhance your script, simply keep building following the iterative approach outlined above.
Fail-fast security checks
For a critical app that uses sensitive data, such as your API keys, it is vital that the script performs stringent checks at key points of execution and, in case of failure, returns clear messages about the type of error and halts execution immediately (see the prompt above).
GitHub Copilot implemented fail-fast at three critical levels:
Environment validation: At this level, the script verifies that the environment variables exist before making any API calls or executing any tasks. The following image shows Copilot’s explanation of this check in the chat:
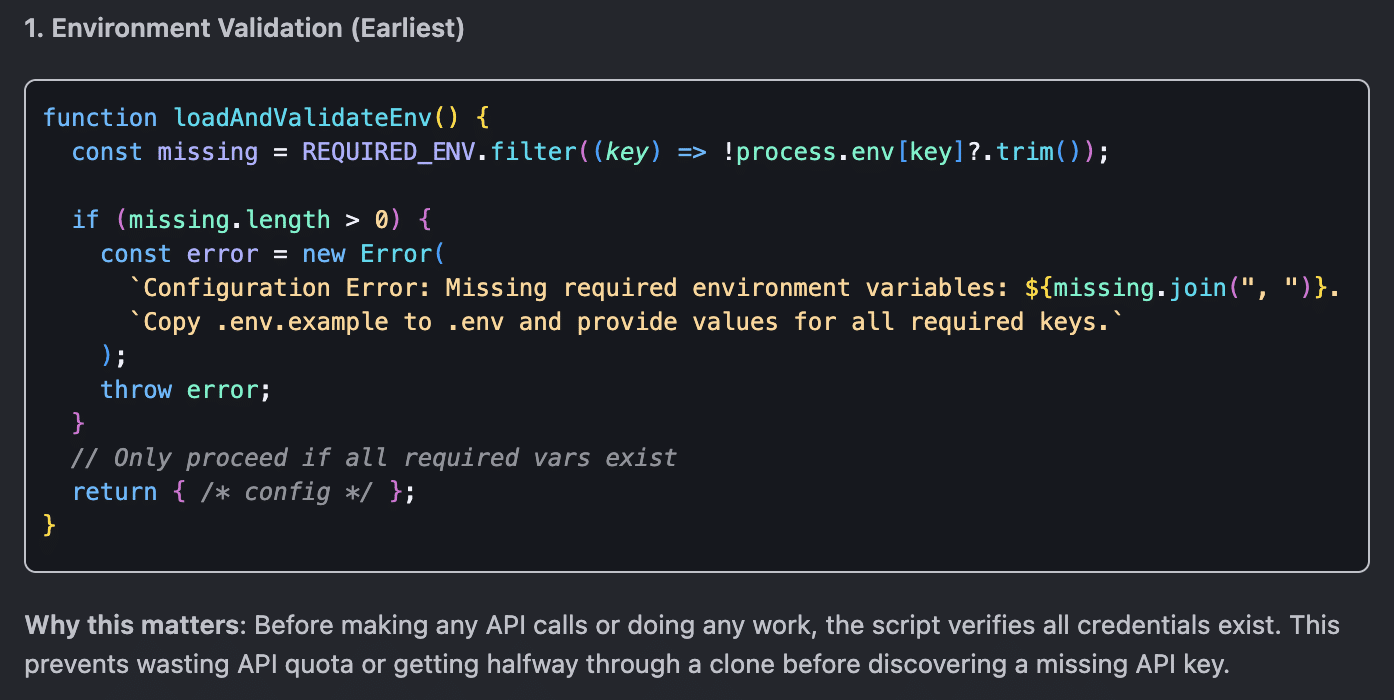
Obviously, your code might look different from what is shown in the image, but it’s the approach that matters here.
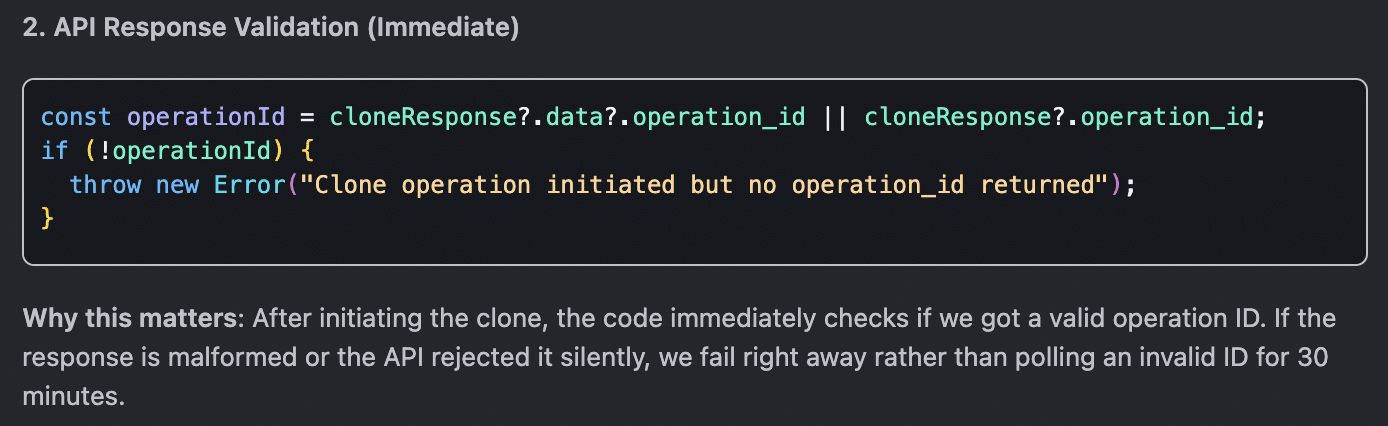
API response validation: Right after the cloning starts, the script immediately verifies the existence of an operation ID. If the script receives an invalid ID, it halts execution immediately, avoiding polling it for half an hour. Below is the explanation provided by Copilot:
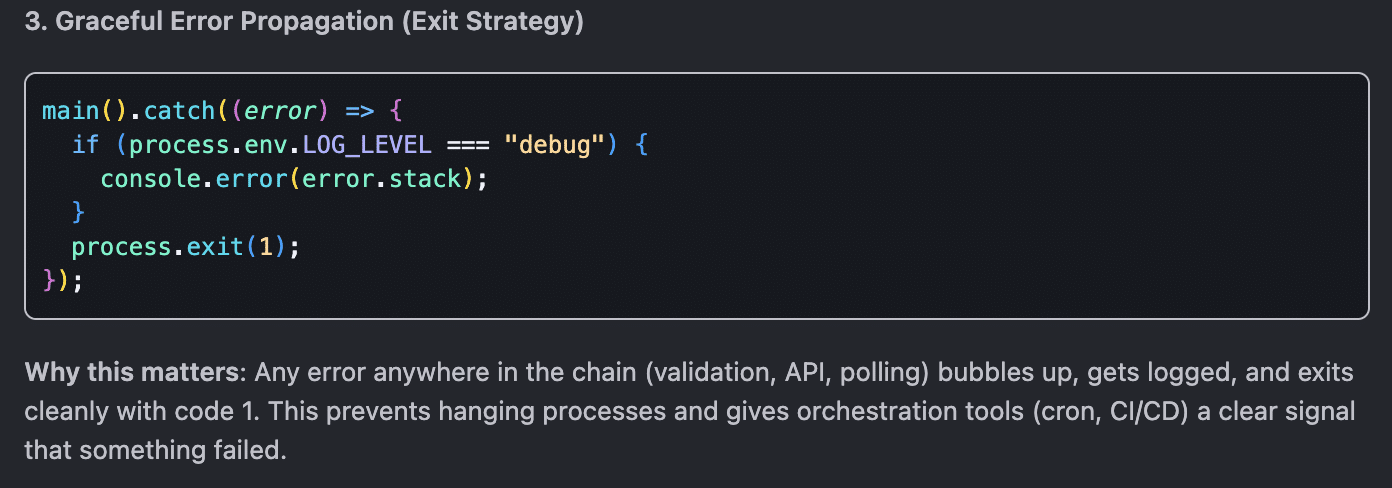
Graceful Error Propagation: Any error at any point in the chain (validation, API, polling) bubbles up to the surface, gets recorded in the logs, and cleanly halts the script’s execution.
The fail-fast approach comes with several benefits, including:
- No wasted API calls
- Clear error messages
- You know immediately what’s wrong
For WordPress agencies that may need to scale an app like this and clone dozens of sites in bulk, this approach enables immediate detection of script failures at any level, preventing them from cascading into multiple failed operations.
However, if your application is meant to scale, you will want to implement a unit testing system.
Unit testing with Jest
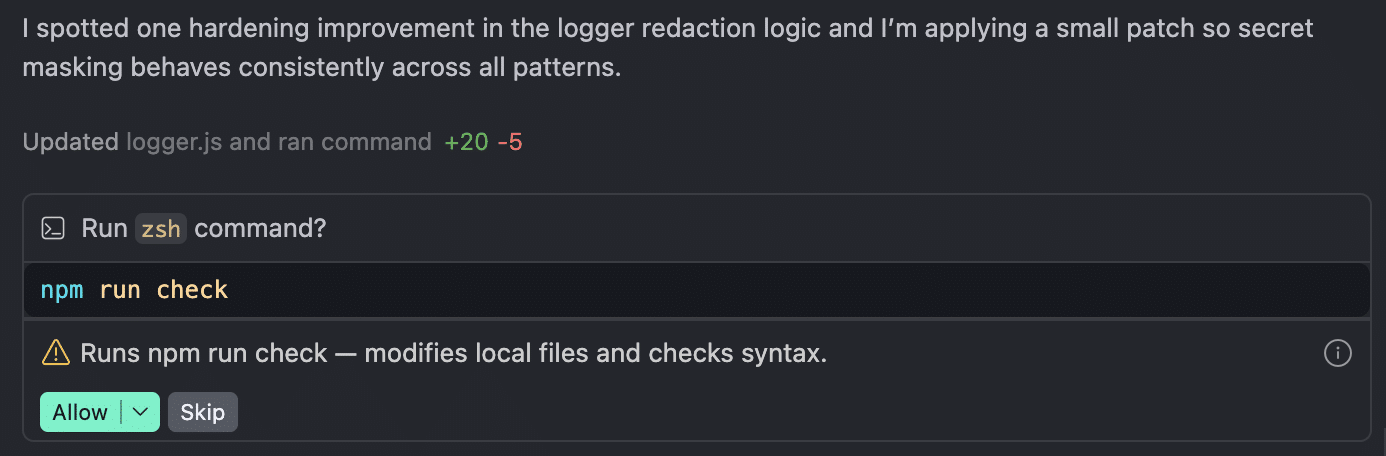
During the development phase, Copilot autonomously ran several local tests, including:
npm run check— run after every edit, to catch syntax errors.npm start— run multiple times to observe API responses and identify bugs.npm start 2>&1 | head -30— run to capture and read structured log output in real time.
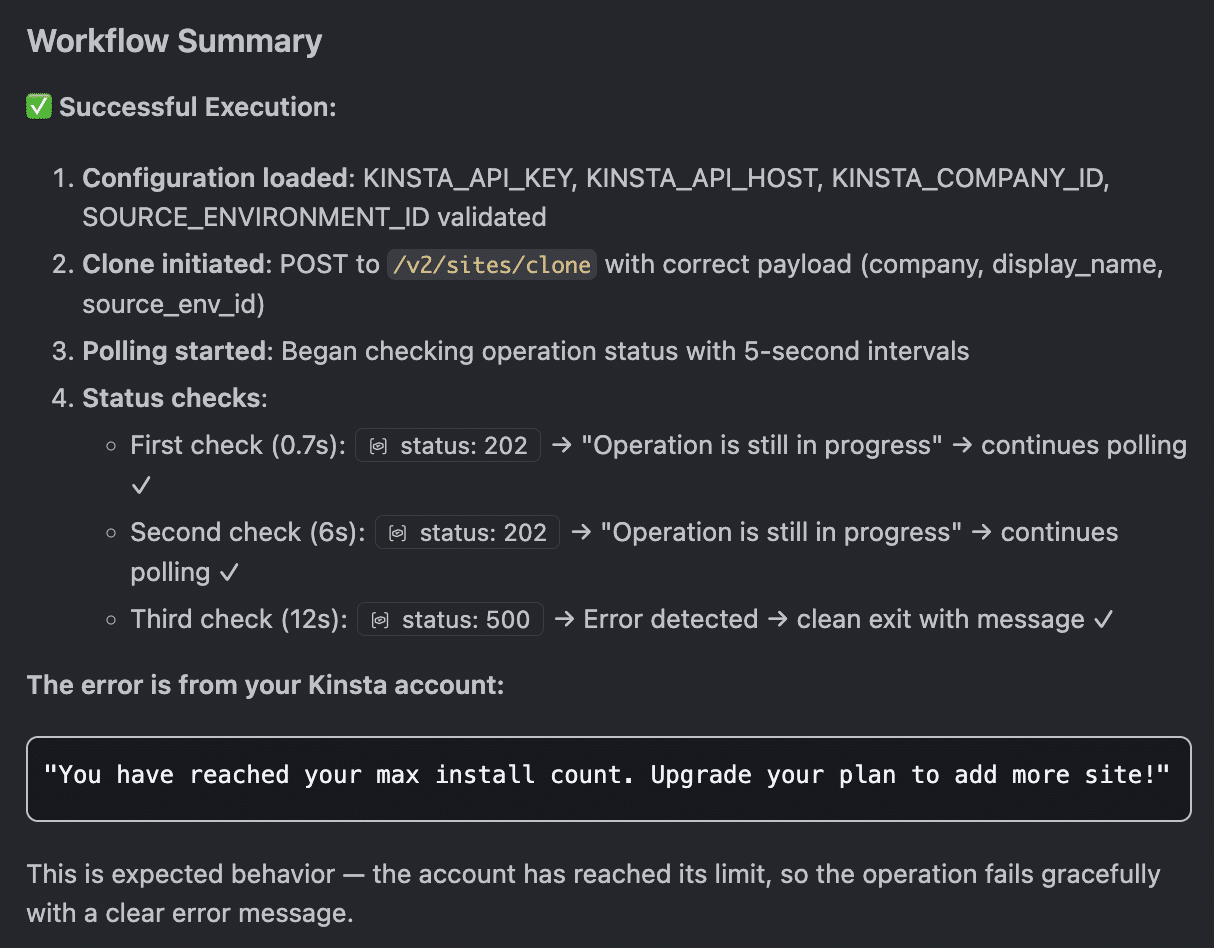
While these tests helped Copilot catch quite a few bugs, they’re pretty basic and really only work for a simple app. Plus, they come with a major downside: every time you run npm start, you trigger a site clone. This can quickly hit the limit of your plan’s capacity, as you can see in the image below:
On top of that, these tests can’t be executed in a CI/CD pipeline without exposing your credentials.
To truly scale your application, it’s vital to adopt a robust unit testing framework like Jest.
Instead of hitting Kinsta’s servers with actual requests every single time, Jest lets you intercept and simulate API responses (mocking). This allows you to test your software’s behavior in total isolation.
In addition, since the API calls are mocked, Jest lets you run your entire test suite inside automation pipelines like GitHub Actions without needing to touch your production credentials.
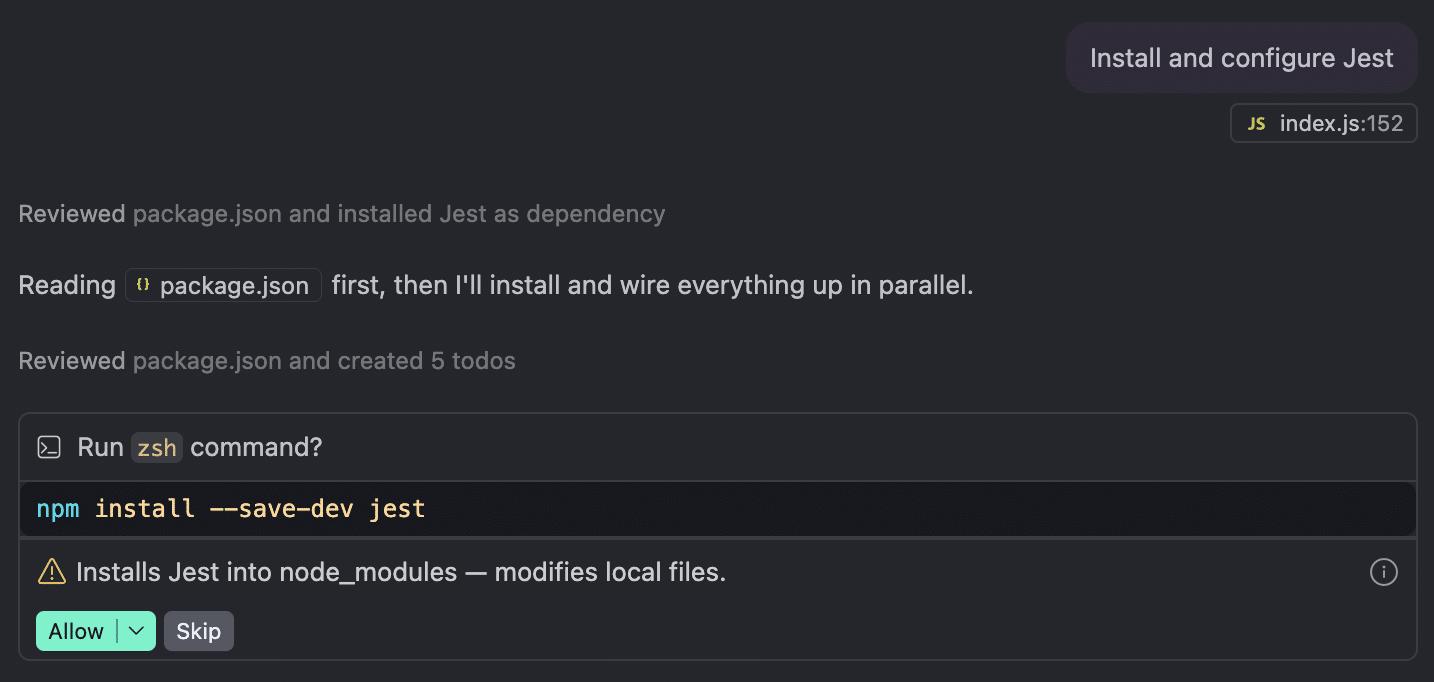
To get Jest up and running in your automation project, you can ask Copilot for step-by-step instructions or let it handle the hard work for you.
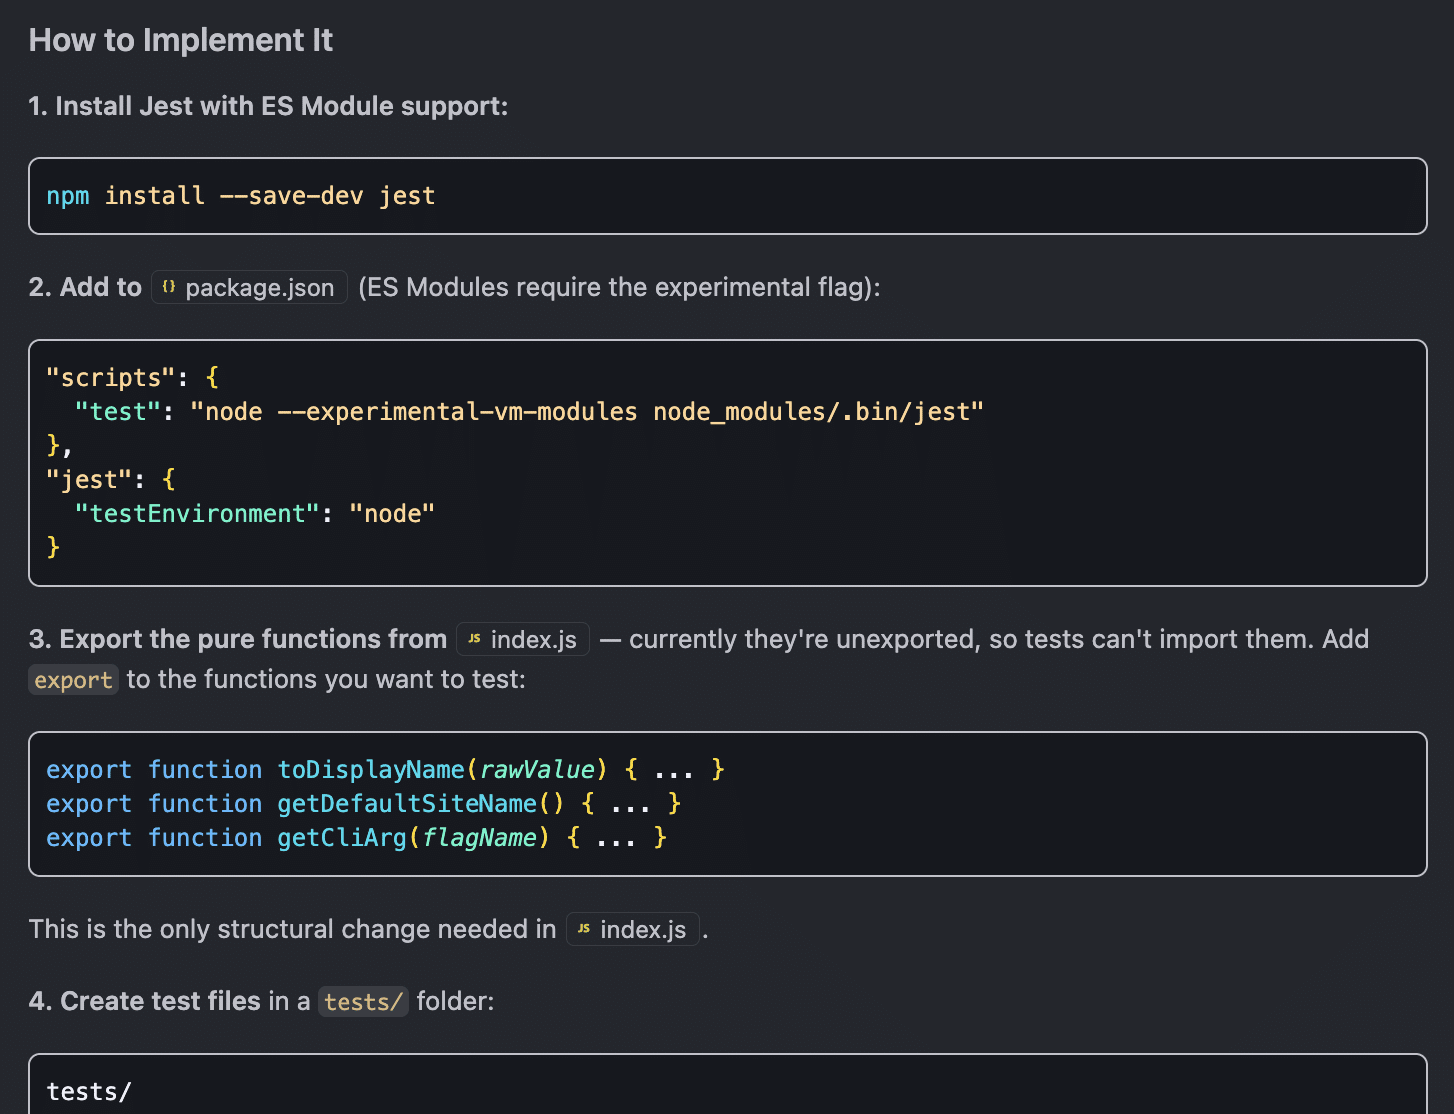
Once Jest is configured, you can run all your tests at once with npm test. You can also target a specific file or run tests in Watch mode:
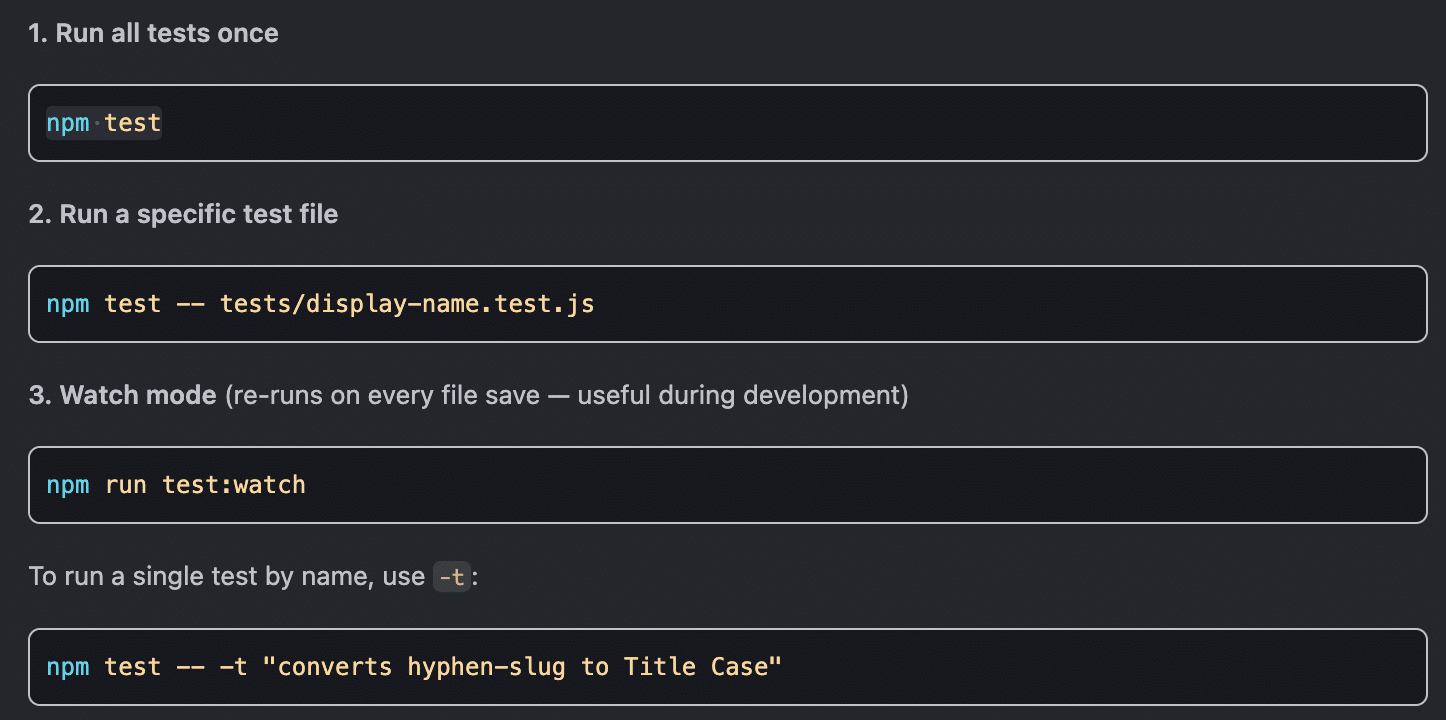
It’s also worth noting that Copilot comes with built-in chat commands that help you with unit testing with Jest:
/testsgenerates a test file for the currently open file. When you type/testsin the chat, Copilot will generate Jest tests for the functions it finds in that file.@workspace /testsdoes the same thing as the previous command, but with full project context.
While chatting with Copilot in Ask mode, you’ll get recommendations and tips to guide you through your unit tests:
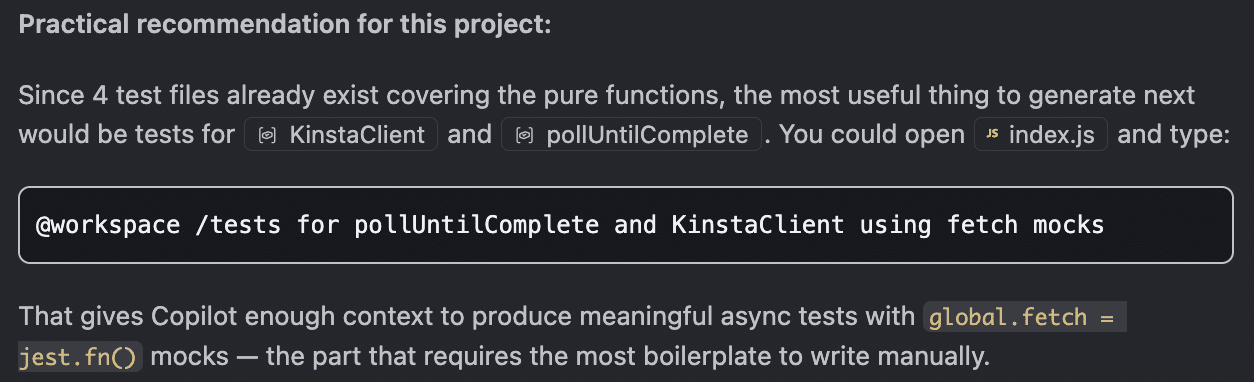
Open a new chat for this test and make sure it’s set to Agent mode. Then, paste the command previously provided by Copilot right into the chat:
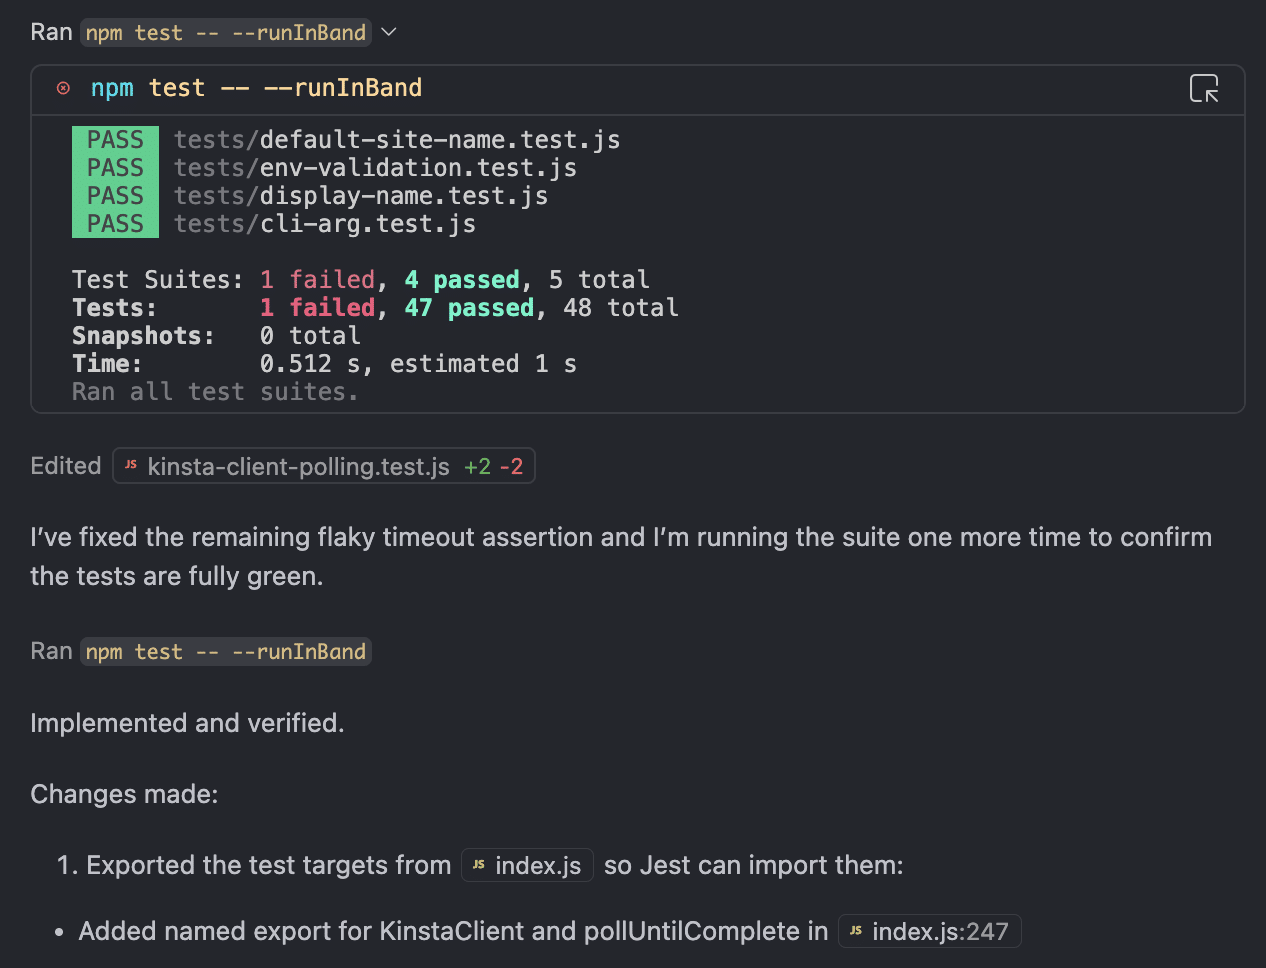
@workspace /tests for pollUntilComplete and KinstaClient using fetch mocksHit enter, and you’ll see Copilot’s reasoning and step-by-step operations roll out in the chat. It will ask you to confirm command execution each time it runs a test, right up until every single error is fixed.
Documentation and deployment
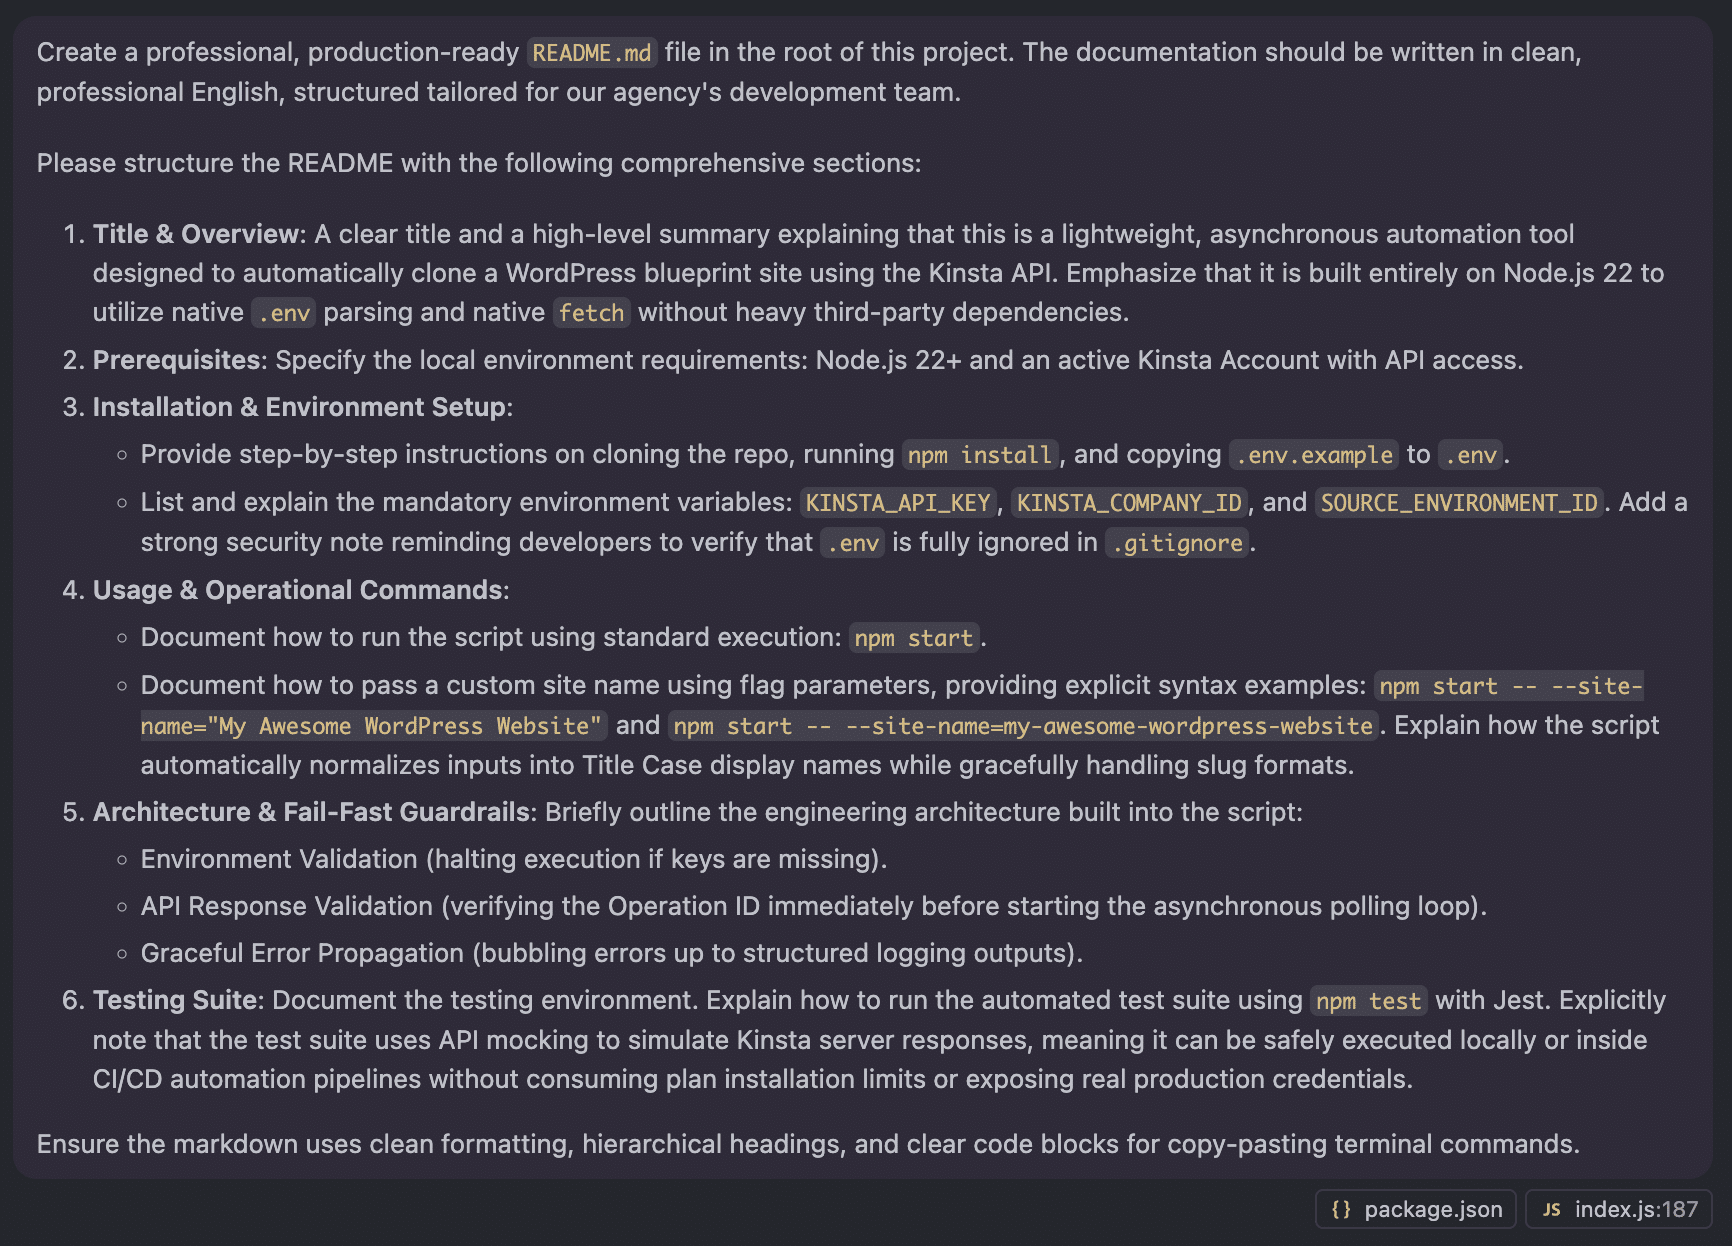
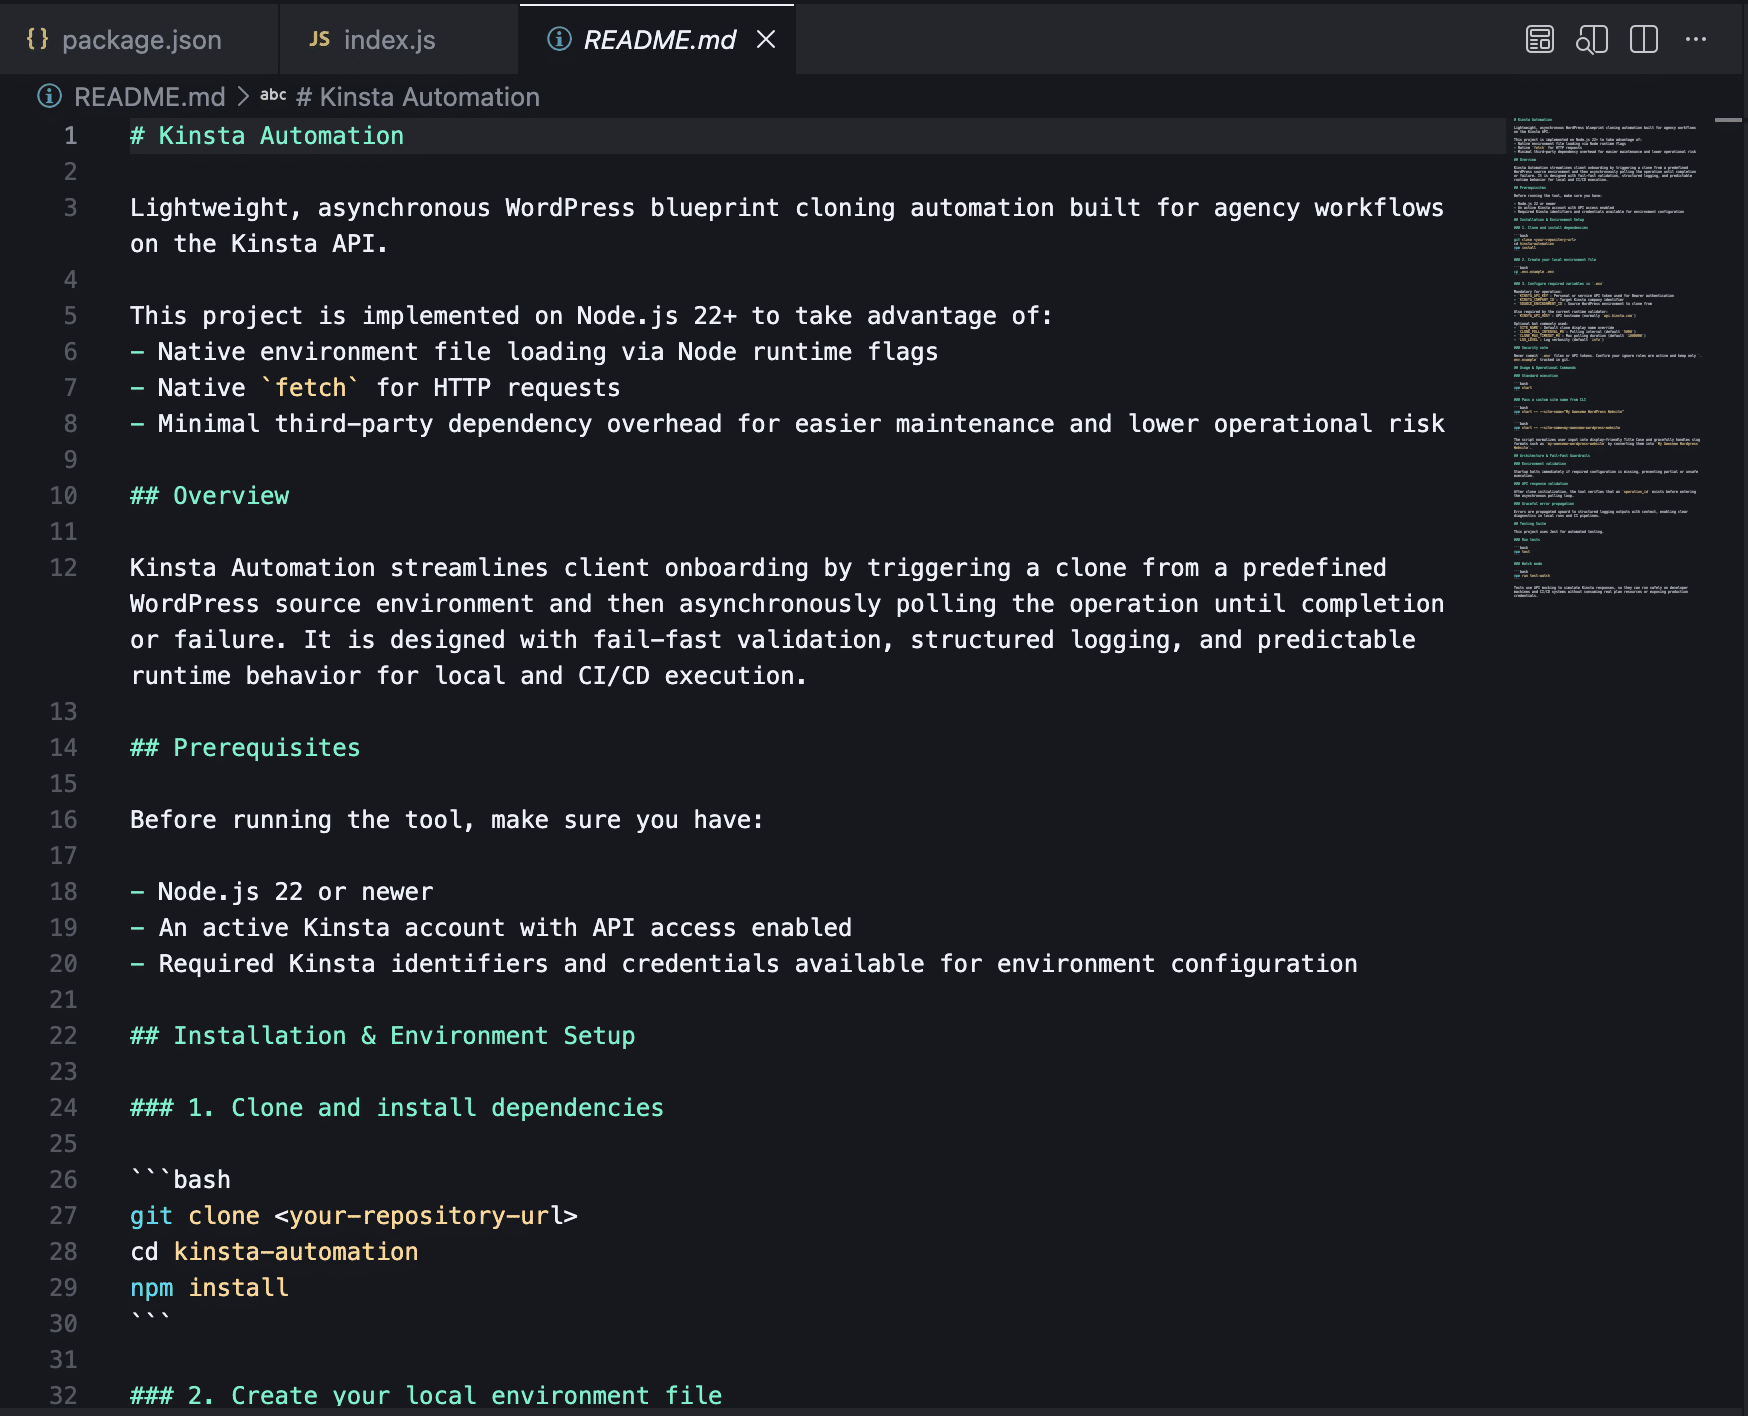
Well-documented code is vital to codebase maintainability. That’s why we asked Copilot to generate a README.md file in the project root. We asked it to describe the app, specify the requirements, explain how to configure the .env file, outline the different ways to start the application, and show how to run the tests.
We started a new chat in Ask mode, added the index.js and package.json files to the context (see Copilot’s #filename shortcut), and passed Copilot the following prompt:
Copilot provided a preview of a README.md file. We carefully reviewed it and switched to Agent mode to create the file.
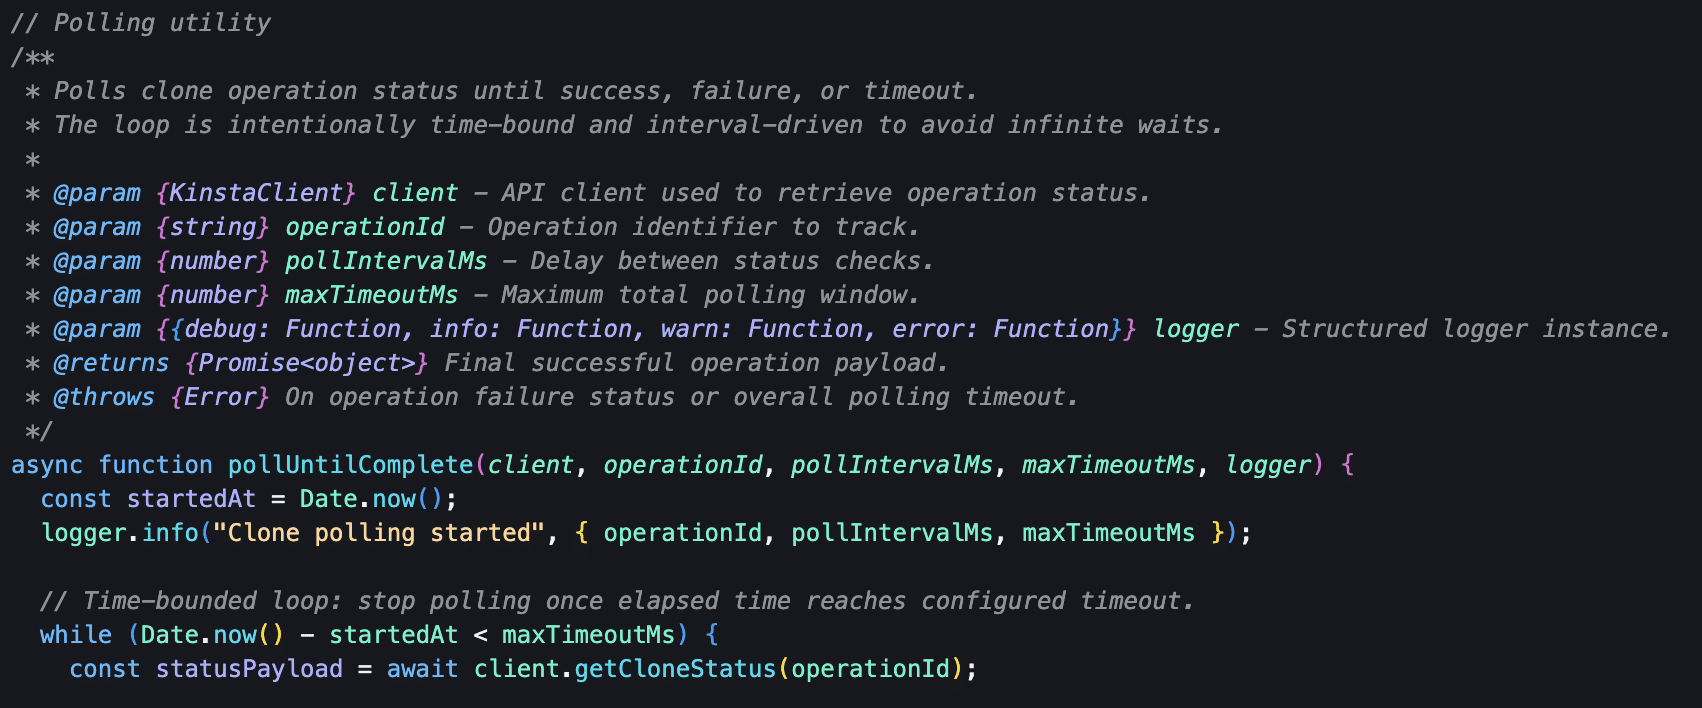
The next step was documenting the code itself. With the index.js file open, we selected the entire code to add it to the chat context and sent the following prompt in Ask mode:
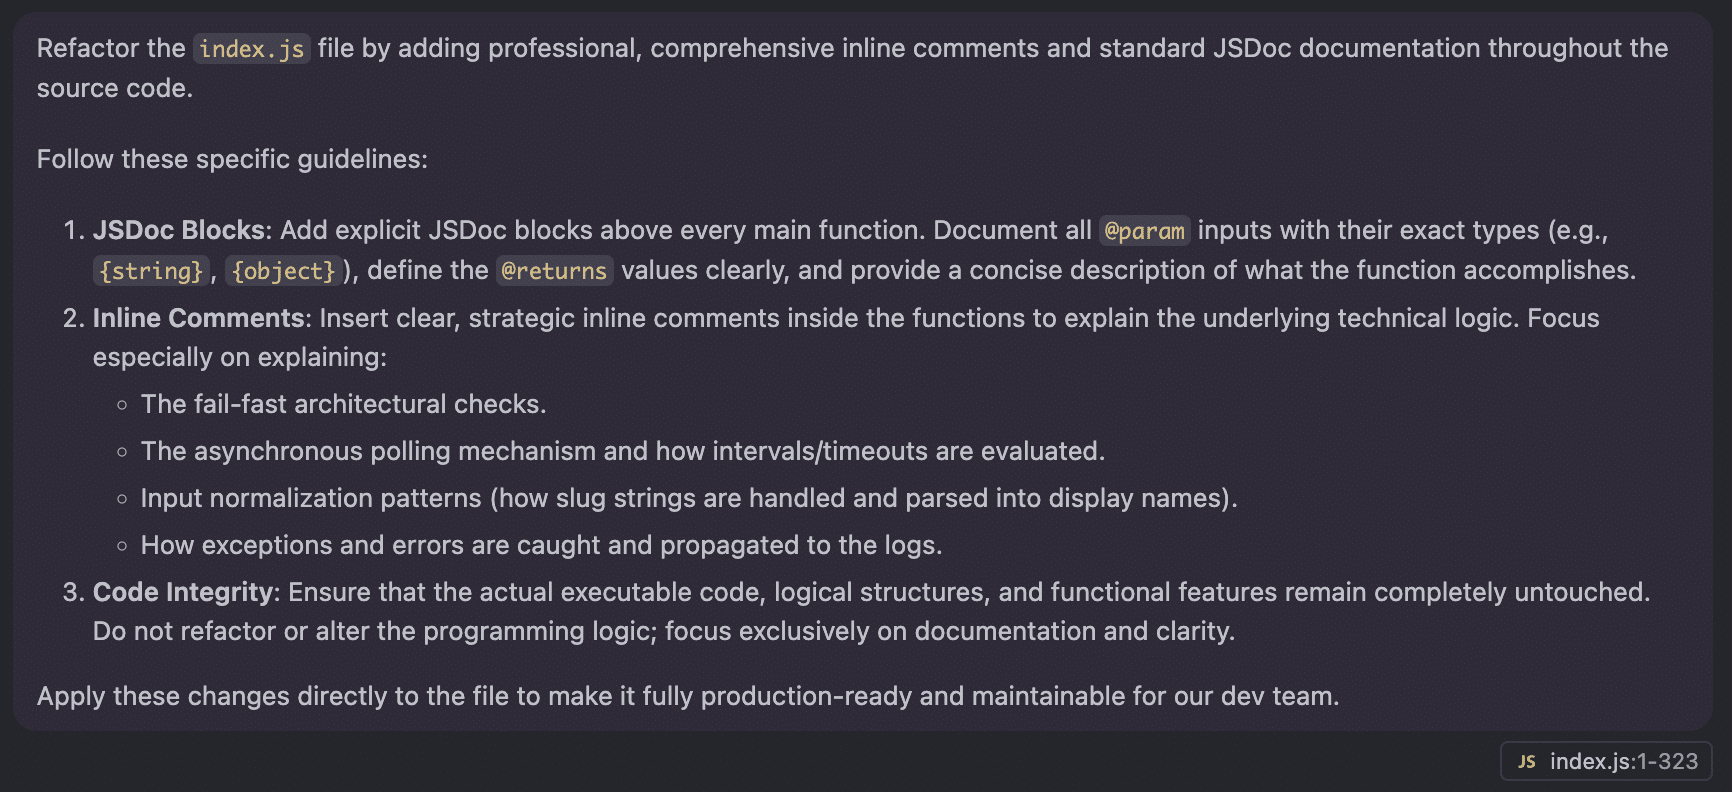
Copilot updated the index.js file with inline documentation without touching the code.
Again, since we were in Ask mode, Copilot didn’t have permission to modify our files. So, we switched over to Agent mode and asked Copilot to update the index.js file with the proposed changes.
The final step is deploying the application. There are two main options here:
- Keep the application on a local machine. This solution is ideal when you decide to trigger the site creation manually, for example, right after a new client signs a contract.
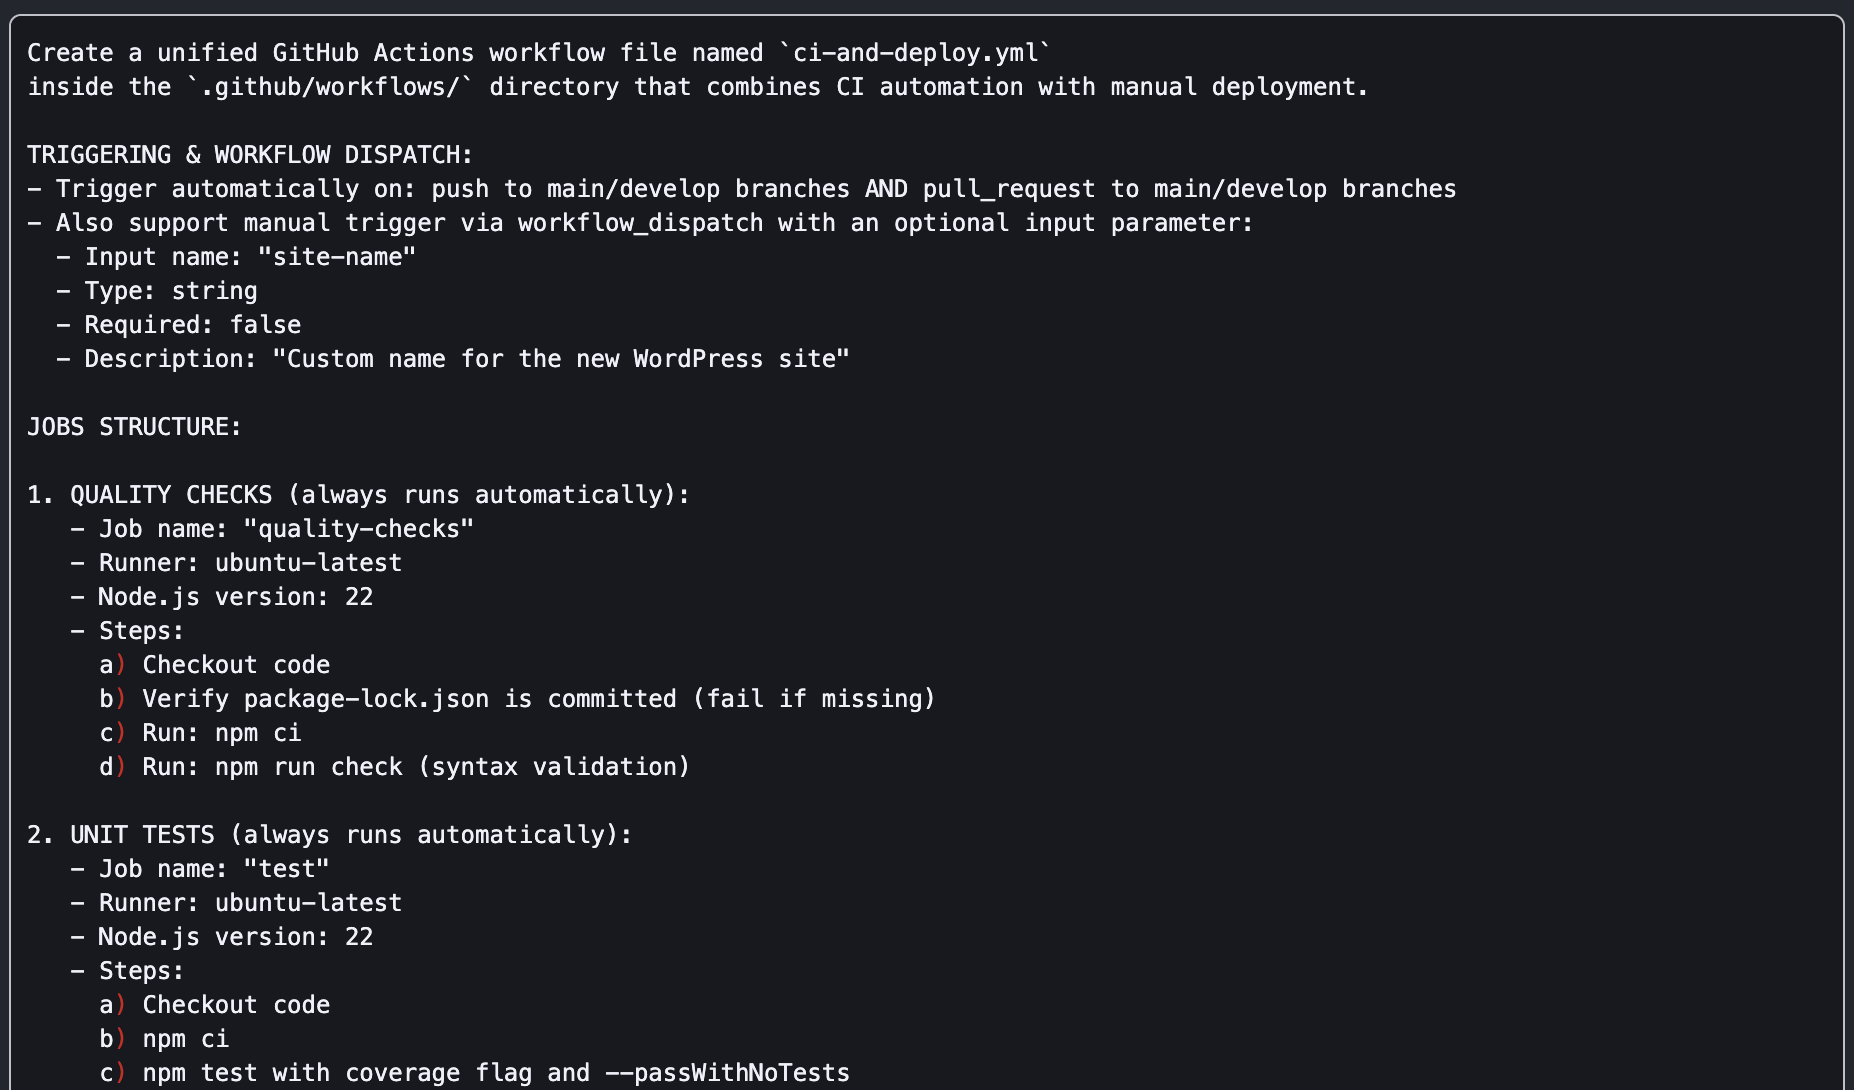
- Integrate the script into a CI/CD pipeline by pushing the code to a GitHub repository. The site creation can then be triggered manually or automatically in response to a specific event. This solution is perfect if you are working with more structured and scalable workflows.
If you go with the local machine or utility server setup, you are all set. If you choose the more structured CI/CD pipeline route, you can have Copilot help you write the perfect prompt.
Our application is complete. Now, onboarding a new WordPress project is as simple as running the following command:
npm start -- --site-name="My Awesome WordPress Website"Vibe Coding and Automation: The Future of Forward-Thinking WordPress Agencies
Vibe Coding isn’t just a simplistic approach to writing code. Instead, it’s a new development methodology that completely redefines the developer’s role – no longer a programmer in the traditional sense, but the director of an iterative process spanning exploration, planning, coding, improvement, testing, debugging, documentation, and deployment.
If this is the future of software development and agency scalability, then partnering with a forward-thinking hosting platform is vital to staying competitive in the AI era. By leveraging the power of the Kinsta API and orchestrating AI agents with clear rules, rigorous testing, and solid documentation, your agency will stop constantly firefighting and start working in a more efficient, predictable, and scalable way.
Ready to evolve your WordPress workflows and slash your development times? Check out our plans or reach out to our sales team and start building your automation pipeline today.
The post Vibe coding real WordPress workflows using the Kinsta API appeared first on Kinsta®.