You’ve set aside time for a client appointment, prepared your materials, and blocked out your calendar. Then the appointment time comes, and nobody shows up.
It’s frustrating, and it’s costing your business both time and money.
You’ve probably noticed how doctors and dentists handle this. They send you email reminders days before your appointment, then follow up with a confirmation request.
And it works. Automated reminders can meaningfully reduce no-shows, which means fewer wasted time slots and more predictable revenue for your business.
The good news is that you can set up the same professional reminder system on your WordPress site with the right plugin. In this guide, I’ll show you exactly how to reduce no-show appointments using WordPress, including how to automate email reminders and require deposits.
Quick Summary
Reducing no-show appointments doesn’t have to be complicated or time-consuming. With Sugar Calendar Bookings, you can create an automated system that keeps your schedule full and your clients accountable.
The combination of email reminders, self-service links, and optional pre-payments gives you multiple layers of protection against missed appointments.
Once you set everything up, it runs on autopilot, saving you hours of manual follow-up while noticeably improving your attendance rates.
Here are the topics I’ll cover in this tutorial:
- Why Reducing No-Show Appointments Is Important
- Which Booking Plugin Should You Use?
- Before You Start
- Install and Configure Sugar Calendar Bookings
- Send Email Booking Notifications With Sugar Calendar Bookings
- Require Pre-Payment or Deposits for Appointments
- Make Rescheduling Easy and State Your Cancellation Policy
- Frequently Asked Questions About Reducing No-Show Appointments
- Additional Resources for Appointment Bookings
Why Reducing No-Show Appointments Is Important
No-show appointments are more than just an inconvenience. They cost your business real money in lost revenue and wasted time that you could have spent with paying clients.
When someone misses an appointment without warning, you’re left with an empty time slot that’s often too late to fill.
This means you’ve blocked off part of your day for nothing, and those hours add up quickly over weeks and months.
Understanding why clients miss appointments helps you pick the right fix. Most no-shows fall into a few key areas:
- The client forgot about the appointment.
- The client double-booked.
- The client lost interest but didn’t want the awkward cancellation call.
- Or the client never had real commitment because no deposit was on the line.
Each strategy in this guide targets one of these causes. Reminders fight forgetting. Self-service links fight the awkward-call problem. Deposits fight the no-commitment problem.
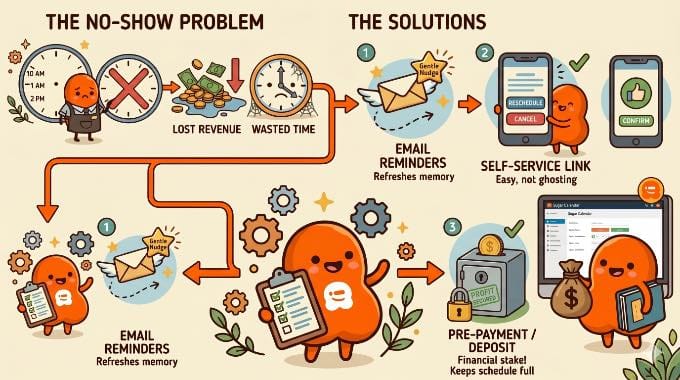
The good news is that automated reminders can meaningfully cut how often this happens. Let me break down how different notification strategies stack up against each other:
| Strategy | Why It Works |
|---|---|
| Email Reminder | Serves as a gentle nudge to refresh the client’s memory. Best sent 24-48 hours before the appointment. |
| Self-Service Link | Allows clients to easily reschedule or cancel, so they notify you instead of ghosting. |
| Pre-Payment / Deposit | Creates financial ‘skin in the game’. Clients rarely miss appointments they have already paid for. |
The impact of self-service links might seem counterintuitive. You might wonder why making it easier to cancel would improve attendance.
The answer is simple psychology. When clients have an easy way to reschedule, they are much more likely to notify you in advance rather than simply not showing up.
A last-minute cancellation is frustrating, but it is far better than a no-show. At least with advance notice, you have a chance to fill that slot with another client.
Which Booking Plugin Should You Use?
I recommend Sugar Calendar Bookings because it is a complete appointment scheduling suite. Booking forms, Stripe payments, Zoom calls, and email automation all come bundled, so you can run every no-show prevention strategy in this guide without installing three or four single-purpose plugins.
The plugin supports email notifications natively, so you can set up automated reminders right out of the box.
It also lets you include self-service links in your email notifications. These links give your clients one-click access to manage their appointments, which removes the friction that often leads to no-shows.
Finally, you can require a deposit or full payment during booking. The plugin also integrates with Stripe, so clients have a financial stake in the appointment. That lowers the chance they’ll skip it.
I have found that the combination of automated reminders, self-service options, and upfront payments creates the most effective system for keeping your schedule full.
Before You Start
Before you follow this tutorial, let’s make sure you have a few things ready:
- A WordPress website you can log in to as an administrator.
- A short list of the services you offer, with rough durations and prices.
- A free Stripe account if you plan to collect deposits or pre-payments. You can create one at stripe.com in a few minutes.
Install and Configure Sugar Calendar Bookings
Before you can start sending automated reminders, you need to set up your booking plugin. Sugar Calendar Bookings makes this process straightforward, even if you’re new to WordPress plugins.
The setup only takes about 10 minutes, and once it’s done, you’ll have a complete booking system ready to accept appointments. Let me walk you through each step.
Step 1: Install and Activate Sugar Calendar Bookings
First, you need to install the Sugar Calendar Bookings plugin. There are two versions to choose from:
- Sugar Calendar Bookings Lite (Free): Includes the booking form, Stripe payments, Zoom, and appointment reminders. Stripe payments through Lite carry a 3% transaction fee on top of Stripe’s own processing fees, so Lite is best for a solo provider testing the system or running reminders-only.
- Sugar Calendar Bookings Pro: Removes the 3% Lite fee on Stripe payments, and adds multiple-employee scheduling, per-service email templates, and priority support. Best if you’re taking deposits or pre-payments regularly, or running a team.
For this tutorial, I’ll use the Pro version to show the full admin experience and skip the 3% Lite fee on payments. You can follow every step here on Lite if you want to test before you upgrade. Both tiers include a 14-day money-back guarantee, so you can try Pro risk-free.
If you need help, then see our step-by-step guide on how to install a WordPress plugin.
Step 2: Configure Core Settings with the Setup Wizard
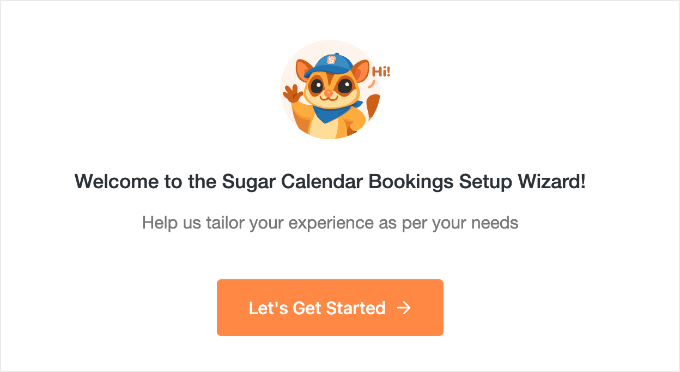
One of the things I really appreciate about this plugin is the Setup Wizard.
After you activate the plugin, it launches automatically. You can simply click the ‘Let’s Get Started’ button to begin.
The setup wizard will quickly help you set up the plugin:
1. Choose Your Meeting Type: First, you’ll select how you meet clients. Choose ‘In-Person’ for physical locations or ‘Custom Link’ for virtual meetings (like Zoom or Google Meet).
2. Select Your Industry: Next, you can pick the category that best describes your business (for example, ‘Health & Wellness‘ or ‘Education’). Sugar Calendar will pre-load sample services based on your choice to help you get started quickly.
3. Customize Your Services: You’ll see a list of suggested services. You can easily edit the Name, Duration, and Price for each one right here. I find it helpful to just get the basics down now—don’t worry about getting it perfect, as you can always change these later.
4. Set Employee & Availability: Enter your details as the primary service provider. Then, set your default Availability Schedule (such as Mon-Fri, 9 AM – 5 PM). This makes sure clients can only book times when you’re actually free.
5. Connect Payments: Finally, you will see an option to connect Stripe. If you plan to require pre-payments or booking deposits, then simply click the ‘Connect with Stripe’ button. I recommend doing this now to get it out of the way.
Pro Tip: Don’t forget to block out holidays. Go to Bookings » Settings » Availability later and scroll down to the Date Overrides section. Here, you can mark specific dates as unavailable so no one books you on days you’re off.
For a full walkthrough of how to do this, see our guide on how to set up a WordPress appointment booking system and book clients 24/7.
Once you finish the wizard, your booking system is almost ready. You just need to visit the Bookings » Settings page and enter your license key. You can find this information in your account on the Sugar Calendar website.
Step 3: Display the Booking Form
Now that your settings are configured, you need to display the booking form so clients can use it.
Create a new page in WordPress and name it something like ‘Book Now’. Next, simply click the ‘+‘ button to add the ‘Booking Form’ block.
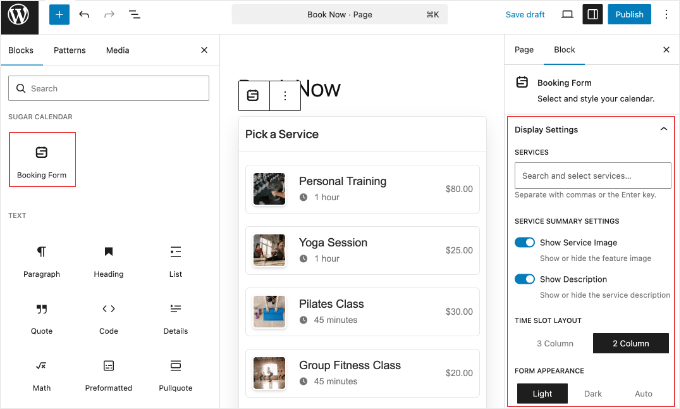
In the block settings on the right, you have a few customization options. I personally prefer the ‘3 Column’ layout for a compact view, but the ‘2 Column’ option works great for sidebars.
- Time Slot Layout: Choose ‘3 Column’ for a compact view or ‘2 Column’ for sidebars.
- Form Appearance: Select ‘Light’ or ‘Dark’ mode to match your website’s theme.
- Services: You can choose to show all services or specific ones.
Don’t forget to click the ‘Publish’ button to make your booking page live.
Finally, I recommend visiting your new booking page to see how it looks and test the booking process yourself.
Send Email Booking Notifications With Sugar Calendar Bookings
Email reminders are your first line of defense against missed appointments. Since they are built directly into Sugar Calendar (even the free version), I think they are the easiest way to start reducing no-shows immediately.
These automated messages remind clients of the time and build confidence in your business. When clients see a professional confirmation and reminder system in place, they take the appointment more seriously.
Best of all, once you set this up, it runs on autopilot. You’ll never need to manually email a client to confirm a time again.
Step 1: Access Notification Settings
To configure your emails, you can head over to Bookings » Settings in your WordPress dashboard and click the ‘Emails’ tab.
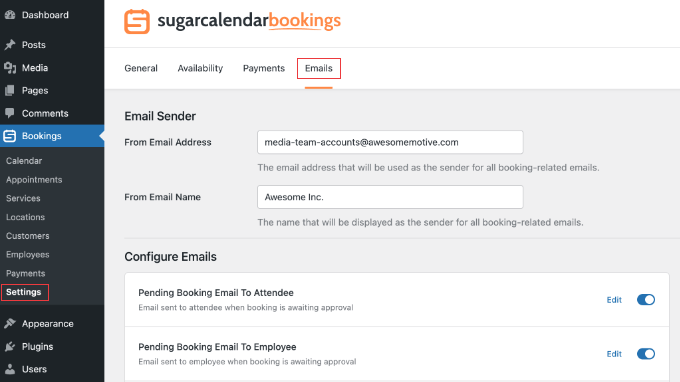
Here, you’ll see a list of all available email types, including ‘Booking Confirmation’, ‘Cancellation’, and ‘Appointment Reminder’.
By default, most of these are enabled, but you can toggle them on or off based on your workflow.
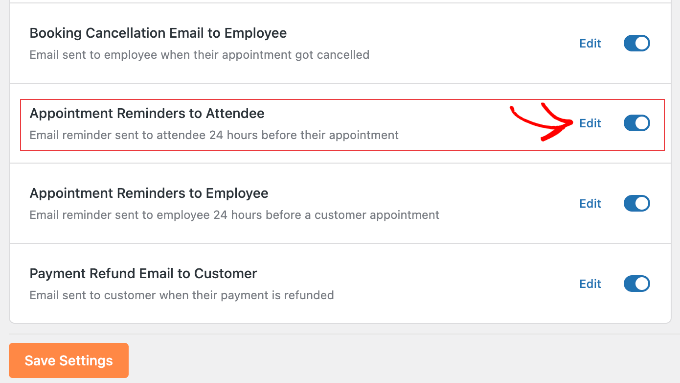
Step 2: Customize Your Reminder Templates
Next, you can click the ‘Edit’ button next to the ‘Appointment Reminders to Attendee’ template.
This opens the editor where you can personalize the message.
You’ll notice Smart Tags like {service_name}, {start_date}, and {start_time}. These automatically pull in the specific details for each appointment, so every email feels personal and accurate.
My Recommendation: Add a Cancellation Link
You’ll likely see that the plugin automatically adds a ‘Cancel Appointment’ link to the footer of the email.
This is great, but I also prefer to give clients a specific way to manage their booking in the main body of the text.
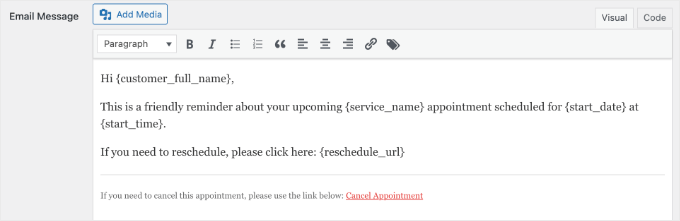
Giving clients an easy way to change plans can reduce no-shows by up to 70%. You can use the {cancel_url} tag to give them that option upfront.
Here is a script I like to use:
Hi {customer_full_name}, this is a friendly reminder about your {service_name} scheduled for {start_date} at {start_time}. If you need to change your time, please click here: {cancel_url}
Don’t forget to click the ‘Save Settings’ button at the bottom of the page to store your customized email reminder.
Step 3: Test Your Notifications
Before going live, it’s always a good idea to test the system. You can create a test appointment for yourself and check your inbox.
Does the email arrive? Do the Smart Tags display the correct time?
Troubleshooting Tip: If the emails aren’t arriving, then they might be getting stuck in spam folders. This is a common WordPress issue.
To fix this, I strongly recommend installing WP Mail SMTP. It helps your appointment reminders land in your clients’ primary inbox, so they never have an excuse to say “I didn’t get the memo.”
Require Pre-Payment or Deposits for Appointments
Pre-payment is one of the most effective strategies to reduce no-shows. It relies on a simple psychological principle: ‘Skin in the Game’.
I’ve found that when clients make a financial commitment to their appointment (even a small one), they treat it as a firm obligation rather than a casual plan. Nobody likes to lose money, so that upfront payment serves as a powerful motivator to show up.
Pre-payment also makes your operations cleaner. You don’t have to chase down outstanding invoices or sort out payment delays when the client arrives.
Plus, only clients who are serious about your services end up taking space on your calendar.
Step 1: Verify Your Stripe Connection
If you connected Stripe during the Setup Wizard earlier, then you’re already on the right path. However, it is always a good idea to double-check that the connection is active before you start pricing your services.
You can head over to Bookings » Settings and click on the ‘Payments’ tab. You should see that Stripe is enabled.

But if you skipped this step previously, then you can simply click the ‘Connect with Stripe’ button here to link your account.
While you’re on that page, make sure that you are using the right currency.
Step 2: Set Service Prices (The ‘Deposit’ Strategy)
Once Stripe is connected, you need to determine how much to charge. In Sugar Calendar Bookings, pricing is set individually for each service.
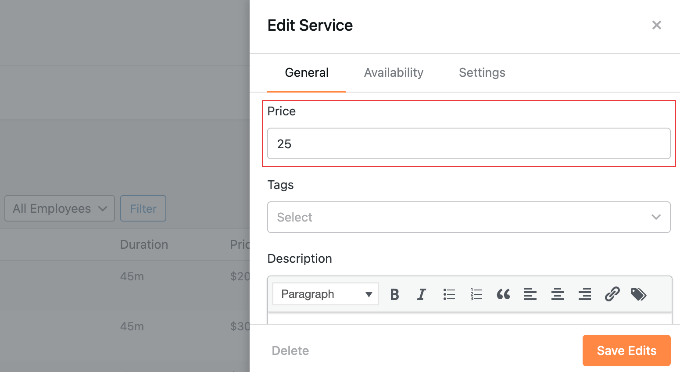
You can go to Bookings » Services and click the ‘Edit’ icon for the service you want to update (such as ‘Group Fitness Class’).
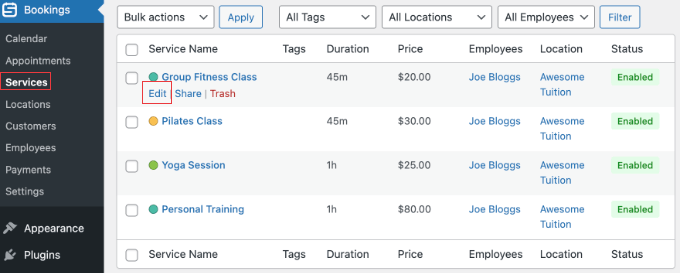
In the Price field, you can simply enter the amount you want to charge. While there is only one field, you can use it in two different ways depending on your goal:
- Strategy 1: Full Pre-payment. You can enter the full service fee (like $100). This eliminates the risk of non-payment entirely.
- Strategy 2: Booking Fee (Deposit). Alternatively, you can enter a smaller amount (such as $25) to act as a deposit to secure the slot. This lowers the barrier to entry while still making sure the client has a financial commitment to showing up. Just keep in mind that Sugar Calendar will only process the amount you enter here. You will need a separate process (like your in-person point-of-sale system or a separate invoice) to collect the remaining balance at the time of the appointment.
Once you save the service with a price, the booking form will automatically require that payment via Stripe before the appointment is confirmed.
Step 3: Communicate Your Policy Clearly
Technically, the booking form will simply display the price you entered above. It won’t automatically label it as ‘Full Price’ or a ‘Deposit’. This can be confusing if the total service cost is actually higher.
To avoid any misunderstandings, I strongly recommend being very clear in the service name or description.
For example, you might name the service ‘Initial Consultation ($20 Deposit)’ so the expectation is set immediately. Then, in the description, you can clarify the terms:
Note: The total cost of this service is $100. The $20 paid today is a deposit to secure your slot and will be deducted from your final bill. This deposit is fully refundable if you cancel at least 24 hours in advance.
I’ve found that stating this upfront filters out less serious inquiries and saves you from awkward conversations about money later on.
Pro Tip: If a client cancels inside your stated window, you can refund their Stripe payment directly from the Bookings payments dashboard — no need to log in to Stripe separately. I recommend stating your refund window plainly in the service description (for example, “Refundable up to 24 hours before the appointment”) so the policy is clear before any money changes hands.
Make Rescheduling Easy and State Your Cancellation Policy
Self-service rescheduling can reduce no-shows by 50-70%. The reason is simple: when canceling is friction-free, clients tell you in advance instead of ghosting.
Sugar Calendar Bookings sends every confirmation email with a unique cancellation link, and the cancel link is added to the email footer automatically.
You can also drop the {cancel_url} smart tag directly into the body of your reminder template (I covered this in the email section above), so clients see the option every time you nudge them.
I also recommend pairing the rescheduling flow with a clear written policy. State your cancellation window plainly — for example, ’24-hour notice required to reschedule’ — in three places: your service description, your booking confirmation email, and your reminder email.
When the policy is visible early on, you almost never have to enforce it after the fact.
Frequently Asked Questions About Reducing No-Show Appointments
Reducing no-shows can have a real impact on your revenue and your calendar.
Here are some common questions business owners have about managing appointments and preventing no-shows on a WordPress site.
1. How do you reduce no-show appointments effectively?
The most effective way to reduce no-show appointments is to combine multiple strategies. Sending automated email reminders 24 hours in advance keeps the commitment fresh in the client’s mind. Additionally, requiring an upfront deposit at the time of booking creates a financial incentive for the client to show up. Finally, providing a self-service cancellation link allows clients to easily reschedule in advance instead of simply ghosting the business.
2. How do I send automated appointment reminders in WordPress?
You can send automated appointment reminders in WordPress by using an appointment scheduling plugin like Sugar Calendar Bookings. Once you install Sugar Calendar Bookings on your website, you can configure the plugin to automatically send customized email notifications to clients before their scheduled time slot.
3. How much of a deposit should I charge for appointments?
The ideal deposit amount depends on your specific industry, but charging between 20% and 50% of the total service cost is a standard practice. A small deposit of $20 to $25 is often enough to lower the barrier to entry while still ensuring the client has a financial commitment to attending the appointment. You can easily configure these upfront booking fees using a tool like Sugar Calendar Bookings alongside its built-in Stripe payment integration.
4. What is the best WordPress appointment booking plugin to prevent no-shows?
Sugar Calendar Bookings is one of the best WordPress appointment booking plugins for preventing no-shows. It stands out for small businesses because it offers native email reminders, built-in self-service cancellation links, and Stripe integration for collecting upfront deposits. These are all proven methods for keeping a business schedule full.
5. Why does making it easier to cancel appointments actually reduce no-shows?
Making it easier to cancel appointments reduces no-shows because of simple human psychology. When clients have to call to cancel a meeting, they often feel embarrassed or anxious and choose not to show up. By putting a self-service cancellation link directly in an automated email reminder, clients are much more likely to notify the business in advance, allowing the business owner to fill the empty time slot.
6. Do I need Sugar Calendar to use Sugar Calendar Bookings?
No. Sugar Calendar Bookings is a standalone plugin, so you do not need a separate Sugar Calendar license to use it. You only need the Sugar Calendar Bookings license tier that fits your business — Lite for testing or reminder-only use, or Pro for regular pre-payments and multi-employee scheduling.
Additional Resources for Appointment Bookings
I hope this article helped you create a complete system for reducing no-show appointments on your WordPress site. By setting up automated reminders and self-service options, you’ll spend less time chasing down clients and more time focusing on your actual work.
If you found this guide helpful, you might also want to explore these related tutorials to further improve your WordPress booking system and business website:
- How to Create a Contact Form in WordPress
- Best WordPress Appointment and Booking Plugins
- Must Have WordPress Plugins for Every Website
If you liked this article, then please subscribe to our YouTube Channel for WordPress video tutorials. You can also find us on Twitter and Facebook.
The post How to Reduce No-Show Appointments With WordPress (Stop Losing Money) first appeared on WPBeginner.