Styling one border or shadow is quick. Keeping that same border or shadow consistent across an entire site is harder.
A card gets one border. A column gets a slightly different one. A button shadow is copied from another page. Then the design direction changes, and you have to track down the same small style decision across multiple modules.
Divi 5 gives you a better workflow with Option Group Presets. Instead of saving an entire module design, you can save one reusable group of settings, such as Border or Box Shadow, and apply it wherever that option group is available.
In this post, we’ll show you how to create reusable border and shadow presets, organize them into a practical preset library, use Design Variables inside them, and update those styles globally from one place.
Why Create A Border And Shadow Preset Library?
Borders and shadows often look like minor styling details, but they shape how polished a site feels. If cards, images, sections, forms, and callouts all use slightly different radius values, border colors, or shadow strengths, the design starts to feel inconsistent.
A preset library gives those repeated decisions a clear structure.
- Clear names make presets easier to reuse: Labels such as Border: Card, Border: Divider, Shadow: Subtle, and Shadow: Floating tell you what each preset is for.
- Shared presets reduce guesswork: Instead of rebuilding the same border or shadow by hand, you apply the saved preset.
- Global edits save time: Update the preset once, and every element using that preset can follow the change.
- Defaults speed up new builds: When a preset is set as the default for an option group, new elements can start with the right styling already applied.
- Reusable libraries support design systems: Borders and shadows become part of a consistent visual language instead of one-off styling choices.
The goal is not to create dozens of presets for every possible situation. The goal is to create a small, clear library you can maintain.
What Are Option Group Presets In Divi 5?
Before Option Group Presets, reusable styling in Divi usually meant saving an Element Preset. Element Presets are still useful, but they save the styling for an entire element or module type.
That works when you want a complete Button preset, Blurb preset, or Call To Action preset. It is less useful when you only want to reuse one part of the design.
Option Group Presets solve that. They save a specific option group, such as:
- Border
- Box Shadow
- Spacing
- Background
- Sizing
- Text
- Button
A Border preset created on a Column can also be applied to a Section, Row, Image module, Group module, or any other element that supports the Border option group. A Box Shadow preset works the same way across elements that expose Box Shadow controls.
That smaller scope is what makes Option Group Presets powerful. You can reuse one styling decision without bringing along every other setting from the original module.
Where Design Variables Fit In
Design Variables store reusable values, such as colors, numbers, fonts, images, and links.
When you use variables inside a preset, the preset becomes easier to maintain.
For example, a border preset might use:
- A Color Variable for the border color
- A Number Variable for the border width
- A Number Variable for the border radius
A shadow preset might use:
- A Color Variable for the shadow color
- Number Variables for blur, spread, or vertical position
The variable holds the raw value. The preset applies that value to a styling pattern. If the variable changes later, every preset and element referencing it can stay aligned with the updated design system.
How To Create Reusable Border Presets
There are two practical ways to create a Border Option Group Preset in Divi 5.
You can create one directly from an element you are already styling, or you can create one from the Preset Manager before applying it to a real element.
Path 1: Create A Border Preset From An Element
This path works well when you are already designing in context. You style an element, confirm that it looks right in the layout, then save that Border group as a reusable preset.
Open An Element And Go To The Design Tab
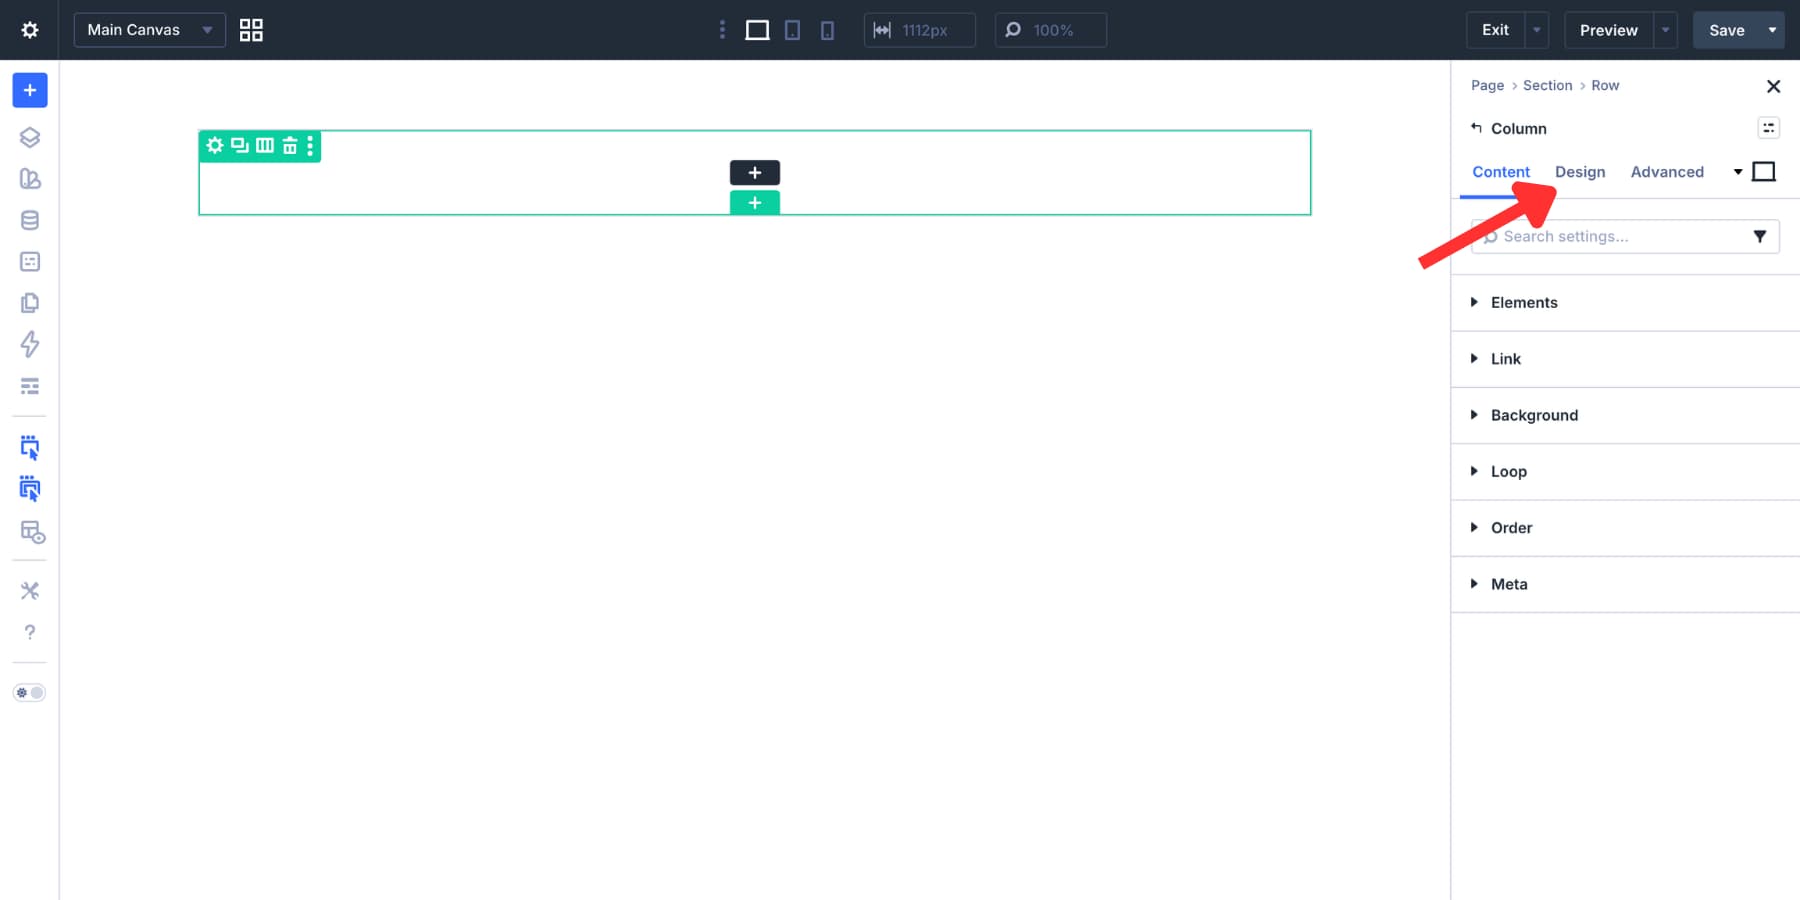
Click an element in your layout. A Column is a good example because borders are often used on cards and containers, but the same workflow works for Sections, Rows, Groups, Images, Blurbs, and other elements that include Border settings.
Open the element settings, then click the Design tab.
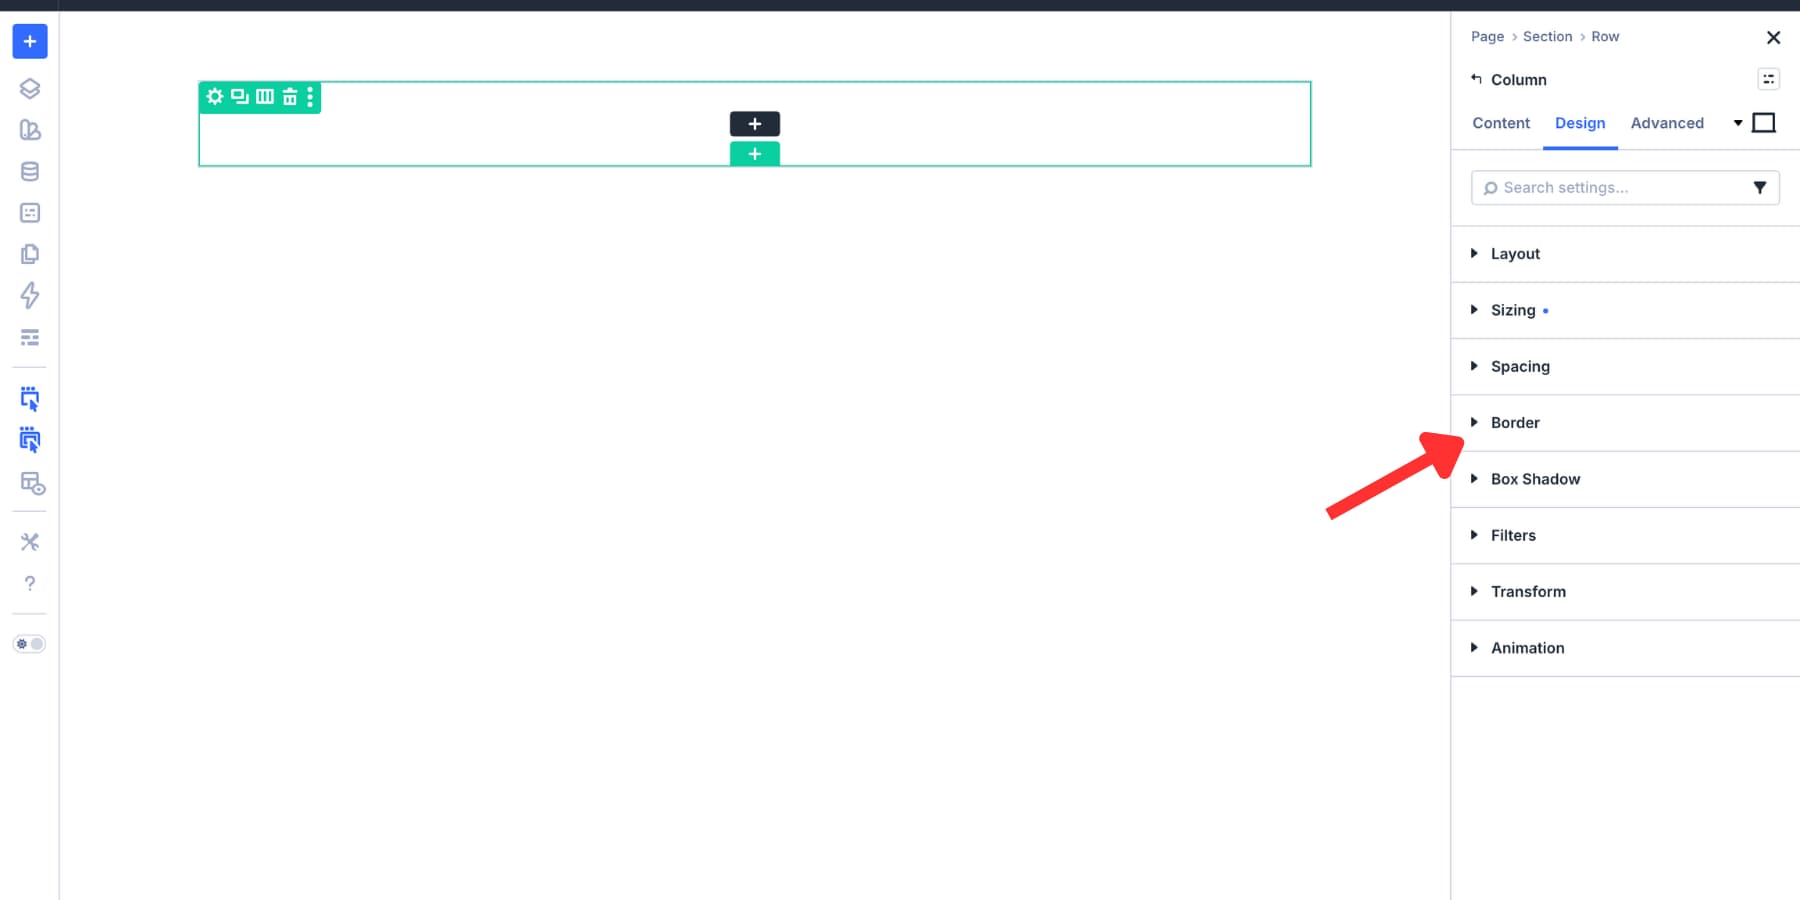
Scroll to the Border option group.
Open the group to access border radius, width, color, and style controls.
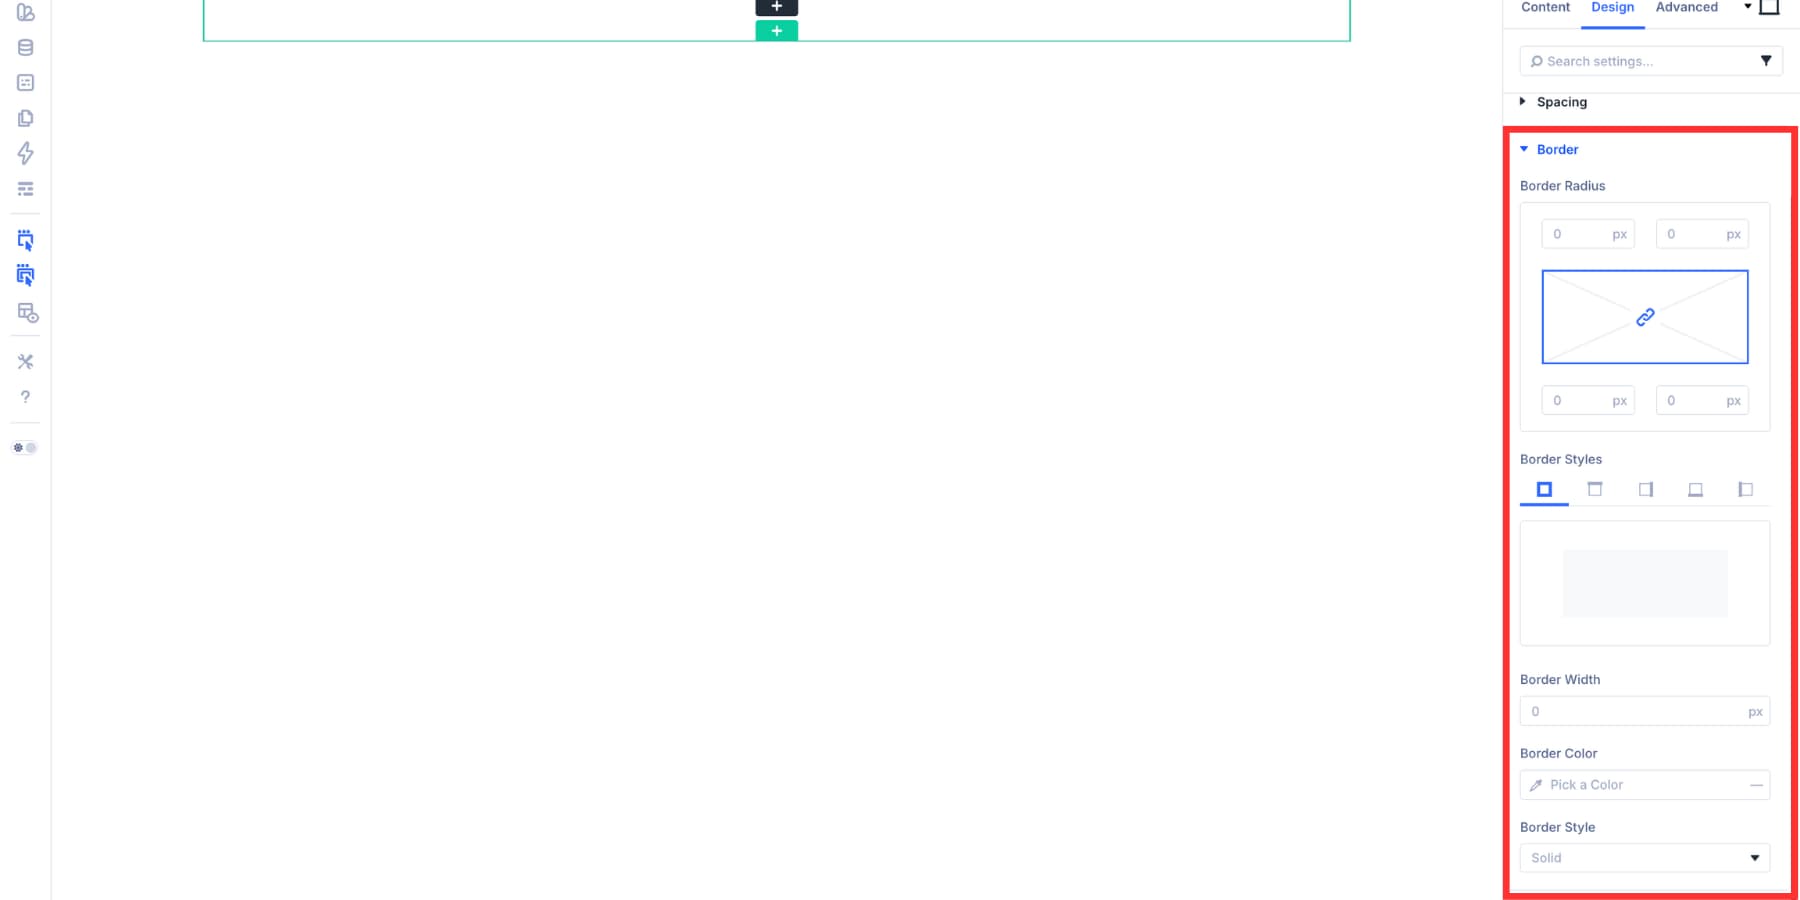
Set The Border Style
Start with Border Radius. The four corner fields are linked by default, so one value applies to all corners. You can unlink them if the design needs different values for each corner.
Use a Number Variable if your site already has a radius scale.
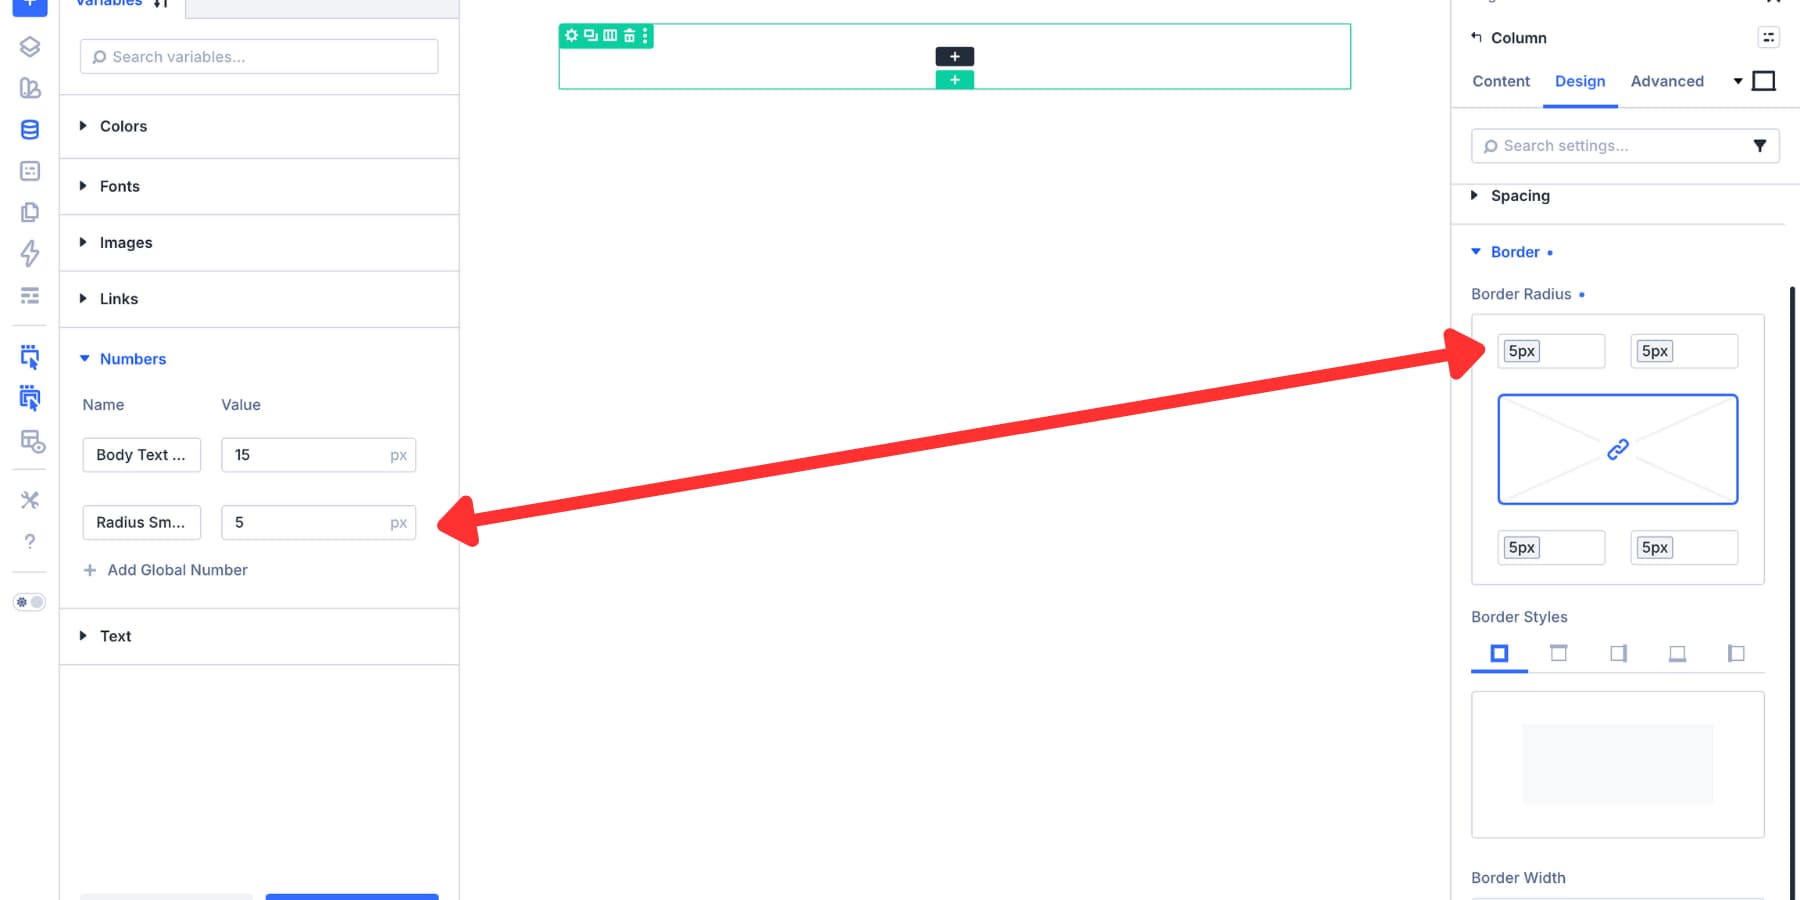
Next, set the border width and color. A Color Variable works well for border color because it keeps the preset connected to your site’s broader color system.
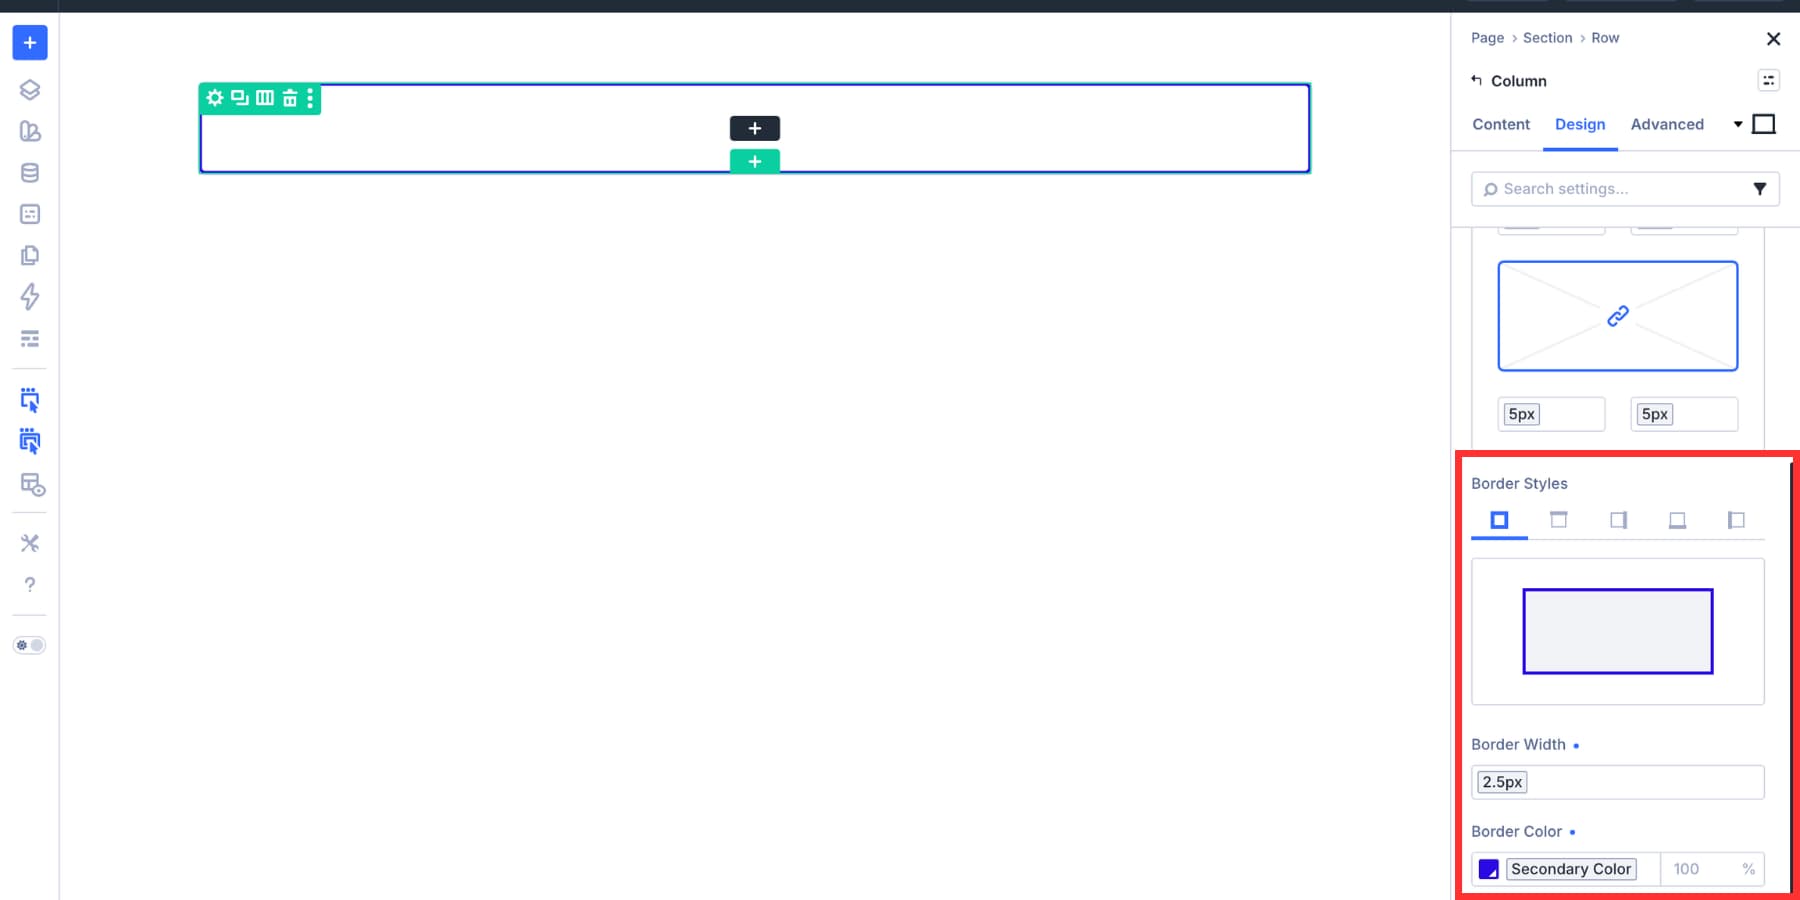
By default, width and color apply to all four sides. You can unlink the sides when you need a bottom border, left accent border, top-and-bottom divider, or another directional treatment.
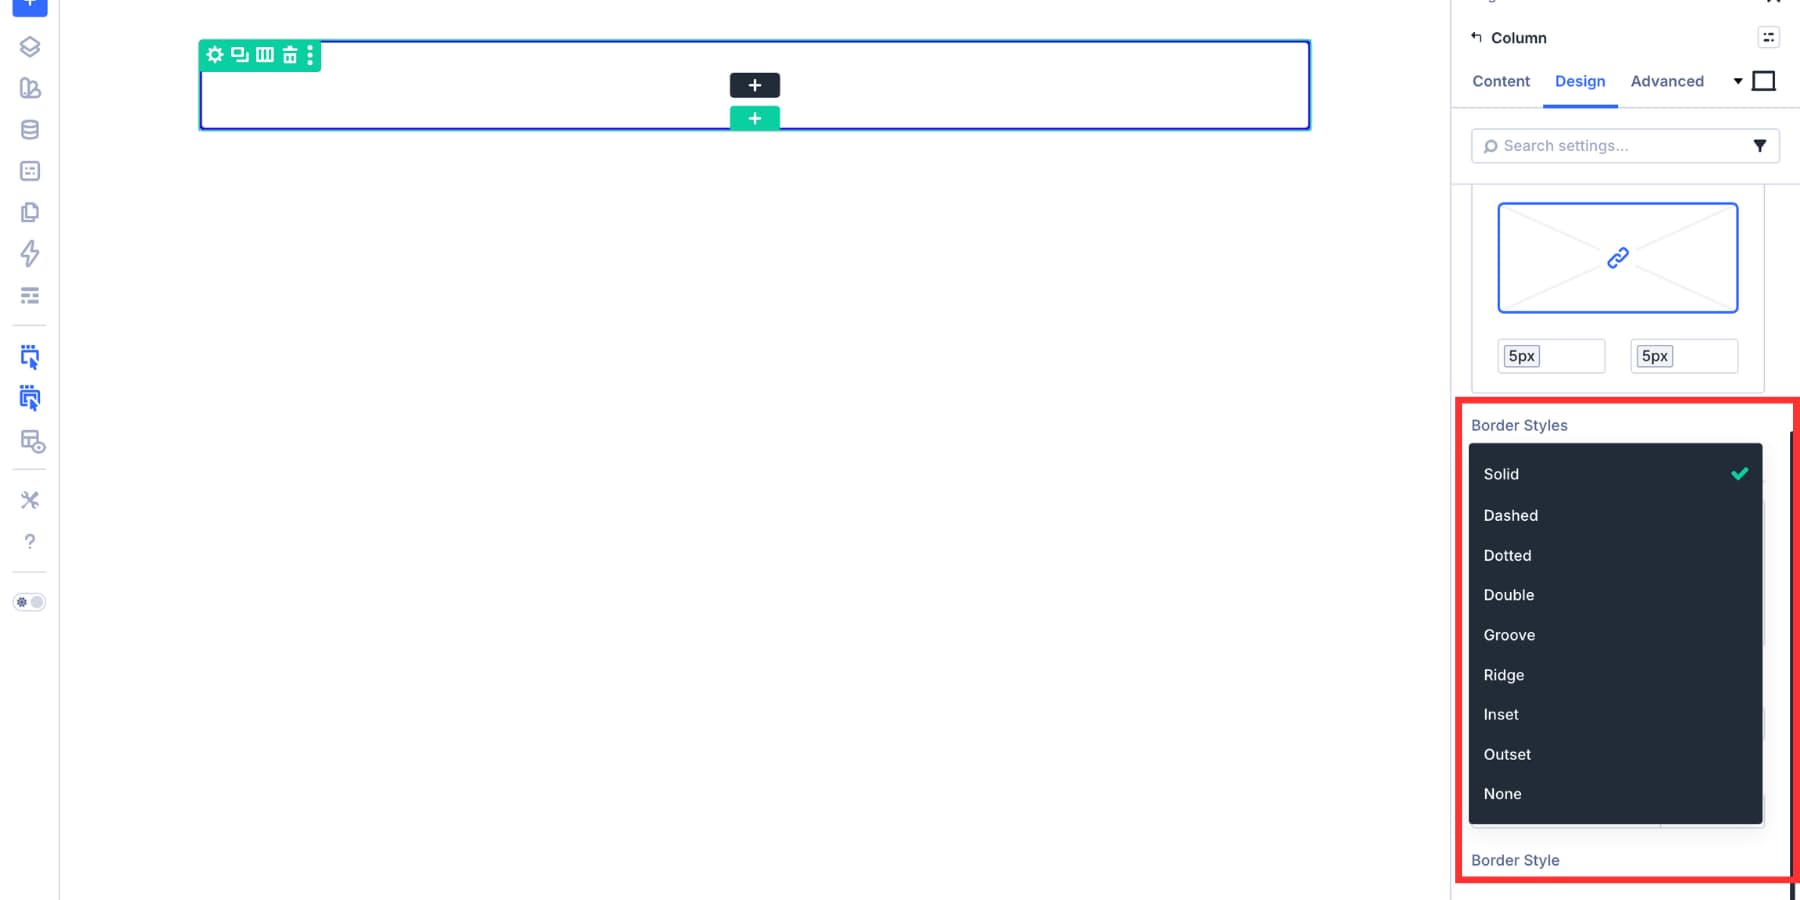
Finally, choose a border style. Solid borders work well for card outlines, image frames, and form fields. Dashed or dotted borders can work for secondary containers, placeholder areas, or decorative separators.
Save The Border Group As A Preset
Once the border looks right, hover over the Border group header. Click the preset icon that appears.
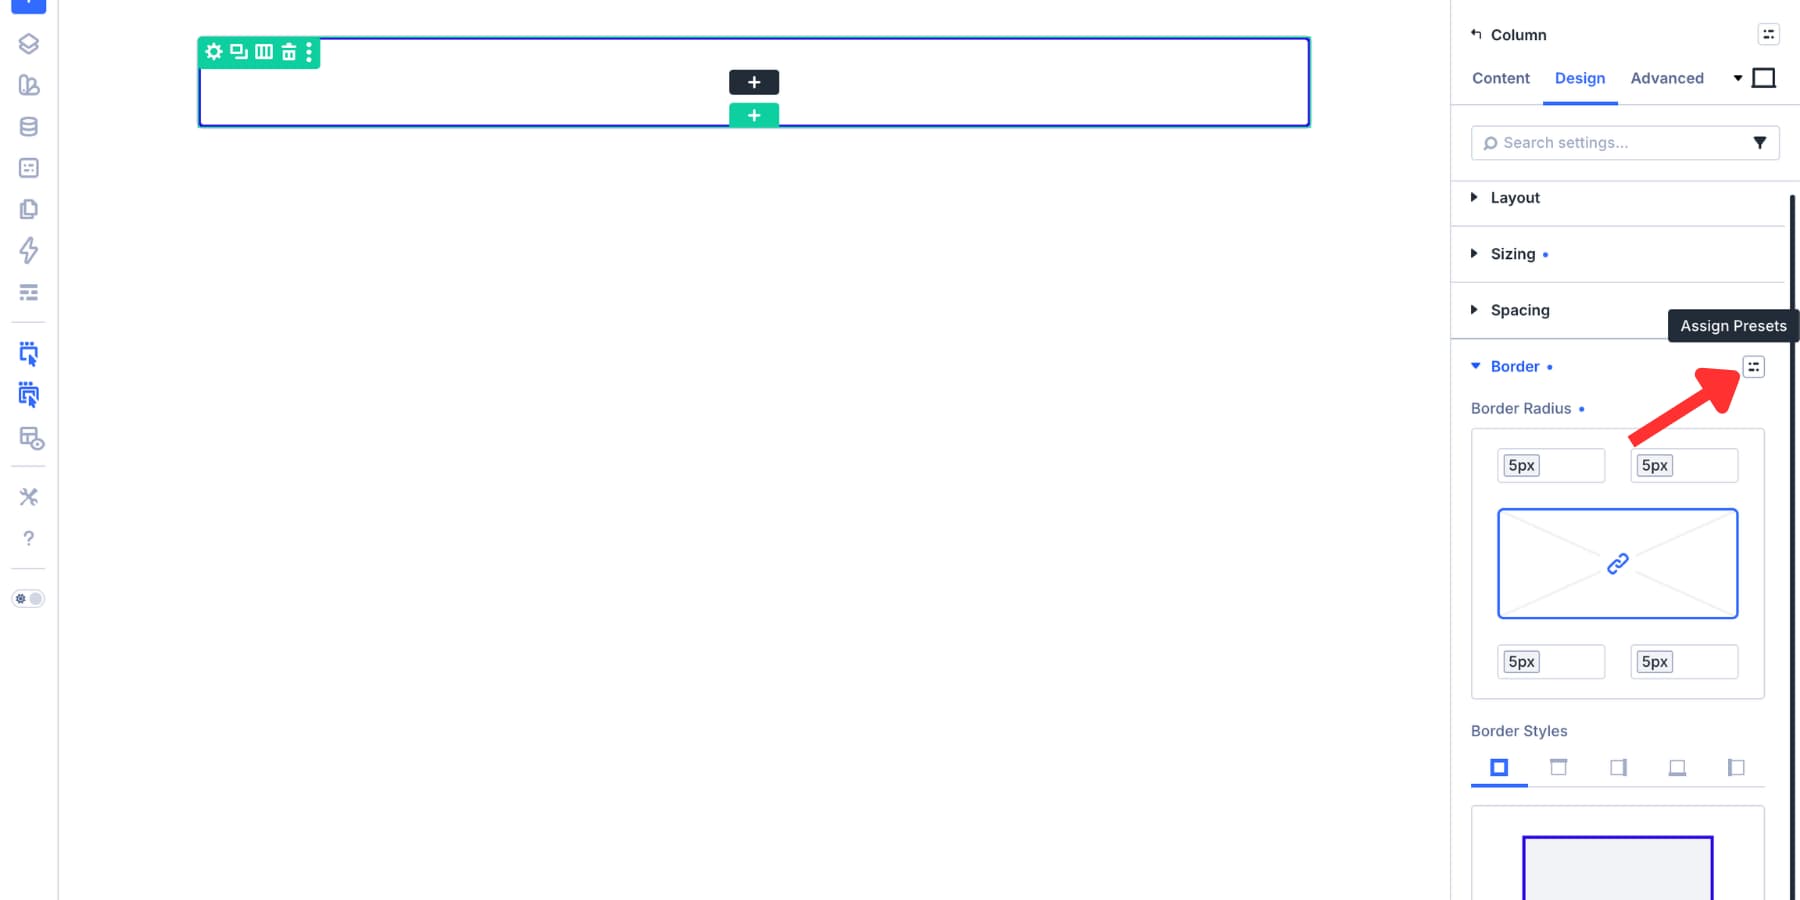
Choose New Preset From Current Styles to save the border settings you just created.
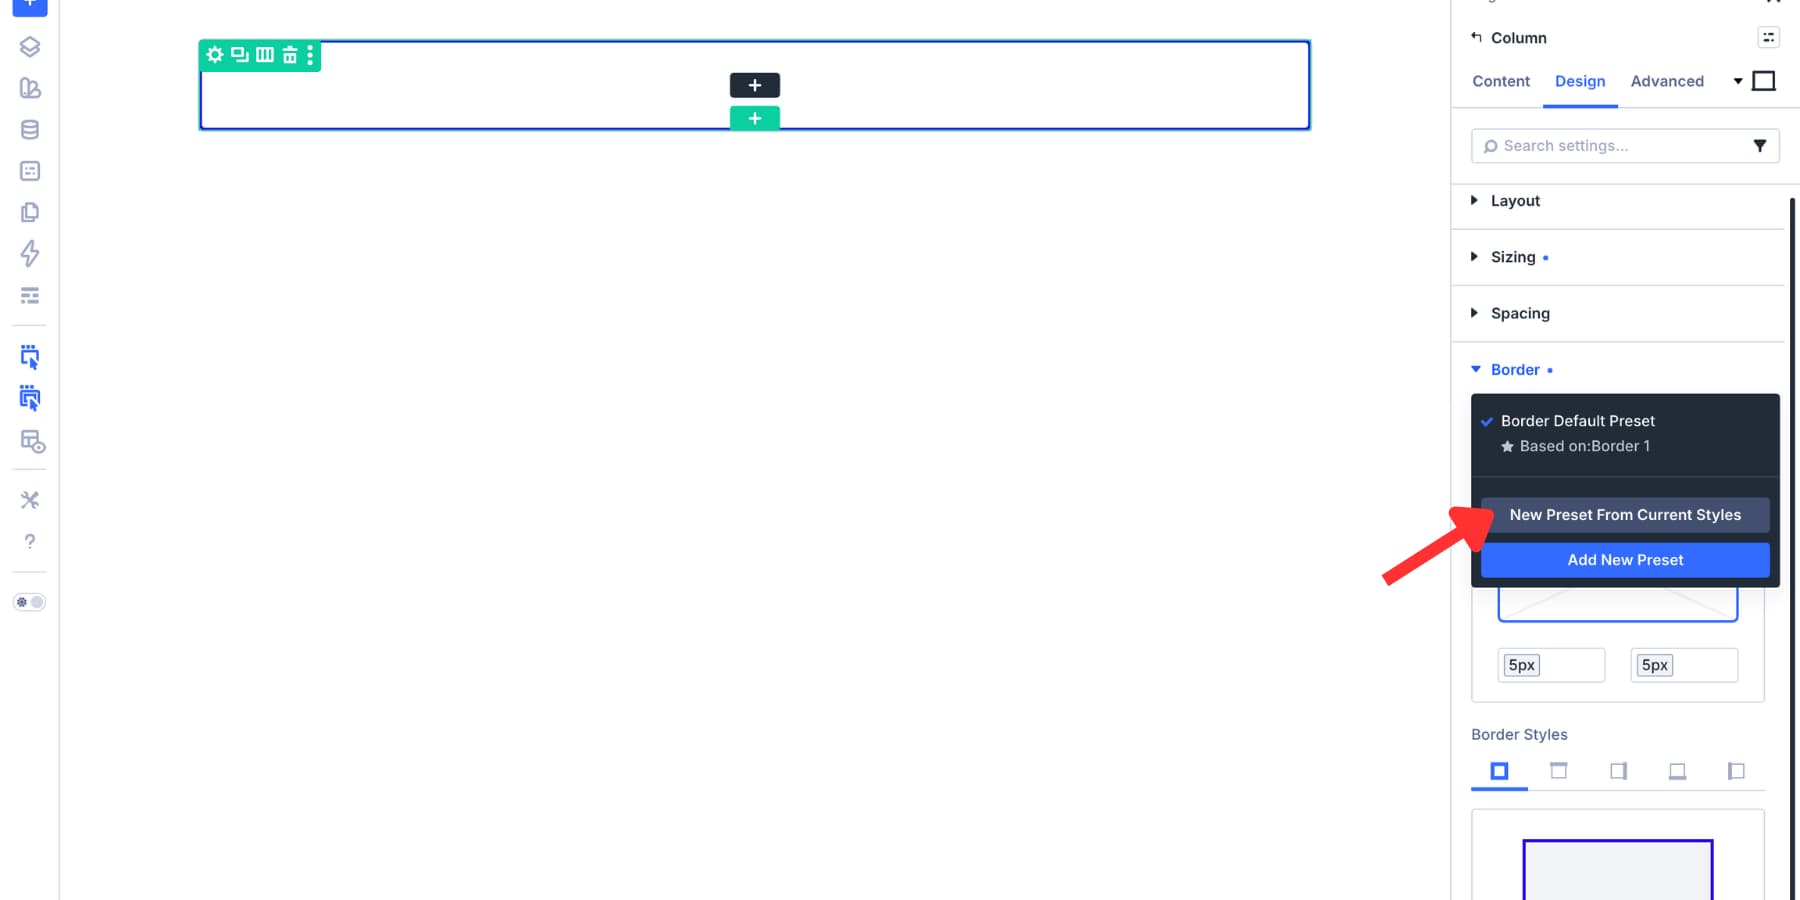
Give the preset a clear name and save it.
Good preset names describe the style, not only the element where it was created. For example:
- Border: Card
- Border: Subtle
- Border: Divider
- Border: Accent Left
- Border: Image Frame
That naming approach matters because the same preset can be used across different element types.
Path 2: Create A Border Preset In The Preset Manager
The second path starts in the Preset Manager. This is useful when you want to define your preset library before styling individual elements.
It is also helpful on collaborative builds. Instead of each person creating borders their own way, the team can pull from the same preset library from the start.
Open The Preset Manager And Switch To Group Presets
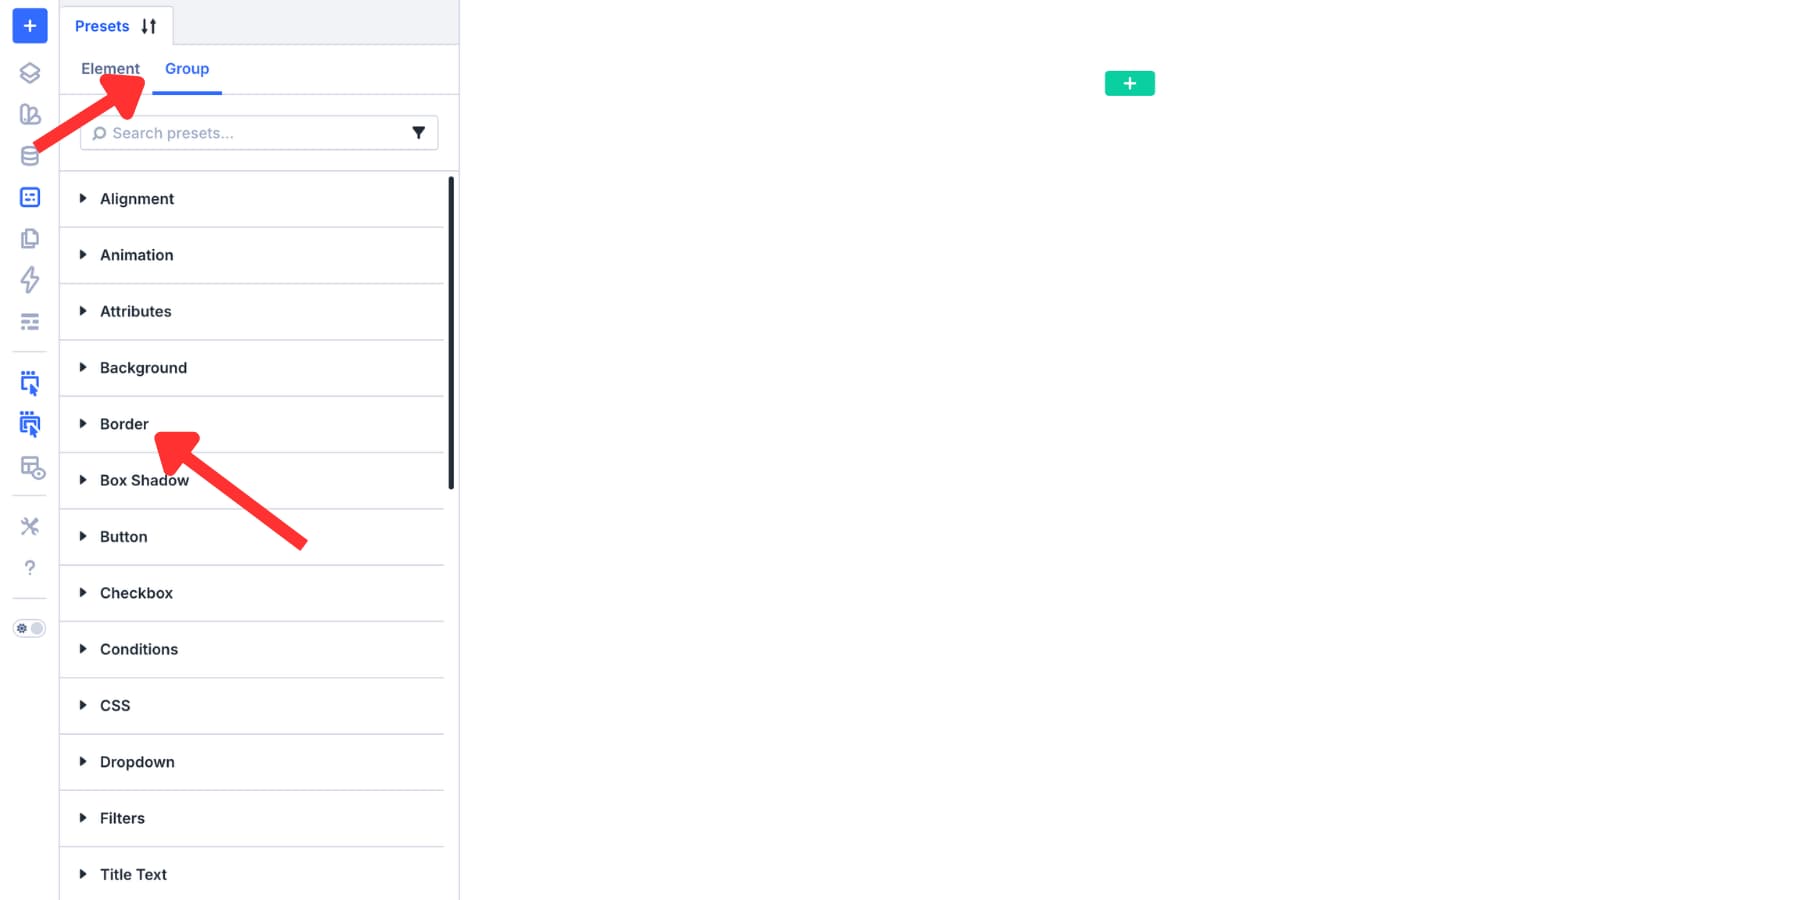
Click the Preset Manager icon in the left sidebar of the Visual Builder.
The Preset Manager gives you a central view of your preset library. Element presets and group presets are managed separately.
Go to the Group tab. This is where Option Group Presets live, including Border, Box Shadow, Spacing, Background, and other option group presets.
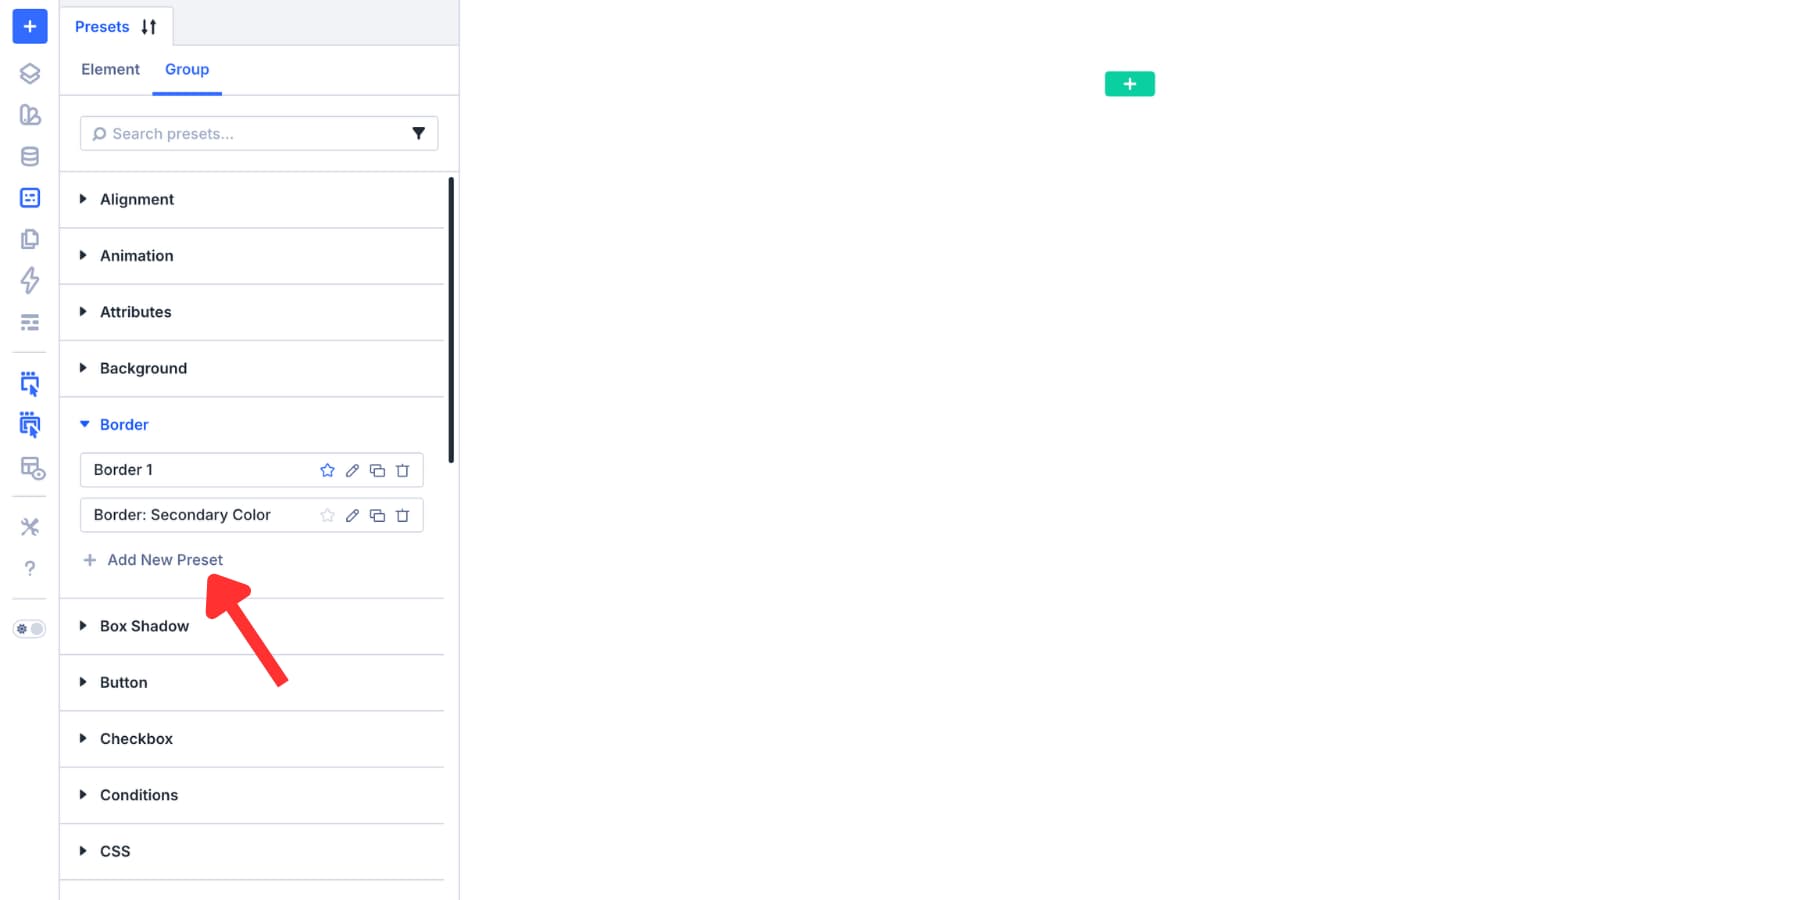
Select Border to view or create Border presets.
Add A New Border Preset
Click Add New Preset.
The Preset Preview panel opens. This lets you edit the preset itself without changing an element on the page.
Set the border radius, width, color, sides, and style. The preview updates as you work, so you can test the preset before applying it to a real element.
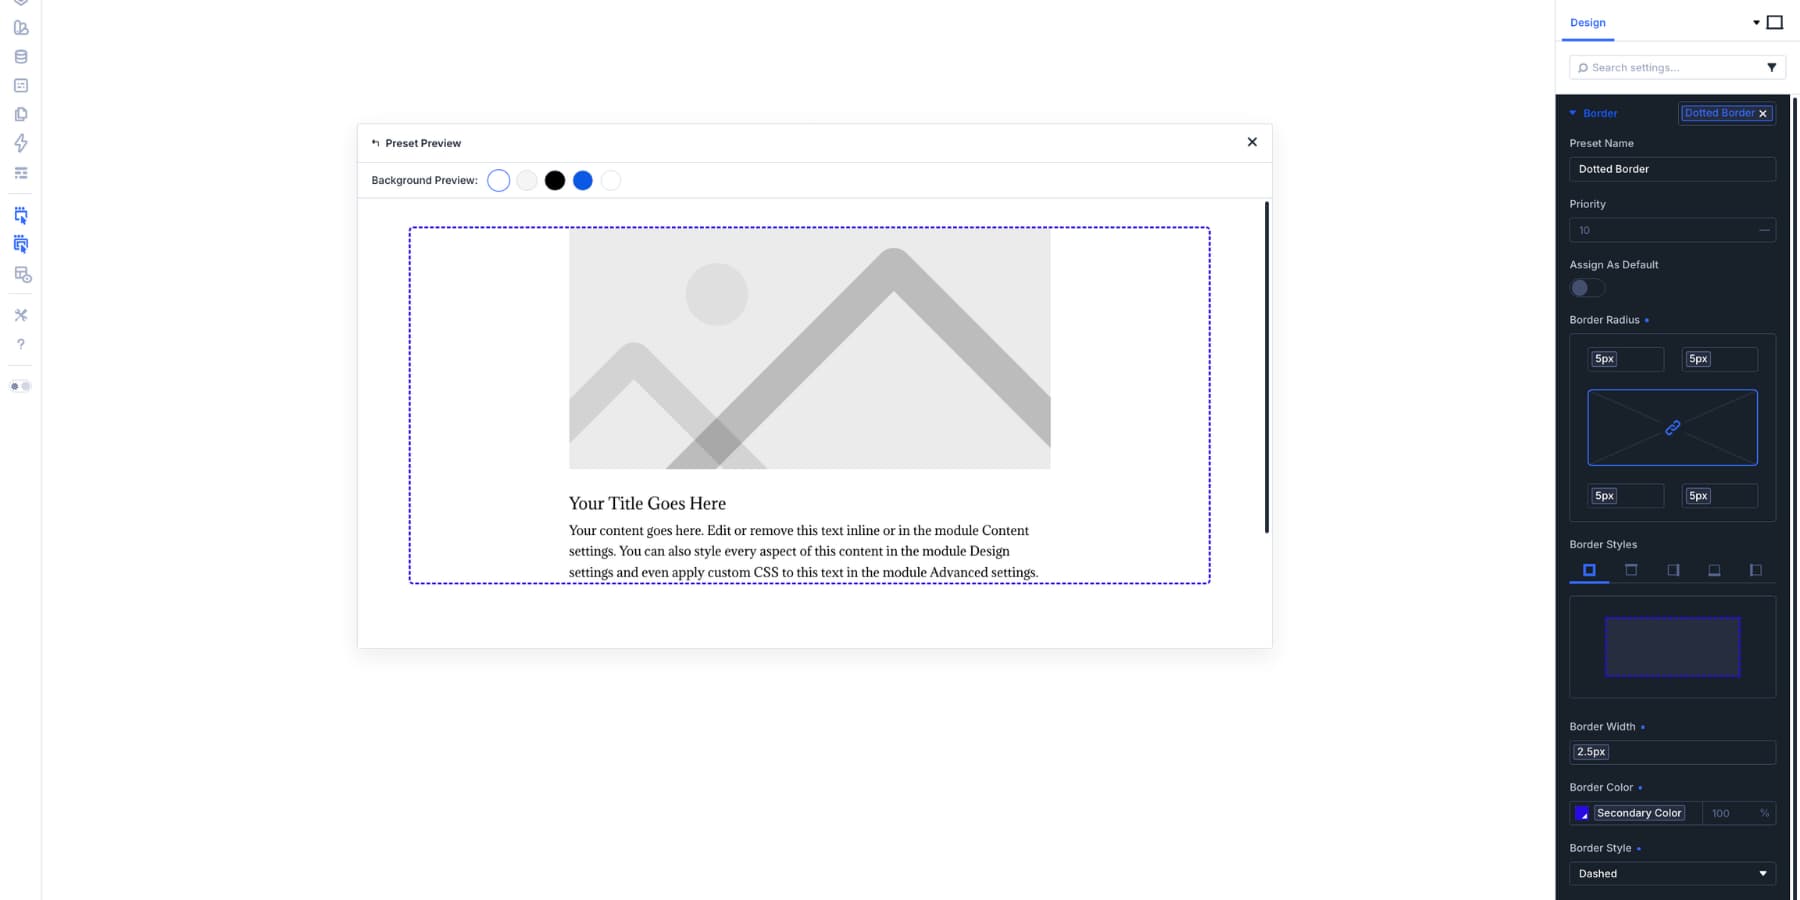
When the preset is ready, name it and save it. It will appear in the Border preset library and can be applied across the site.
How To Create Reusable Shadow Presets
Box Shadow presets work the same way as Border presets. You can create them from an element’s settings or from the Preset Manager.
Open an element, go to the Design tab, expand Box Shadow, set the style, and save the group as an Option Group Preset. Or open the Preset Manager, go to the Group tab, choose Box Shadow, and create the preset there.
Start With The Box Shadow Controls
The Box Shadow group includes built-in shadow options that can be used as starting points.
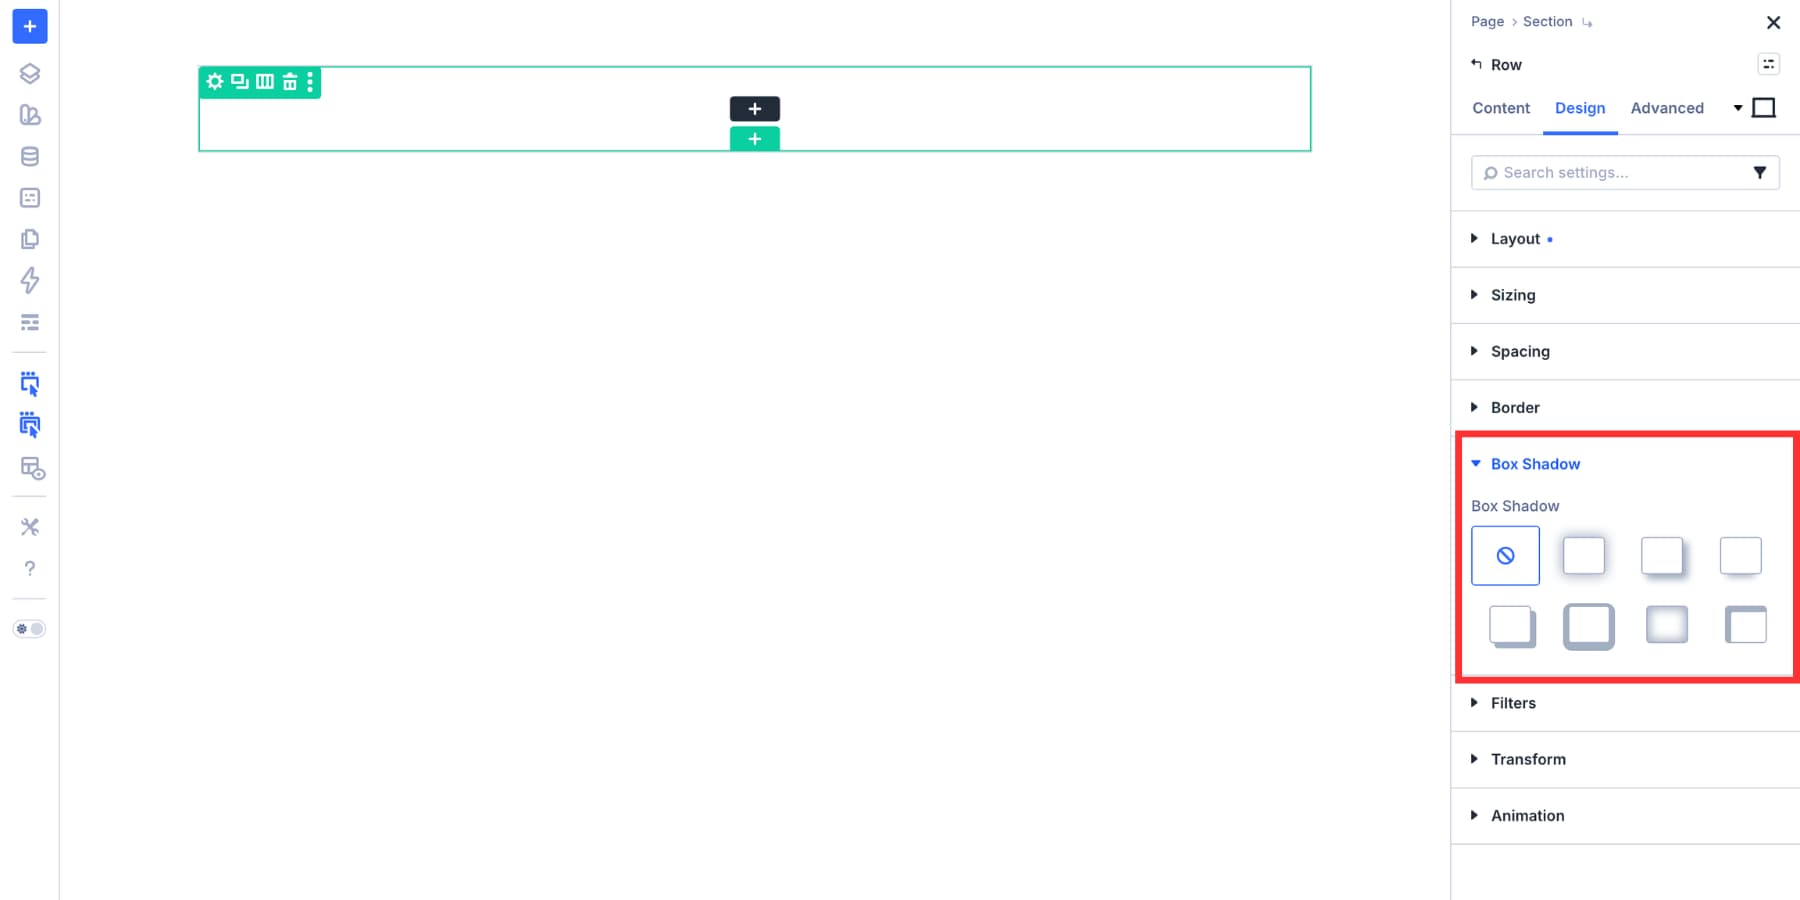
After choosing a starting point, adjust the shadow settings.
The main controls include:
- Horizontal Position: Moves the shadow left or right.
- Vertical Position: Moves the shadow up or down.
- Blur Strength: Controls how soft or sharp the shadow appears.
- Spread Strength: Expands or contracts the shadow.
- Shadow Color: Sets the color and opacity of the shadow.
- Box Shadow Position: Switches between outer and inner shadow behavior.
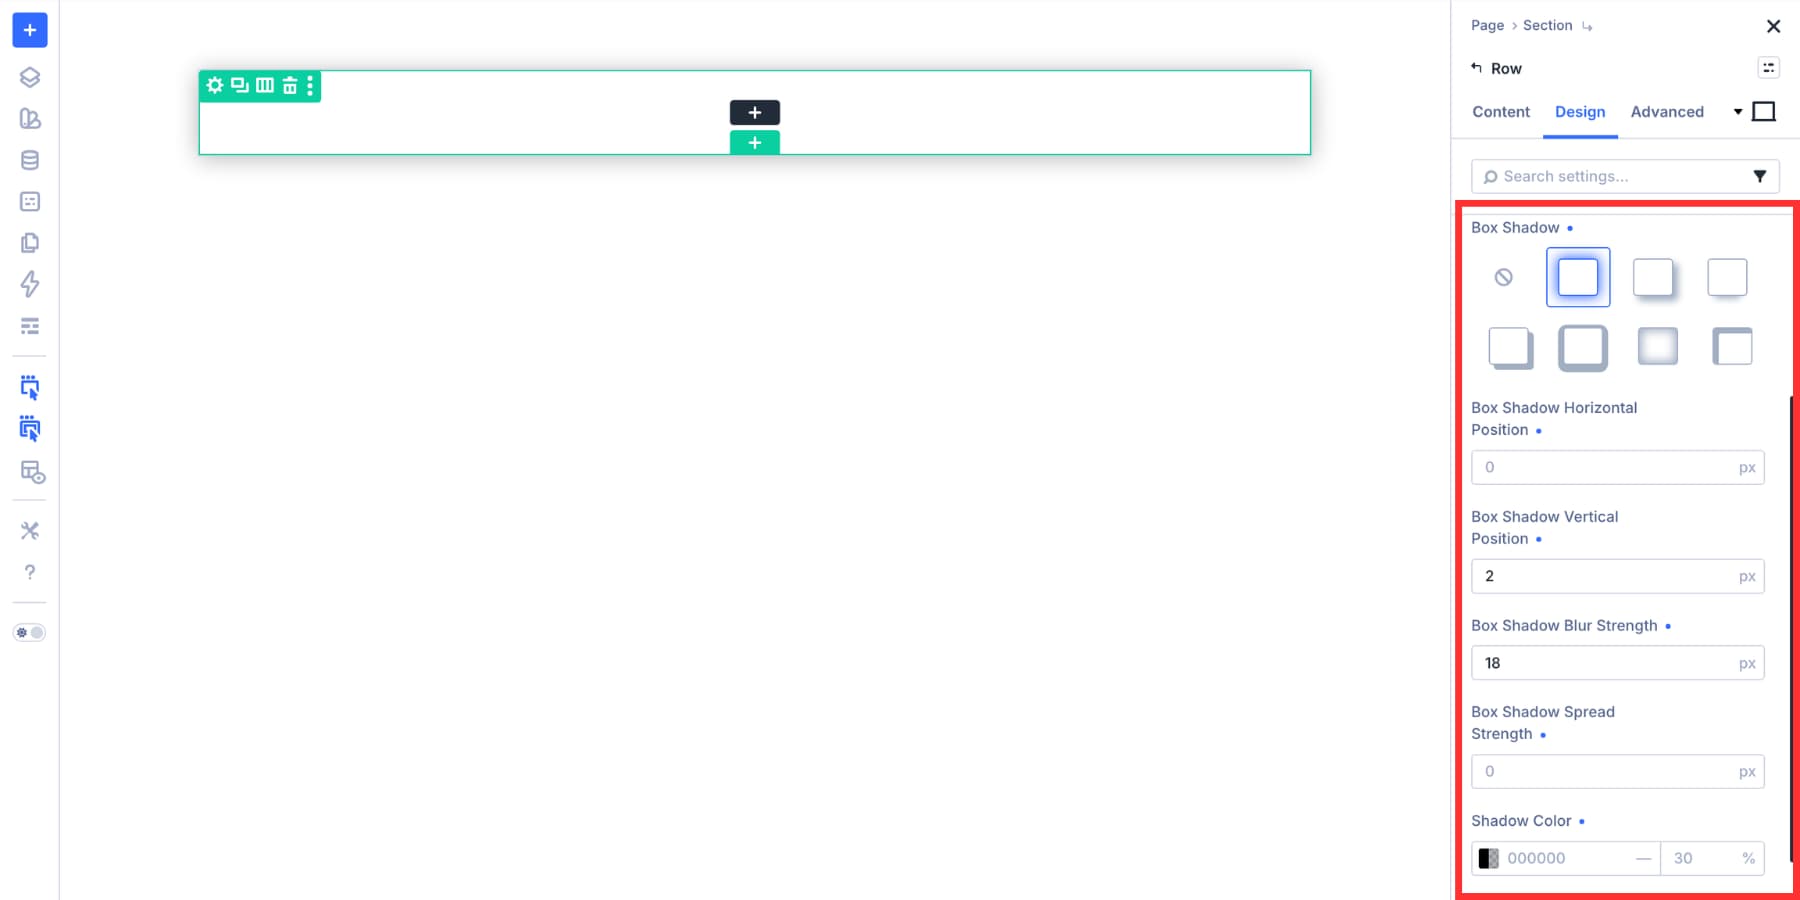
Vertical Position and Blur Strength usually do the most visual work. Smaller values feel tighter and more grounded. Larger values make an element feel more lifted.
Spread Strength can help contain the shadow. A negative spread can pull the shadow back so it does not spill too far past the element.
Use Variables For Shadow Values
For a maintainable shadow system, connect shadow values to Design Variables where it makes sense.
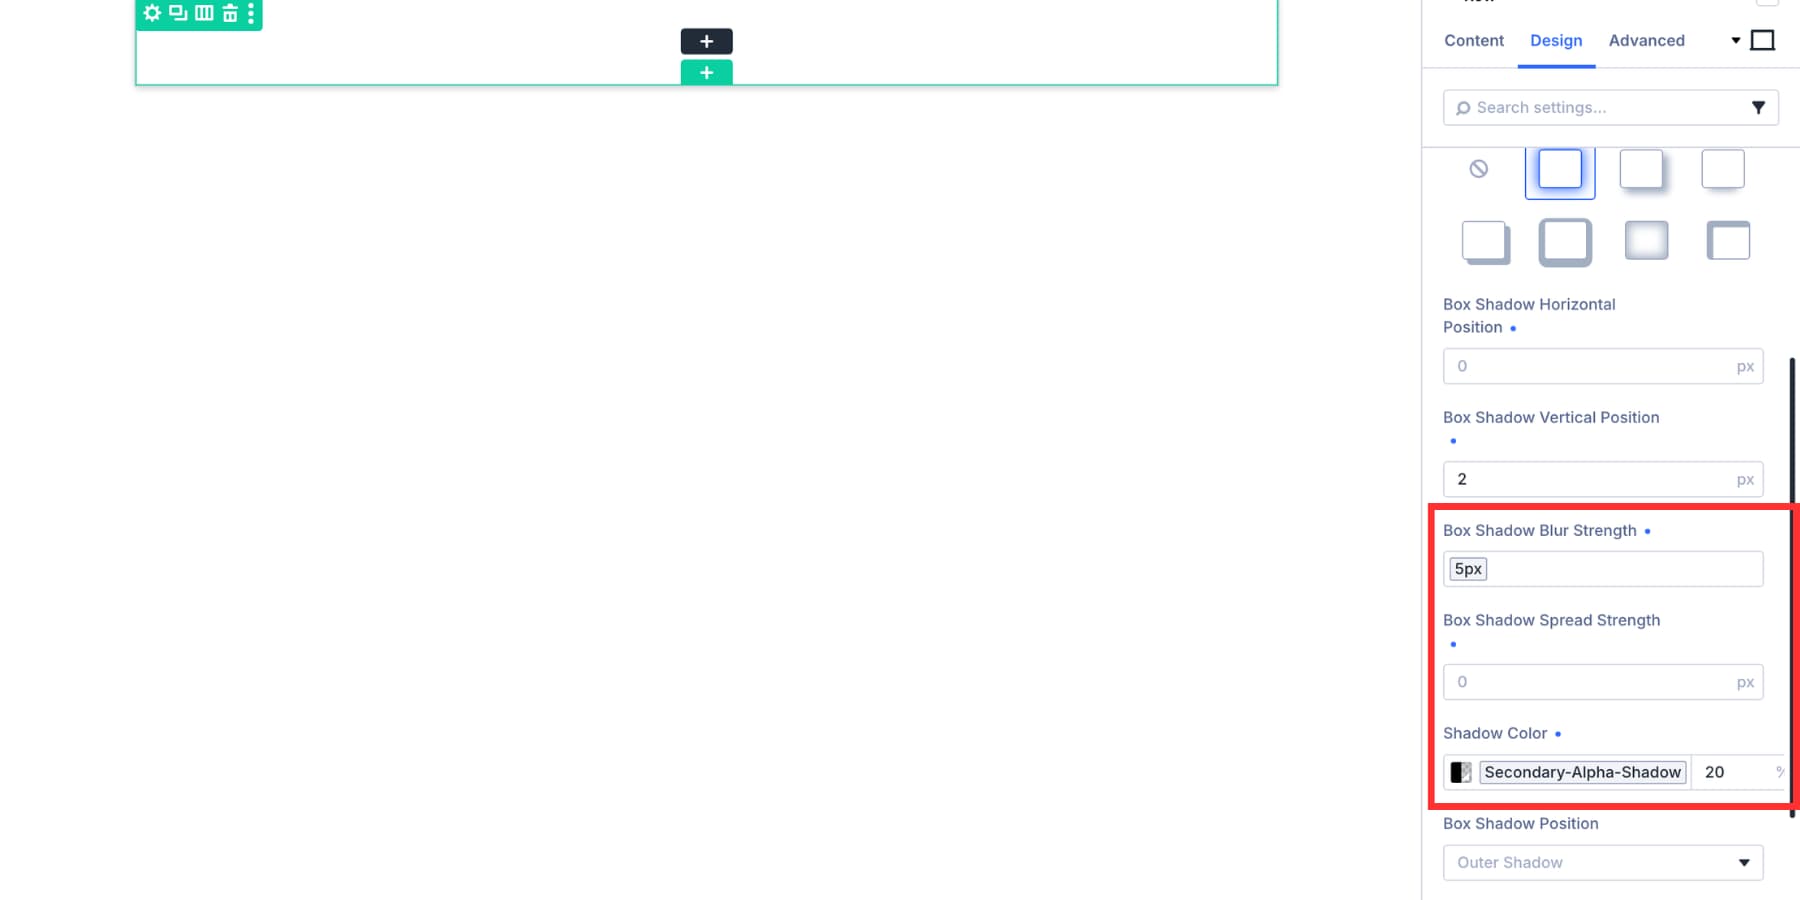
A shadow color variable keeps shadow tone consistent across the site. Opacity matters as much as color here. Most interface shadows work best when they stay subtle.
You can also use Number Variables for values such as blur, spread, or vertical position. This is useful if you want a small shadow scale, such as:
- Shadow: Subtle
- Shadow: Medium
- Shadow: Floating
Inner shadows should be used more selectively. They can work well for inset form fields, pressed states, toggles, and panels that need a recessed effect.
Name Shadow Presets By Weight And Context
Shadow presets are easiest to manage when the name tells you how strong the shadow is.
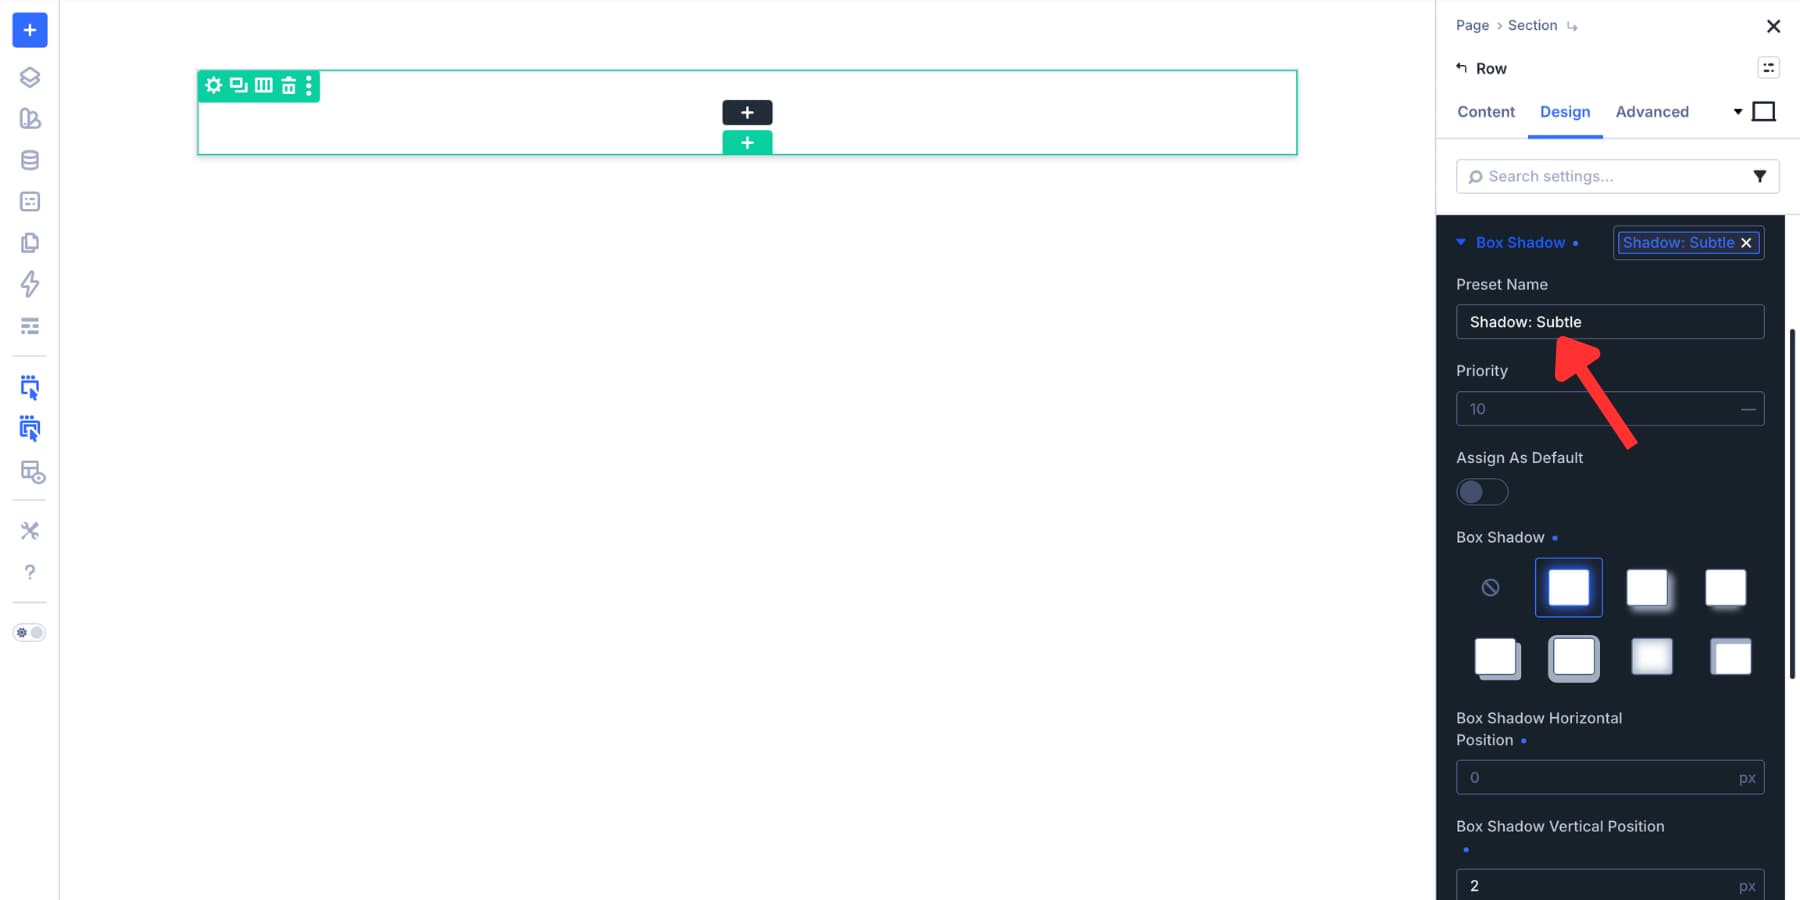
Good examples include:
- Shadow: Subtle
- Shadow: Medium
- Shadow: Floating
- Shadow: Inset
- Shadow: Dark Section
If your site has both light and dark sections, consider separate shadow presets for each context. A shadow that looks soft on a light background may disappear on a dark one, or feel too heavy when the background changes.
Apply Border And Shadow Presets Across Your Site
After your presets are saved, applying them is quick.
Open any element that supports the option group, go to the Design tab, hover over the Border or Box Shadow group header, click the preset icon, and choose the preset from the list.

This can work across different element types because the preset belongs to the option group, not the module. The same Border preset can style a Column, Section, Image, Group, or Blurb when the Border option group is available.
Use Local Overrides When Needed
Presets do not prevent one-off adjustments. If a preset sets a 4px border but one element needs 3px, you can override that specific value on the element.
The rest of the preset can stay connected. For example, the color, radius, and border style can remain controlled by the preset while the one element uses its own width value.
Use overrides intentionally. If the same override starts appearing in multiple places, save it as a new preset instead of repeating it by hand.
Set Defaults For Faster Builds
If a border or shadow style should be the default for new elements, set it as the default preset.
Defaults are useful for repeated patterns such as:
- Standard card borders
- Default image frames
- Form field borders
- Subtle section shadows
- Default container radius
This reduces the number of manual styling decisions you need to make while building new sections.
Use Border And Shadow Presets Together
Border and shadow presets work especially well together because they control separate parts of a visual style.
For example:
- Border: Card controls the outline and radius.
- Shadow: Subtle controls depth.
- Background: Surface controls the card background.
- Spacing: Card Padding controls internal spacing.
Keeping those decisions separate gives you flexibility. You can use the same border with different shadows, or the same shadow with different border treatments.
Use Nested Presets For Larger Patterns
Nested Presets let smaller Option Group Presets sit inside larger presets or Element Presets.
For example, you might create:
- Border: Radius Standard
- Border: Card Outline
- Shadow: Subtle
- Element Preset: Card
The Element Preset can include the smaller Option Group Presets. When you apply the Card Element Preset, the border and shadow decisions come with it while still staying editable from their own preset sources.
This gives you a layered system:
- Variables hold reusable values.
- Option Group Presets apply those values to one group of settings.
- Nested Presets combine smaller preset decisions.
- Element Presets apply full design patterns to modules.
Each layer stays easier to update because it has a clear job.
Clean Up Existing Border And Shadow Styles
If a page was built before your preset library existed, it may still contain static values: one-off border colors, inconsistent radius values, or shadow settings that do not match your system.
Divi 5 gives you several tools to clean that up.
Use Inspector To Audit Existing Styles
Use the Inspector when you need to understand what is already on the page.
Right-click a section and choose Inspect. You can review applied styles in one place instead of opening every module individually.
This is useful when a row of cards looks slightly inconsistent but you do not yet know which border, radius, or shadow values are different.
Use Find And Replace For Known Values
Use Find And Replace when you already know the exact value you want to replace.
For example, you can replace a static border color with a Color Variable, change a repeated 1px border width to 2px, or update a shadow color that no longer matches your system.
Use Only Replace Identical Fields carefully. It can help prevent a number intended for border radius from being replaced in unrelated fields that happen to use the same value.
Use Extend Attributes To Copy A Correct Style
Use Extend Attributes when one element already looks right and you want matching elements to use the same styling.
Right-click the styled element, choose Extend Attributes, then extend the Border option group, Box Shadow option group, or both. Choose the scope and target element types, then apply the change.
This is less about finding a value and more about saying: make the rest match this element.
Update Presets Globally In The Preset Manager
When you need to change a preset, you do not need to find an element using it first.
Open the Preset Manager, go to the Group tab, find the Border or Box Shadow preset, and edit it. The Preset Preview system lets you adjust the preset in a safe preview area before saving.
After you save, the change applies to elements using that preset.
The Preset Manager is also useful for organizing your library. You can duplicate a preset to create a variation, set a preset as the default, remove presets that no longer fit, and move your most-used presets where they are easier to find.
Best Practices For Border And Shadow Presets
A preset library works best when it stays small, named clearly, and connected to reusable values.
- Name by role: Use names such as Border: Card or Shadow: Subtle instead of names tied to one module.
- Use variables where possible: Connect colors, radius, width, and shadow values to Design Variables when those values should stay global.
- Separate border and shadow decisions: Keep Border and Box Shadow presets independent unless you intentionally combine them through nesting or an Element Preset.
- Create variations intentionally: A small library of Subtle, Medium, and Strong is easier to manage than ten nearly identical shadows.
- Use defaults for repeated patterns: Set default presets for common card, image, or field treatments.
- Audit older pages: Use Inspector, Find And Replace, and Extend Attributes to bring older static values into your preset system.
- Review on light and dark backgrounds: Borders and shadows can feel very different depending on the section background.
Build A Reusable Border And Shadow System In Divi 5
Borders and shadows are small details, but they appear everywhere. When they are managed module by module, they become hard to maintain. When they are saved as Option Group Presets in Divi 5, they become part of your design system.
Create a focused preset library, connect repeated values to Design Variables, combine presets when needed, and update them from the Preset Manager when the design changes.
That way, your cards, images, sections, forms, and callouts stay consistent without restyling the same settings again and again.
The post How To Create Reusable Border And Shadow Presets In Divi 5 appeared first on Elegant Themes Blog.