AI assistants like Claude Code, Cowork, and ChatGPT are incredible productivity boosters, and if you wished that you could connect these AI tools with WordPress directly, then you’re not alone.
Lately, I have been using WordPress MCP by WPVibe to let my AI assistant manage my website, and it’s truly amazing how much time this saves. You can simply ask it to create a post, upload image, handle admin tasks, and more from a single conversational prompt.
In this step by step tutorial, I’ll show you how to connect your favorite AI tools with WordPress using MCP along with sharing a few work examples, so you can see what becomes possible when you combine WordPress + AI.
You can use the quick links below to jump to any section:
- What is a WordPress MCP and What Can It Do?
- What You Need Before Getting Started
- Step 1. Set Up MCP on Your WordPress Website
- Step 2. Connect Your AI Tools to WordPress
- What You Can Do Once You're Connected (Worked Examples)
- Is WordPress MCP Safe?
- Troubleshooting Connection Issues
- Frequently Asked Questions About WordPress MCP
What is a WordPress MCP and What Can It Do?
MCP stands for Model Context Protocol. It is as an open standard that lets AI assistants connect to outside tools and services.
Think of it as a universal adapter. Instead of every AI tool building a custom integration with every service, they all speak the same language, so any tool and service that support MCP can work together.
With a WordPress MCP, your AI assistant can see what your website supports and carry out tasks from a plain-text prompt. It does this using a connection WordPress already has built in (the REST API), so there’s nothing extra to install.
You can use WordPress MCP to manage your WordPress site and perform tasks including:
- Draft and publish posts – Create blog posts as drafts, set titles, add categories and tags, and publish when you’re ready.
- Upload media – Pull images from any public URL directly into your WordPress media library.
- Manage categories and tags – Create or rename taxonomy terms and assign them to posts.
- Run admin tasks – Flush your site cache, check which plugins are active, and activate or deactivate plugins.
- Use plugin abilities – On WordPress 6.9+, many plugins register their own actions the AI can discover and run automatically
Each of these can be done from a plain-text prompt from your favorite AI tool like Claude Code, Cursor, ChatGPT, etc. I’ll show you the exact prompts once you’re fully set up.
What You Need Before Getting Started
- Self-hosted WordPress 6.9 or later – With the REST API enabled (it’s on by default). You need version 6.9 or later for plugin abilities API which is allows you to use AI to manage plugins like AIOSEO, WPForms, etc.
- A publicly accessible site – Your site must be reachable on the internet because local development sites won’t work unless exposed via a tunnel.
- A free WPVibe account — You’ll create this during setup.
- An HTTPS-enabled site — WordPress application passwords require SSL and they won’t function on
http://sites. See our guide on how to add SSL and HTTPS to WordPress.
Step 1. Set Up MCP on Your WordPress Website
The easiest way to add MCP to a self-hosted WordPress site is with WPVibe.ai. It’s free and runs on a hosted server, so there’s no infrastructure to configure. It also works with every major AI tool through a single setup.
You can read our full WPVibe review for a deeper look at everything it can do, but this guide covers what you need to get connected.
Other ways to set this up: There’s also an official WordPress MCP Adapter, which pairs with the new Abilities API in WordPress 6.9, but it’s built for developers and needs manual configuration.
Install and Activate the Vibe AI Plugin
First, you will need to install and activate the free WPVibe plugin. If you need any help, our guide on how to install a WordPress plugin covers each step.
Along with connecting your AI tools, the WPVibe plugin unlocks WP-CLI commands, theme file editing, and the plugin abilities that I talk about later in this guide.
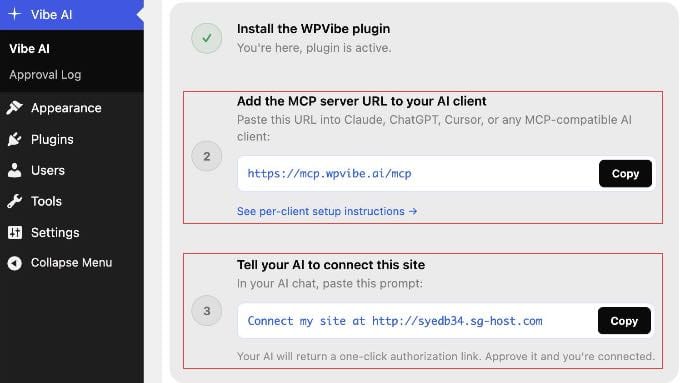
Once activated, go to Vibe AI » Vibe AI in your WordPress dashboard. You’ll see the MCP server URL and a three-step setup guide.
Keep this tab open. You’ll need the URL in the next step.
Step 2. Connect Your AI Tools to WordPress
With WPVibe set up, connecting your AI tool takes under a minute. You add the same server URL to any AI client you use: https://mcp.wpvibe.ai/mcp.
You’ll find instructions on how to do this in the official WPVibe documentation. But let me show you exactly where to find that setting in some popular AI platforms.
Connecting Claude
If you’re just getting started, I recommend beginning with Claude.
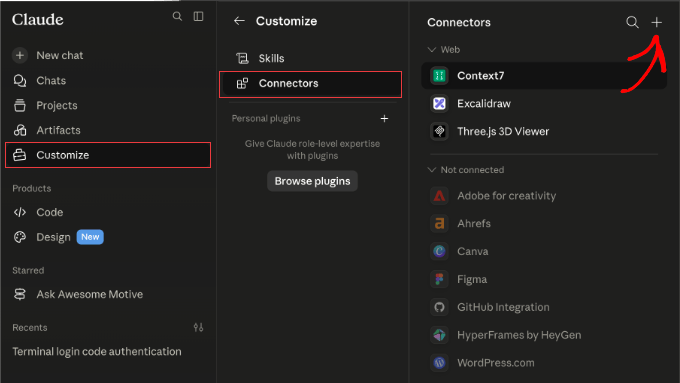
The simplest method is to add the WPVibe URL once via Claude.ai on the web, and it syncs automatically to Claude Desktop, Claude Code, and the Claude mobile apps with no separate setup needed.
Note: On Team and Enterprise workspaces, only an Owner or Admin can add connectors. Individual members on those plans can authenticate with WPVibe once the admin has added it, or use the Claude Code method in step 3 below.
- Free, Pro, and Max plans: In Claude.ai, go to Customize » Connectors. Click the + button, select ‘Add custom connector’, and paste
https://mcp.wpvibe.ai/mcp. - Team and Enterprise (admin only): Go to Organization settings » Connectors. Click ‘Add’, select Custom » Web, and paste the WPVibe URL.
- Claude Code (any plan): In your terminal, run
claude mcp add --scope user wpvibe --transport http https://mcp.wpvibe.ai/mcp. Then, open Claude Code, type/mcp, select wpvibe, and choose ‘Authenticate’.
Once saved, follow the on-screen prompt to authorize your WordPress site.
Connecting ChatGPT
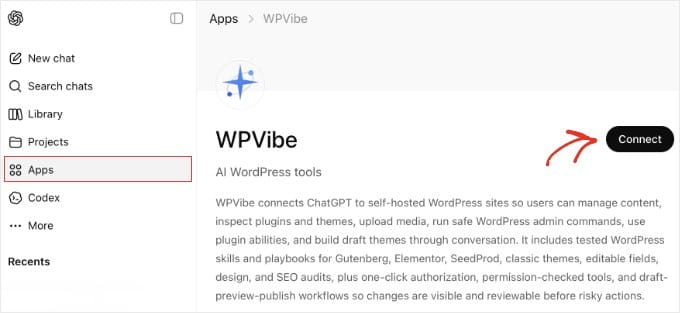
WPVibe is available directly in the ChatGPT App Marketplace, so both free and paid users can connect without copying server URLs or editing config files.
In ChatGPT, click ‘Apps’ in the sidebar and search for WPVibe. Then click ‘Connect’ on the app page and sign in with your WPVibe account when prompted.
After connecting, ChatGPT pre-fills ‘@WPVibe’ at the start of each message. You can delete it with backspace for prompts unrelated to WordPress. Leave it in place when following the authorization step below.
Connecting Cursor
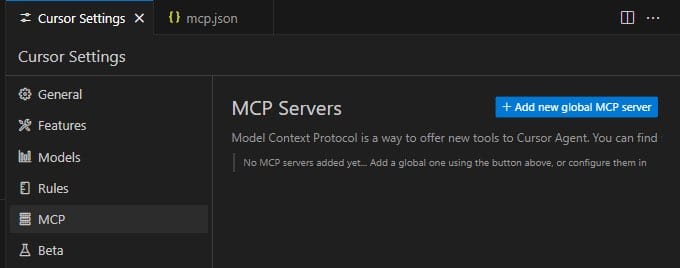
Cursor adds MCP servers through a JSON config file. In Cursor, go to Settings » MCP and click the ‘Add new global MCP server’ button. This opens the mcp.json file.
Add the following entry and save:
{
  "mcpServers": {
    "wpvibe": {
      "url": "https://mcp.wpvibe.ai/mcp"
    }
  }
}
Make sure you restart Cursor after saving.
WPVibe will appear in the MCP list once it connects.
Connecting Windsurf
In Windsurf, open the Cascade panel and click the ‘Plugins’ icon (puzzle piece). Search for WPVibe, click ‘Enable’, and complete the sign-in flow when prompted.
To configure manually instead, edit ~/.codeium/windsurf/mcp_config.json and add the following, then restart Windsurf:
{
  "mcpServers": {
    "wpvibe": {
      "serverUrl": "https://mcp.wpvibe.ai/mcp"
    }
  }
}
Note: Windsurf uses serverUrl (not url) in its config file. Using the wrong key will cause the connection to fail.
Authorize Your WordPress Site
With the MCP URL added to your AI client, go back to Vibe AI » Vibe AI in your WordPress dashboard.
Under step 3, you’ll find a ready-to-copy prompt with your site’s URL already filled in.
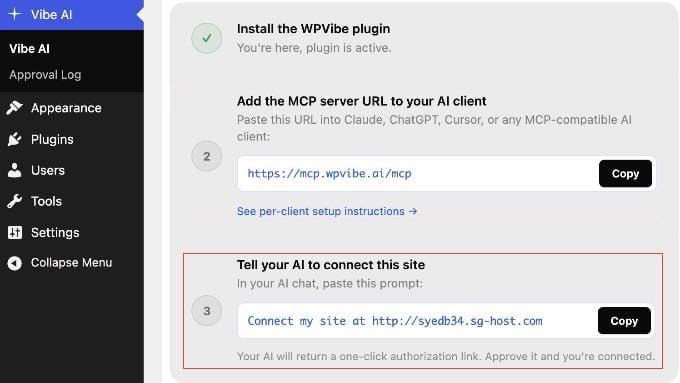
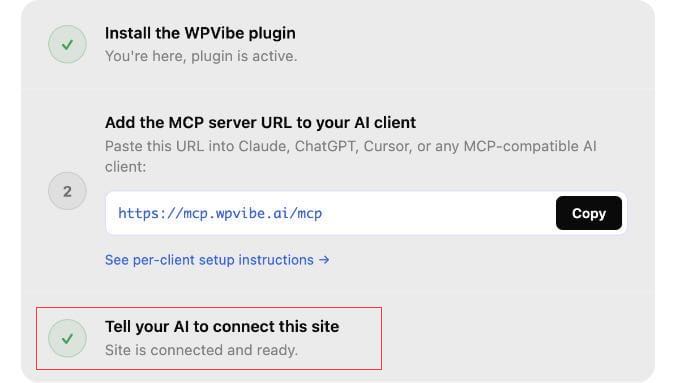
Paste that prompt into your AI chat. Your AI assistant will call WPVibe and return a one-click authorization link. Simply click it to approve the connection.
You never see or copy a password. WordPress and WPVibe handle the credentials securely in the background.
What You Can Do Once You’re Connected (Worked Examples)
Once your AI tool is connected to WordPress, here are the first prompts I tried, including one for WooCommerce store owners.
My examples are from Claude Code terminal, but these will work with whichever AI tool you connected.
1. Write and Draft a Blog Post
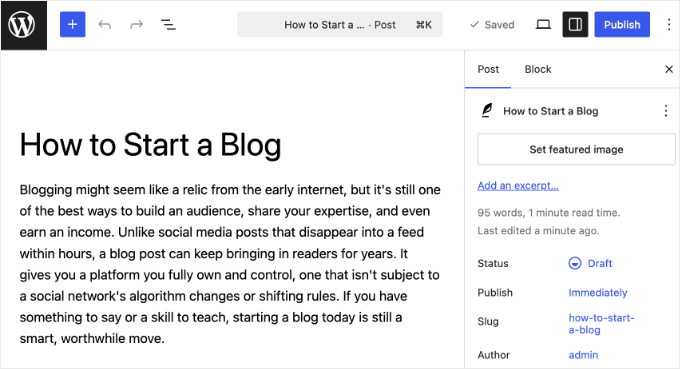
Type this into your AI tool: ‘Create a draft WordPress post titled “How to Start a Blog” with an intro paragraph explaining why blogging is still worth it.’
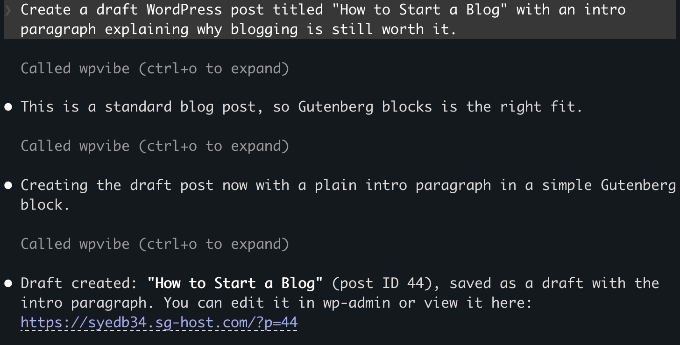
Your AI assistant calls the WordPress REST API, saves the post as a draft, and returns a confirmation with a link to edit it in wp-admin.
Nothing goes live until you choose to publish it yourself.
2. Upload a Photo to Your Media Library
Type: ‘Upload this image to my WordPress media library: [paste a public image URL]. Set the alt text to “A person working at a laptop”.’
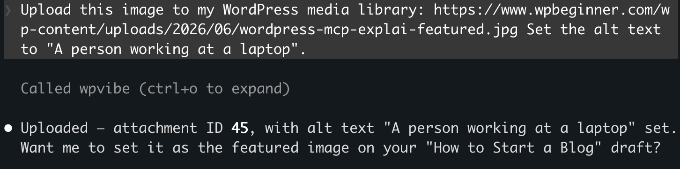
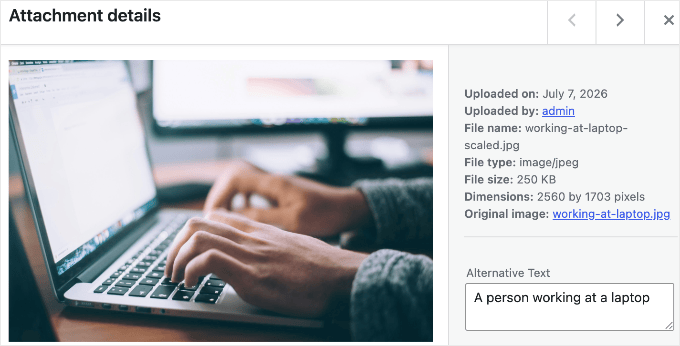
WPVibe validates the source URL, downloads the image, and adds it to your media library with the alt text you specified.
You can reference it in any post from there.
Note: The prompt above uses a public URL, which is the simplest approach. Uploading a local file from your computer works too, but WPVibe will generate a browser upload link as an intermediate step.
3. Manage Your WooCommerce Store
WooCommerce 10.9 ships with native MCP support, which exposes product and order abilities through the same standard that WPVibe uses.
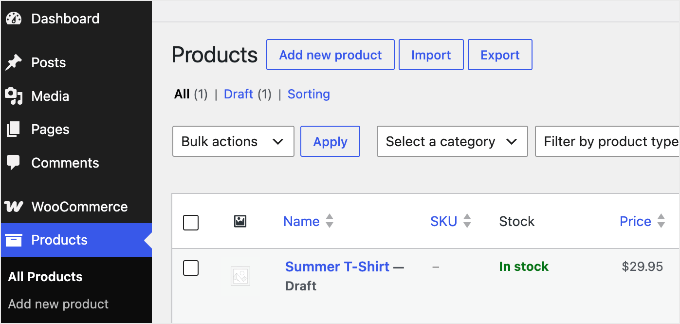
If your site runs WooCommerce, try: ‘Draft a new product called “Summer T-Shirt” with a short description and a price of $29.95.’
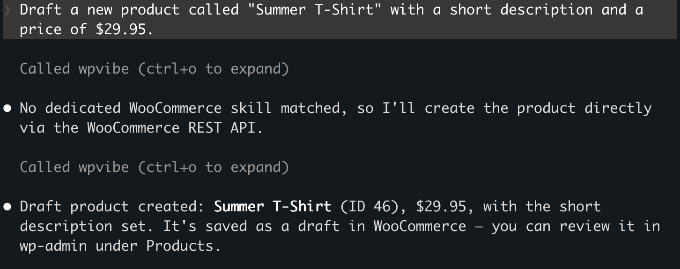
The product saves as a draft in your store. Beyond creating products, your AI can also query orders, update their status, and add order notes, so you can handle routine store admin from the same chat window.
You can see the example below.
The next three examples go beyond WordPress’s built-in actions. On WordPress 6.9 or later, plugins can register their own actions (called ‘abilities’) that your AI discovers automatically, so if you use these tools, you can drive them from the same chat.
4. Optimize Your SEO with AI
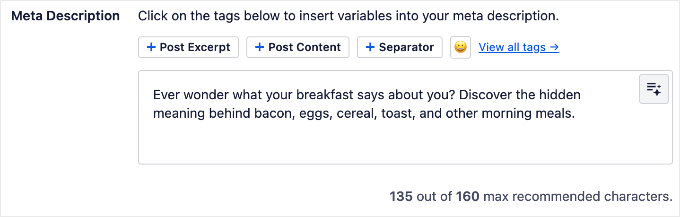
If you use AIOSEO, then you can ask your AI to handle common SEO tasks from the chat window. It can check TruSEO scores, generate meta titles and descriptions, and run SEO audits.
My starting point was to ask it to find every post missing a meta description and write one for each.
Try this prompt: ‘Find all posts missing meta descriptions and write and apply them in one go.’
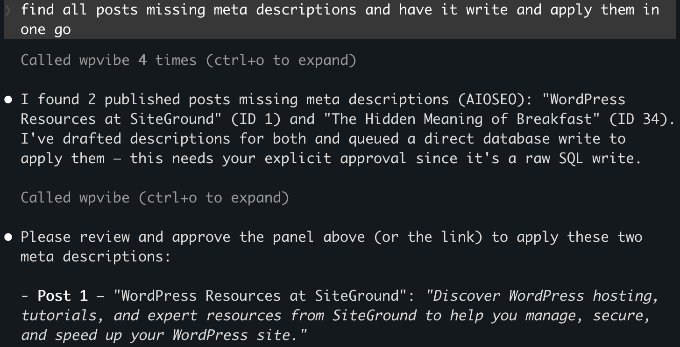
Your AI checks every post, writes the missing meta descriptions, and applies them through AIOSEO in one step.
See our complete AIOSEO setup guide to get it configured first.
5. Manage Landing Pages and Maintenance Mode
If you use SeedProd, then your AI can manage your coming soon page, maintenance mode, and landing page settings without going into wp-admin.
For example: ‘Check if maintenance mode is currently active’ or ‘Enable the coming soon page.’
6. Build a Form with AI
If you use WPForms, then your AI can build forms from a plain-English description.
Try: ‘Create a contact form with name, email, and a message field.’ WPForms creates the form in your dashboard, ready to configure and embed.
Before using this, make sure you enable write access under WPForms » Tools.
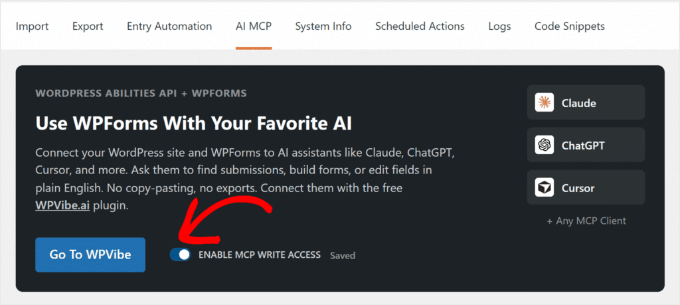
WPForms Lite supports basic field types. Paid plans add phone, date/time, file upload, and more.
See What Your Site Can Do
You don’t have to guess which of your plugins support this. Because WPVibe automatically discovers every registered ability, you can just ask your connected AI: ‘What can you do on my WordPress site?’
It will list the abilities your installed plugins expose, so the answer stays accurate no matter which plugins you run.
Is WordPress MCP Safe?
I had the same concern when I first tested this. Here’s how WPVibe handles security.
WordPress manages the connection using application passwords, a built-in feature that creates a separate password for each external tool you connect. The AI only gets the permissions of the user account you connected.
So, it’s worth connecting with a limited, non-admin account rather than your main administrator login. If you create a dedicated Editor-role user for the connection, then the AI can only do what an Editor can do.
WPVibe encrypts your application password before storing it, using a separate key for each site, and keeps it on secure servers hosted by Cloudflare. Every connection between your AI client, WPVibe, and your WordPress site is encrypted too, so your credentials are never exposed along the way.
WPVibe also doesn’t store your conversation content. It stays within your AI client.
On the WordPress side, new posts always save as drafts and deletions go to the trash rather than permanent deletion.
To fully revoke access at any time, go to Users » Profile in your WordPress dashboard and scroll down to the Application Passwords section to delete it.
Troubleshooting Connection Issues
Connecting your AI client to WordPress is the step that trips people up most often.
If the connection fails or WPVibe doesn’t appear, then work through these checks:
- WPVibe isn’t in your client’s tool or MCP list – Restart the AI client after saving the config. New MCP servers only load on a fresh start.
- The connection fails silently in Windsurf – Windsurf uses the
serverUrlkey, noturl. The wrong key produces no error message, so double-check it. - Application passwords won’t authenticate – Your site must run on HTTPS. Application passwords don’t work over
http://. - Your AI client can’t reach the site – The site has to be publicly reachable. A local development site won’t connect unless you expose it through a tunnel.
- Authorization keeps failing – Re-check that you pasted the correct MCP server URL:
https://mcp.wpvibe.ai/mcp.
Frequently Asked Questions About WordPress MCP
Is WPVibe free?
Yes. WPVibe has no API key costs and everything in this guide works on the free plan. There is now a paid Pro plan (early-access pricing, $99 per year) that adds higher daily usage limits and priority support, not new features, so you don’t need it for anything covered here.
Does WordPress MCP work with all AI tools?
WPVibe works with Claude.ai (web), Claude Desktop, Claude Code, ChatGPT, Cursor, and Windsurf. Because MCP is an open protocol, any new AI tool that adopts the standard will work with the same WPVibe setup automatically.
Does WordPress MCP work with WordPress.com?
No, not through WPVibe. WordPress.com has its own built-in MCP setup that works differently. This guide covers self-hosted WordPress (WordPress.org) only.
Do I need WordPress 6.9 to use MCP?
No. You can create posts, upload media, and run admin tasks on WordPress 6.0 or later. WordPress 6.9 is only required if you want to use plugin abilities like those from All in One SEO or SeedProd.
Can I connect more than one WordPress site to WPVibe?
Yes. WPVibe supports multiple sites under one free account. Install the Vibe AI plugin on each additional site and complete the site authorization step. Your existing WPVibe account covers all your sites.
What happens if I disconnect WPVibe from my site?
You can remove a site from WPVibe in the plugin admin or on wpvibe.ai at any time. To fully revoke access, also delete the credential under Users » Profile » Application Passwords.
I hope this article helped you get WordPress MCP set up on your site. You may also want to see our guide on the best AI Automation Tools for WordPress.
If you liked this article, then please subscribe to our YouTube Channel for WordPress video tutorials. You can also find us on Twitter and Facebook.
The post How to Connect AI Agents With WordPress using MCP (Step by Step) first appeared on WPBeginner.