Building a website often means repeating the same instructions across different pages. We ask for sections that match existing styles, revisions that preserve approved content, and layout checks before a client review. With Divi AI Agent Commands, we can save those instructions and reuse them whenever the same job comes up.
Below, we’ll share ten Commands for common website tasks, explain when each one is useful, and show which details to supply for your own pages.
What Are Divi AI Agent Commands?
Divi AI agents work inside the Divi 5 Visual Builder and let us build and edit pages using plain-language instructions. We can ask an agent to add a section, adjust module settings, or review a layout, including details about what to change and what to preserve.
We can save these requests as Commands, then type a slash (/) in the agent chat to select one from our library. Selecting a Command attaches it to the next request. Add an accompanying message and any relevant Context before sending it. The agent receives the saved instructions together with these page-specific details.
To save one, open the Commands list in the agent chat, click Add New Command, enter the title and instructions, then click Save Command. Type a slash (/) in chat to select it, add the details for the current page, and send the request.
For setup instructions and examples, see our guide on how to use Divi AI Agents Commands.
10 Divi AI Agent Commands To Save And Reuse
For each Command below, use the accompanying message to identify where the agent should work, describe the result you want, and specify anything it should preserve. Attach relevant Context, such as an existing section or preset, to give it a clear reference. Specific requirements help the agent make choices that suit the page, so include the required content, placement, and responsive behavior. Test each Command and review the result before saving it for future use.
Use Build Mode for Commands 1, 2, and 4–7, which create or update elements and design resources. Use Ask Mode for Commands 3 and 8–10, which report findings without making changes. For Command 6, review the proposed variable conversions before confirming them. When reusing a Command on another page, check that its Context still identifies the intended elements and design resources.
1. Build With Your Existing Styles
When adding a section, row, or module to an existing page, we can point the agent to a design we’ve already approved. This Command asks it to follow that reference and reuse the presets and variables that support it.
Save the following as Build With Existing Styles.
For our example, we used a real estate page and attached its Expertise You Can Trust section as Context. We asked for a new How It Works section directly above Meet Our Experienced Team, with three numbered steps explaining the process of finding a home.
Our accompanying message supplied the heading and step titles, asked the agent to write short descriptions, and specified three columns on desktop that stack vertically on phone.
The agent added the section using the supplied design reference. Before keeping the result, check which presets and variables it reused, since those connections allow the new elements to follow future updates to our shared styles.
2. Create A Design Variation Without Replacing The Original
We may want to try a different design treatment while keeping the current version available for comparison. This Command creates a separate variation, so we can review both versions or show a client another option.
Save the following as Create A Design Variation.
For our example, we attached the Jenny Smith hero section as Context and asked for a duplicate directly below it with lighter, softer colors suited to the fashion portfolio. We let the agent choose the background, text, and button colors while keeping the content, images, typography, layout, and spacing unchanged.
The agent placed the variation below the original, letting us compare the color choices against the same content and layout. If the original uses anchor links or element IDs, check those on the duplicate before keeping both versions on the page. Each element ID should remain unique.
3. Compare Your Page With An Approved Design
When reviewing a page against an approved design, we can ask the agent to identify differences and suggest corrections before making any changes. We can also focus the comparison on individual elements that need a closer look.
Save the following as Compare With A Design Reference.
We tested this by comparing the lighter Jenny Smith hero from our previous example with a screenshot of the original. Our accompanying message identified the lighter variation as the section to review and the original as the approved reference.
During the test, the agent asked us to upload and confirm the reference image before continuing. It then identified the color differences without applying changes, demonstrating the color comparison in this example.
Review the findings against the reference before requesting corrections, particularly when the comparison covers more details than we tested here.
4. Apply Consistent Styles Across Elements
Elements that serve the same purpose can develop different styles as we revise a page. We can use an approved element or preset as a reference to bring their styling back into alignment, specifying which settings should match.
Save the following as Match Styles To A Reference.
We tested this on the three Contact Agent buttons in the real estate page’s Divi Exclusives section. After giving the buttons different styles, we attached the first button as Context and asked the agent to make the other two match it.
The agent matched the other two buttons to the reference. For this example, we should also check their hover appearance and confirm that each button still points to its intended destination.
5. Align Typography And Spacing With Your Design Standards
When aligning typography and spacing across a section, we need to match equivalent elements while keeping their hierarchy intact. Card headings should follow the same treatment, for example, without taking on the styling of the larger section heading.
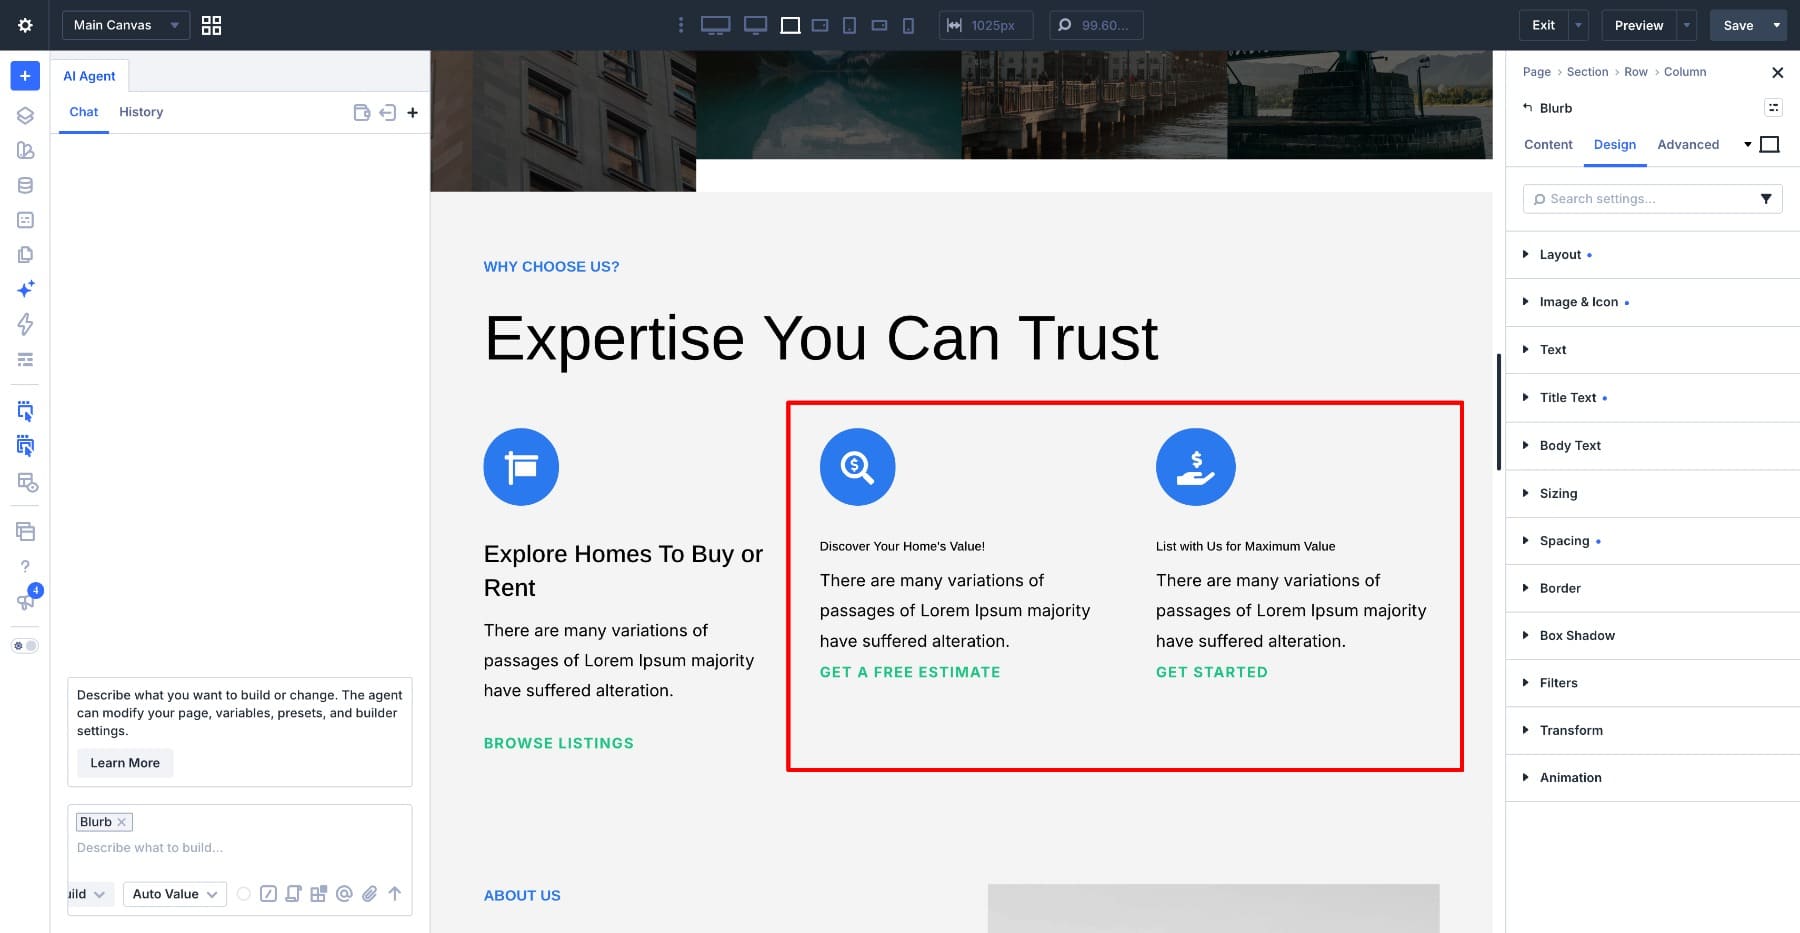
Save the following as Align Typography And Spacing.
For example, we can attach the first service item’s containing column or group in the real estate page’s Expertise You Can Trust section as Context. In our accompanying message, we ask the agent to match the other two items’ heading and body typography, along with the spacing between their icons, headings, descriptions, and links. We leave the larger section heading outside the requested changes.
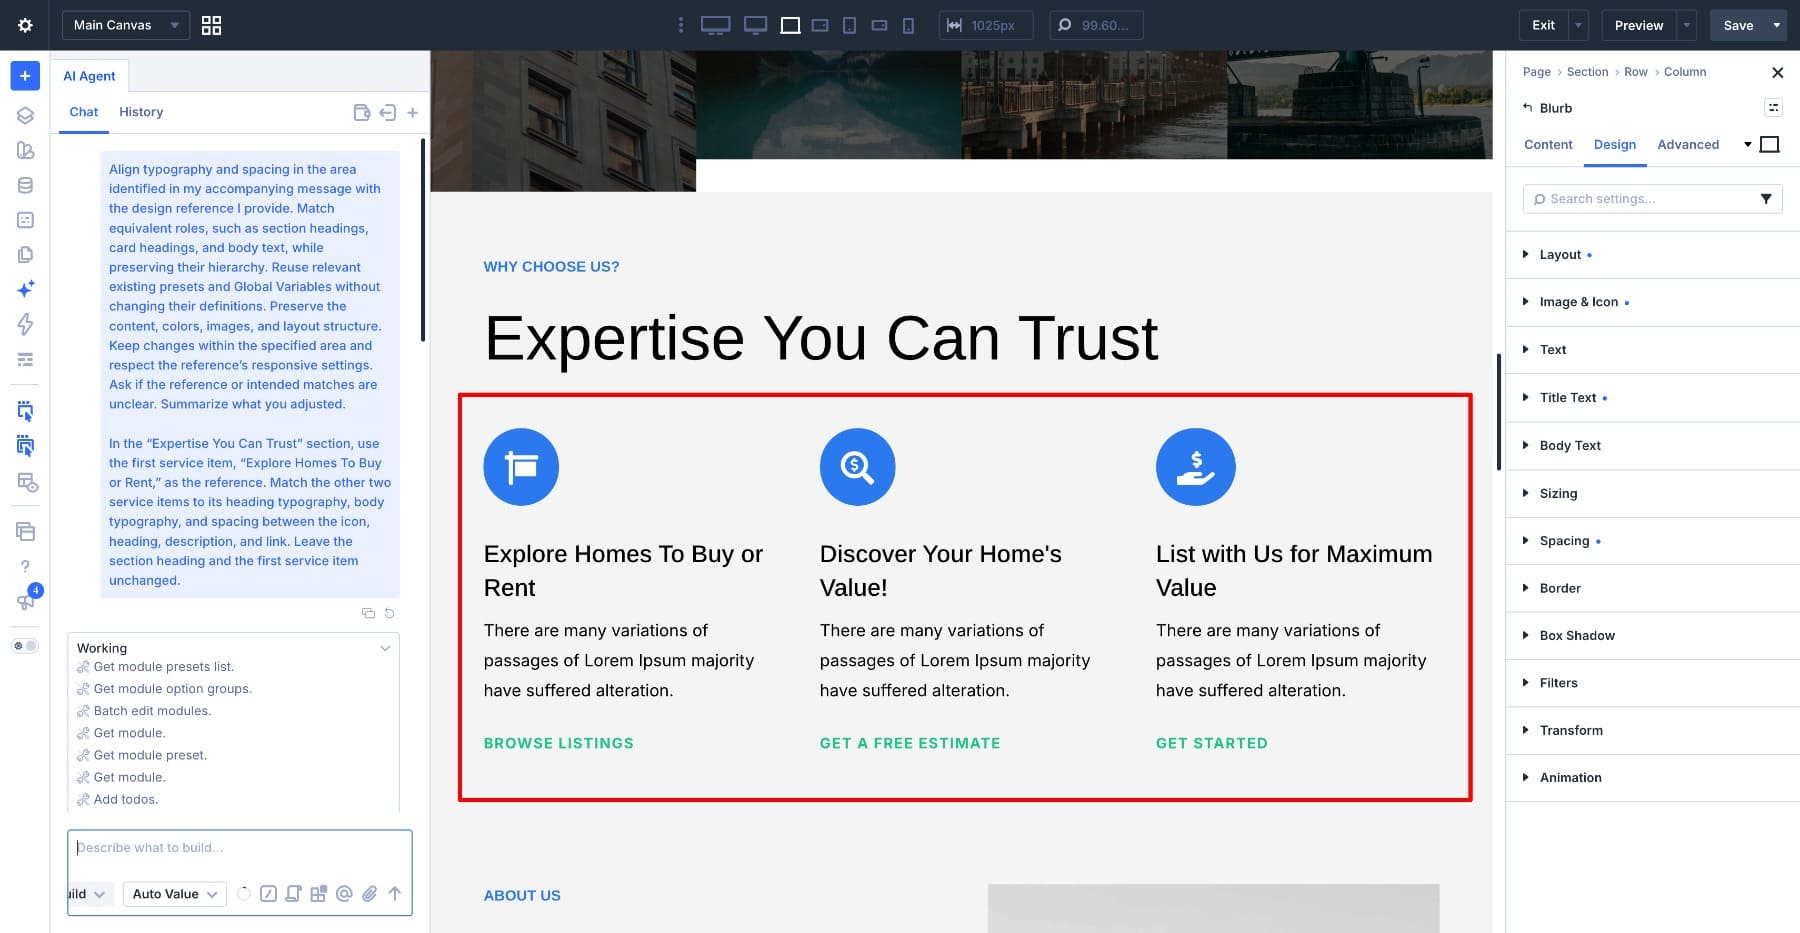
Check the result at the relevant screen sizes, keeping in mind that different-length headings may wrap onto different numbers of lines even when their styling matches.
6. Replace Hardcoded Design Values With Variables
A page can look consistent while using separately entered values for the same colors and spacing. We can connect suitable settings to Global Variables so future changes carry through to every setting using them.
Save the following as Convert Design Values To Variables.
For the real estate page, we can attach the Expertise You Can Trust section as Context and ask the agent to identify hardcoded colors and repeated spacing values for conversion.
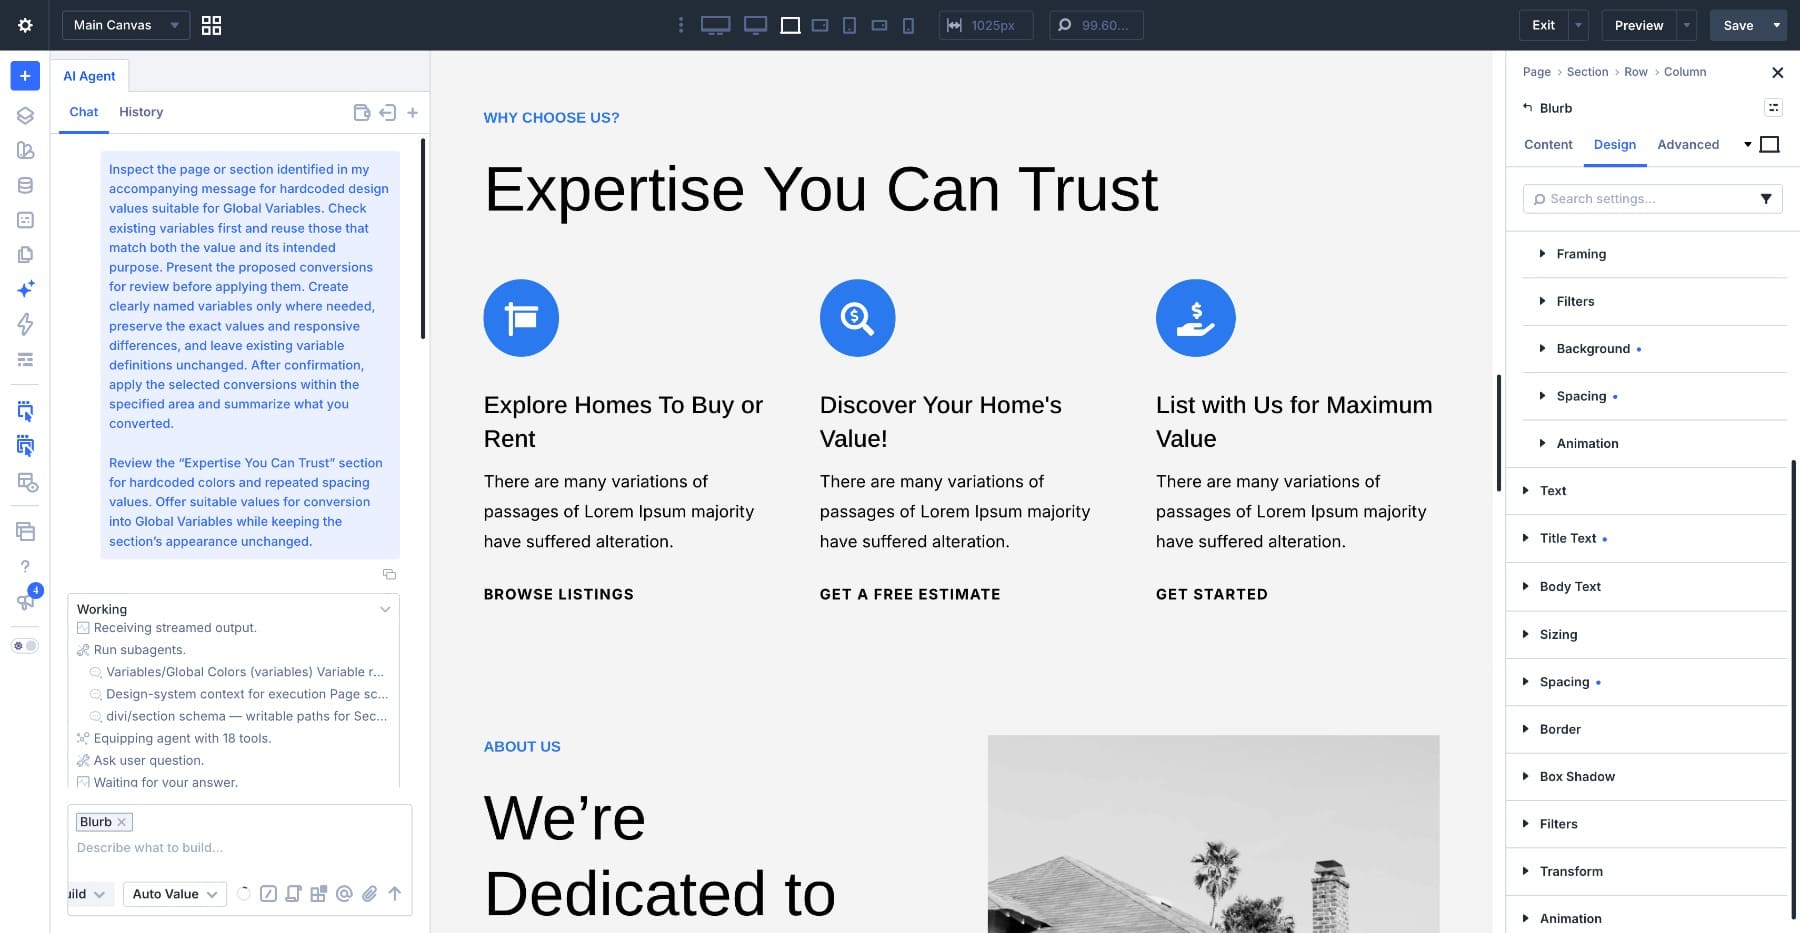
Review the proposed mappings before confirming, since settings with the same value may need to change independently later. A card’s internal padding and the gap between sections, for example, may serve different purposes and need separate variables. After confirming the plan, review any approval card for saving Global Variables and click Approve to continue with the changes you have checked.
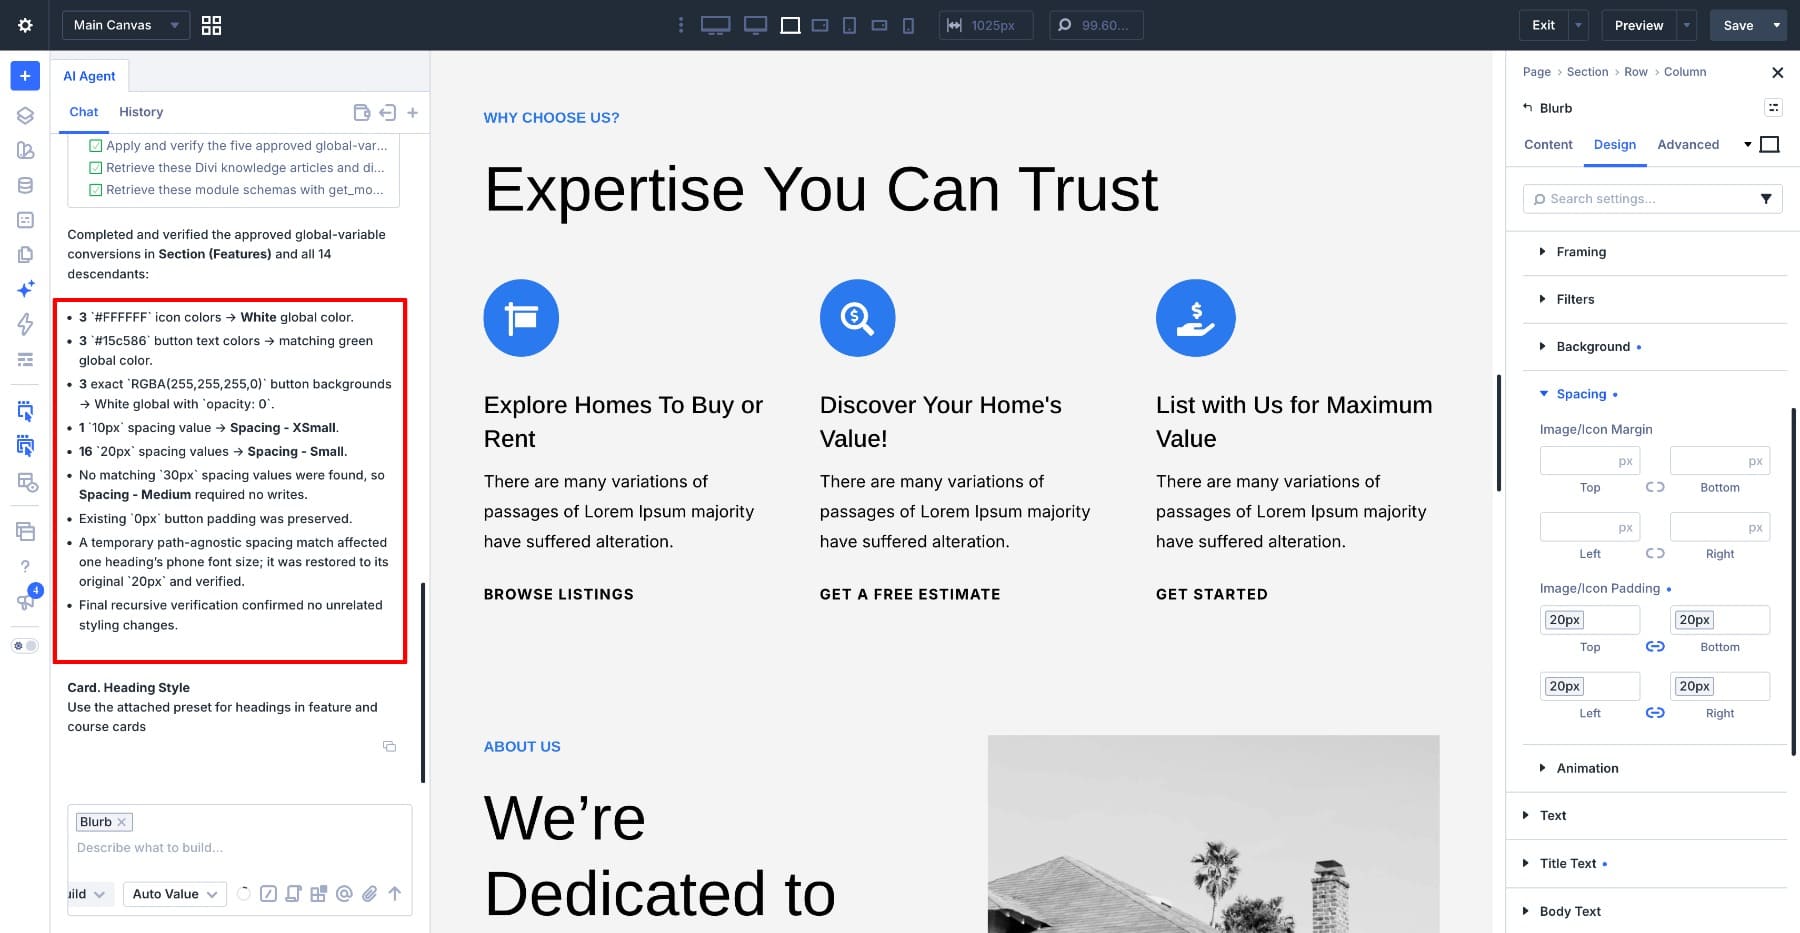
Open a converted field to confirm that it references the intended variable, then check the section at its responsive sizes to make sure its appearance has stayed the same.
7. Save Repeated Styling As A Preset
Once we’ve refined the styling of an element, we can save the settings together as a preset to use elsewhere. Our accompanying message can specify a single option group, such as heading typography, or the element’s broader design treatment.
Save the following as Save Styling As A Preset.
For example, we could attach a service heading from the real estate page as Context and ask the agent to save its heading typography as an Option Group Preset named Service Card Heading. We would also identify the other service headings that should receive it.
Check that the preset contains only the intended typography before using it elsewhere, since future edits to its shared settings can affect every element using it. A Heading Text preset can include the heading level, so confirm that each target keeps the intended HTML level as well as the right appearance.
8. Review Tablet And Phone Layouts
Adding content or rearranging sections can affect how a page looks on smaller screens. We can use this Command to review the layout at specific widths and identify where adjustments may be needed.
Save the following as Review Responsive Layouts.
For example, we can ask the agent to review the real estate page’s Divi Exclusives listings on tablet and phone, specifying an exact width if we’ve noticed a problem at a particular screen size.
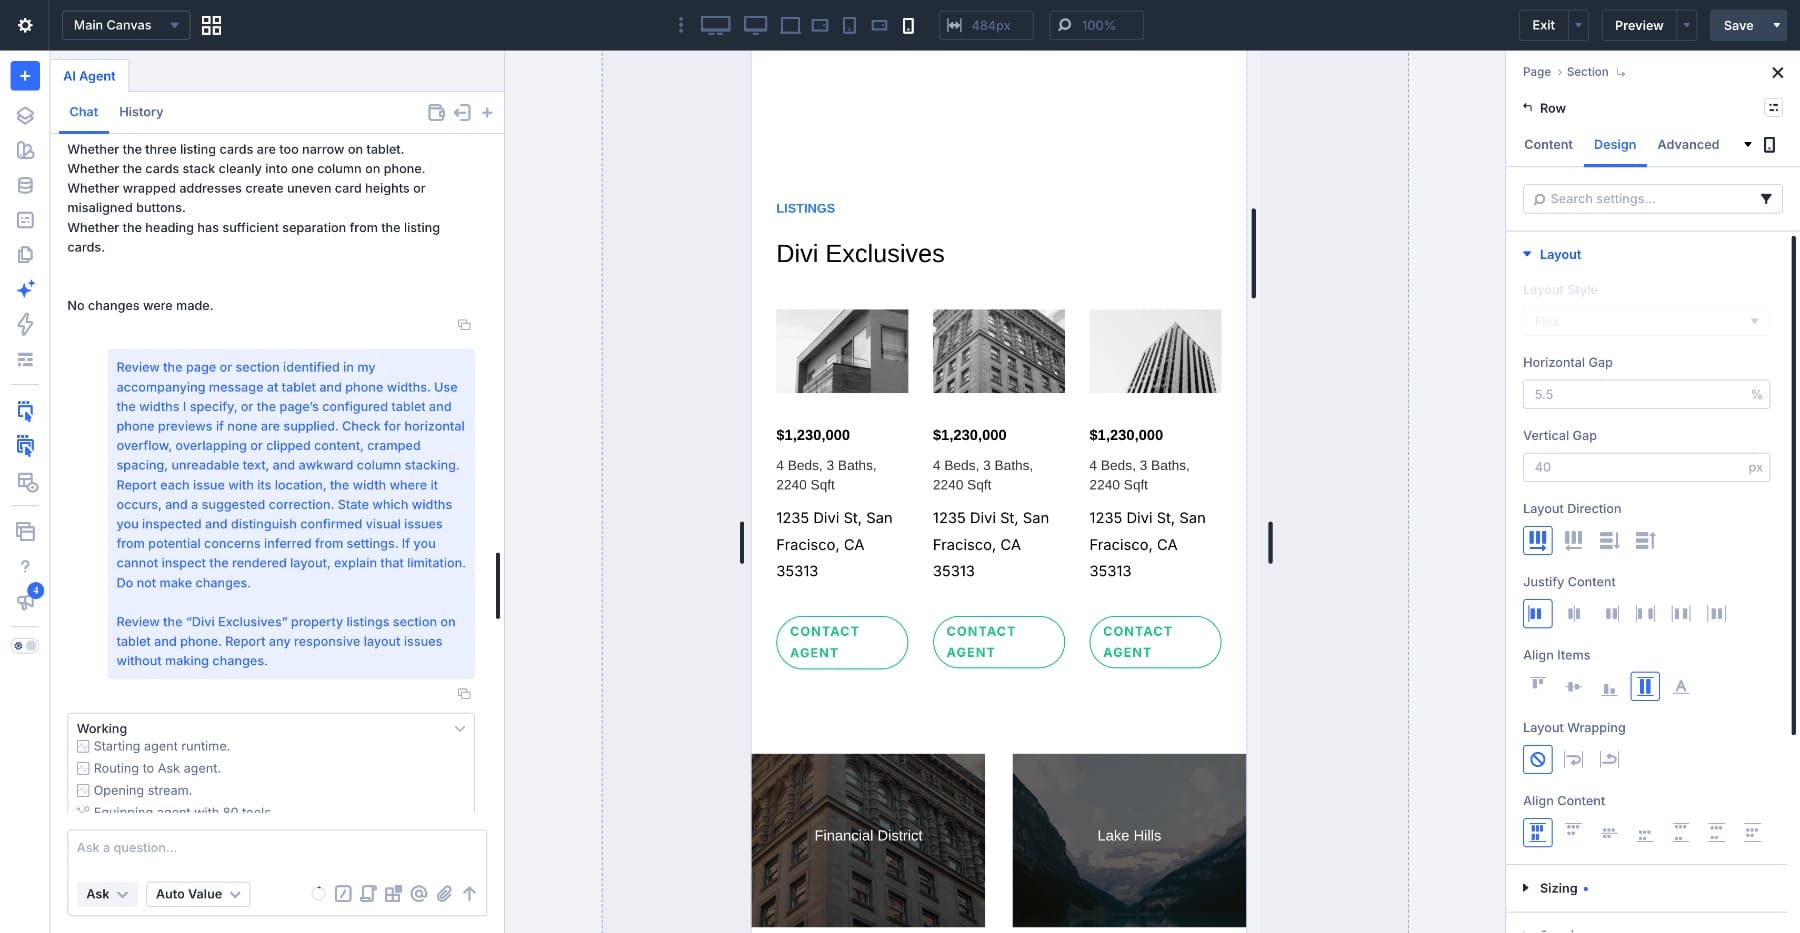
Check whether the report is based on rendered previews or responsive settings. If the agent only inspected settings, use the Builder’s responsive preview to verify those widths before requesting fixes. A heading wrapping onto another line may be acceptable, while text spilling outside its card needs attention. For confirmed issues, request a targeted correction and check that the desktop layout still works as intended.
9. Check Basic Accessibility Details
We can ask the agent to check heading structure, image alt text, and text readability to identify details that may make a page harder to use. This Command reports its findings so we can decide which corrections are needed.
Save the following as Review Basic Accessibility.
For the real estate page, we could ask the agent to review the property listings and agent profiles. Our accompanying message can explain what the images need to communicate, helping it assess their alt text alongside the surrounding descriptions.
When reviewing the findings, check the headings’ HTML levels to confirm their order in the page structure. Check each image’s rendered alt attribute on the frontend alongside its field in the Builder. This is a basic accessibility check, and keyboard navigation, screen reader behavior, and other requirements still need separate testing.
10. Run A Final Content Check Before Handoff
Before sending a page to a client or preparing it for publishing, we can check for leftover placeholder copy, spelling errors, and inconsistent business details. Attach approved information as Context so the agent has a reference for checking names, contact details, services, and dates.
Save the following as Run A Final Content Check.
For example, the Jenny Smith fashion page contains placeholder paragraphs and references to a 2024 collection. We could ask the agent to flag content that needs attention before handoff. The placeholder copy needs replacing, but the collection date could refer to an older collection that should remain on the site.
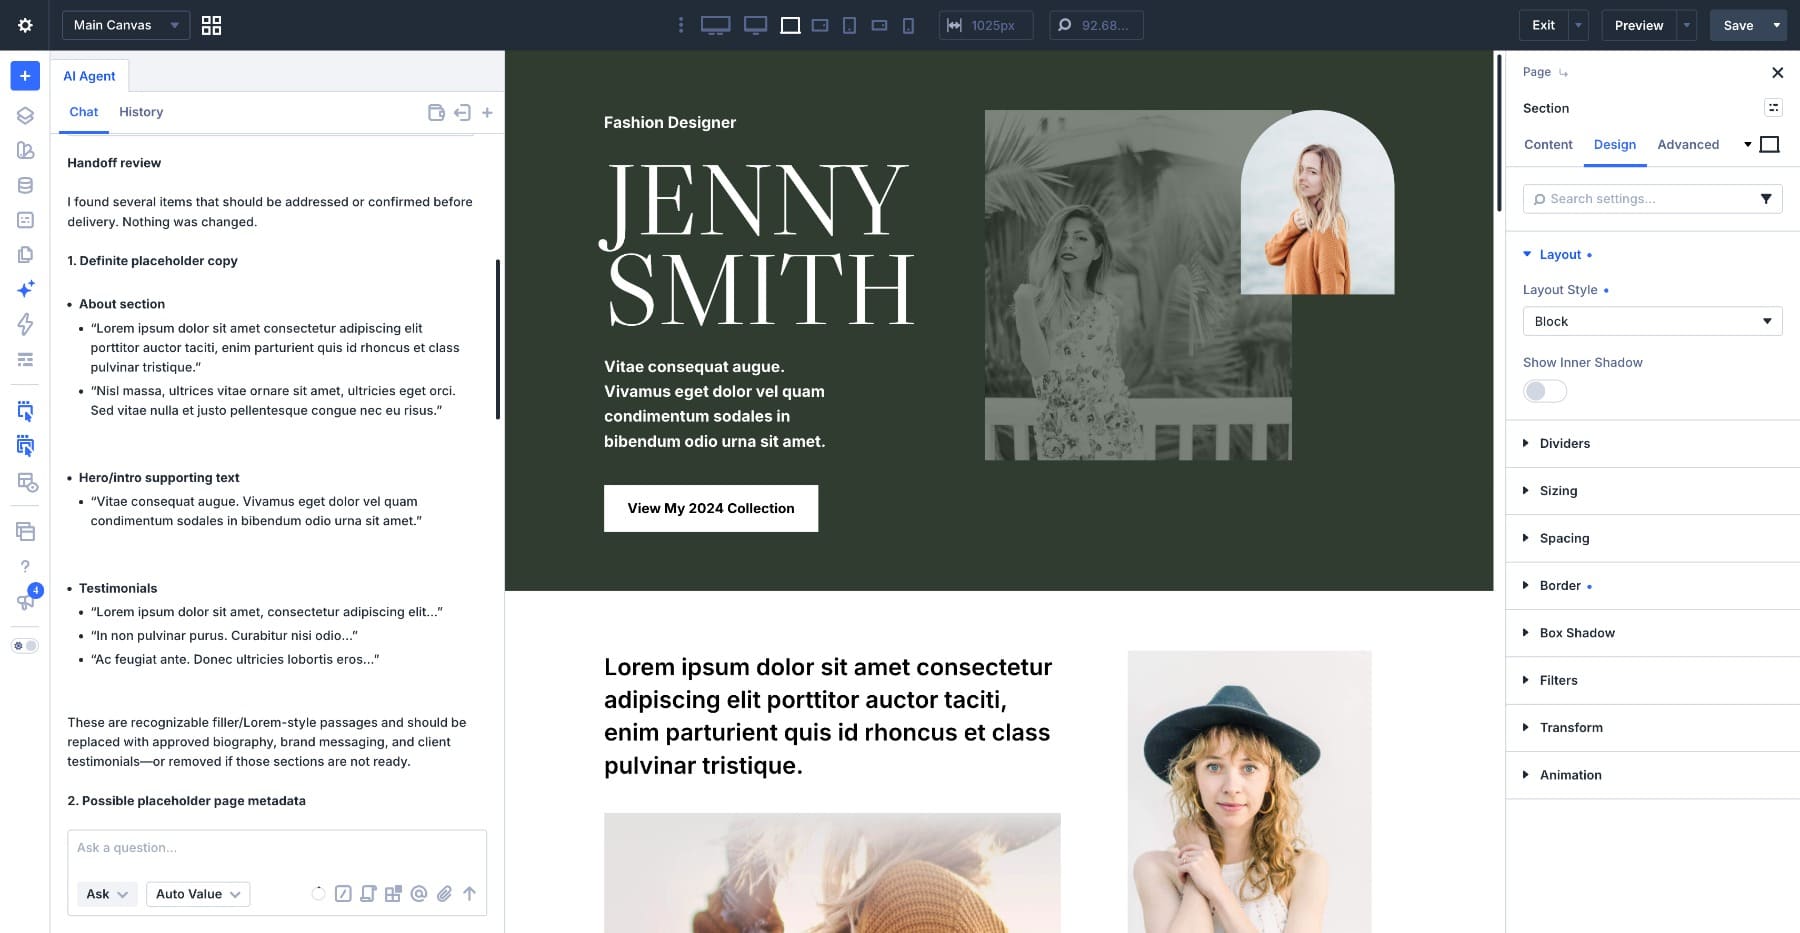
After reviewing the findings, we can confirm which details need updating and supply any missing copy before requesting changes.
Build A Command Library Around Work You Repeat
Start with the Commands that fit tasks you already handle regularly, and adapt them as you use them on your own pages. The examples here show particular uses, but the same Command can work with different elements when we supply the relevant requirements and references.
Pay attention to the follow-up instructions you keep adding. If the same requirement applies every time, add it to the saved Command. Keep details that change between projects in the accompanying message or attached Context, so the Command stays reusable without losing the guidance each task needs.
The post 10 Commands You Need To Add To Your Divi AI Agents Command Library appeared first on Elegant Themes Blog.