Popups are one of the most effective tools for driving conversions and engagement. Whether you want to grow your email list, promote a limited-time offer, capture leads, or guide visitors toward a key action, a well-designed popup can deliver impressive results. In some cases, you can significantly increase signups or sales when a popup is timed and styled correctly.
In the past, creating custom, high-performing popups in Divi typically meant relying on third-party plugins like Bloom or other tools that added extra bloat and complexity. But Divi 5 changes that. With major features like Interactions and Canvases, Divi 5 gives you native, lightweight, and flexible ways to build dynamic popups directly in the Visual Builder.
In this post, we’ll explore three distinct approaches to designing popups in Divi 5: Canvases + Interactions, Interactions + Visibility Settings, and the Bloom plugin. Let’s dive in.
What Are Divi 5 Interactions?
Interactions is one of the most exciting additions to the Visual Builder. It serves as a powerful, no-code system that turns static pages into dynamic experiences. Think of it as an “anything builder” for Divi that allows you to create popups, toggles, scroll effects, hover animations, tooltips, hotspots, and more.
At its core, every Interaction has three main components:
- Triggers: These start the action. Options include Load, Click, Mouse Enter and Exit, Viewport Enter and Exit, and more.
- Effects: This setting controls what happens during the interaction. Common options include Toggle Visibility, Show or Hide an element, Toggle, Add, or Remove Presets or Cookies, Scroll to Element, or Mirror Mouse Movement.
- Targets: These define the element that gets affected. You can target the current element, another module, row, or section on the page, or even elements in separate Canvases.
Interactions are added directly in the Advanced tab of any element. Just click + Add Interaction to create complex behaviors.
For popups, you can use Divi 5’s Visibility settings to keep elements hidden until an interaction triggers them to appear. Interactions shine for lightweight, custom popups because everything stays inside the builder. Plus, you get full design freedom, built-in animation support, cookie support, and no extra plugin overhead.
What Are Divi 5 Canvases?
Canvases introduce a new way to organize and manage off-canvas or hidden content using detached workspaces that live separately from your main page layout. Unlike the Main Canvas, which houses your standard page content, Canvases are independent areas where you can build and store elements such as popups, off-canvas menus, sidebars, mega menus, or experimental designs without cluttering your primary view.
Canvases come in two forms:
- Global: Available site-wide and ideal for reusable popups, headers, or footers that appear on multiple pages.
- Local: Tied to a specific page or template, making them great for one-off designs or experiments.
When you combine Canvases with Interactions, Divi automatically appends targeted canvas content to the frontend page. In the Visual Builder, everything stays neatly separated and hidden, which keeps your main layout clean and faster to edit.
There’s also a new Canvas Portal Module, which lets you inject Canvas content exactly where you want it.
This makes Canvases ideal for advanced, reusable popups. Build them once in a Global Canvas, trigger them with Interactions, and style them with the full power of Divi. You can add animations, fine-tune responsiveness, and apply presets with just a few clicks.
What Is The Bloom Plugin?
Bloom is one of the best email newsletter plugins on the market, and it’s included with your Elegant Themes membership. Designed specifically for building high-converting opt-in forms and popups, it’s a great tool for growing your email list.
While Divi 5’s native Interactions and Canvases handle general-purpose popups beautifully, Bloom excels at email marketing and lead capture with features like:
- 100+ Pre-Designed Templates: Bloom includes more than 100 pre-made templates you can customize for popups, fly-ins, and other opt-in formats.
- Multiple Display Types: Create popups, fly-ins, inline forms, below-content forms, widget-area forms, and locked-content opt-ins.
- Advanced Triggers: Choose from timed delay, scroll percentage, after inactivity, after commenting, after purchasing, and more.
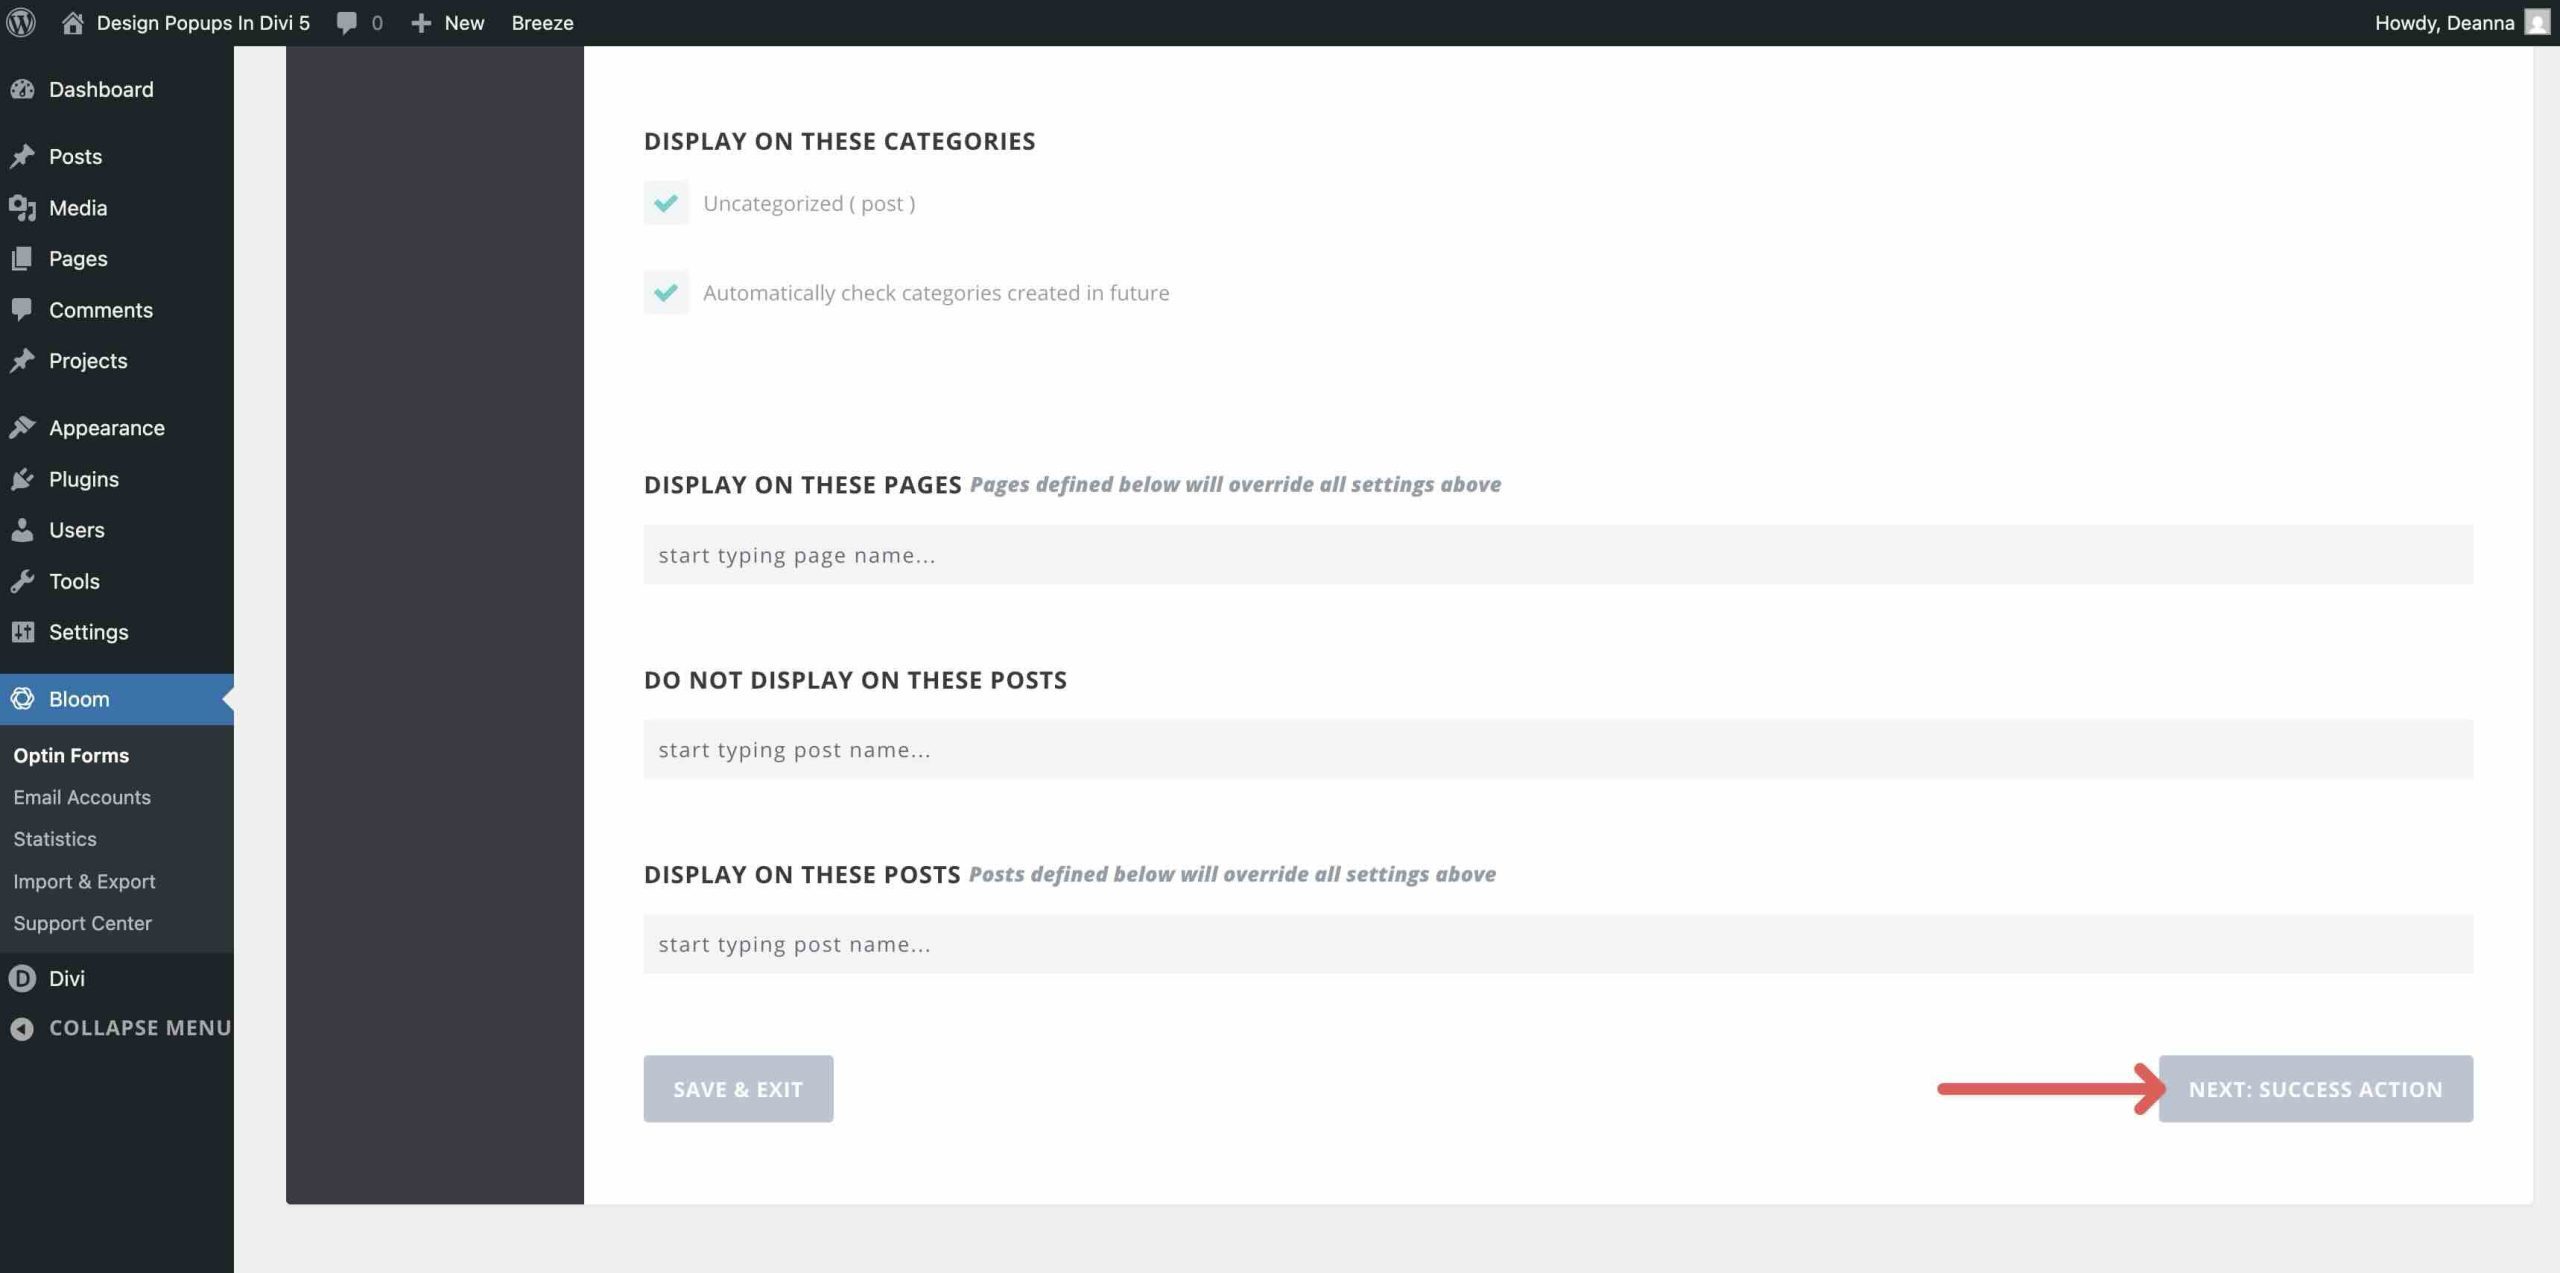
- Targeting And Conditions: Show forms on specific pages, posts, post types, and other targeted areas of your site.
- 19 Email Marketing Integrations: Bloom connects to popular email services like Mailchimp, ActiveCampaign, and ConvertKit.
- A/B Testing And Analytics: Split-test designs and track impressions, conversions, and performance right inside the WordPress dashboard.
Bloom works well alongside Divi 5 and remains a strong choice when your primary goal is lead capture. You can quickly build newsletter signups, discount offers, webinar registrations, or other email-focused campaigns without recreating advanced opt-in logic from scratch.
Three Ways To Design Popups In Divi 5
Now that you know which methods you can use to build effective popups in Divi 5, let’s walk through the steps to create one with each approach.
Method 1: Divi 5 Canvases + Interactions — The Advanced Off-Canvas And Reusable Approach
Divi Canvases is one of the most innovative additions to Divi 5, offering detached workspaces that live independently of your page’s main content. The Main Canvas serves as your standard page layout where all visible content lives. Additional Canvases act as independent areas, making them perfect for building and organizing off-canvas elements such as slide-in menus, sidebars, mega menus, or popups.
Combining Canvases with Interactions allows you to design your popup in its own Canvas, then use Interactions on the Main Canvas to trigger and control it. When an Interaction targets an element in another Canvas, Divi automatically appends that Canvas content to the frontend. This creates seamless, high-performance popups without bloating your main layout.
Key Strengths
When using the Canvases + Interactions method, there are several major benefits. First, it keeps your Main Canvas clean and easy to edit. Hidden sections don’t clutter your primary view. Popups can also be reused across your site when you save them as a Global Canvas, which helps maintain consistent branding and makes updates easier.
This method is especially useful for multi-instance or advanced popups, off-canvas modals, mega menus with popup-like behavior, or safe staging without risking live content. You can create multiple popup versions, test them individually, and choose the best performer with minimal rework.
Most importantly, this method avoids extra plugins while giving you full Divi styling freedom, built-in animation support, and automatic frontend appending for smooth performance.
What This Method Is Best For
Canvases + Interactions are great for site-wide reusable popups, scroll-triggered promotional modals, exit-intent-style offers using interaction logic and cookies, off-canvas sidebars, or any scenario where you want to keep your builder organized while delivering dynamic, high-impact experiences.
Step-By-Step Tutorial
To keep things moving, I won’t walk through every design step involved in creating a popup. Instead, I’ll focus on how to create a new Canvas and set up the Interactions that connect the popup to the Main Canvas.
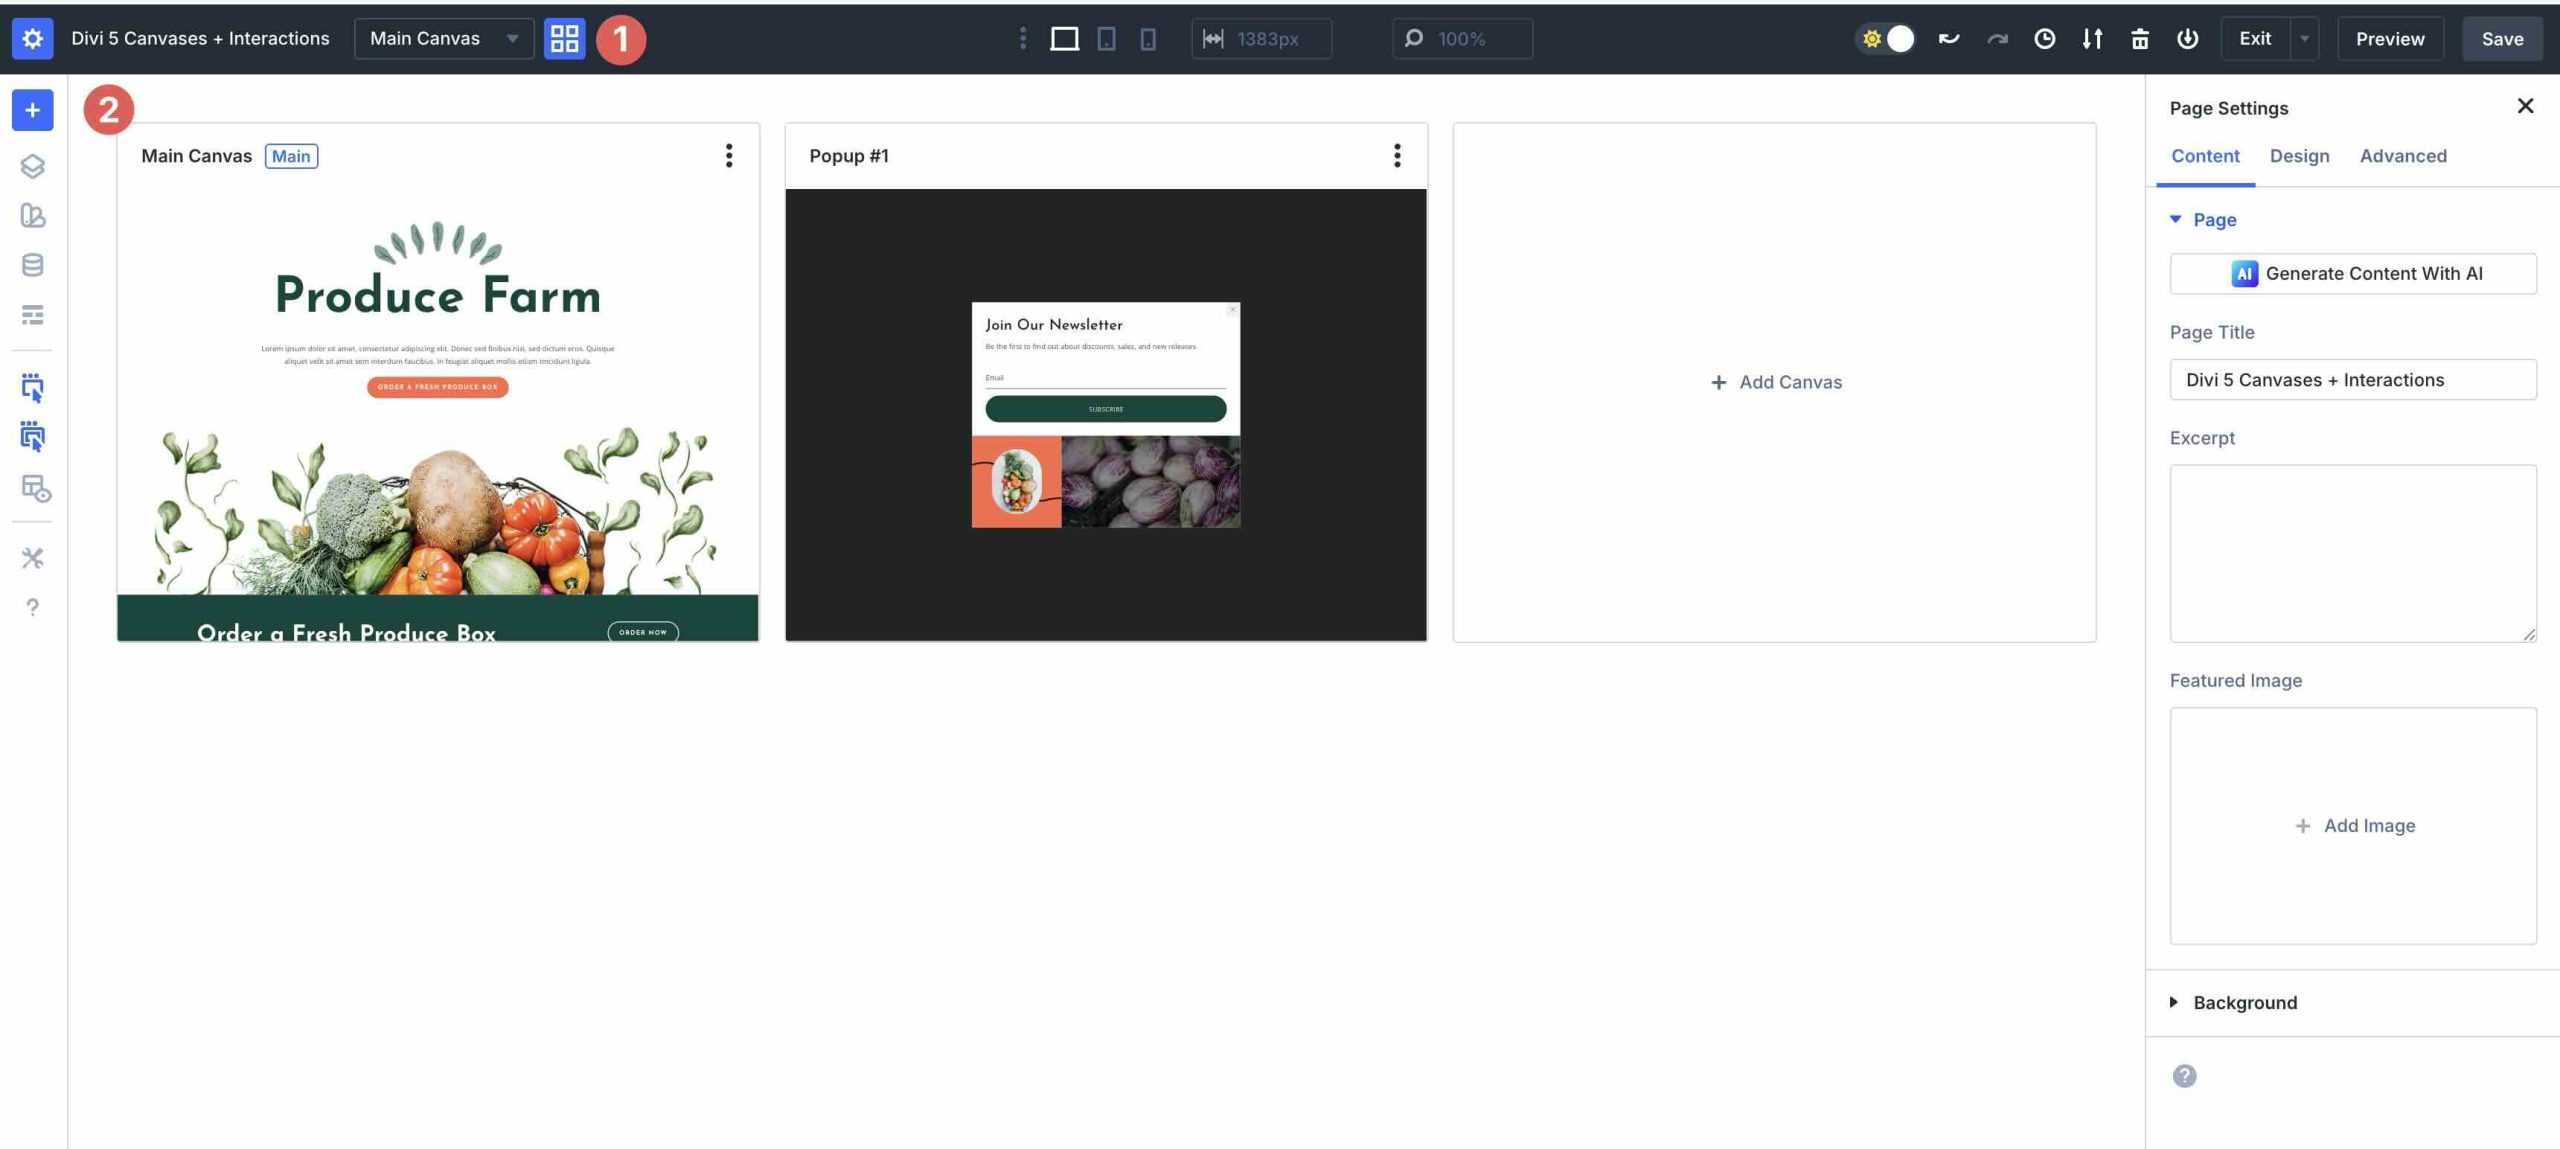
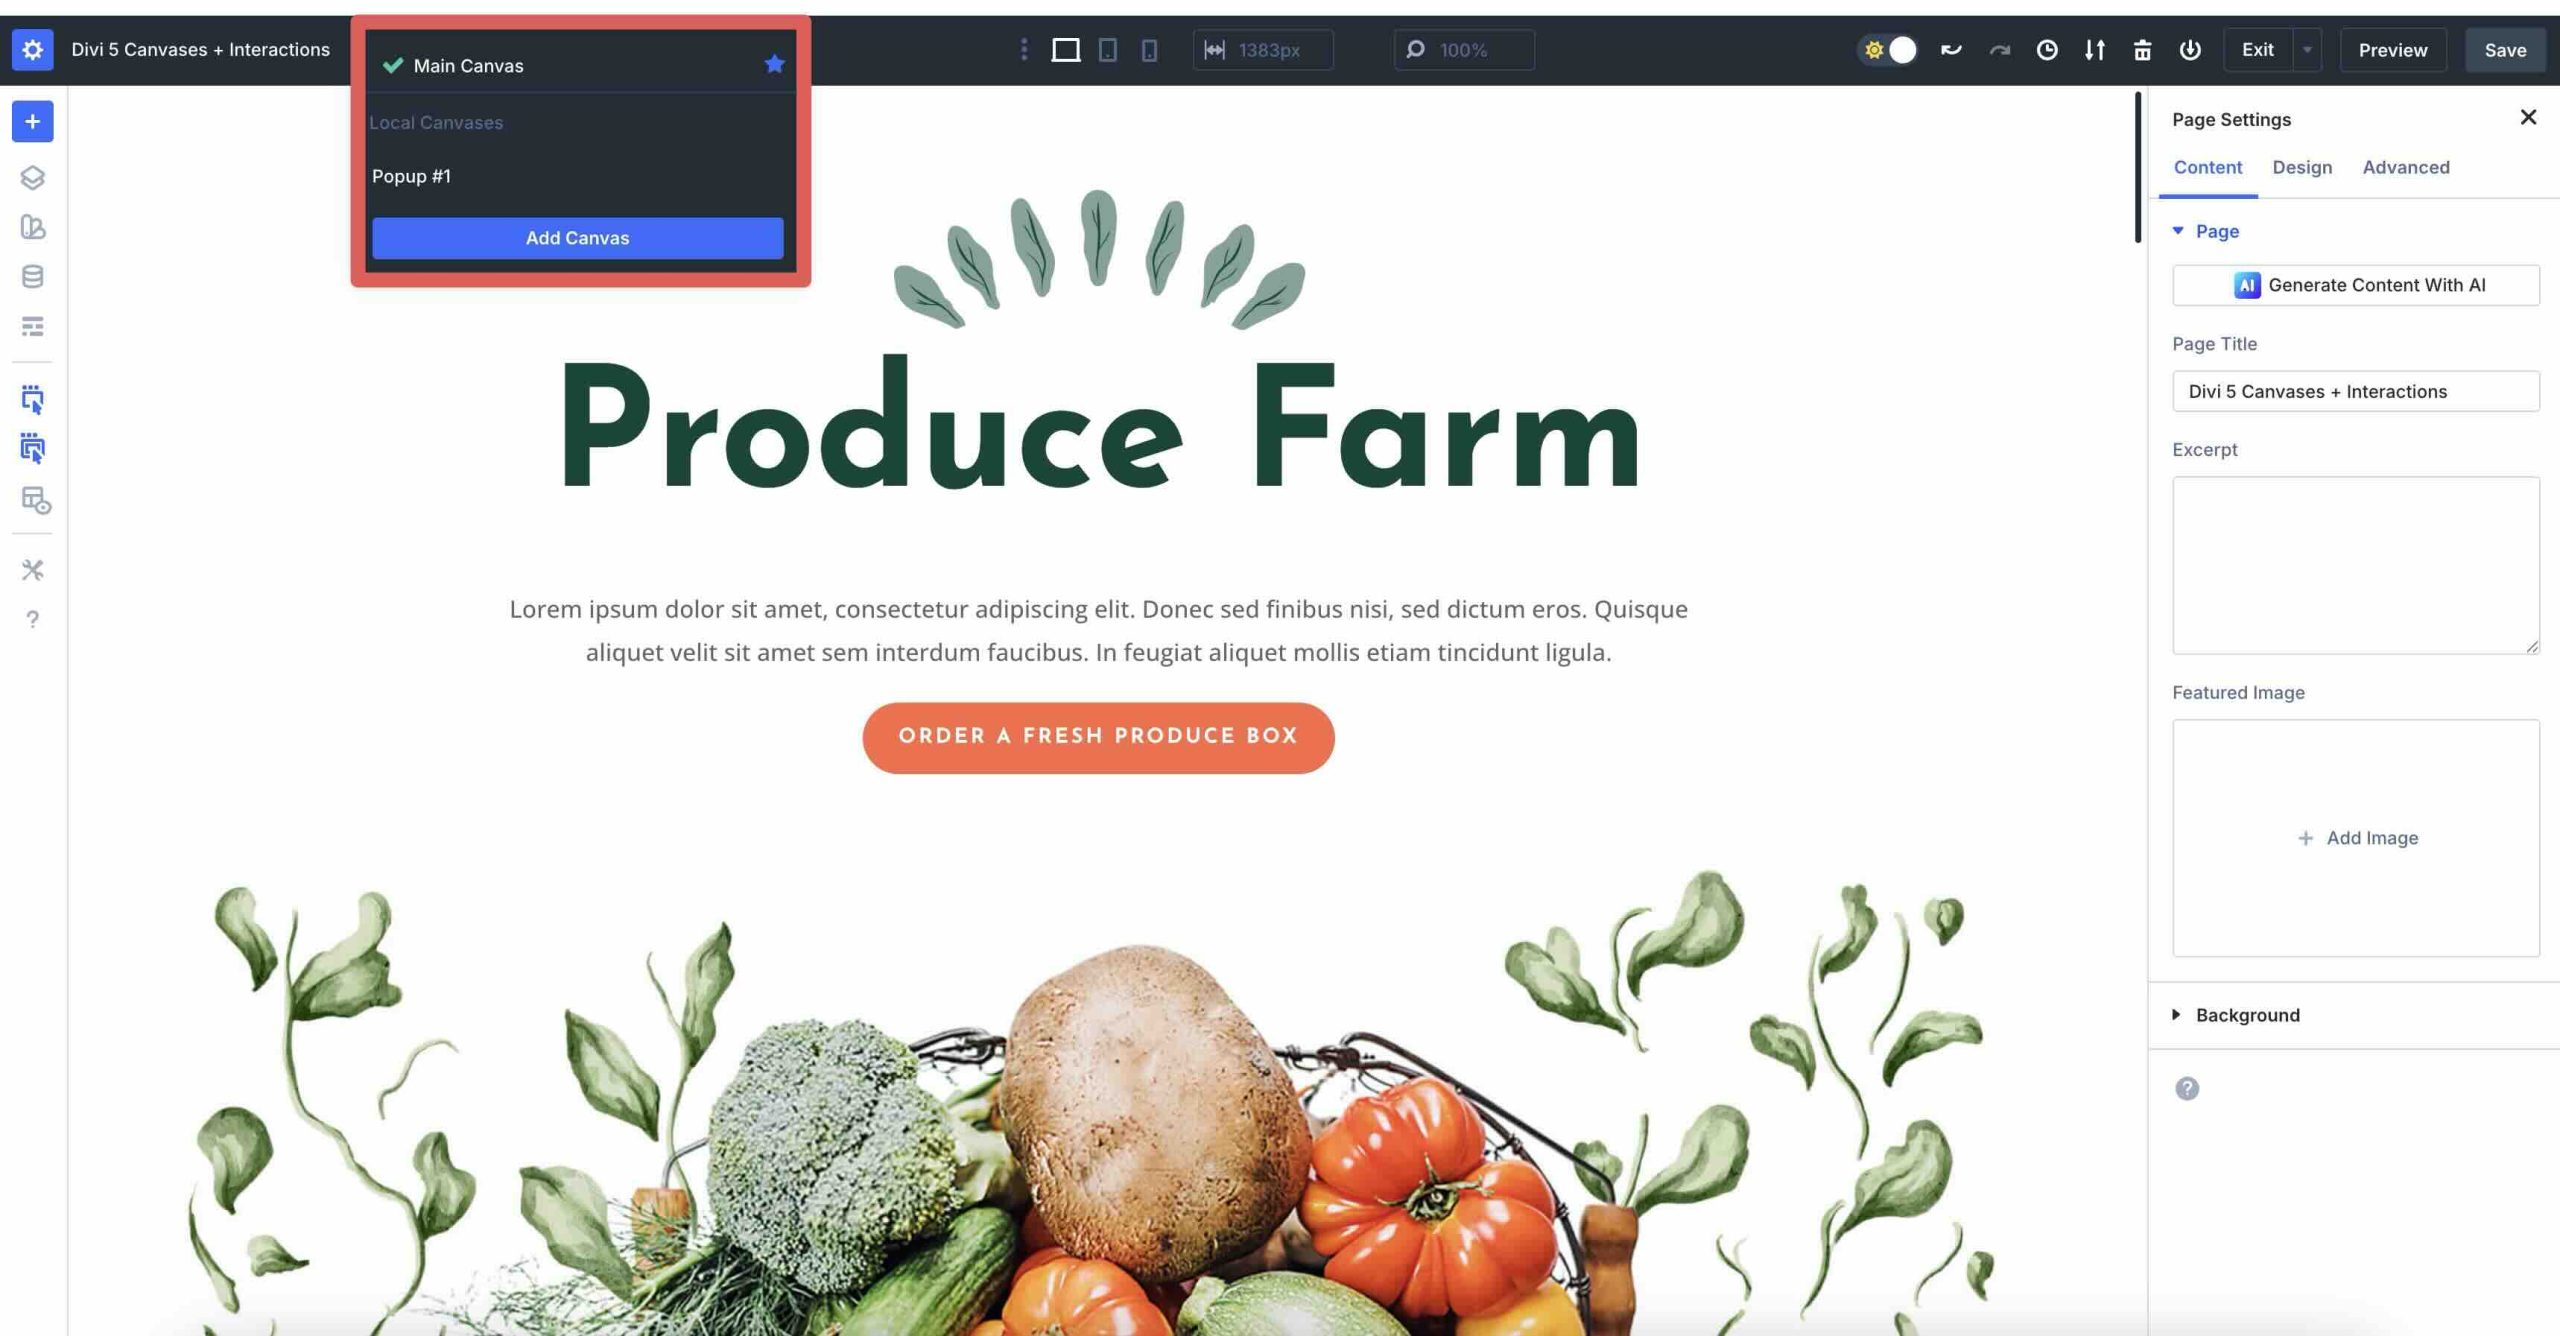
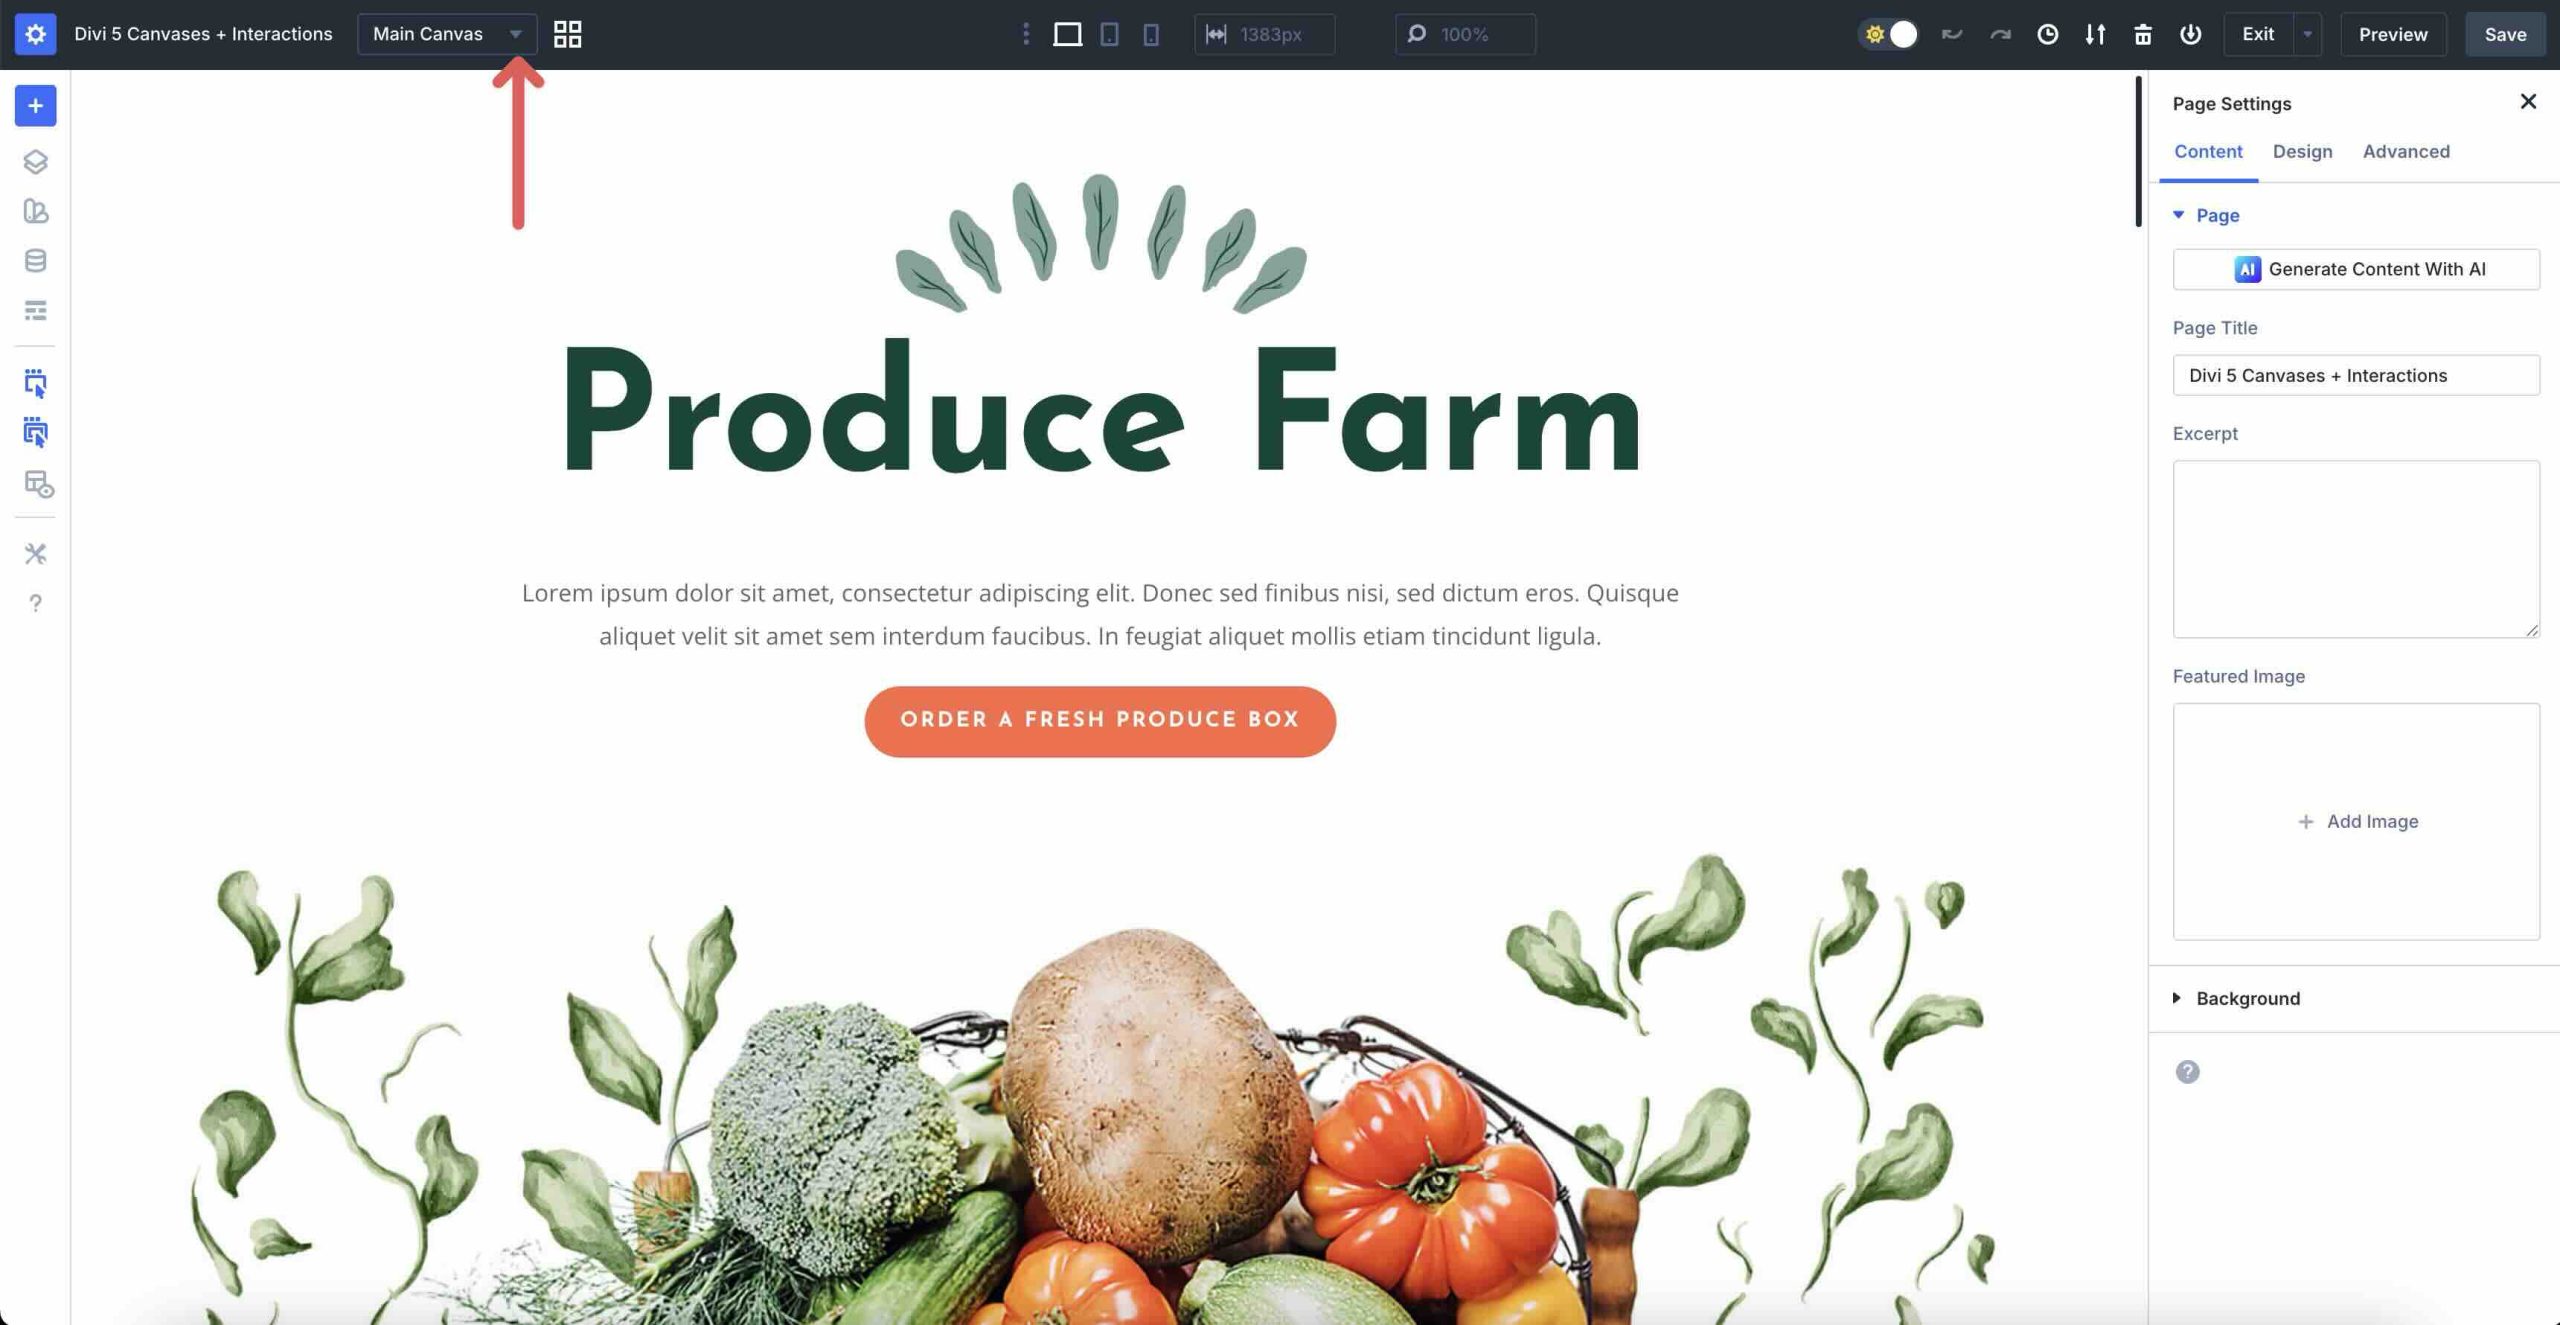
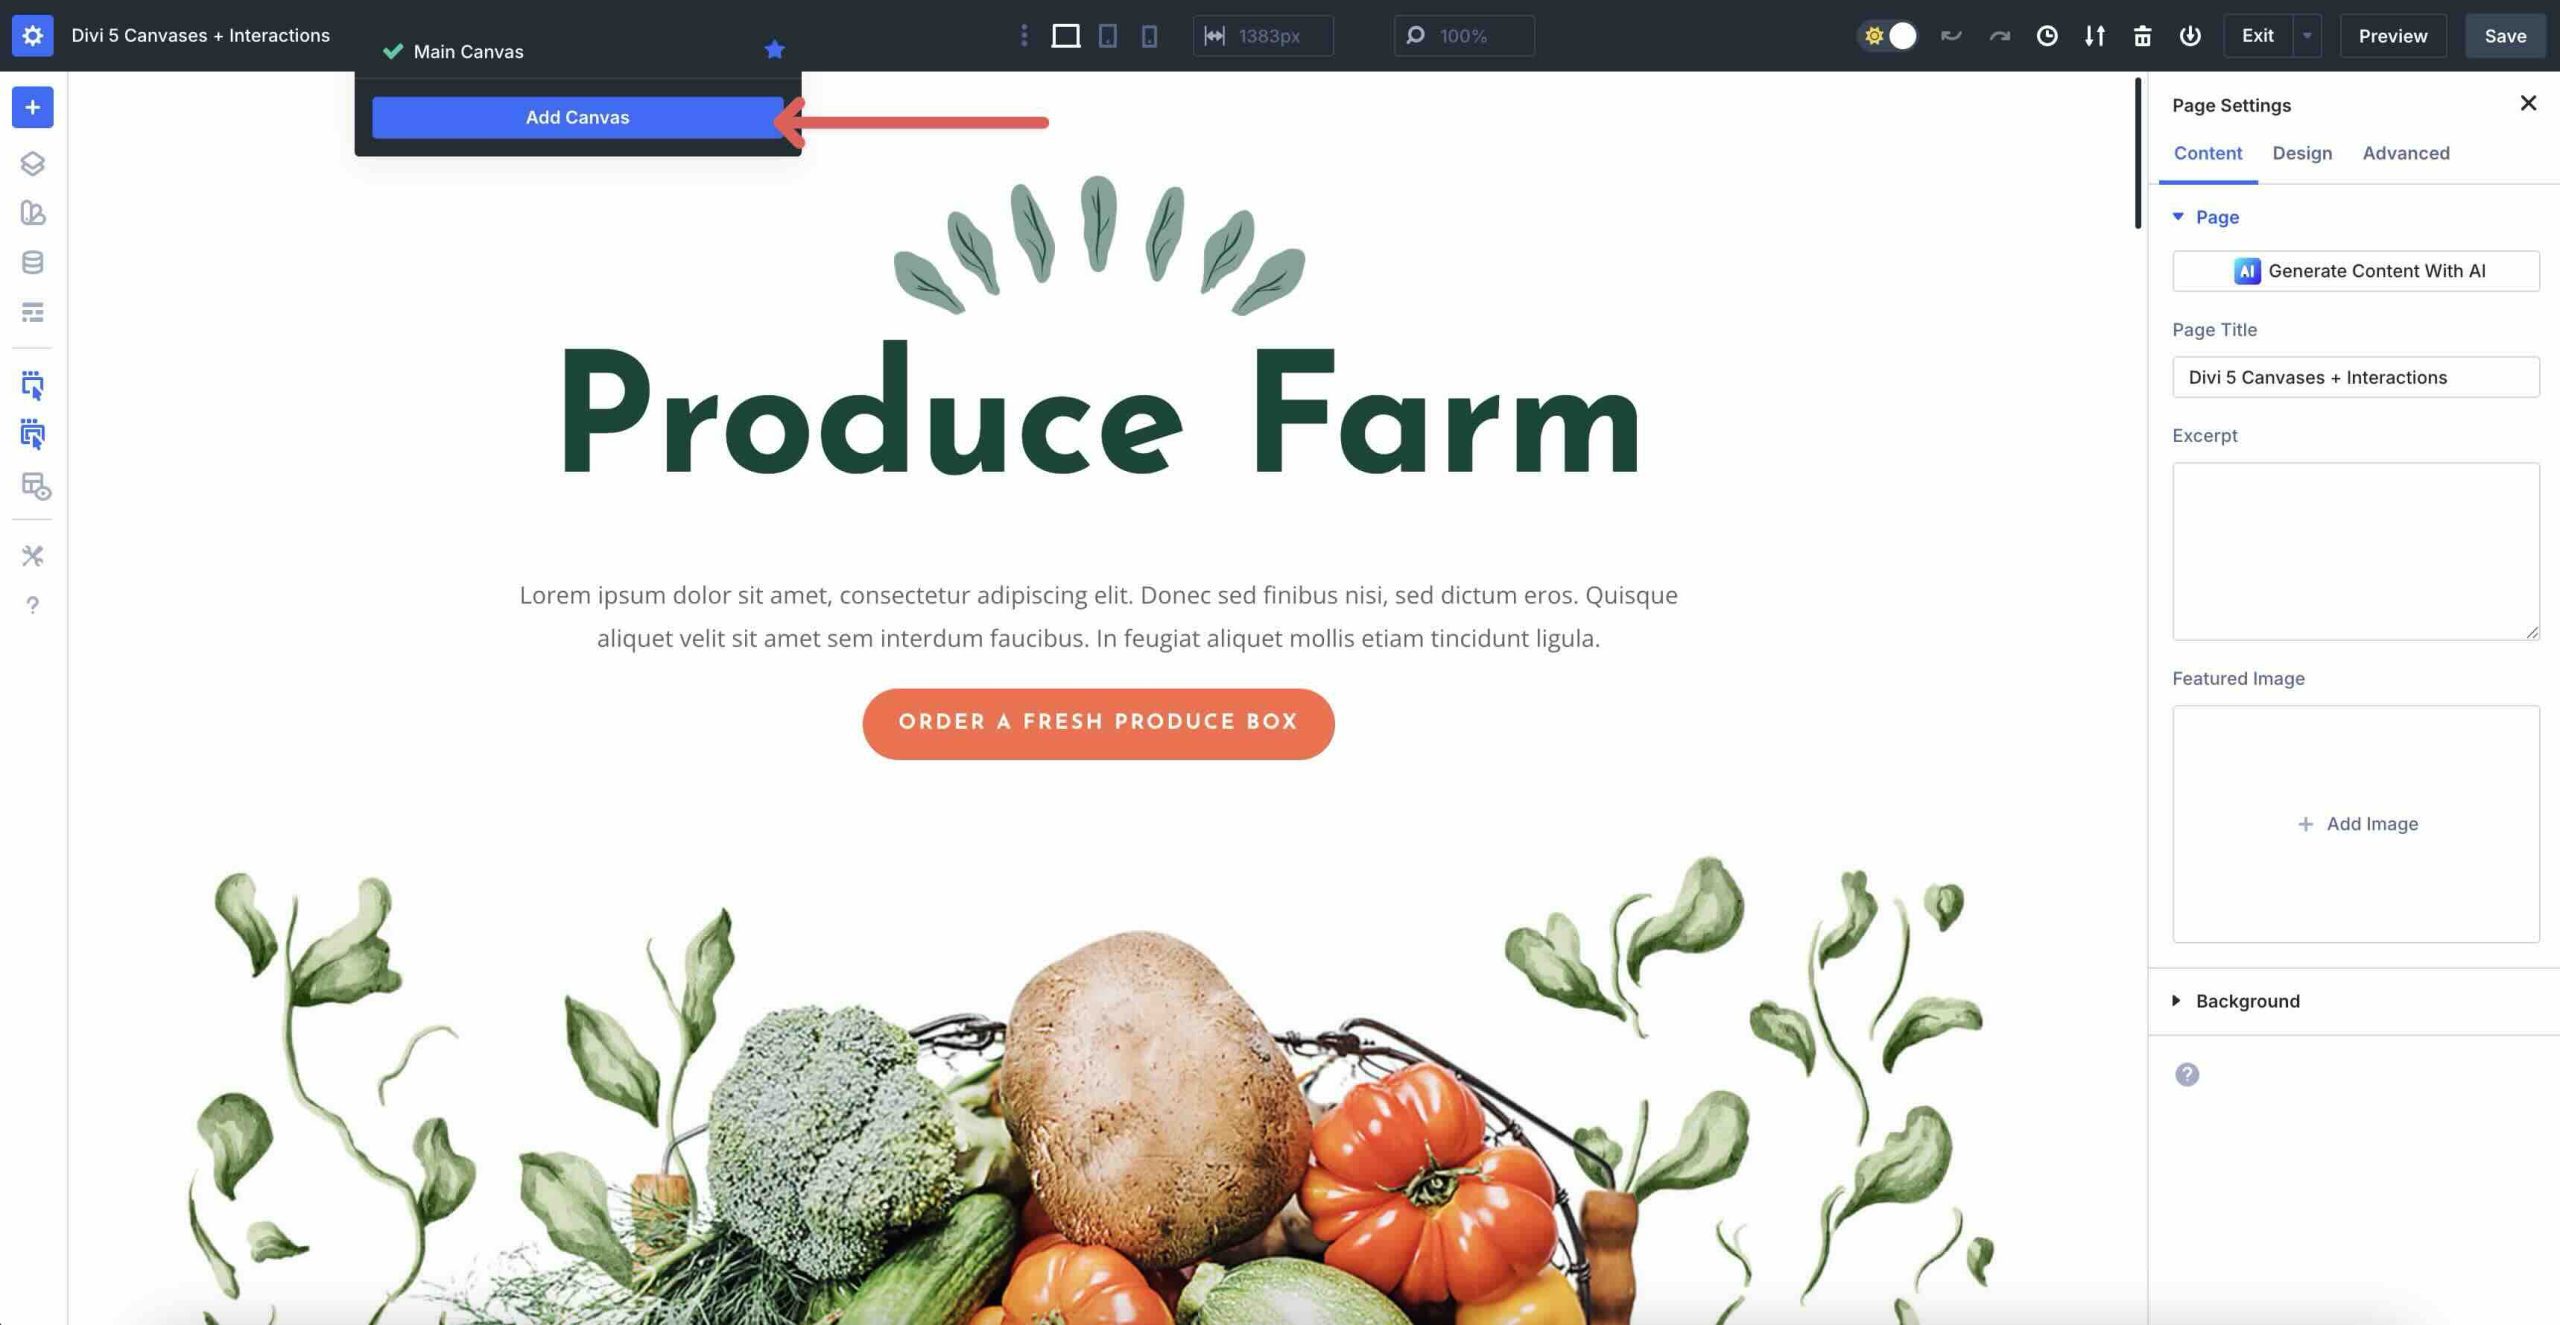
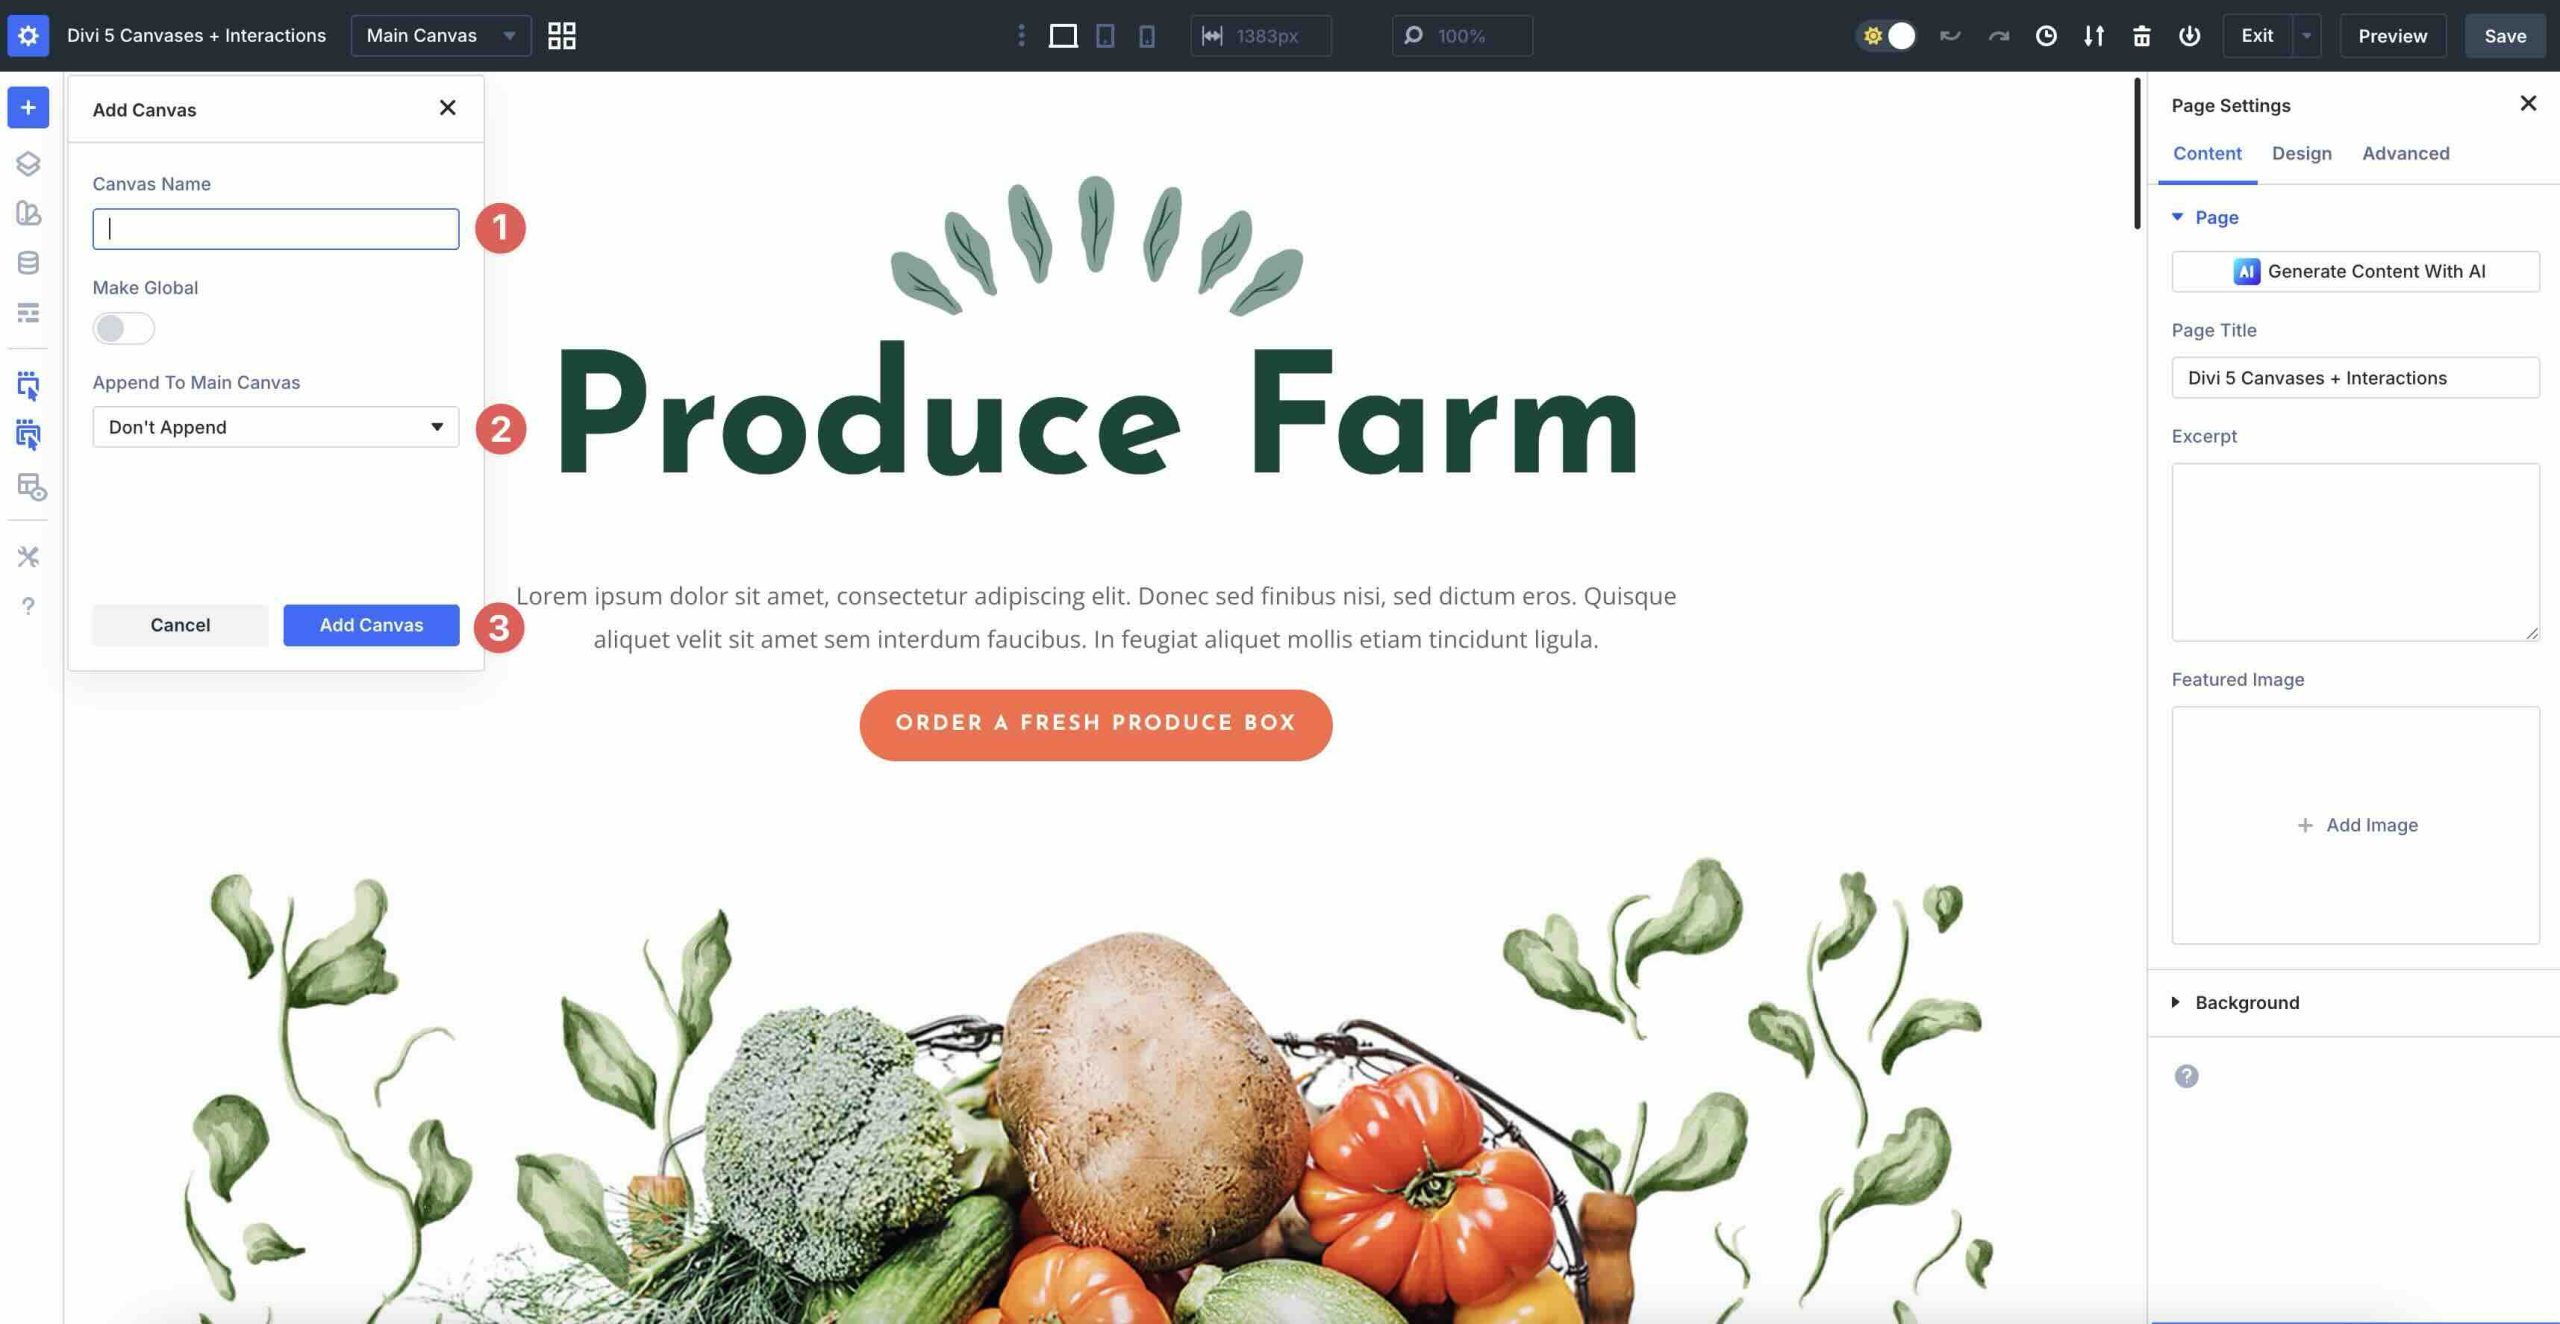
Create a new page or open an existing one in the Visual Builder. Create a new Canvas by clicking the Canvas dropdown menu to the right of the page title.
Click the Add Canvas button to create a new Canvas.
When the Add Canvas modal appears, give your new Canvas a name. If you want your popup to display on every page, choose Append Above or Append Below from the Append To Main Canvas dropdown menu. Otherwise, click the Add Canvas button to open a new Visual Builder window.
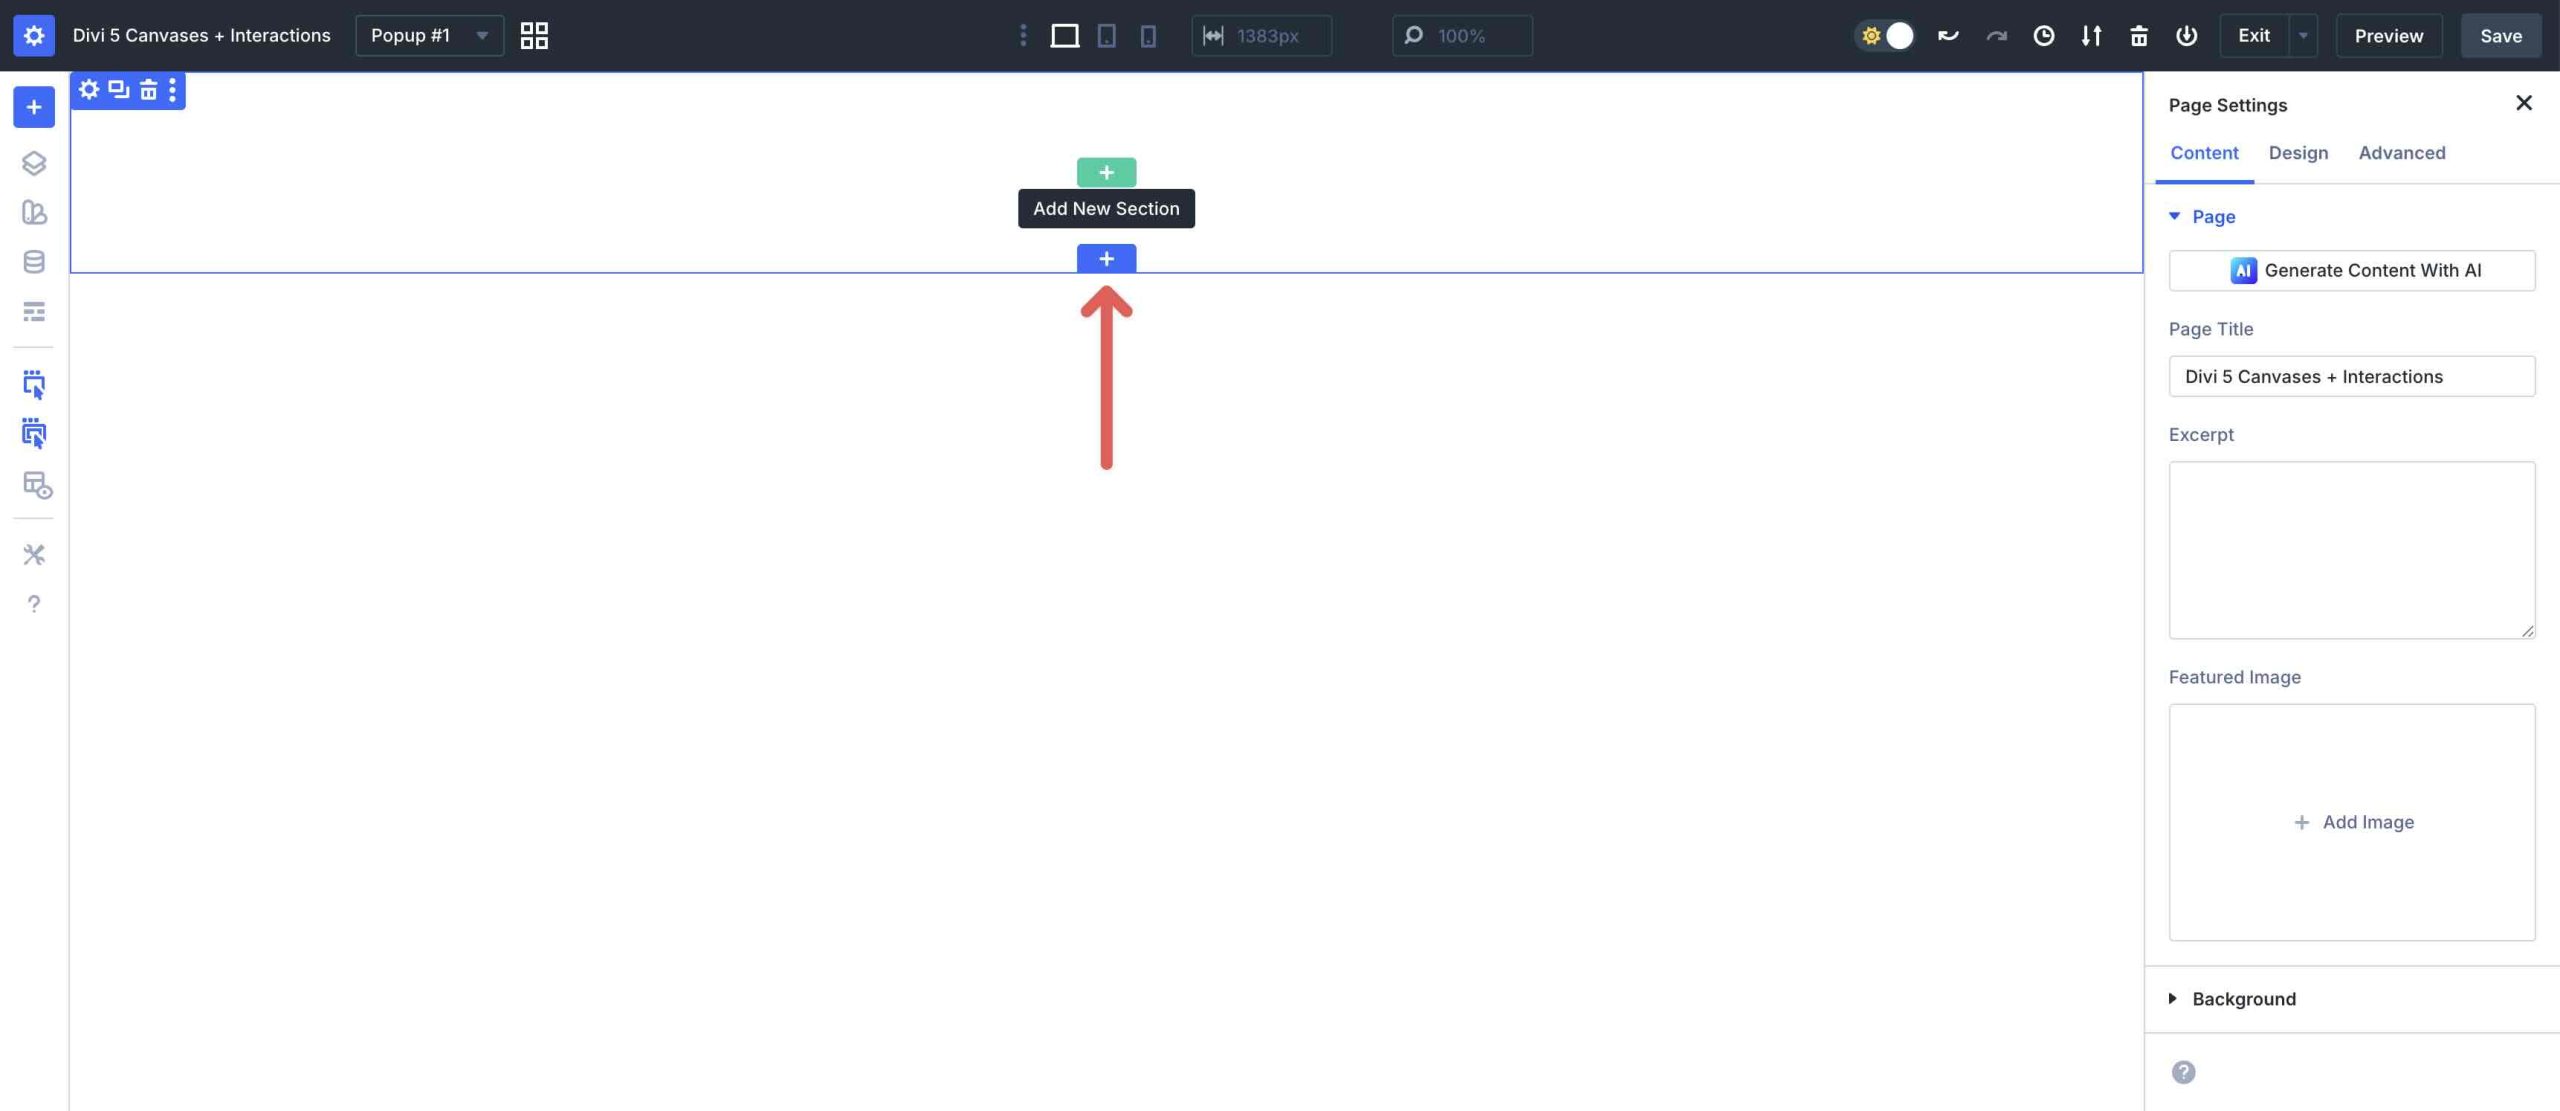
When the new Canvas opens, click to add a new Section.
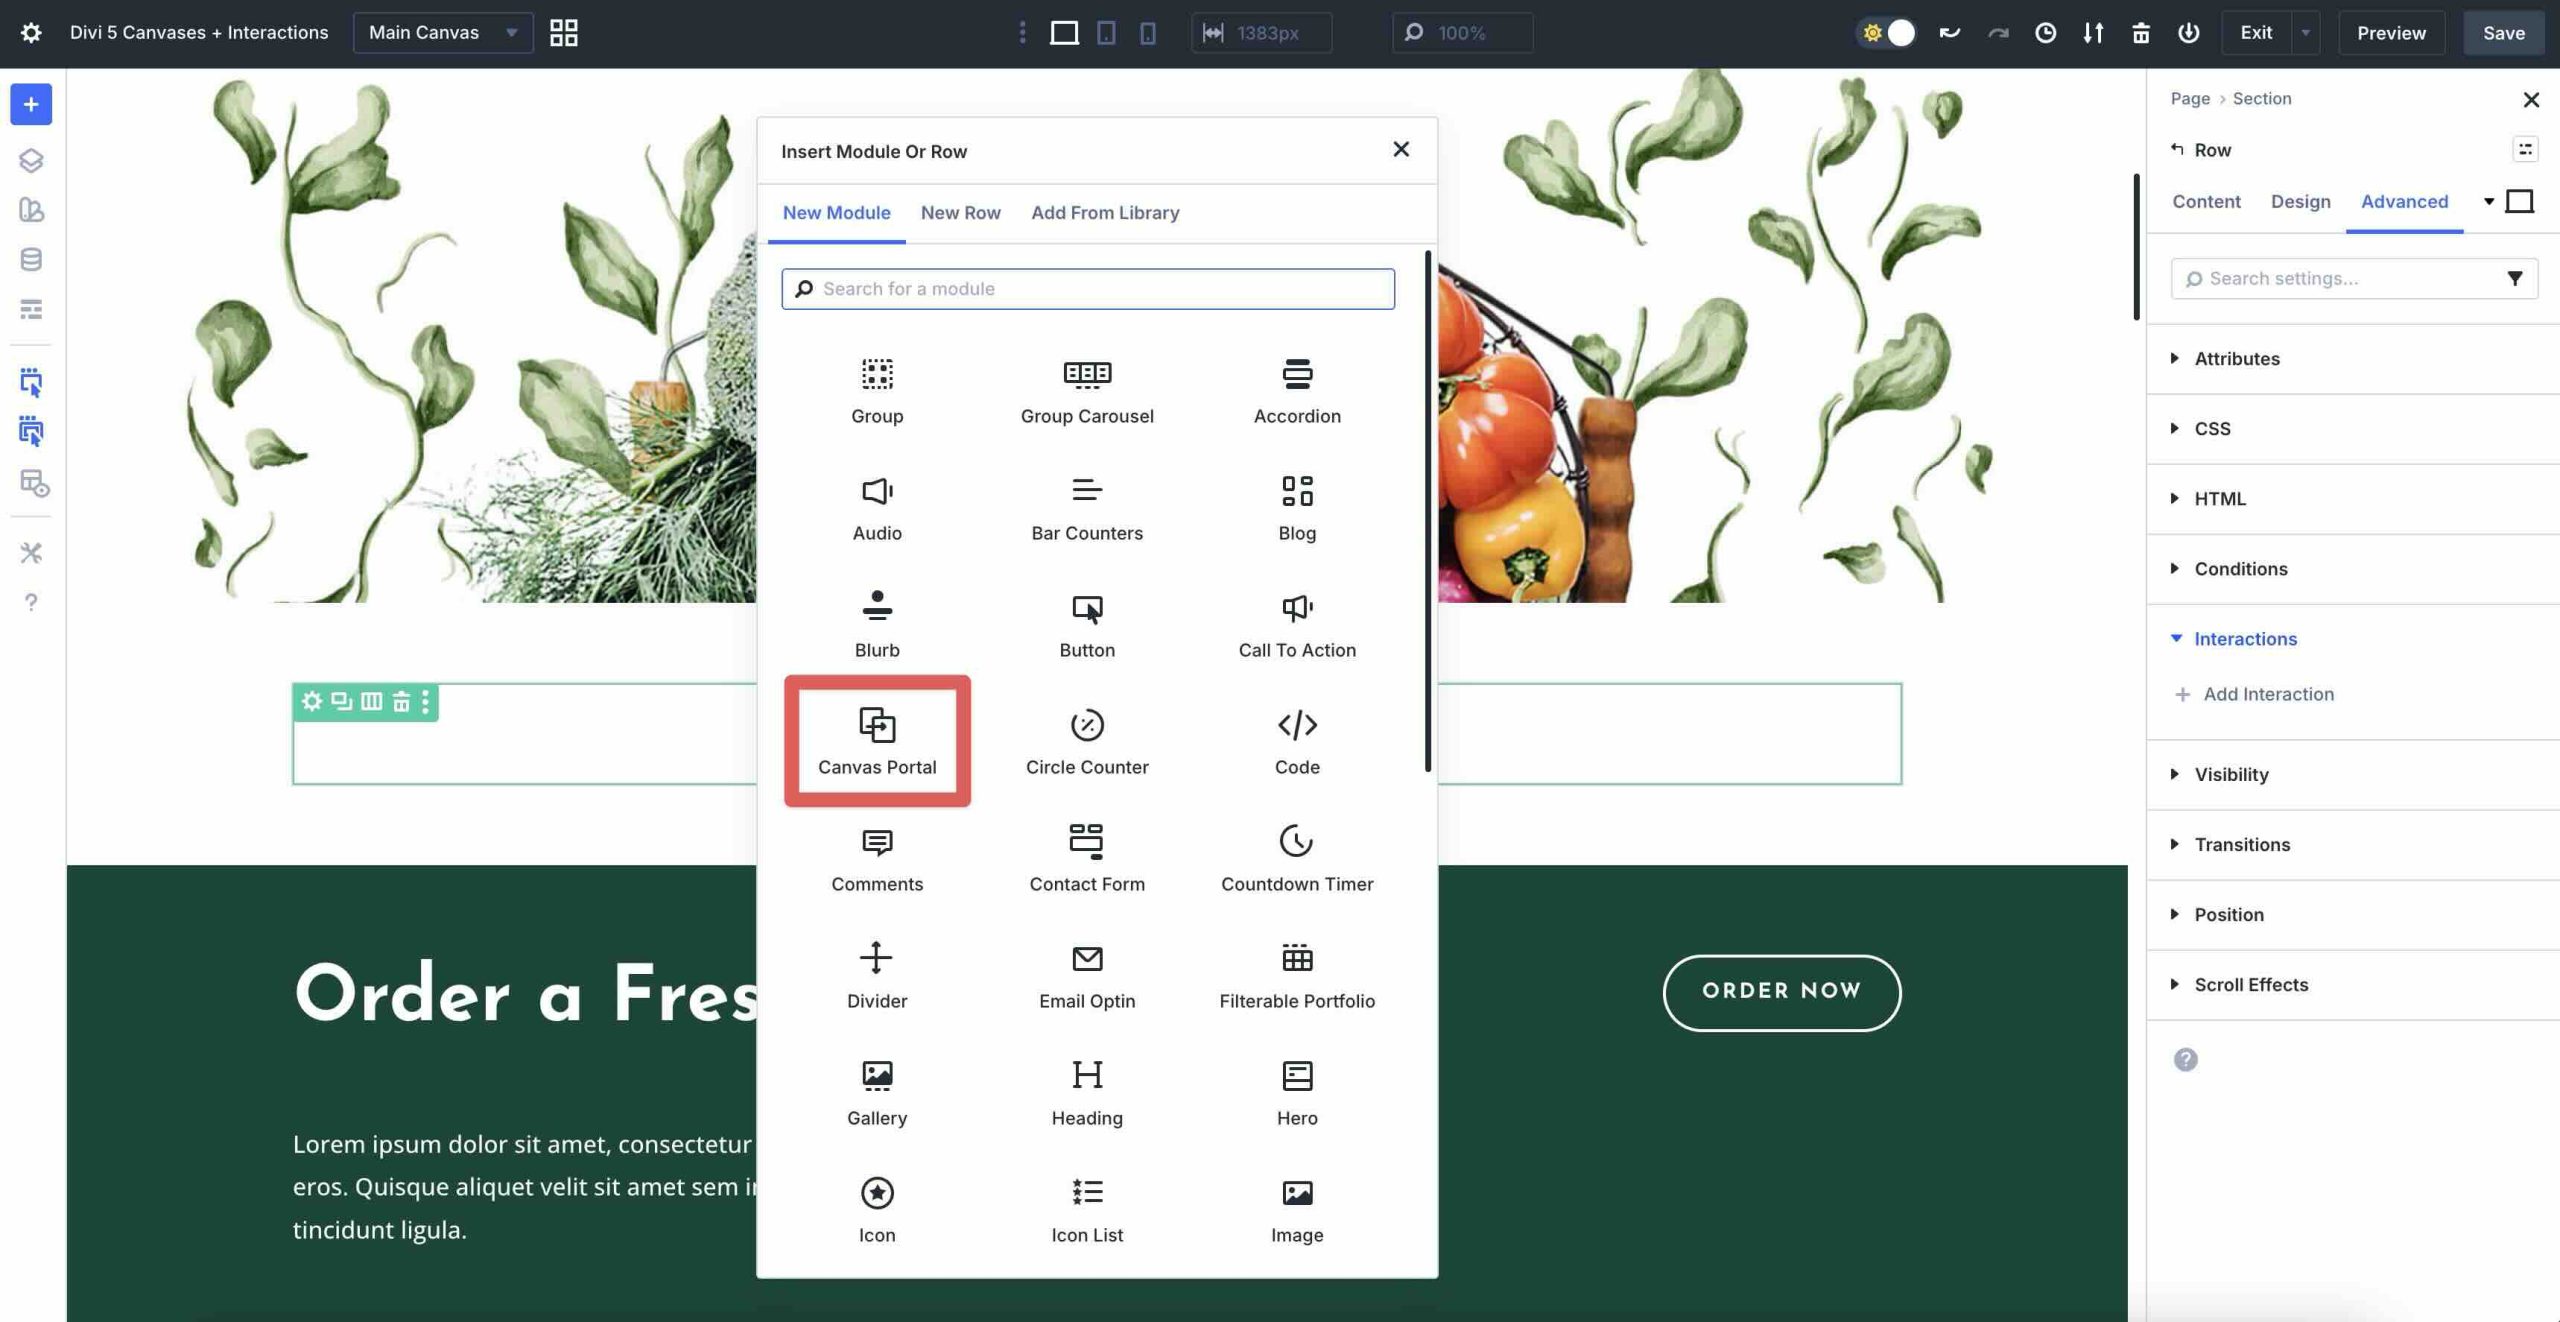
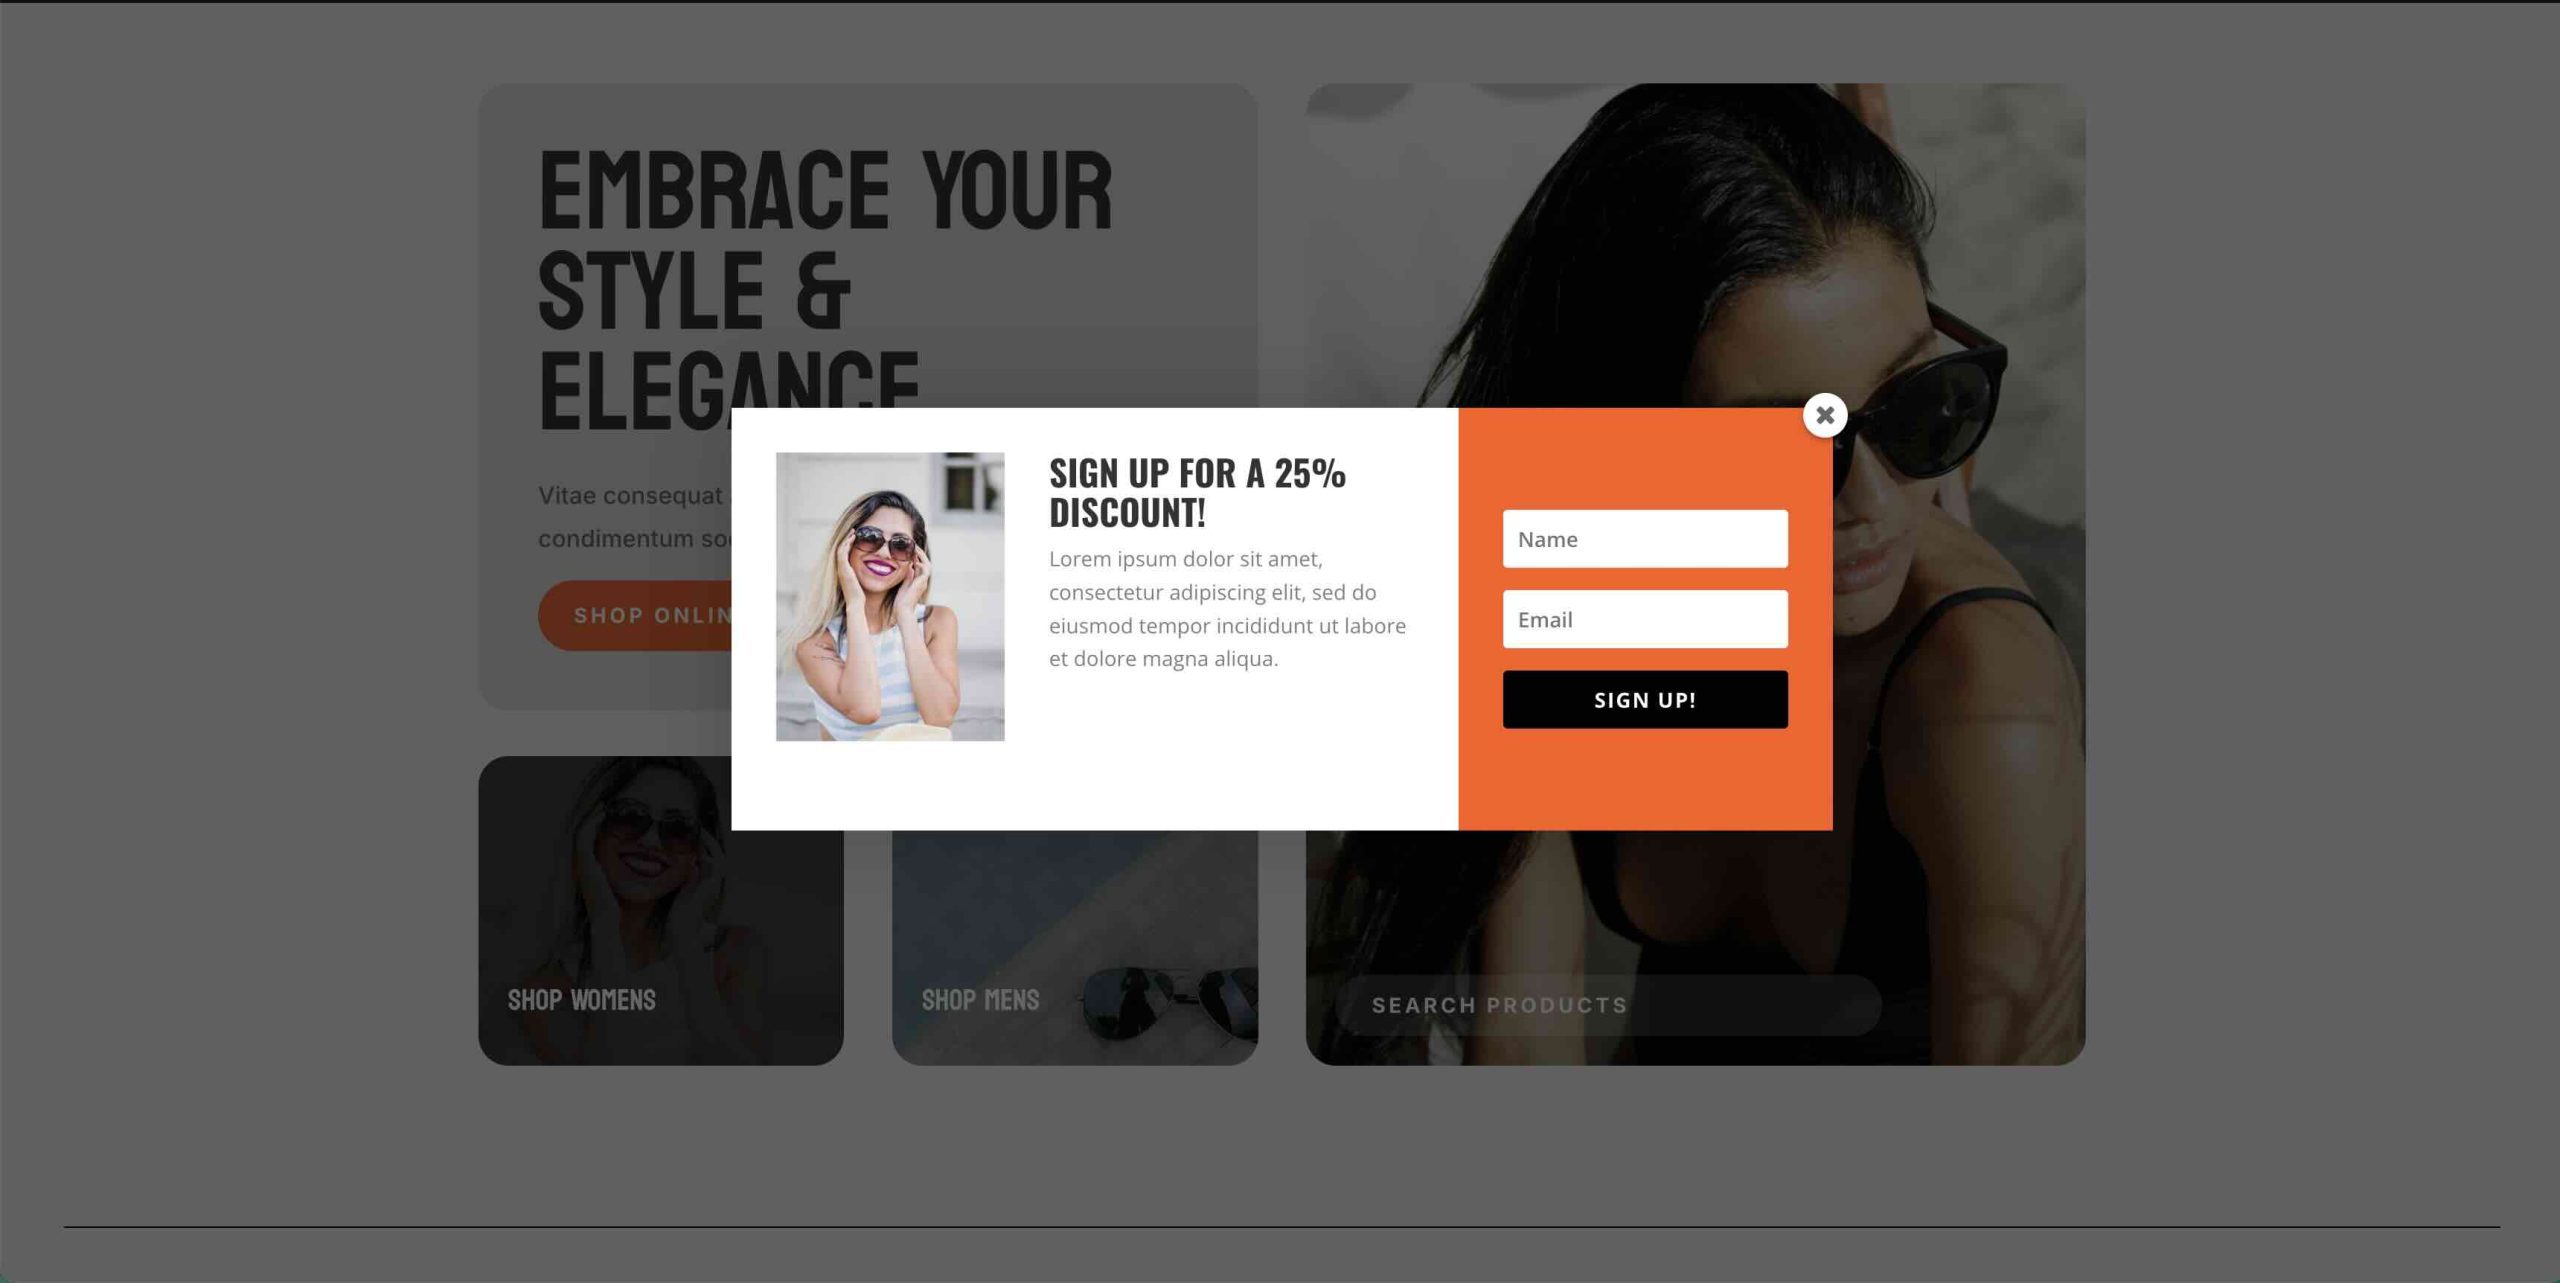
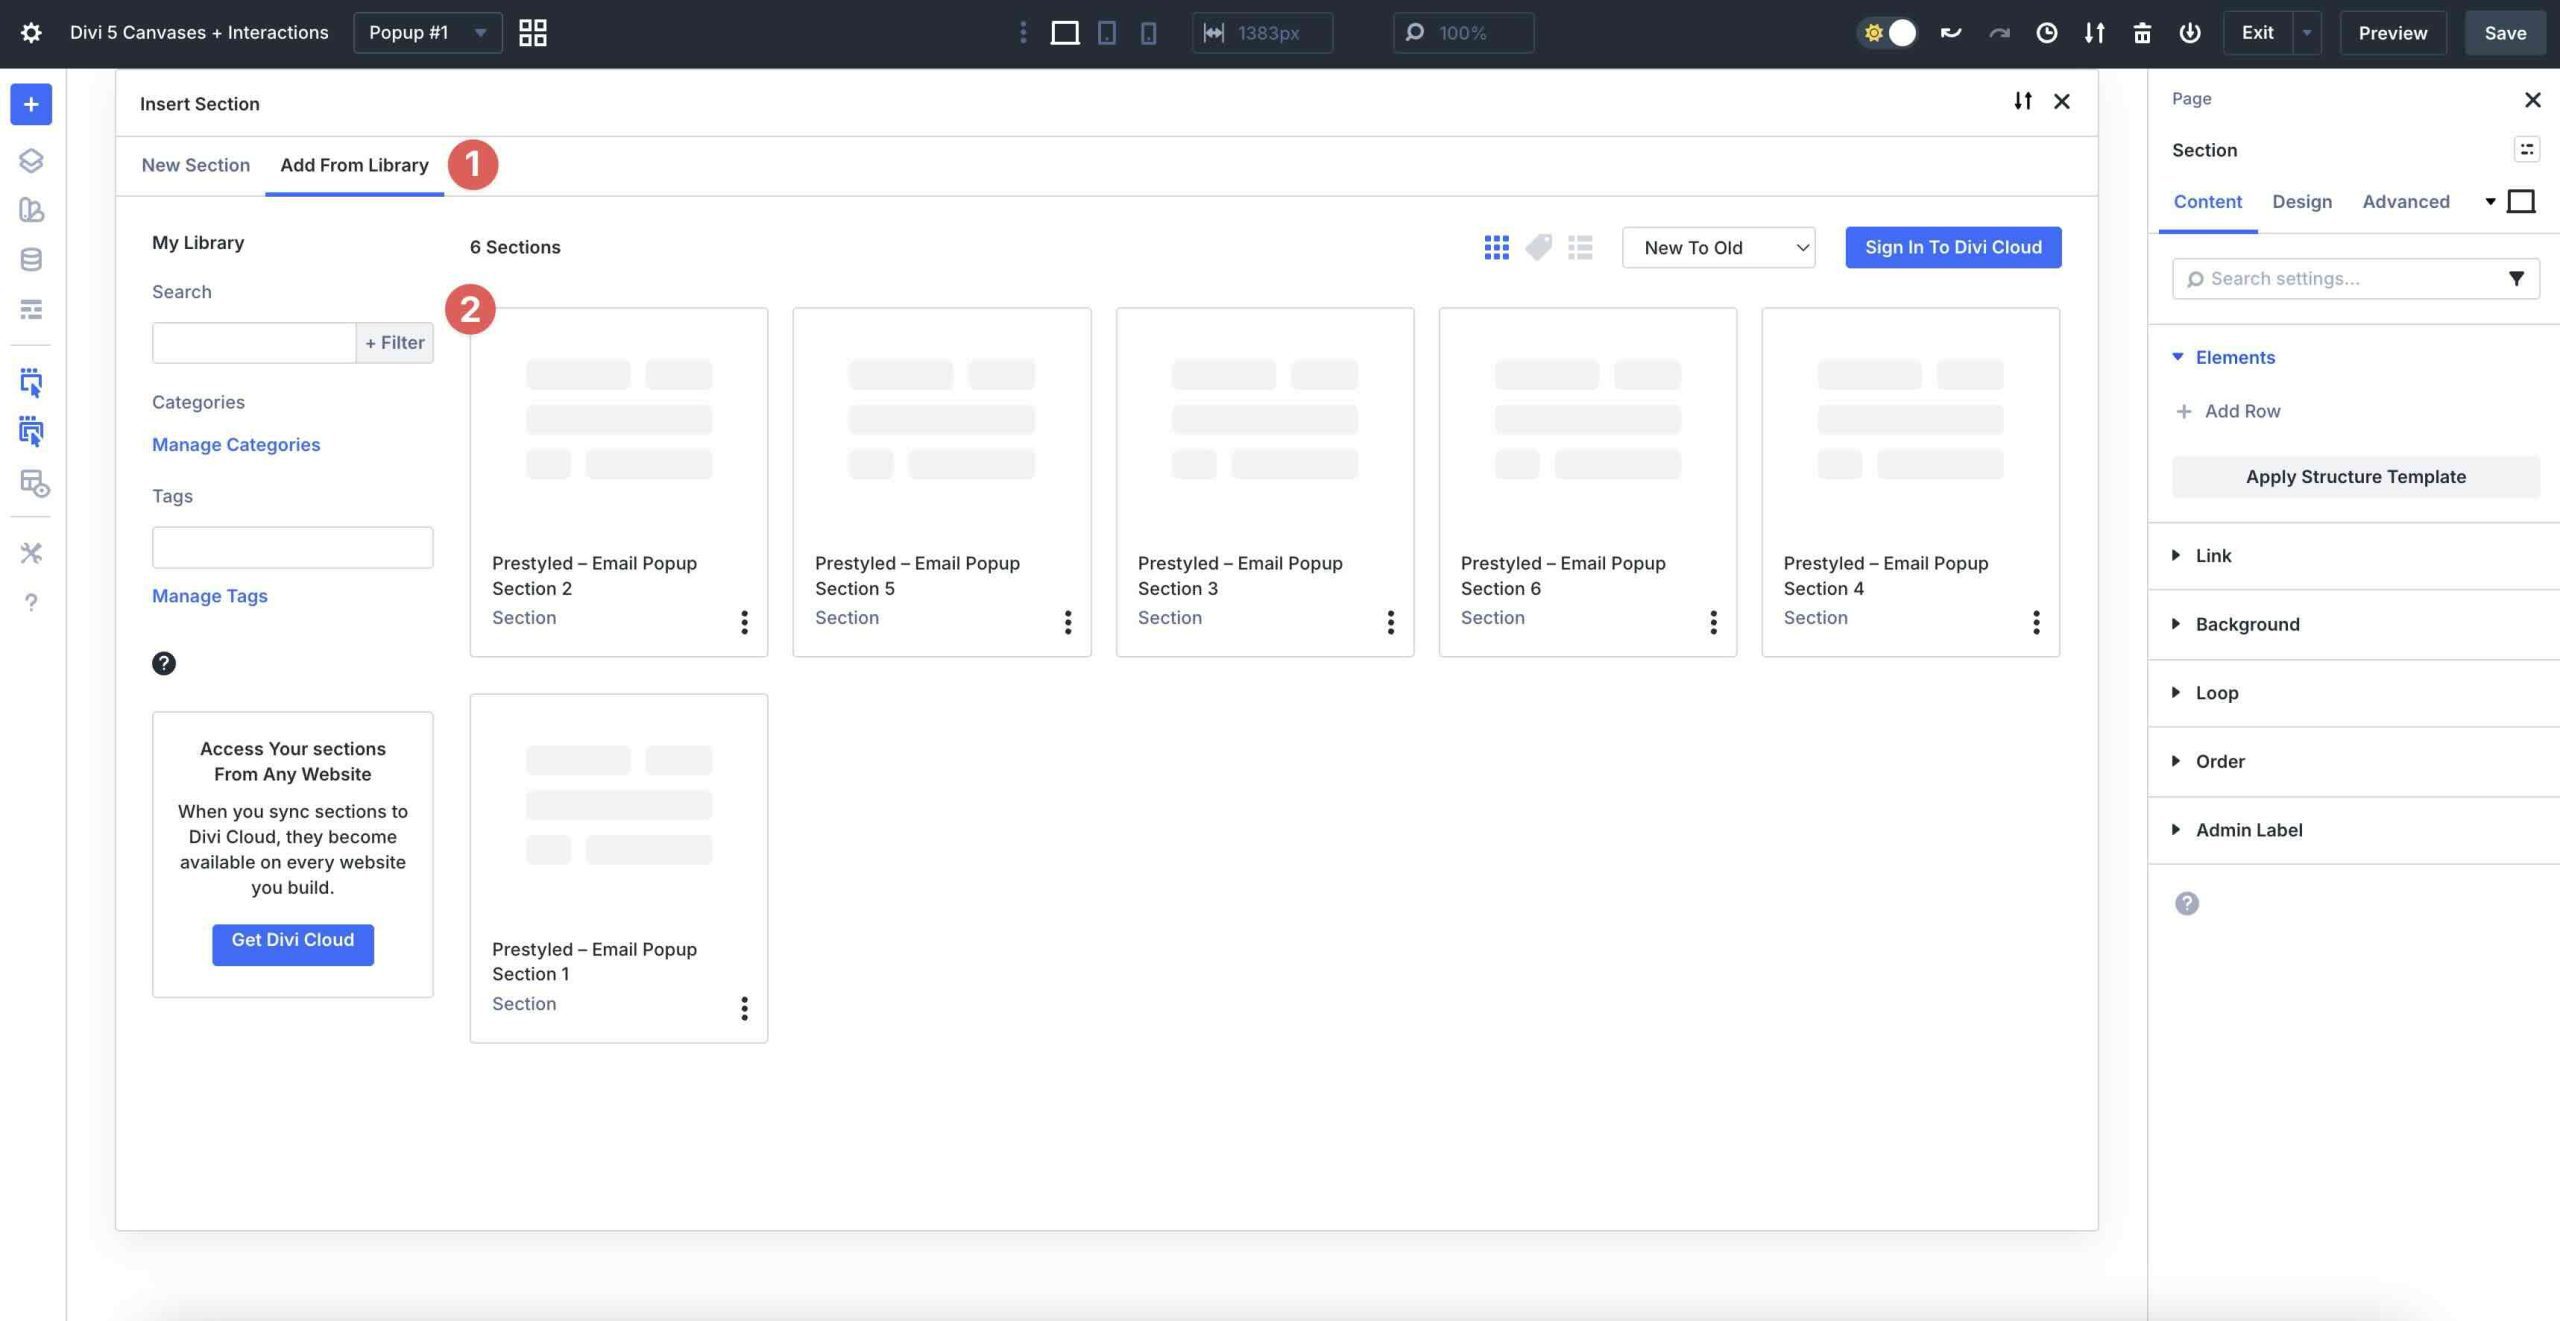
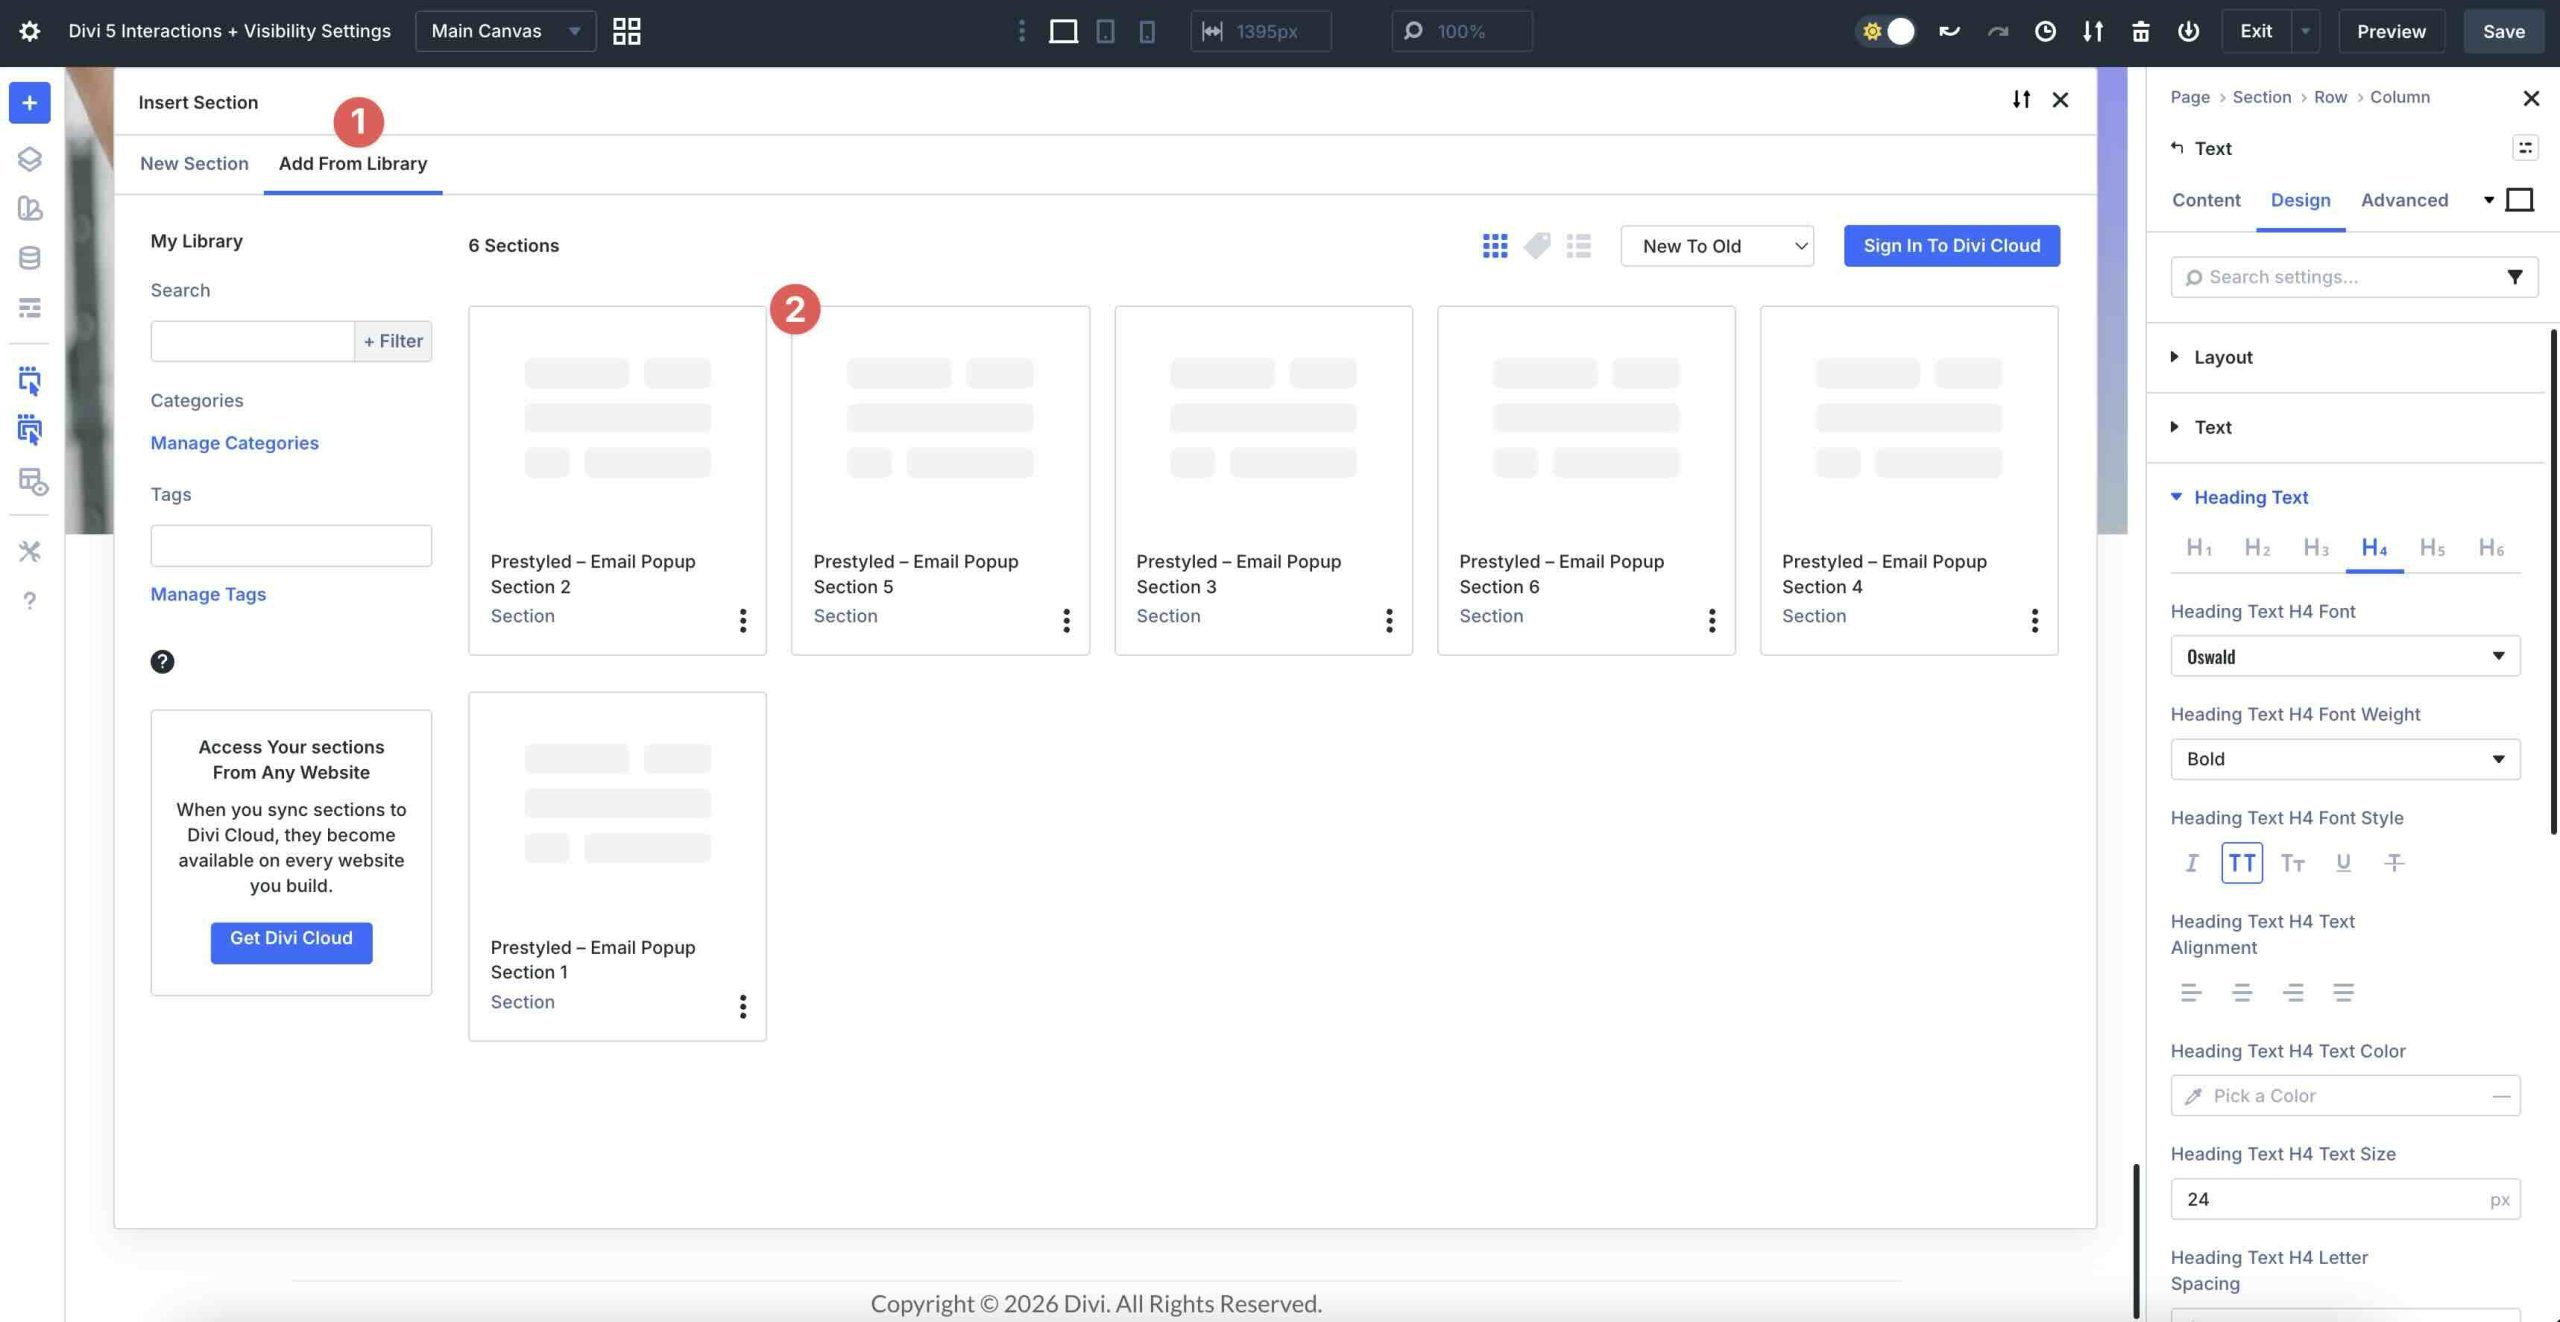
To keep things simple, I’ll use a pre-designed email popup created by the Elegant Themes design team. Select the Add From Library tab and choose one of the designs.
Make any necessary design changes to match your site.
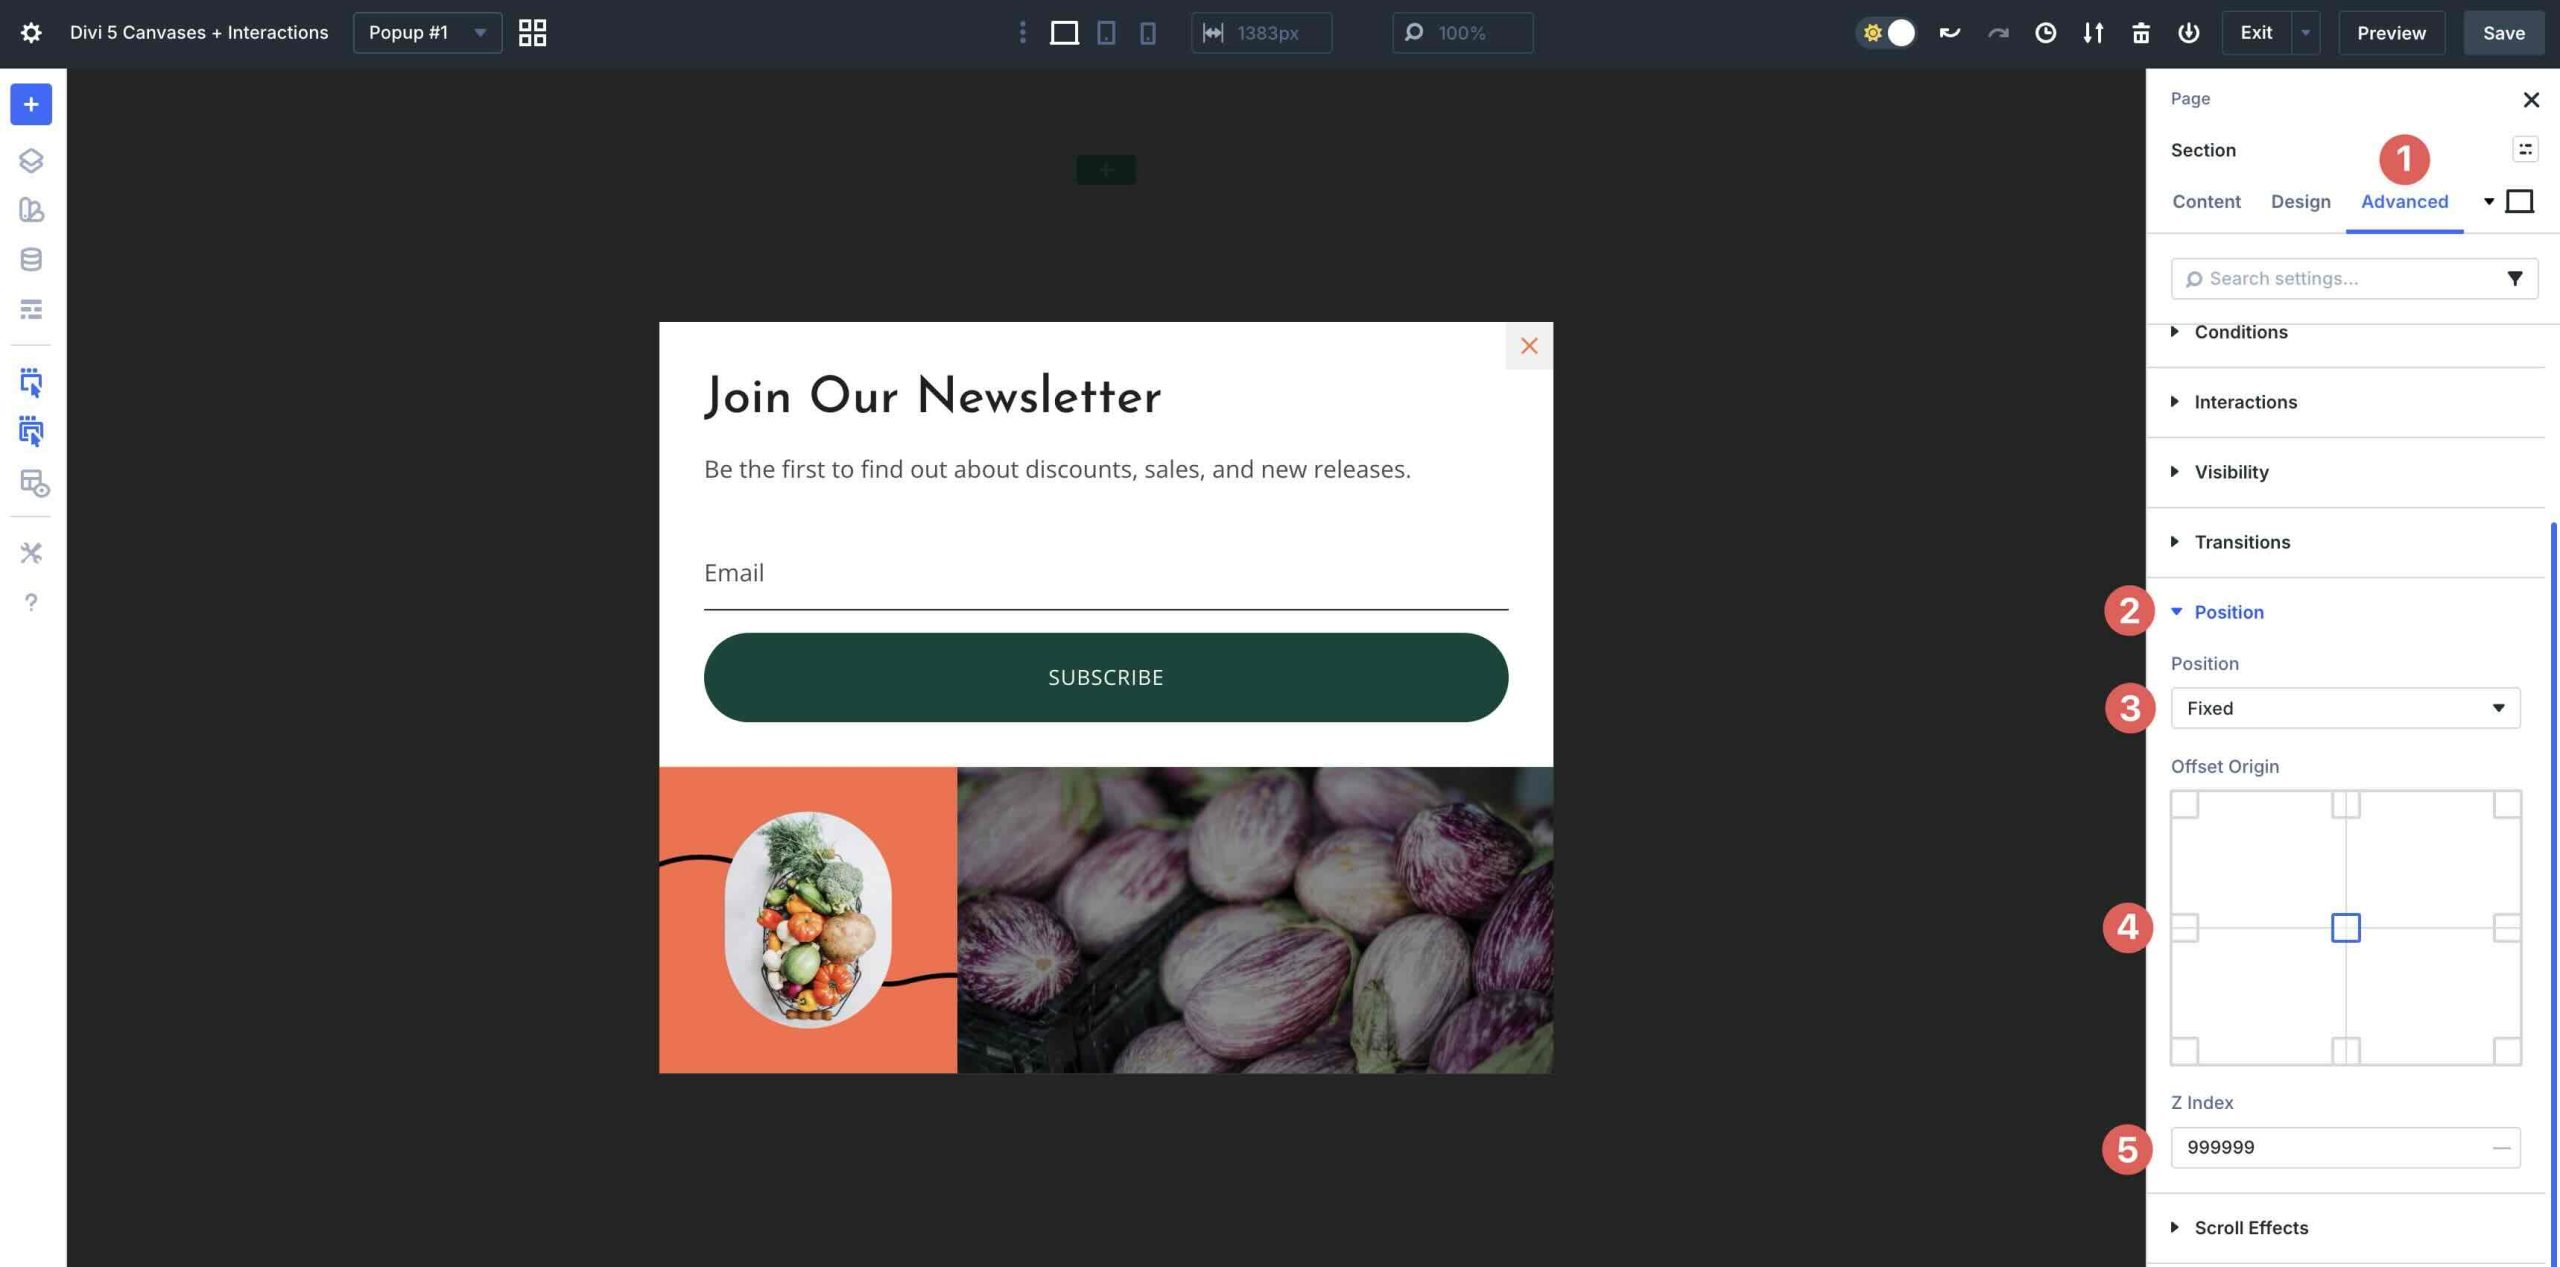
When creating a popup, it’s important to set its position. Navigate to the Advanced tab, expand the Position menu, and set the Position to Fixed. Set the Offset Origin to Center and increase the Z Index to 999999 so it stays above other content on the page.
Once your design changes are complete, save the layout and switch back to the Main Canvas.
Create The Interactions
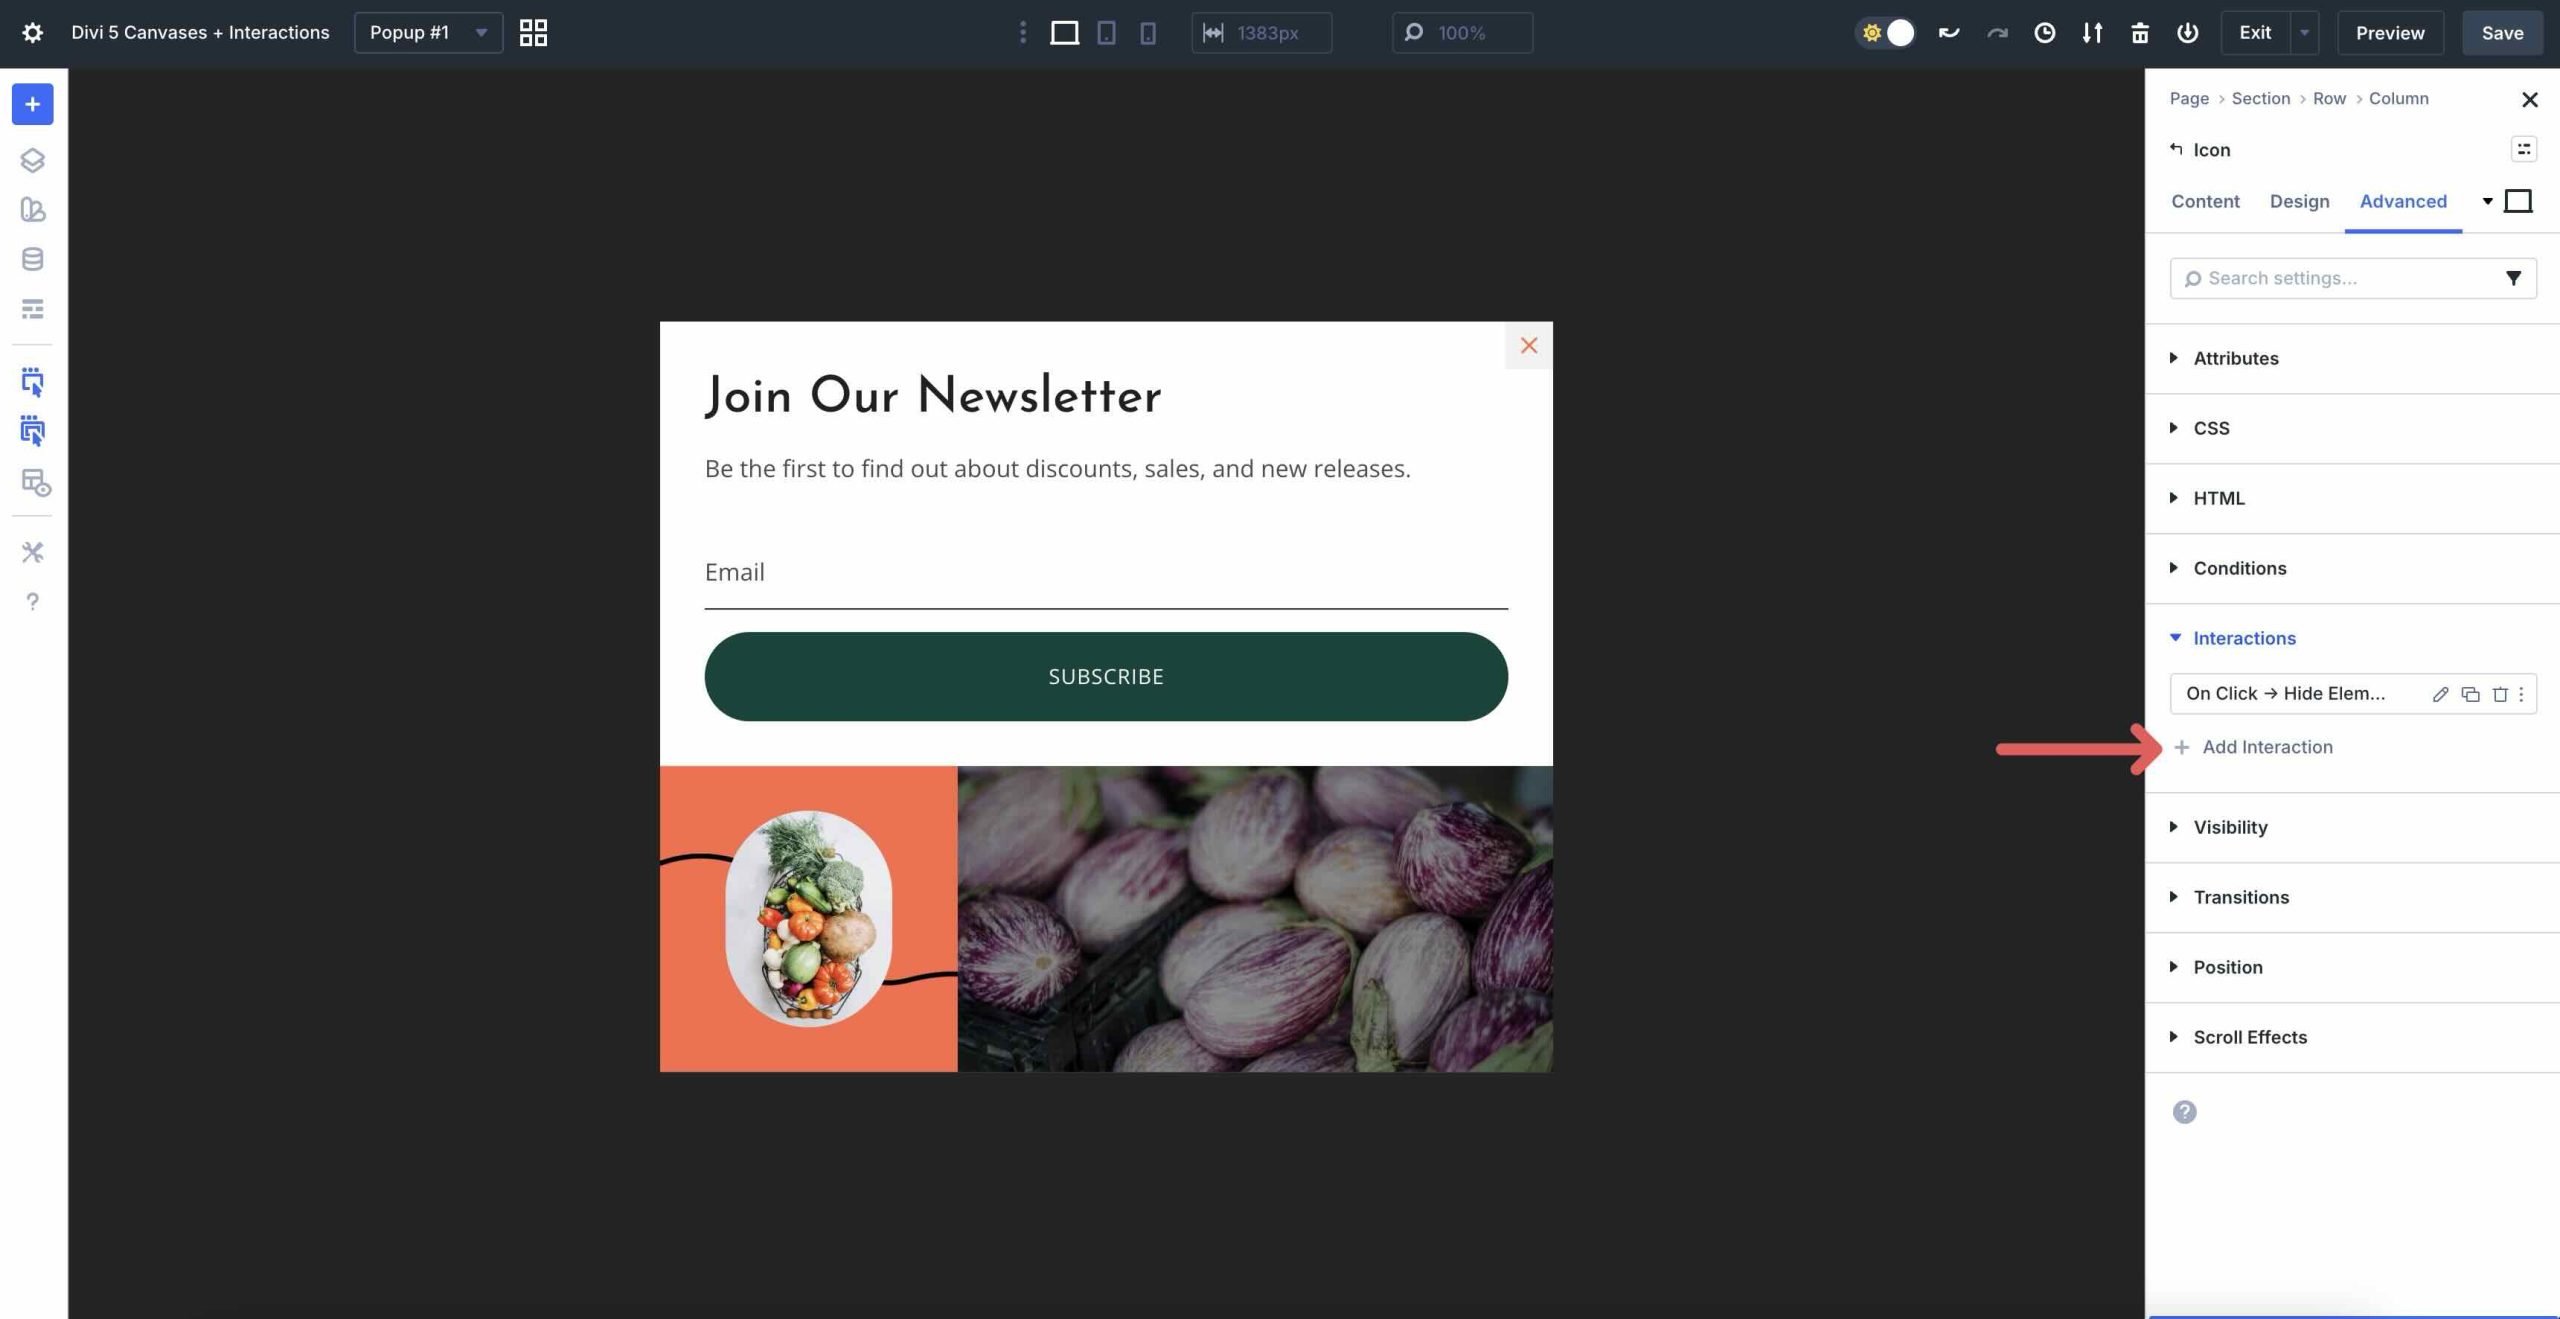
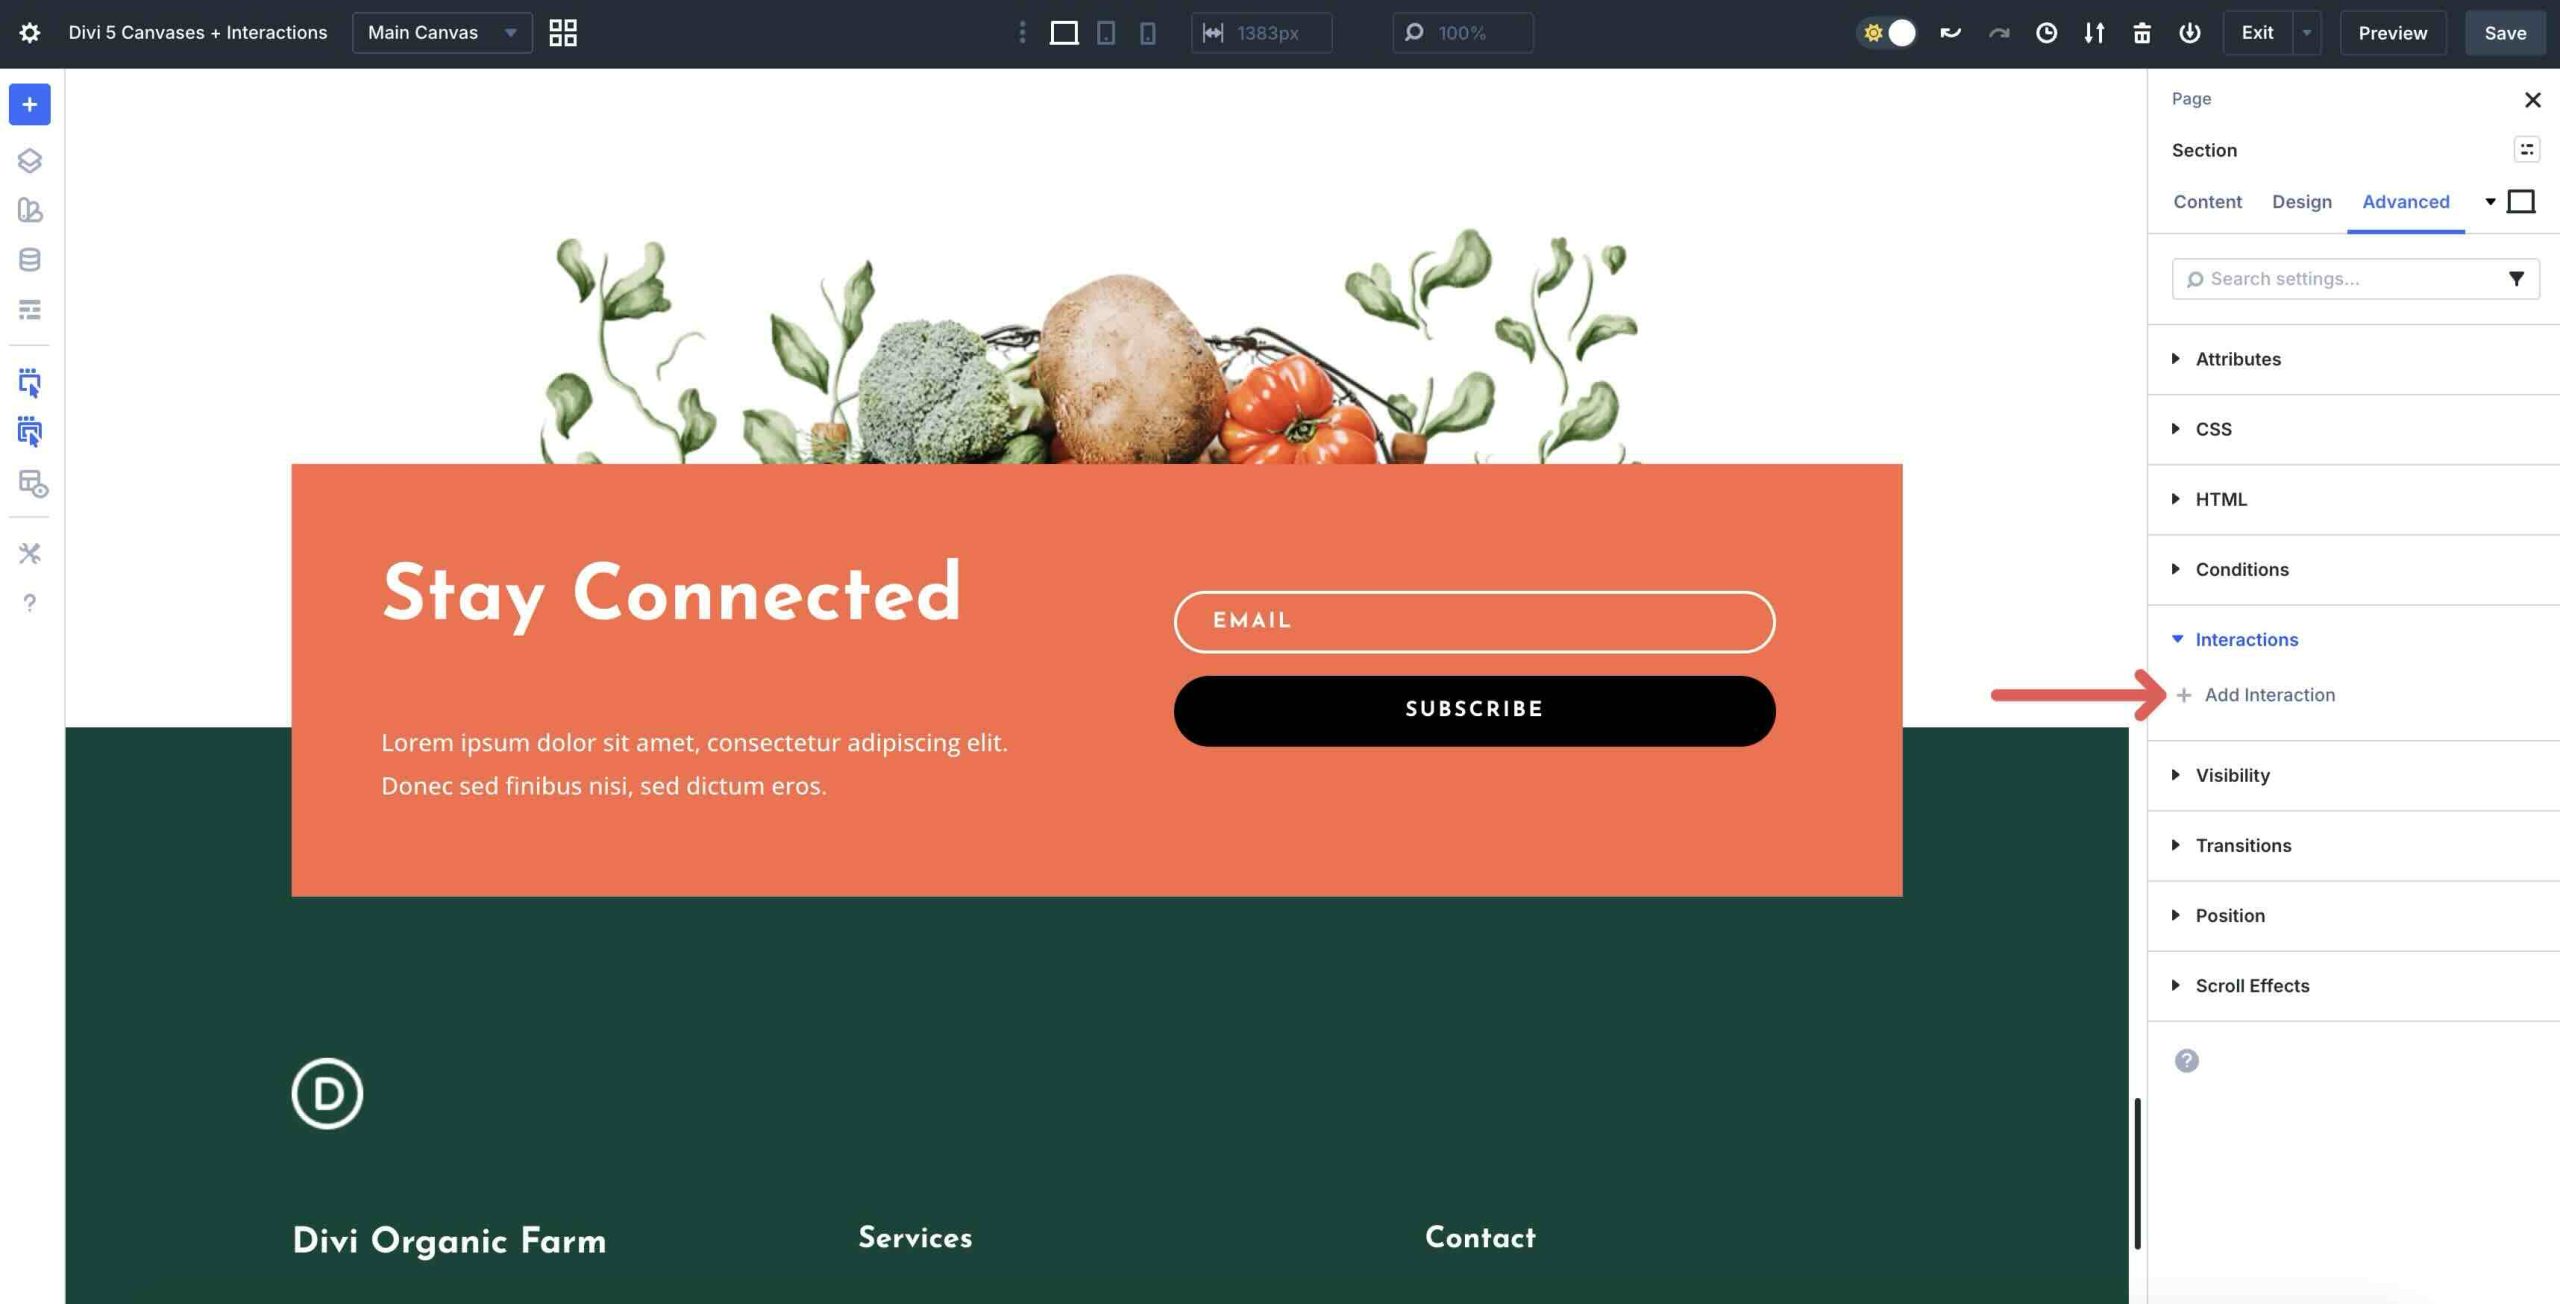
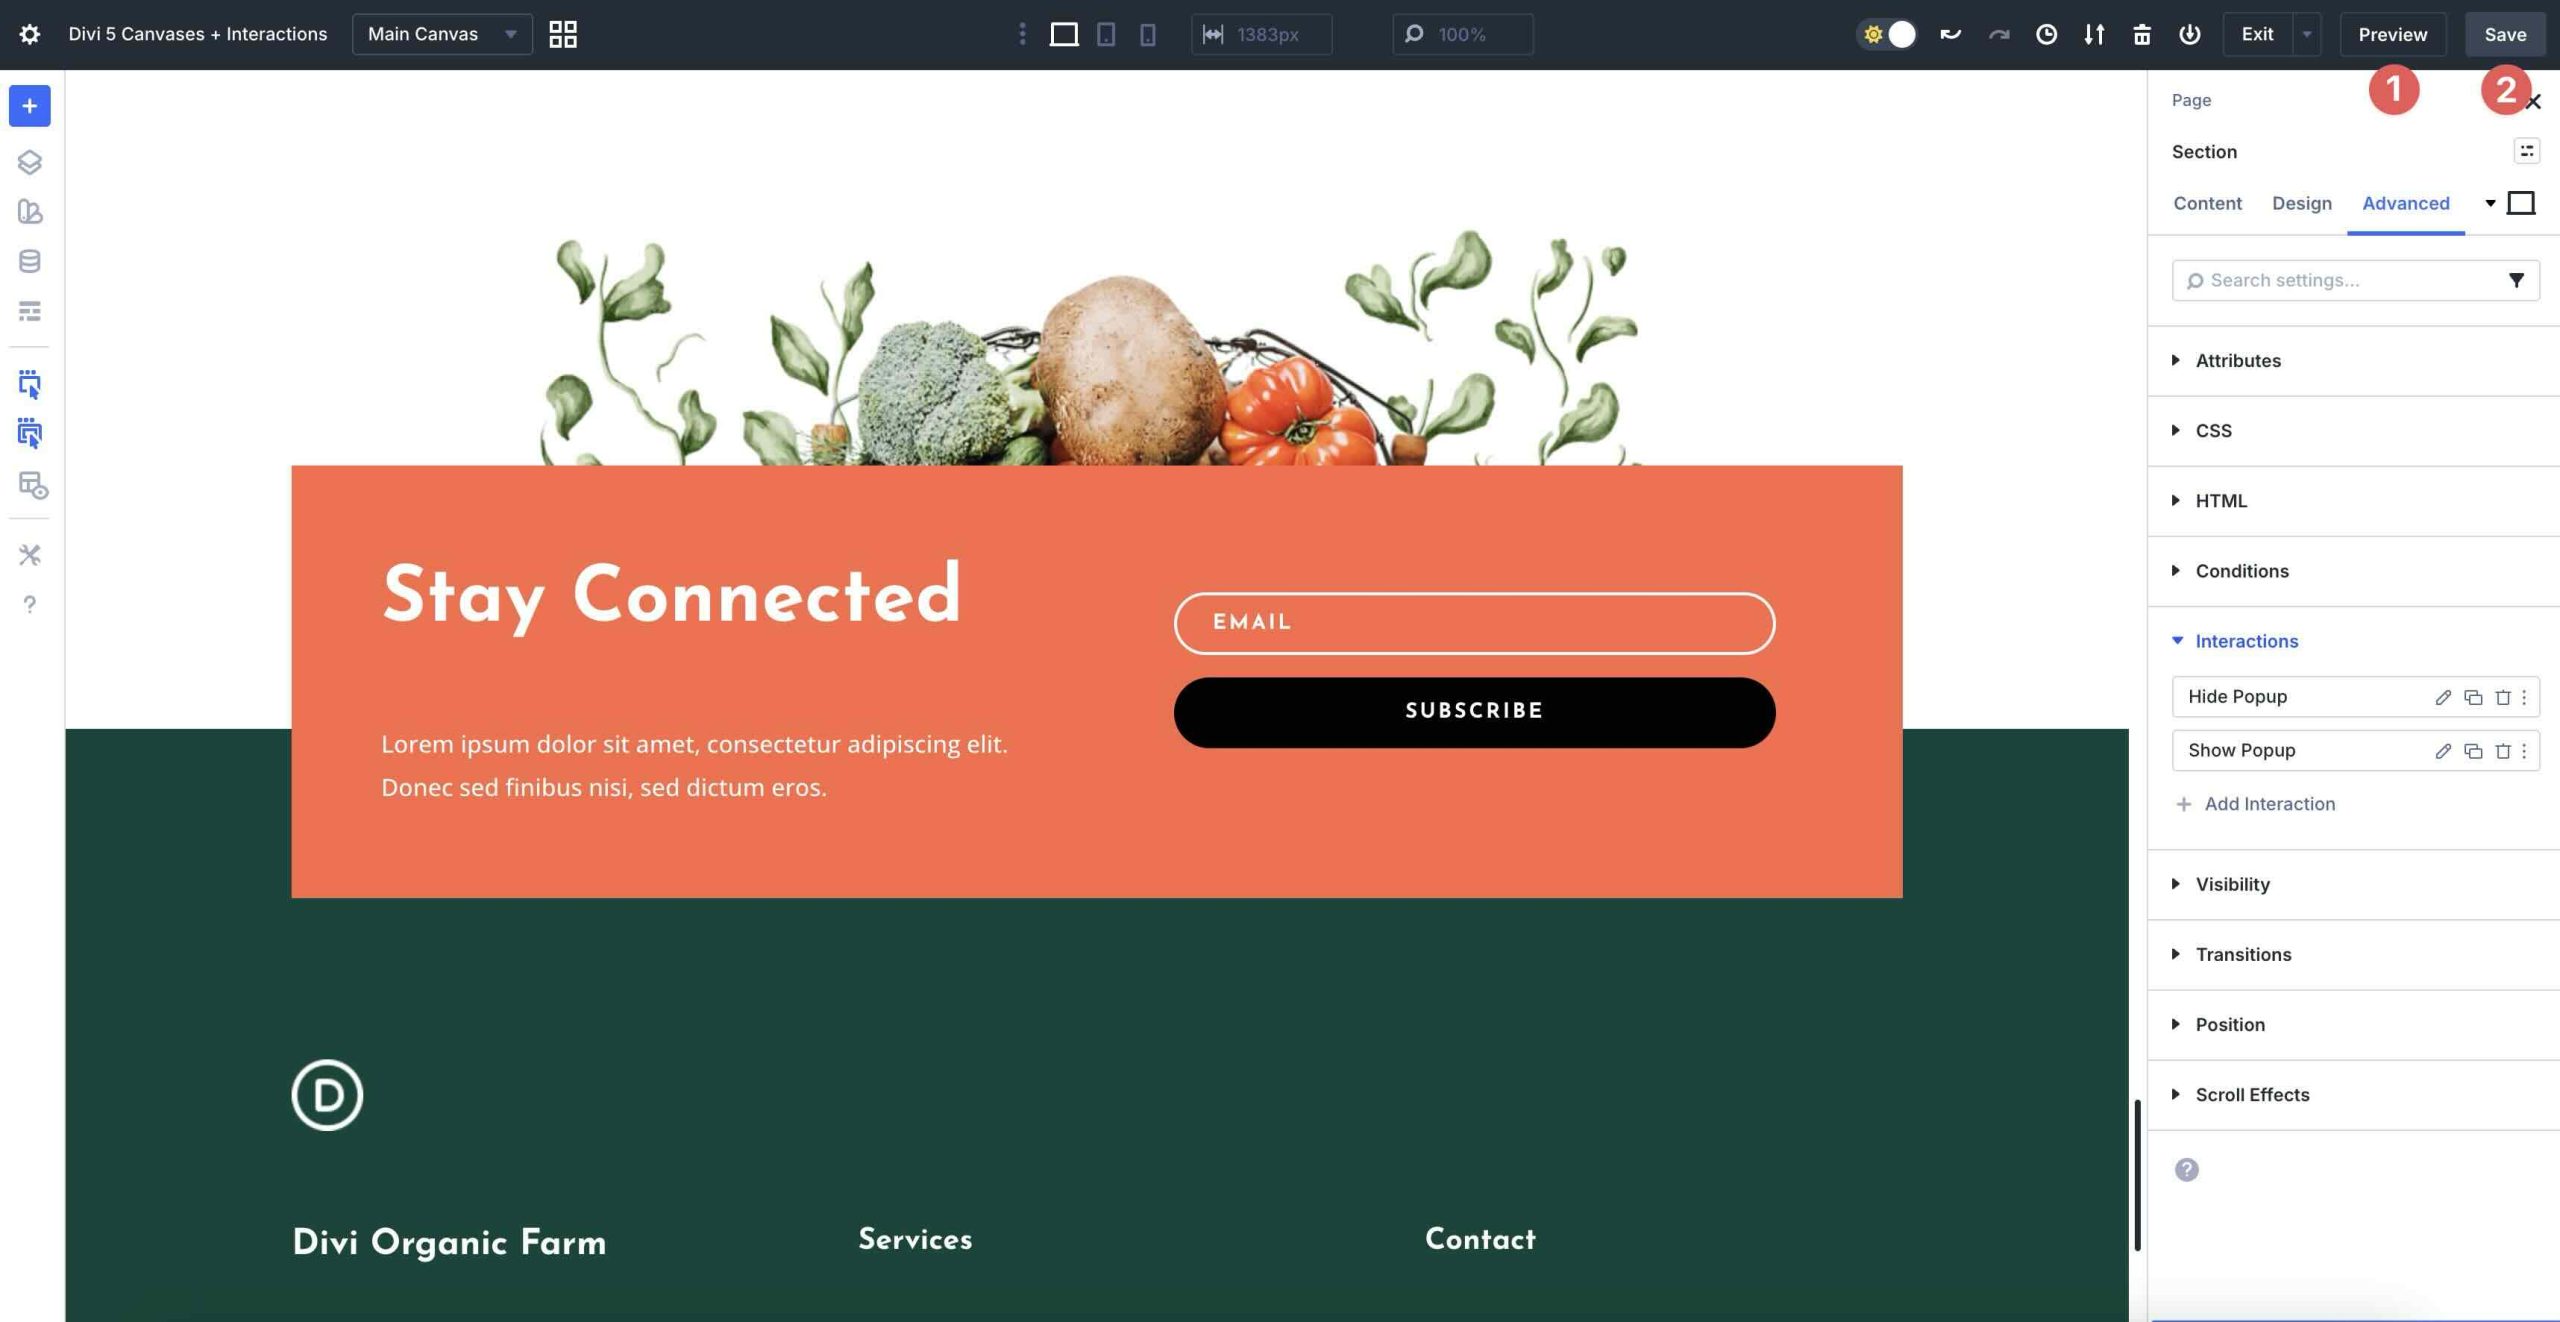
Back on the Main Canvas, you’ll create two Interactions: one to keep the popup hidden on page load and another to display it once a specific section enters the viewport. Scroll down and select a Section toward the bottom of the page. Click the Advanced tab and expand the Interactions menu.
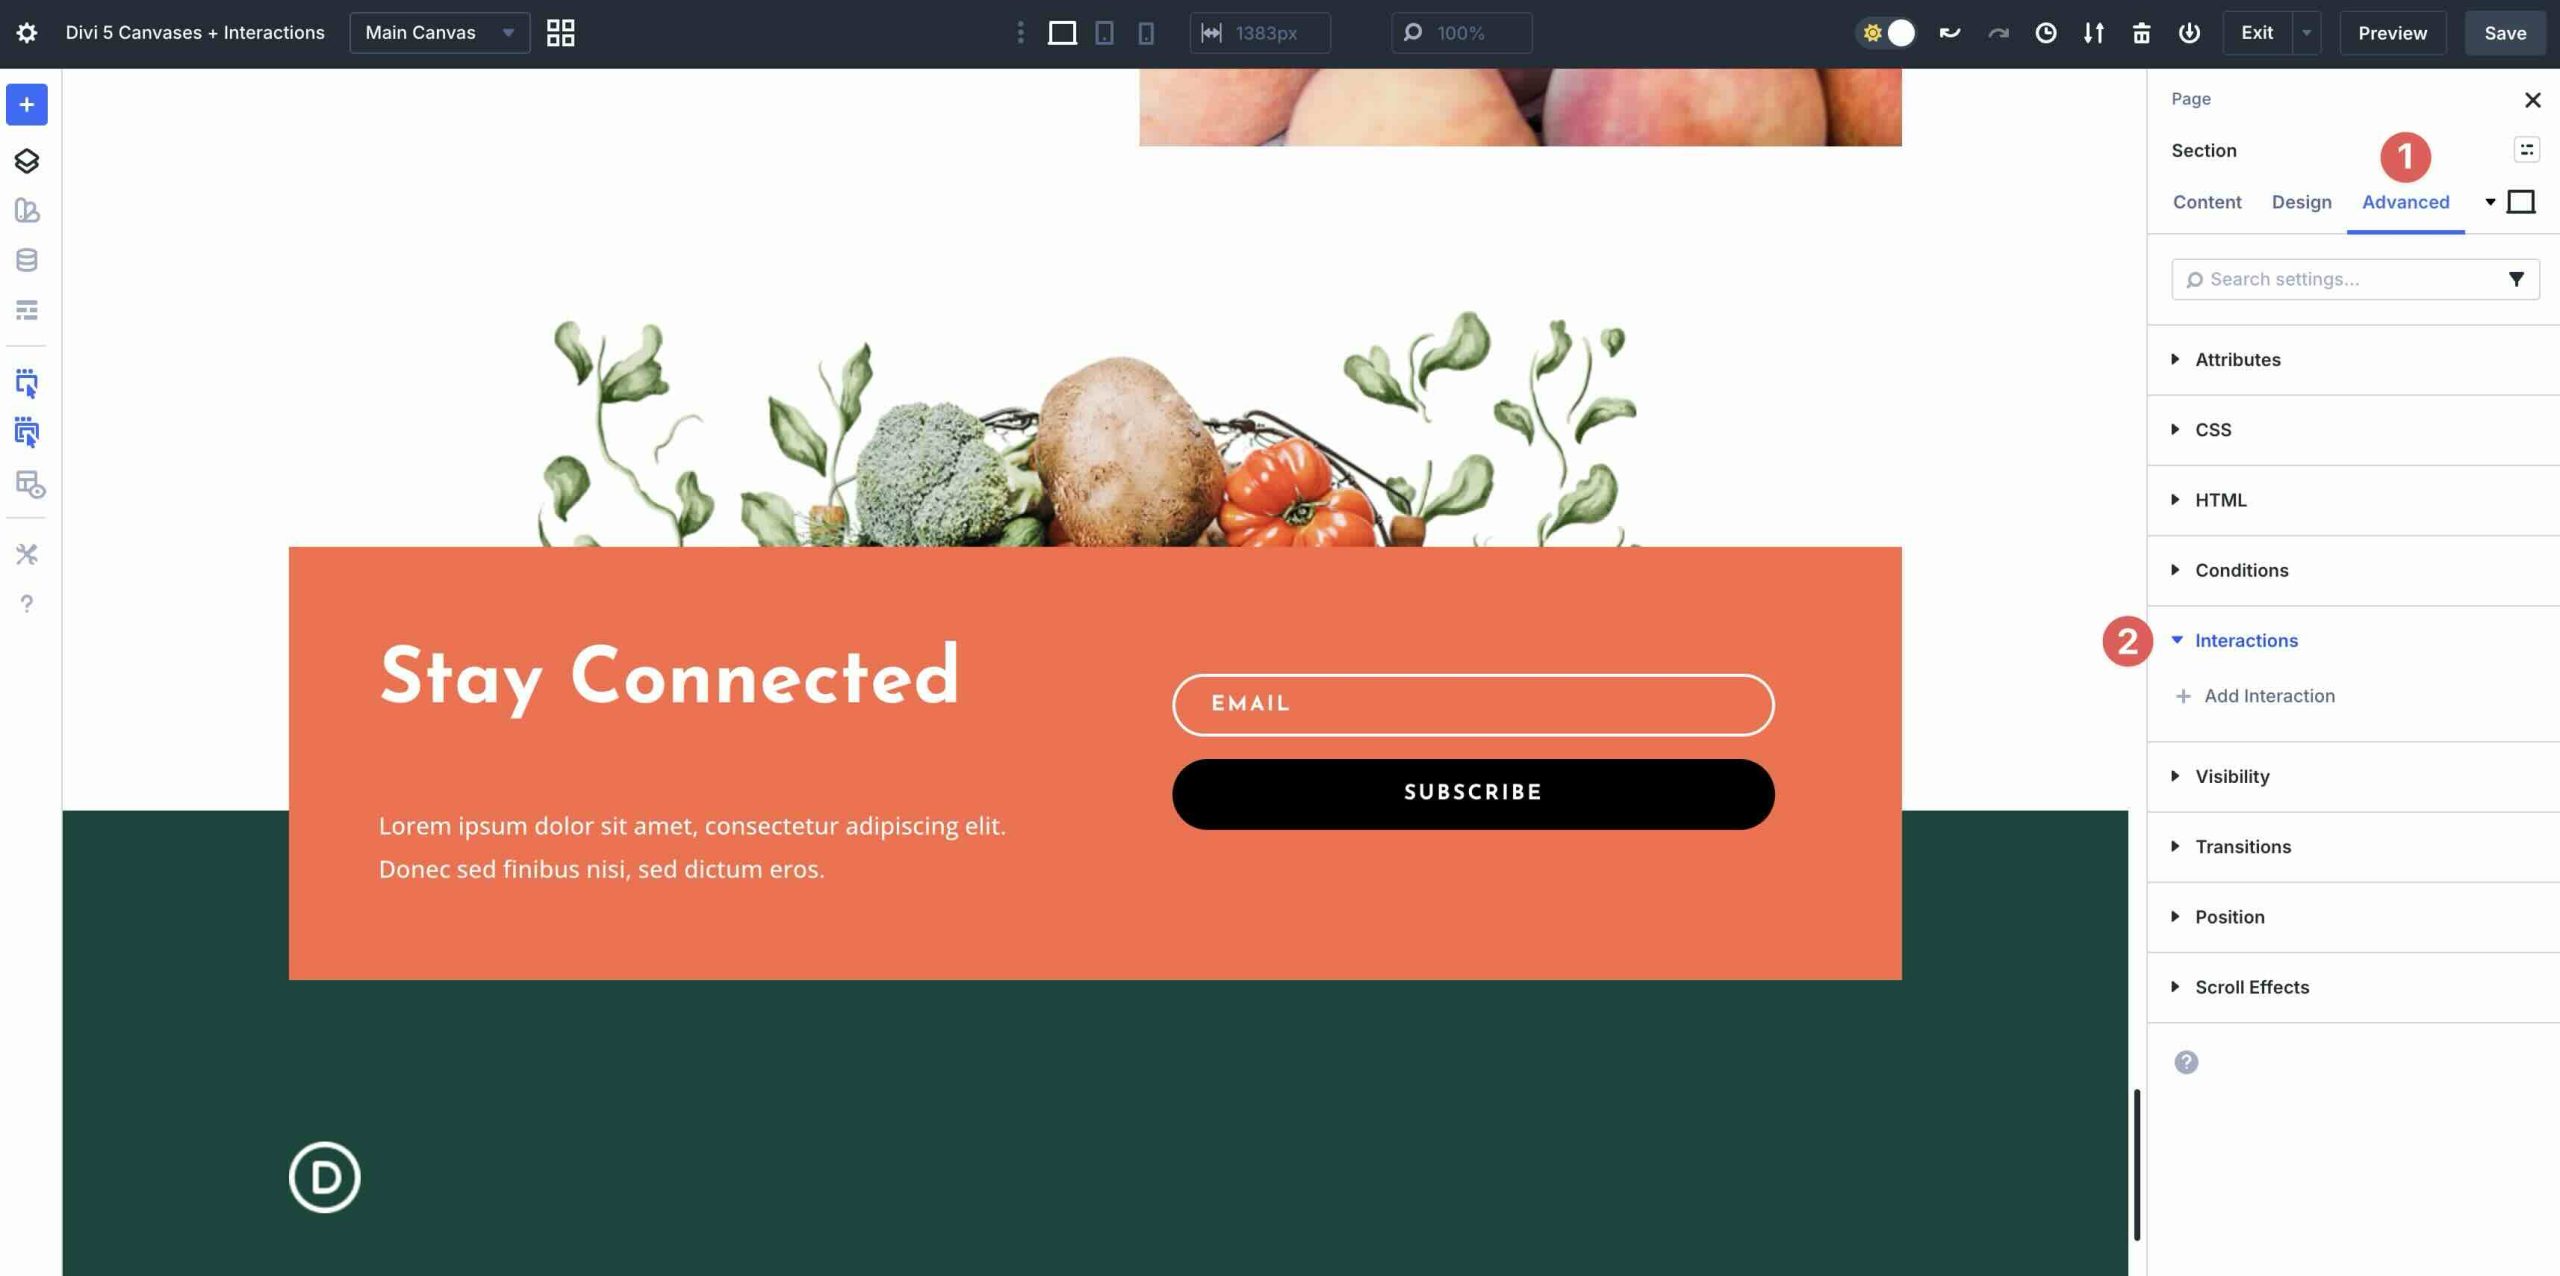
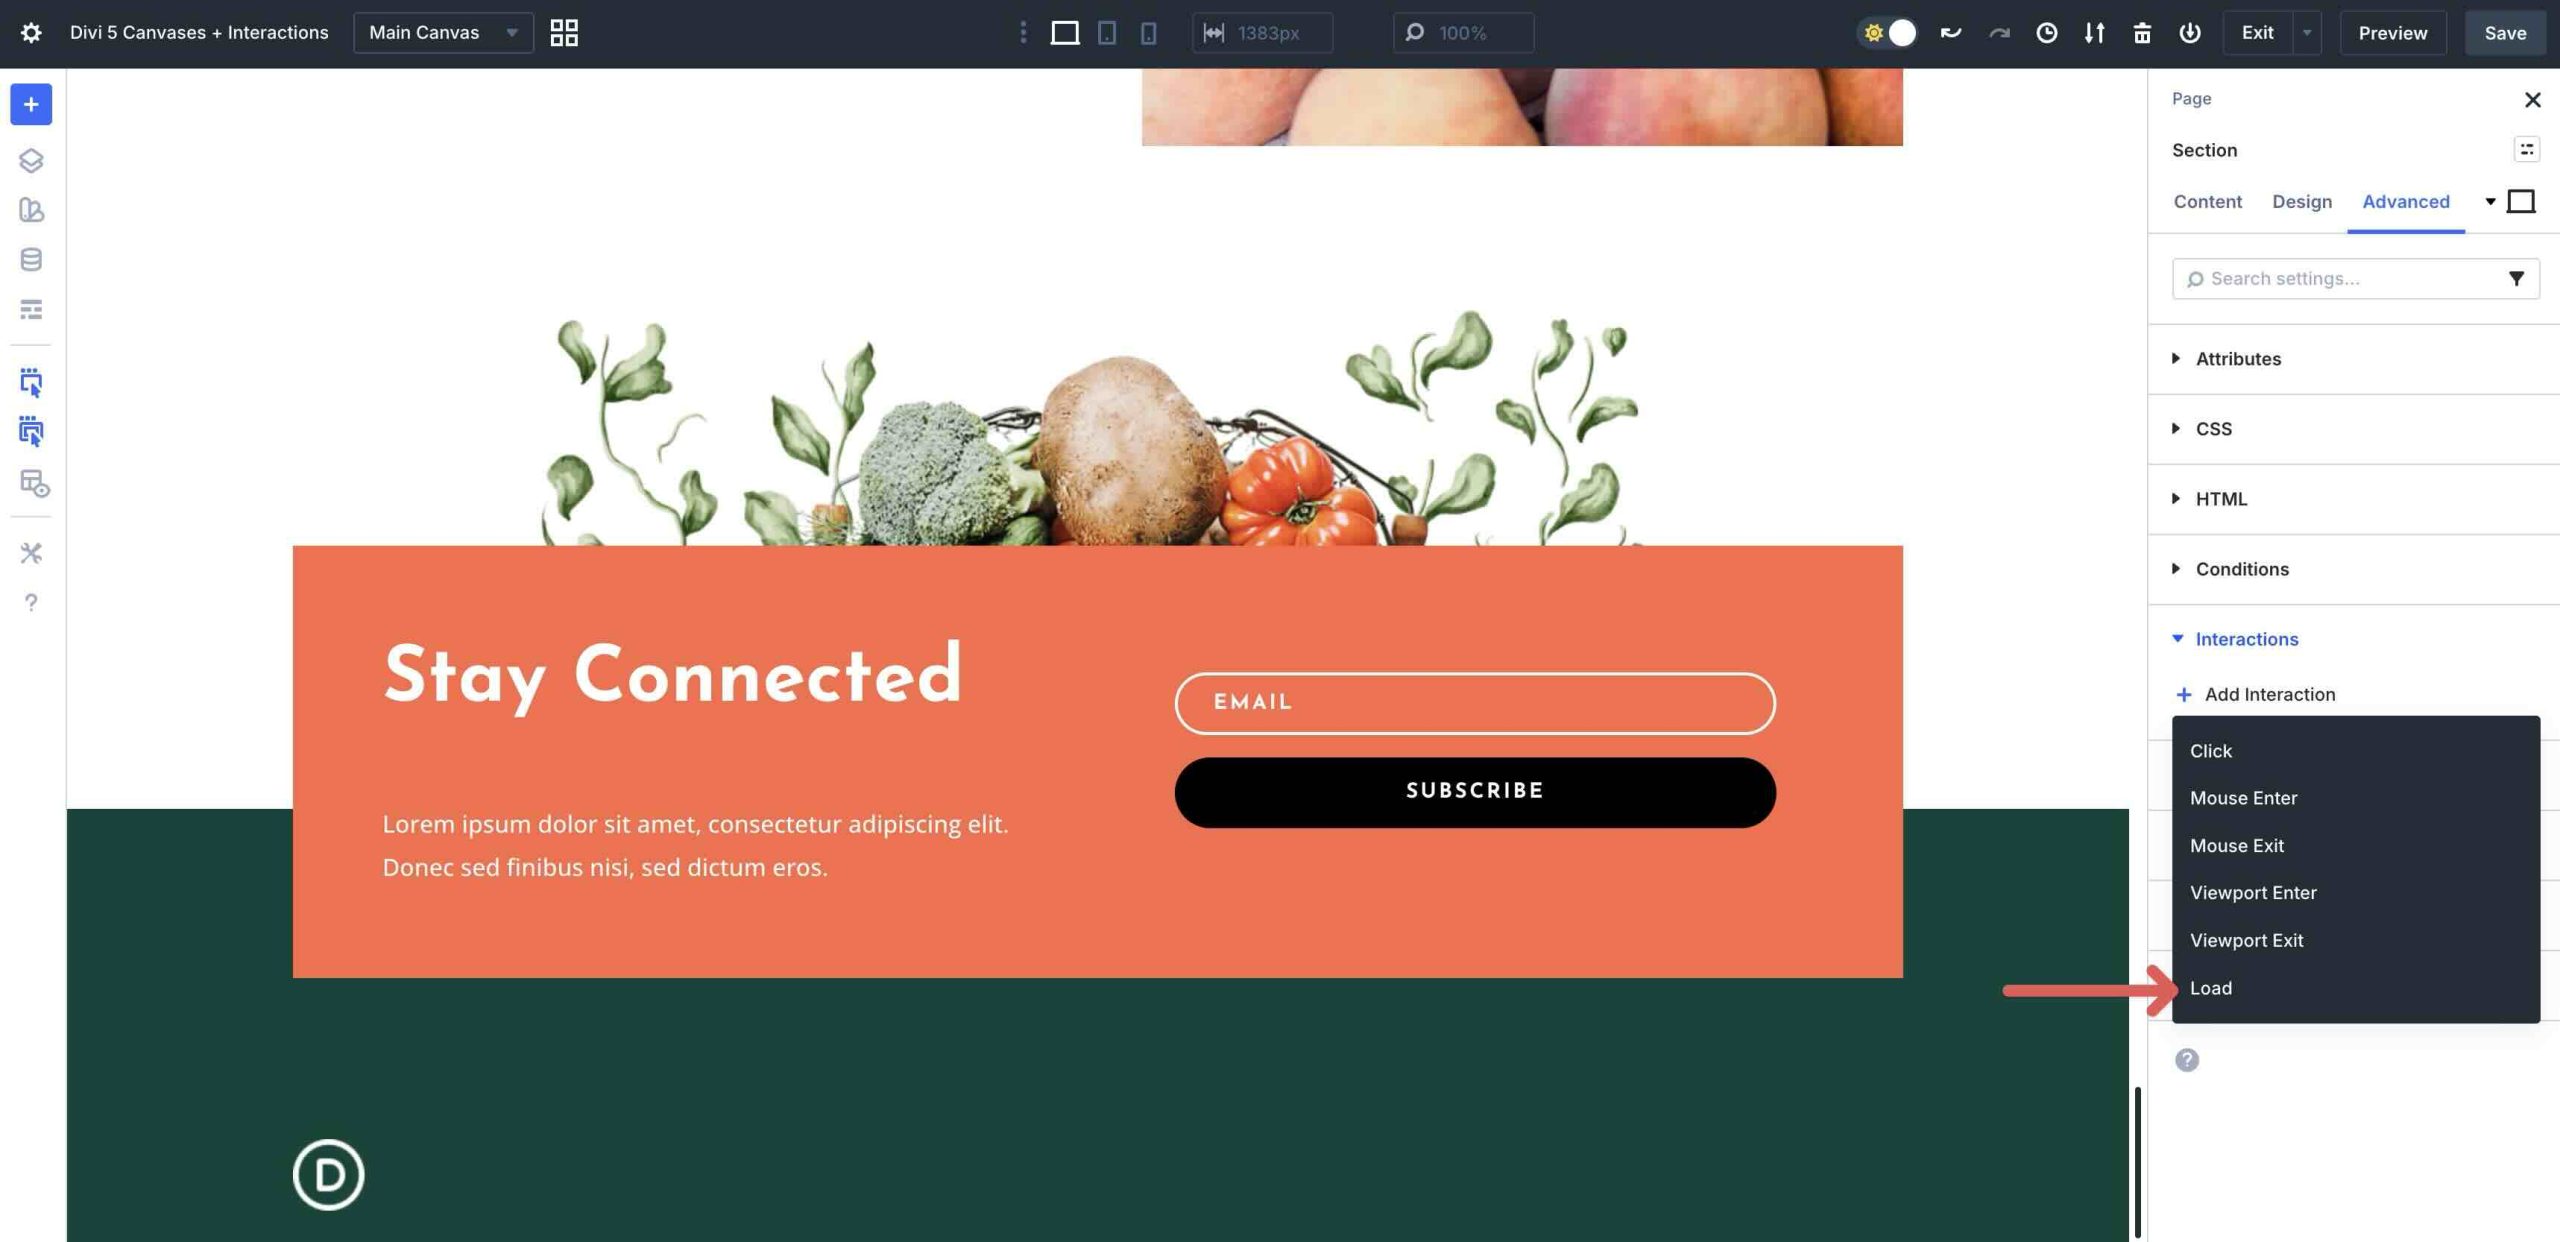
Click the + Add Interaction button to create a new trigger.
Select Load from the dropdown options.
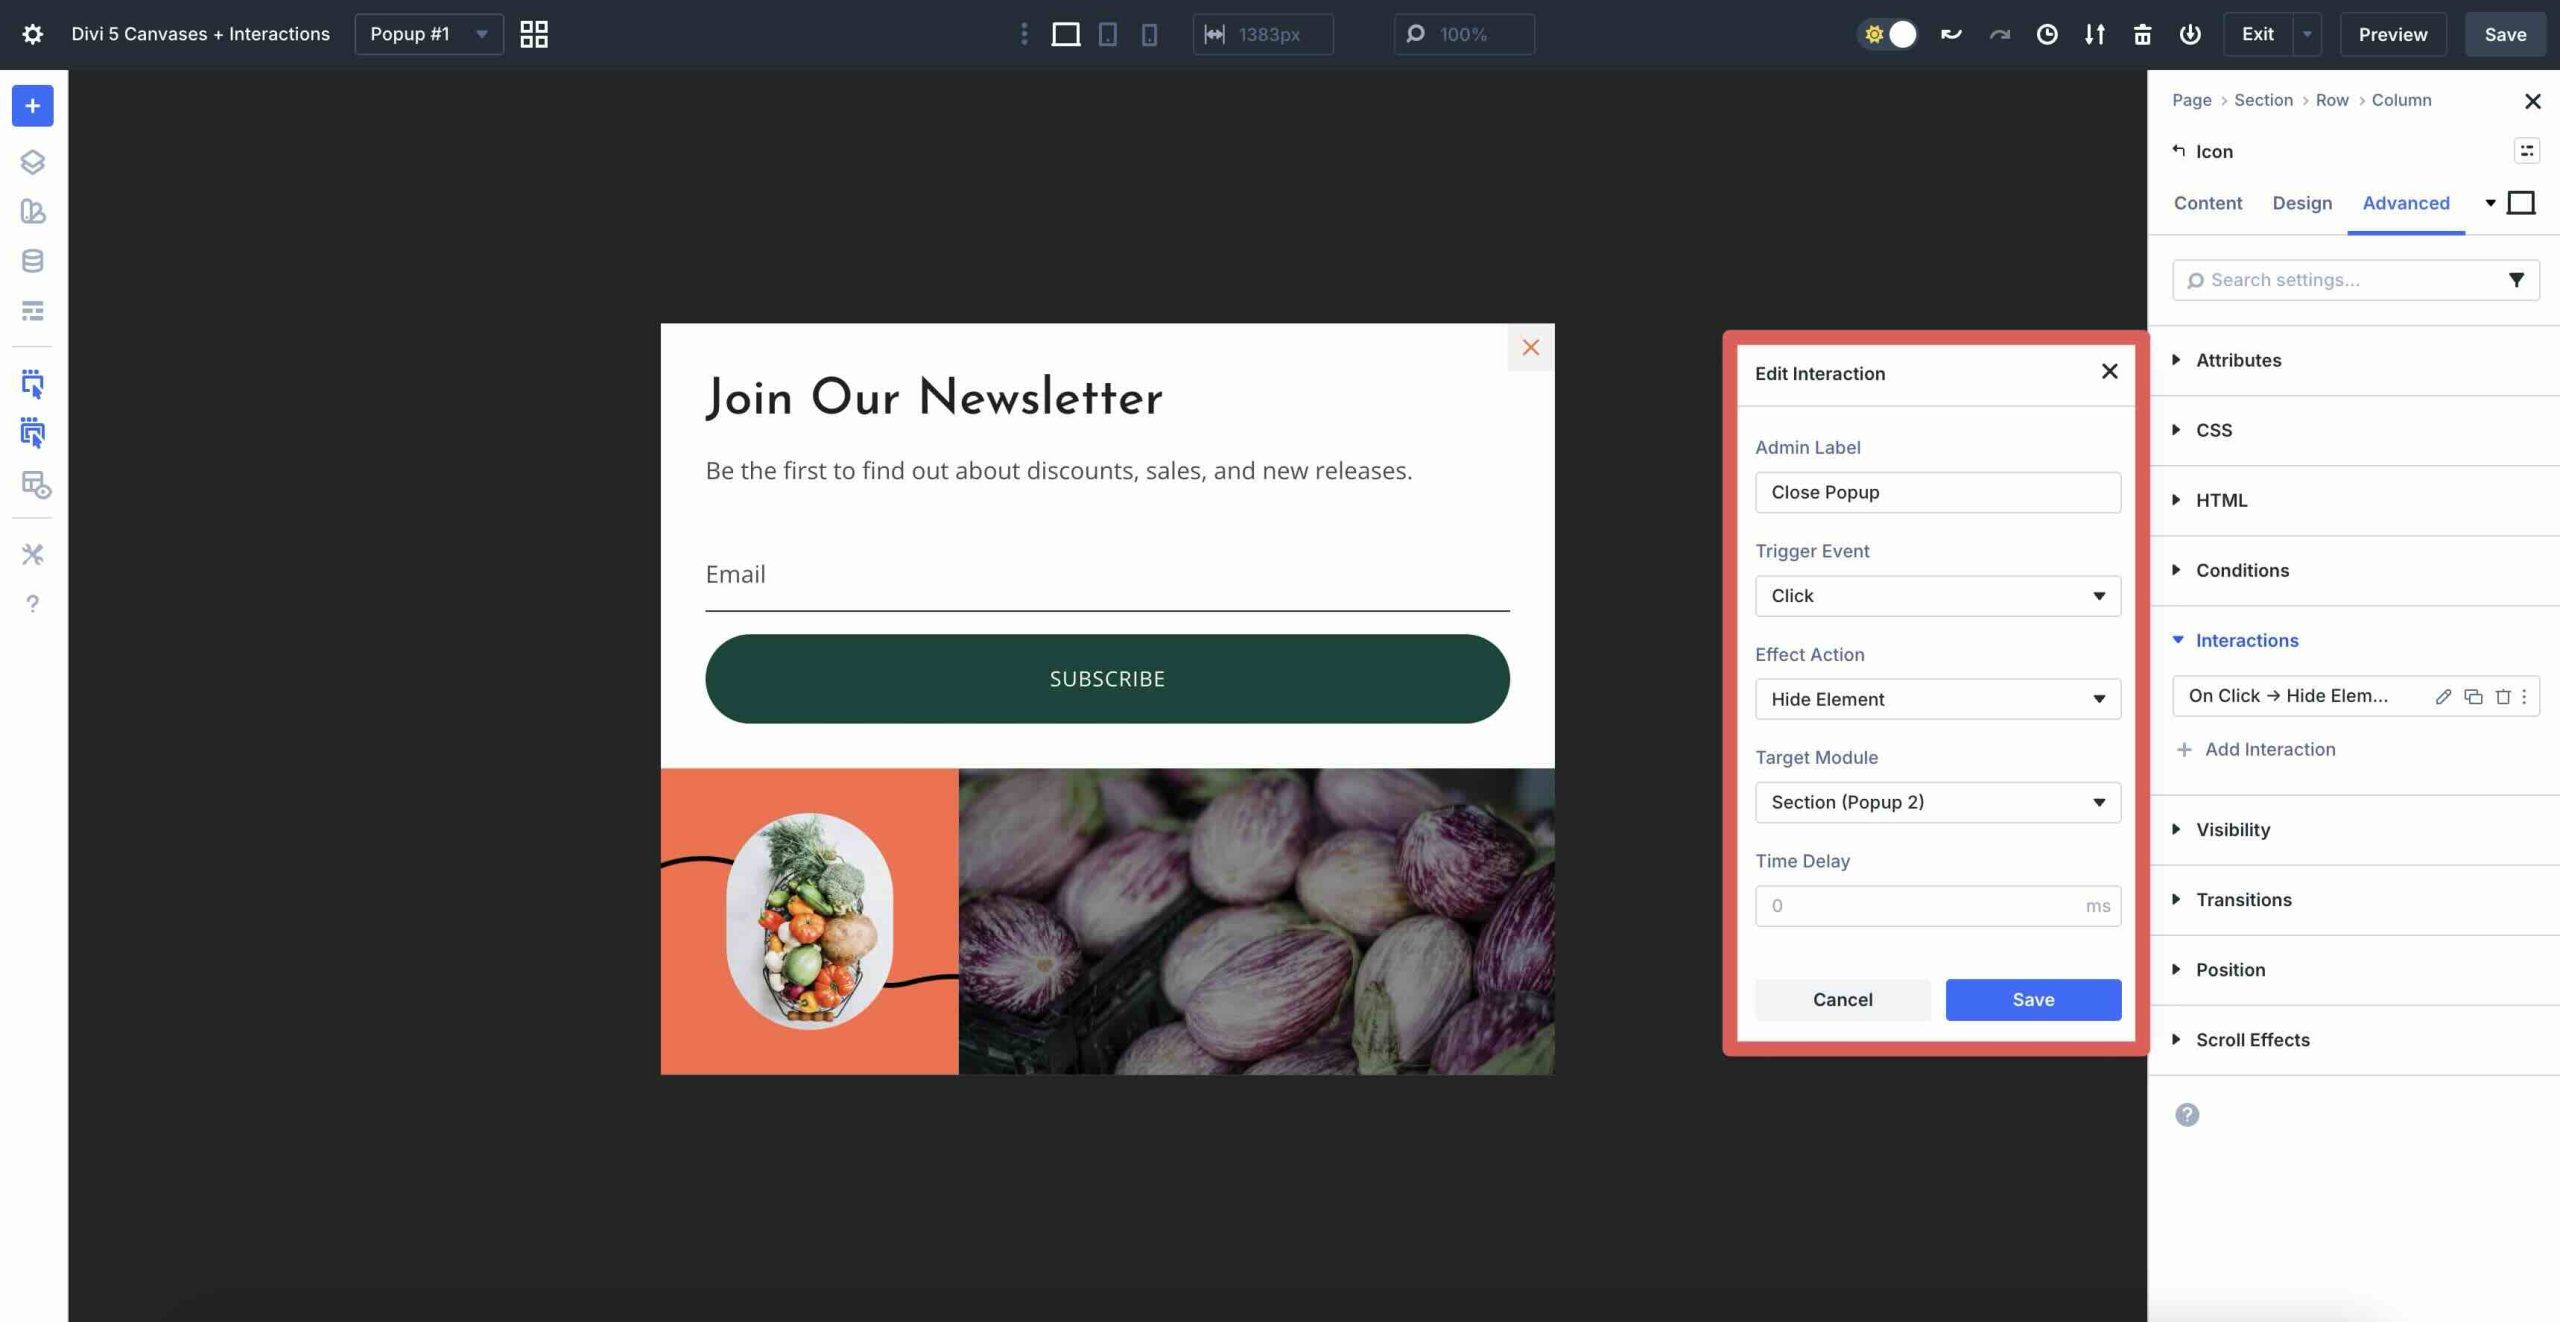
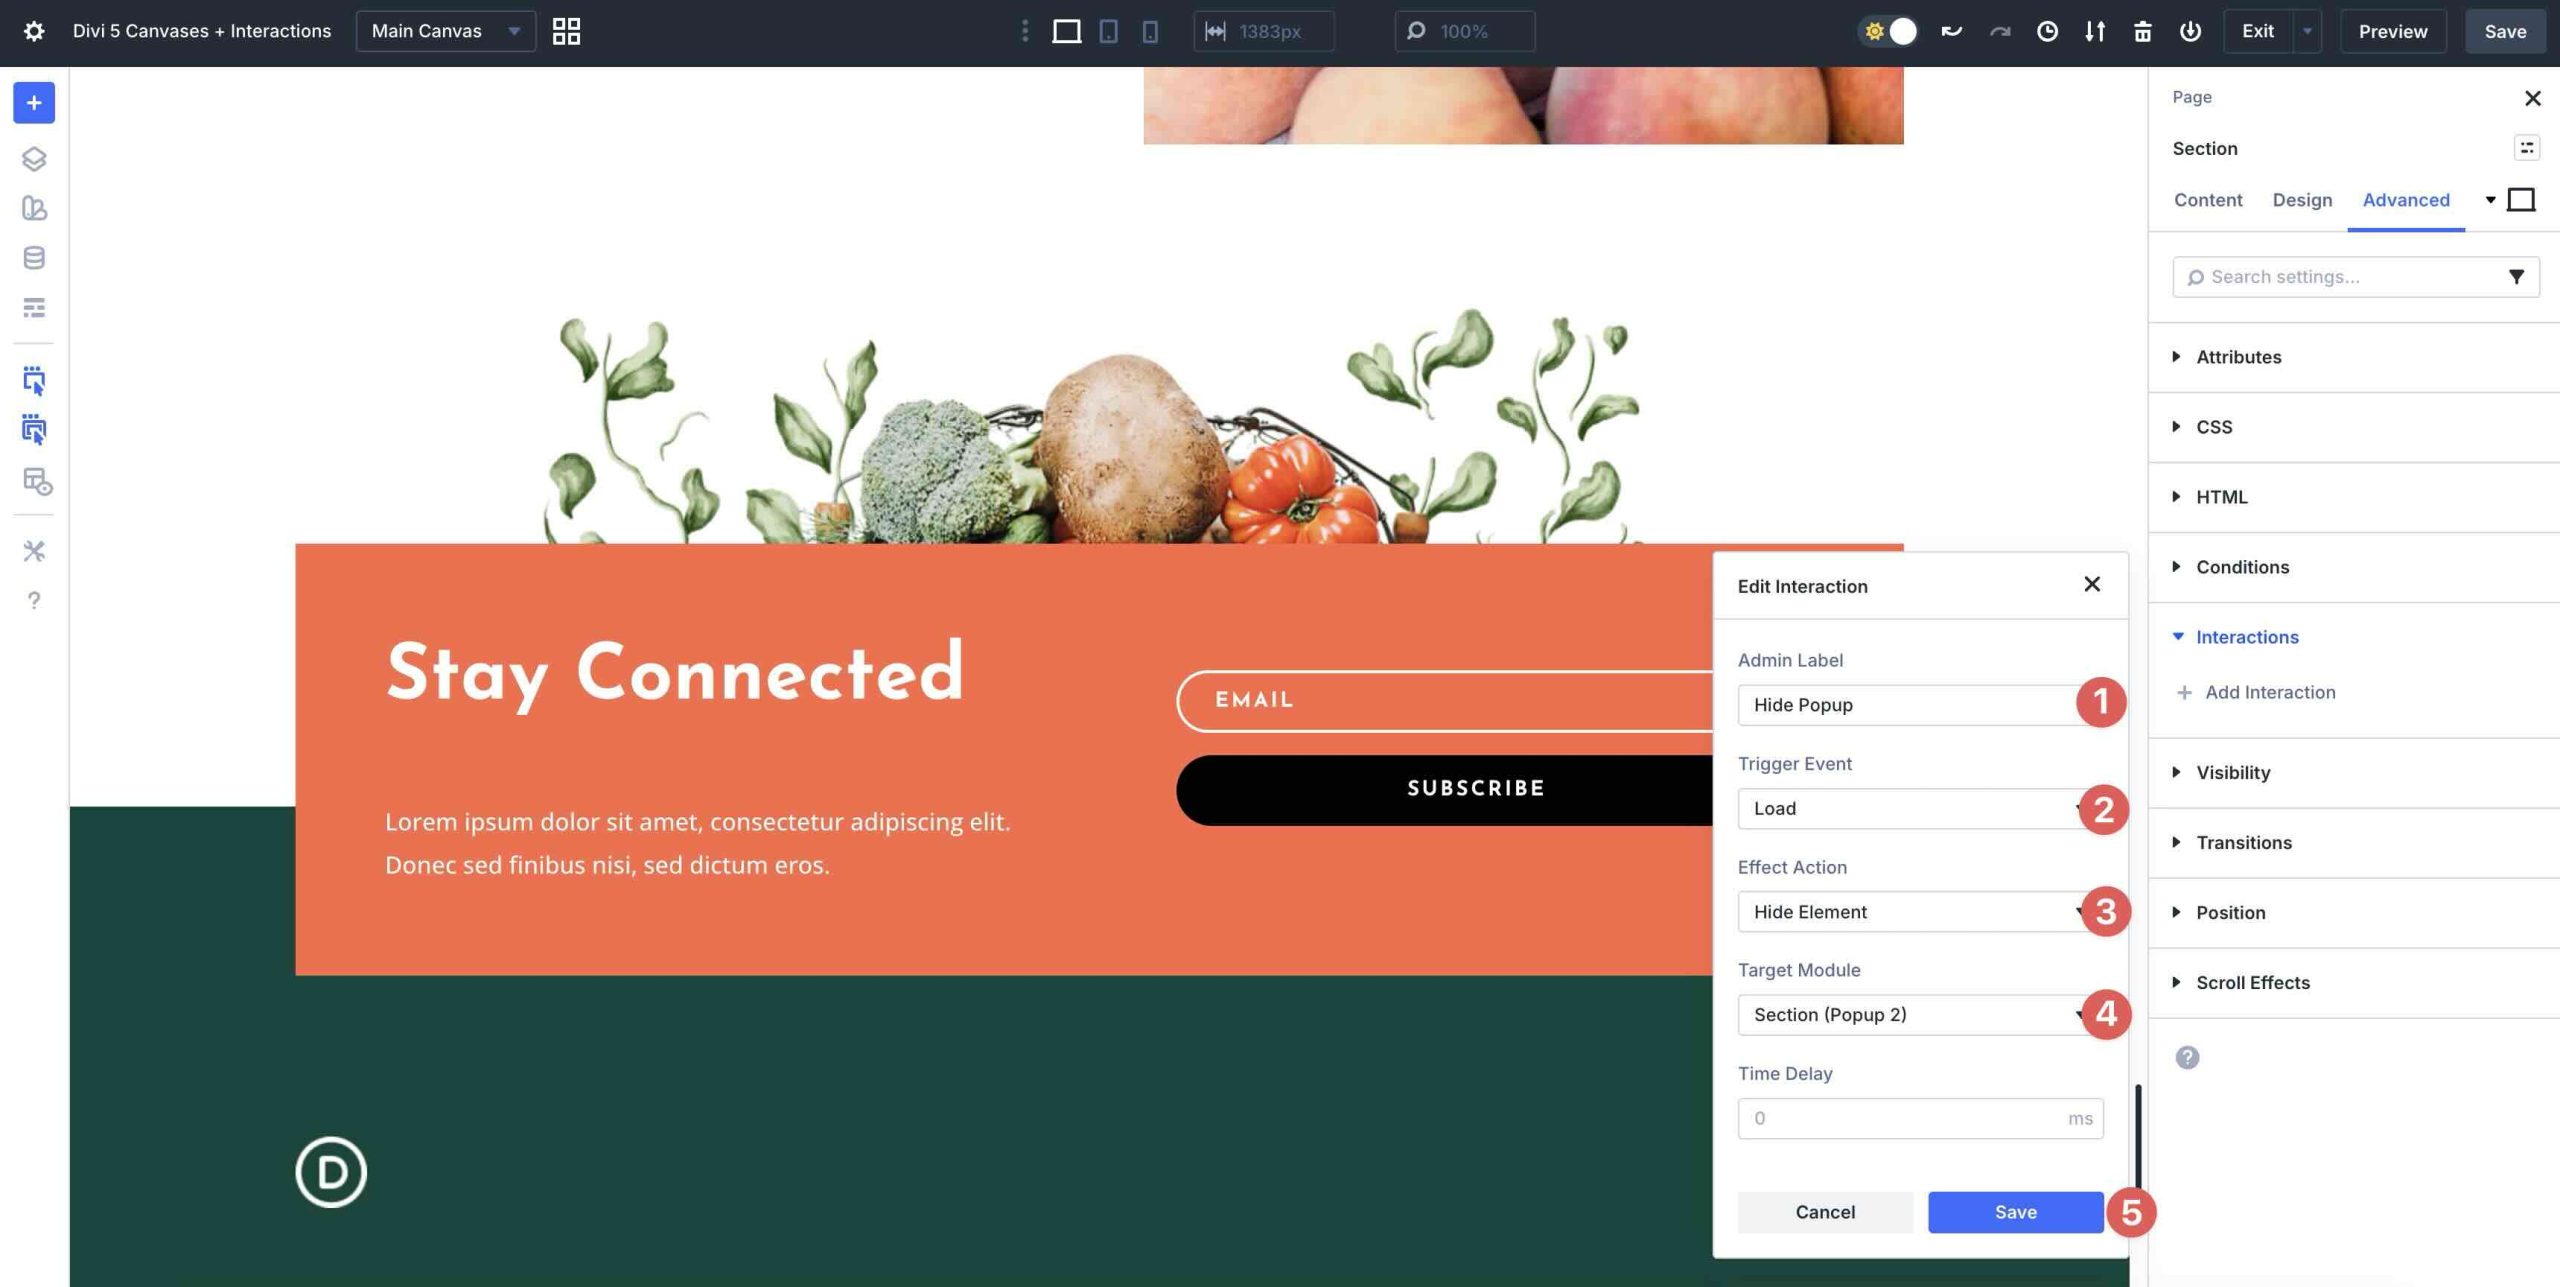
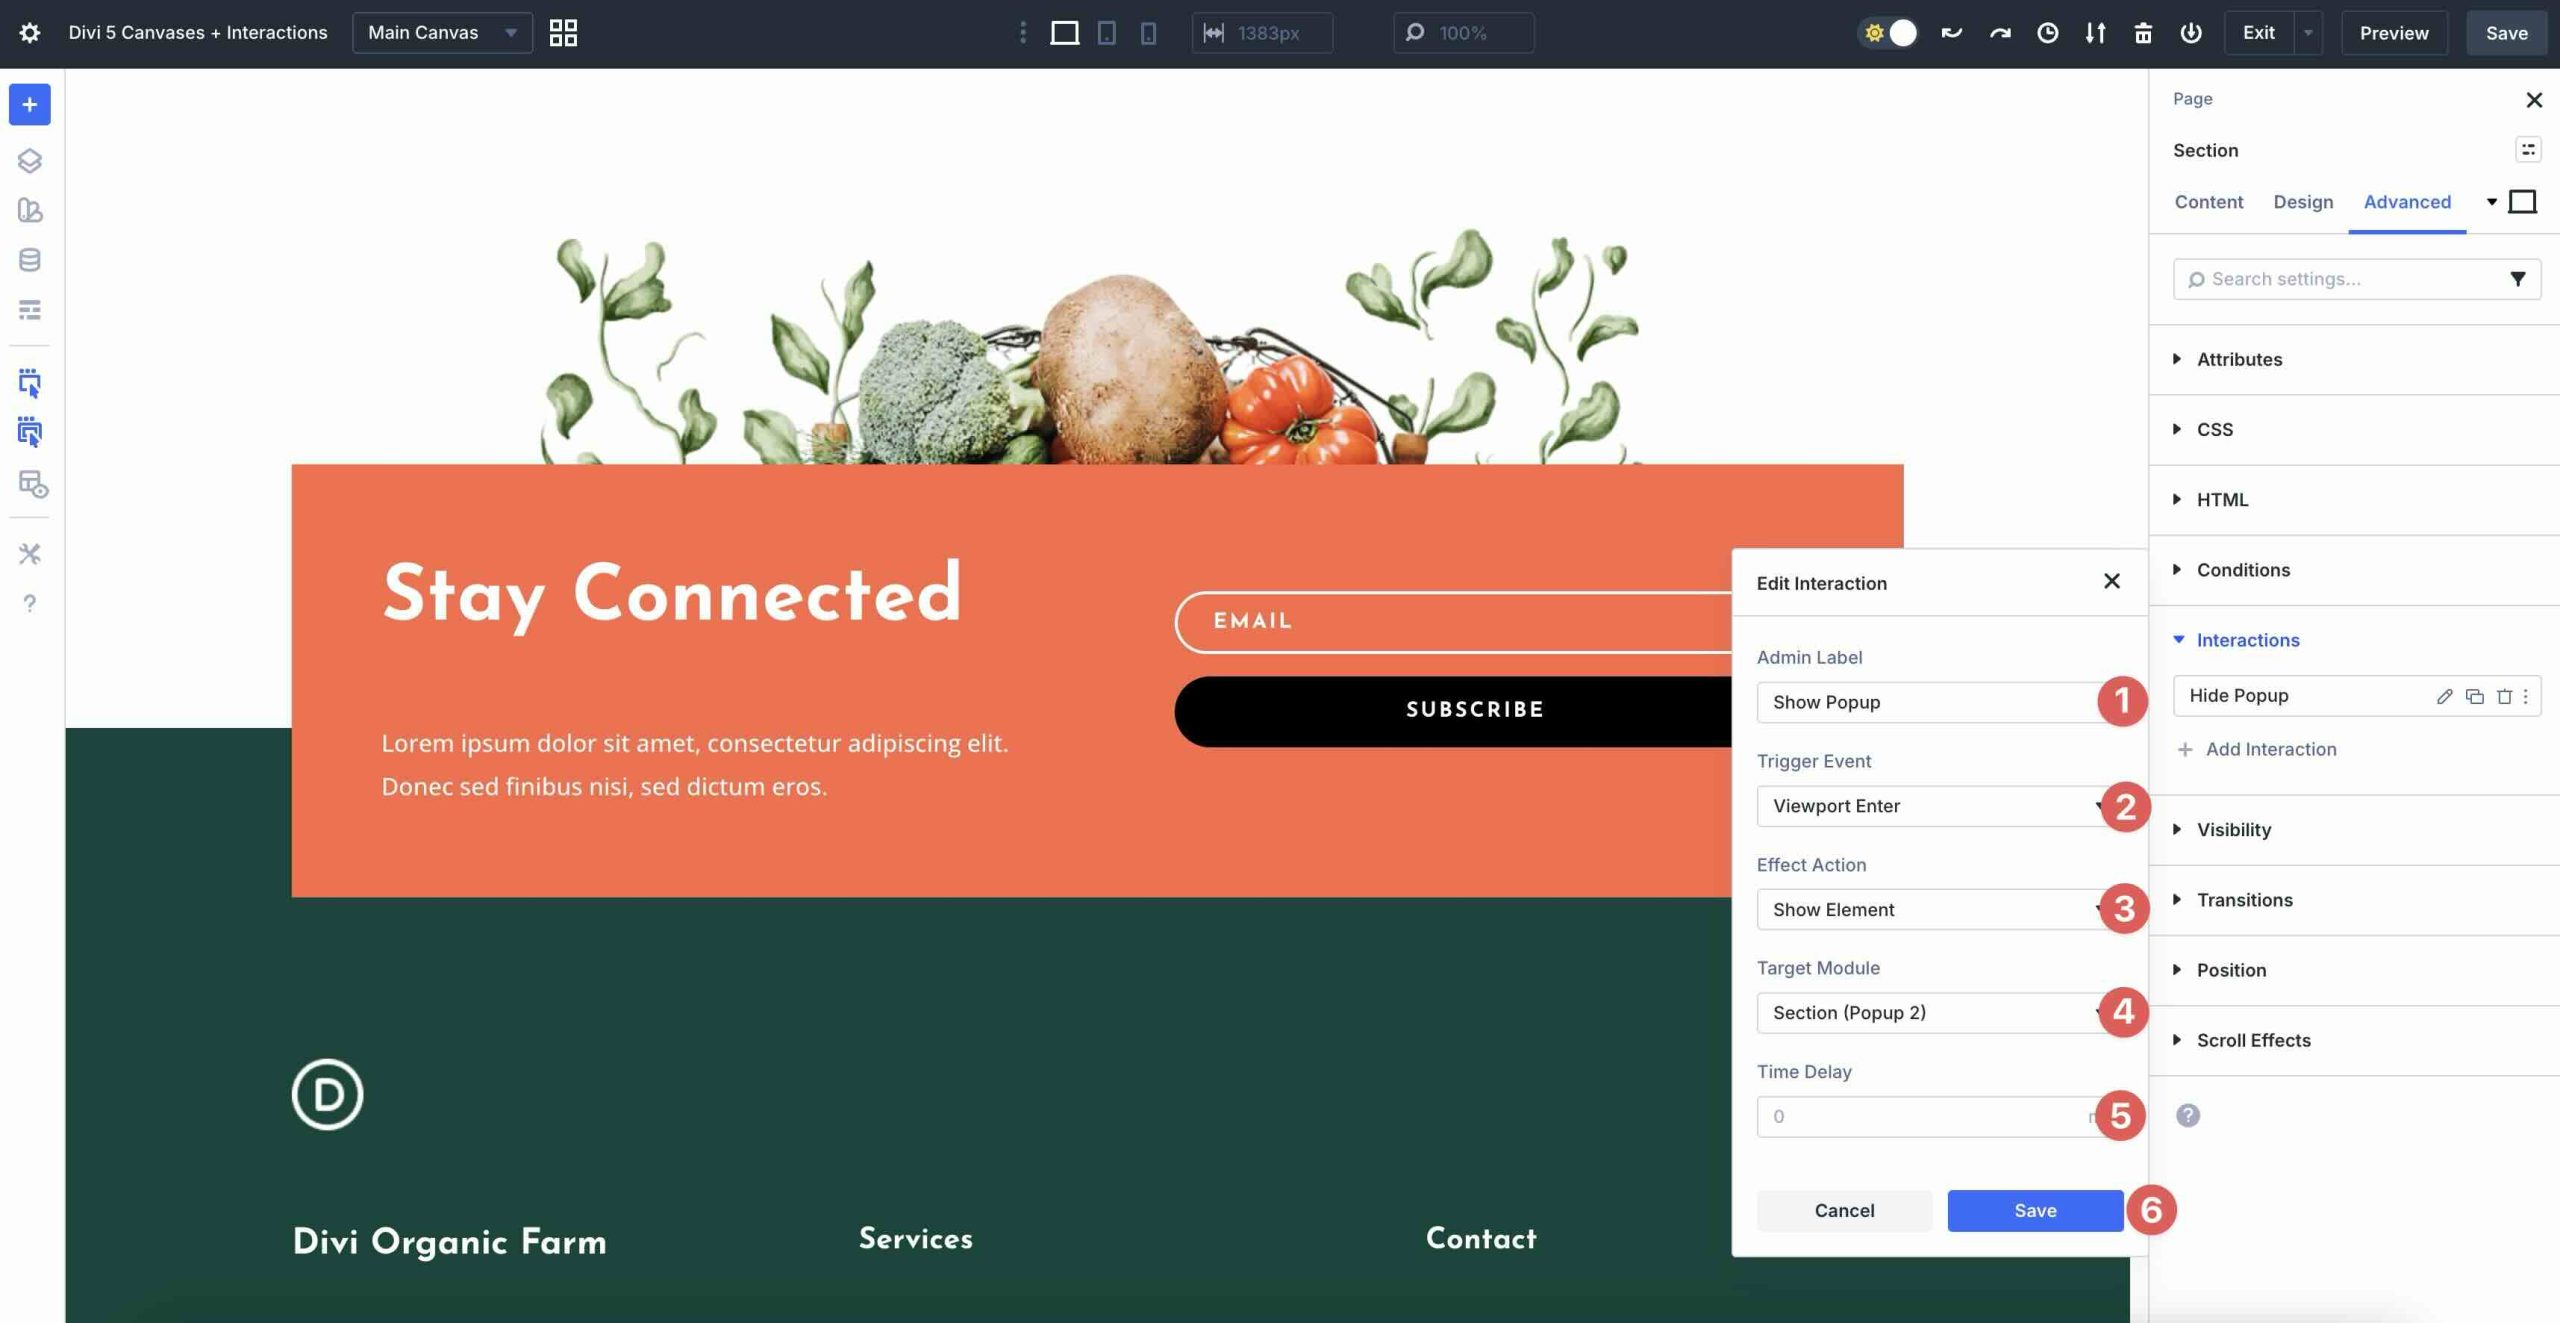
When the Edit Interaction modal appears, assign an Admin Label, select Hide Element as the Effect Action, and choose the popup Section from the Canvas you just created. Finally, click Save.
The next Interaction will launch the popup. Click + Add Interaction once more. This time, select Viewport Enter.
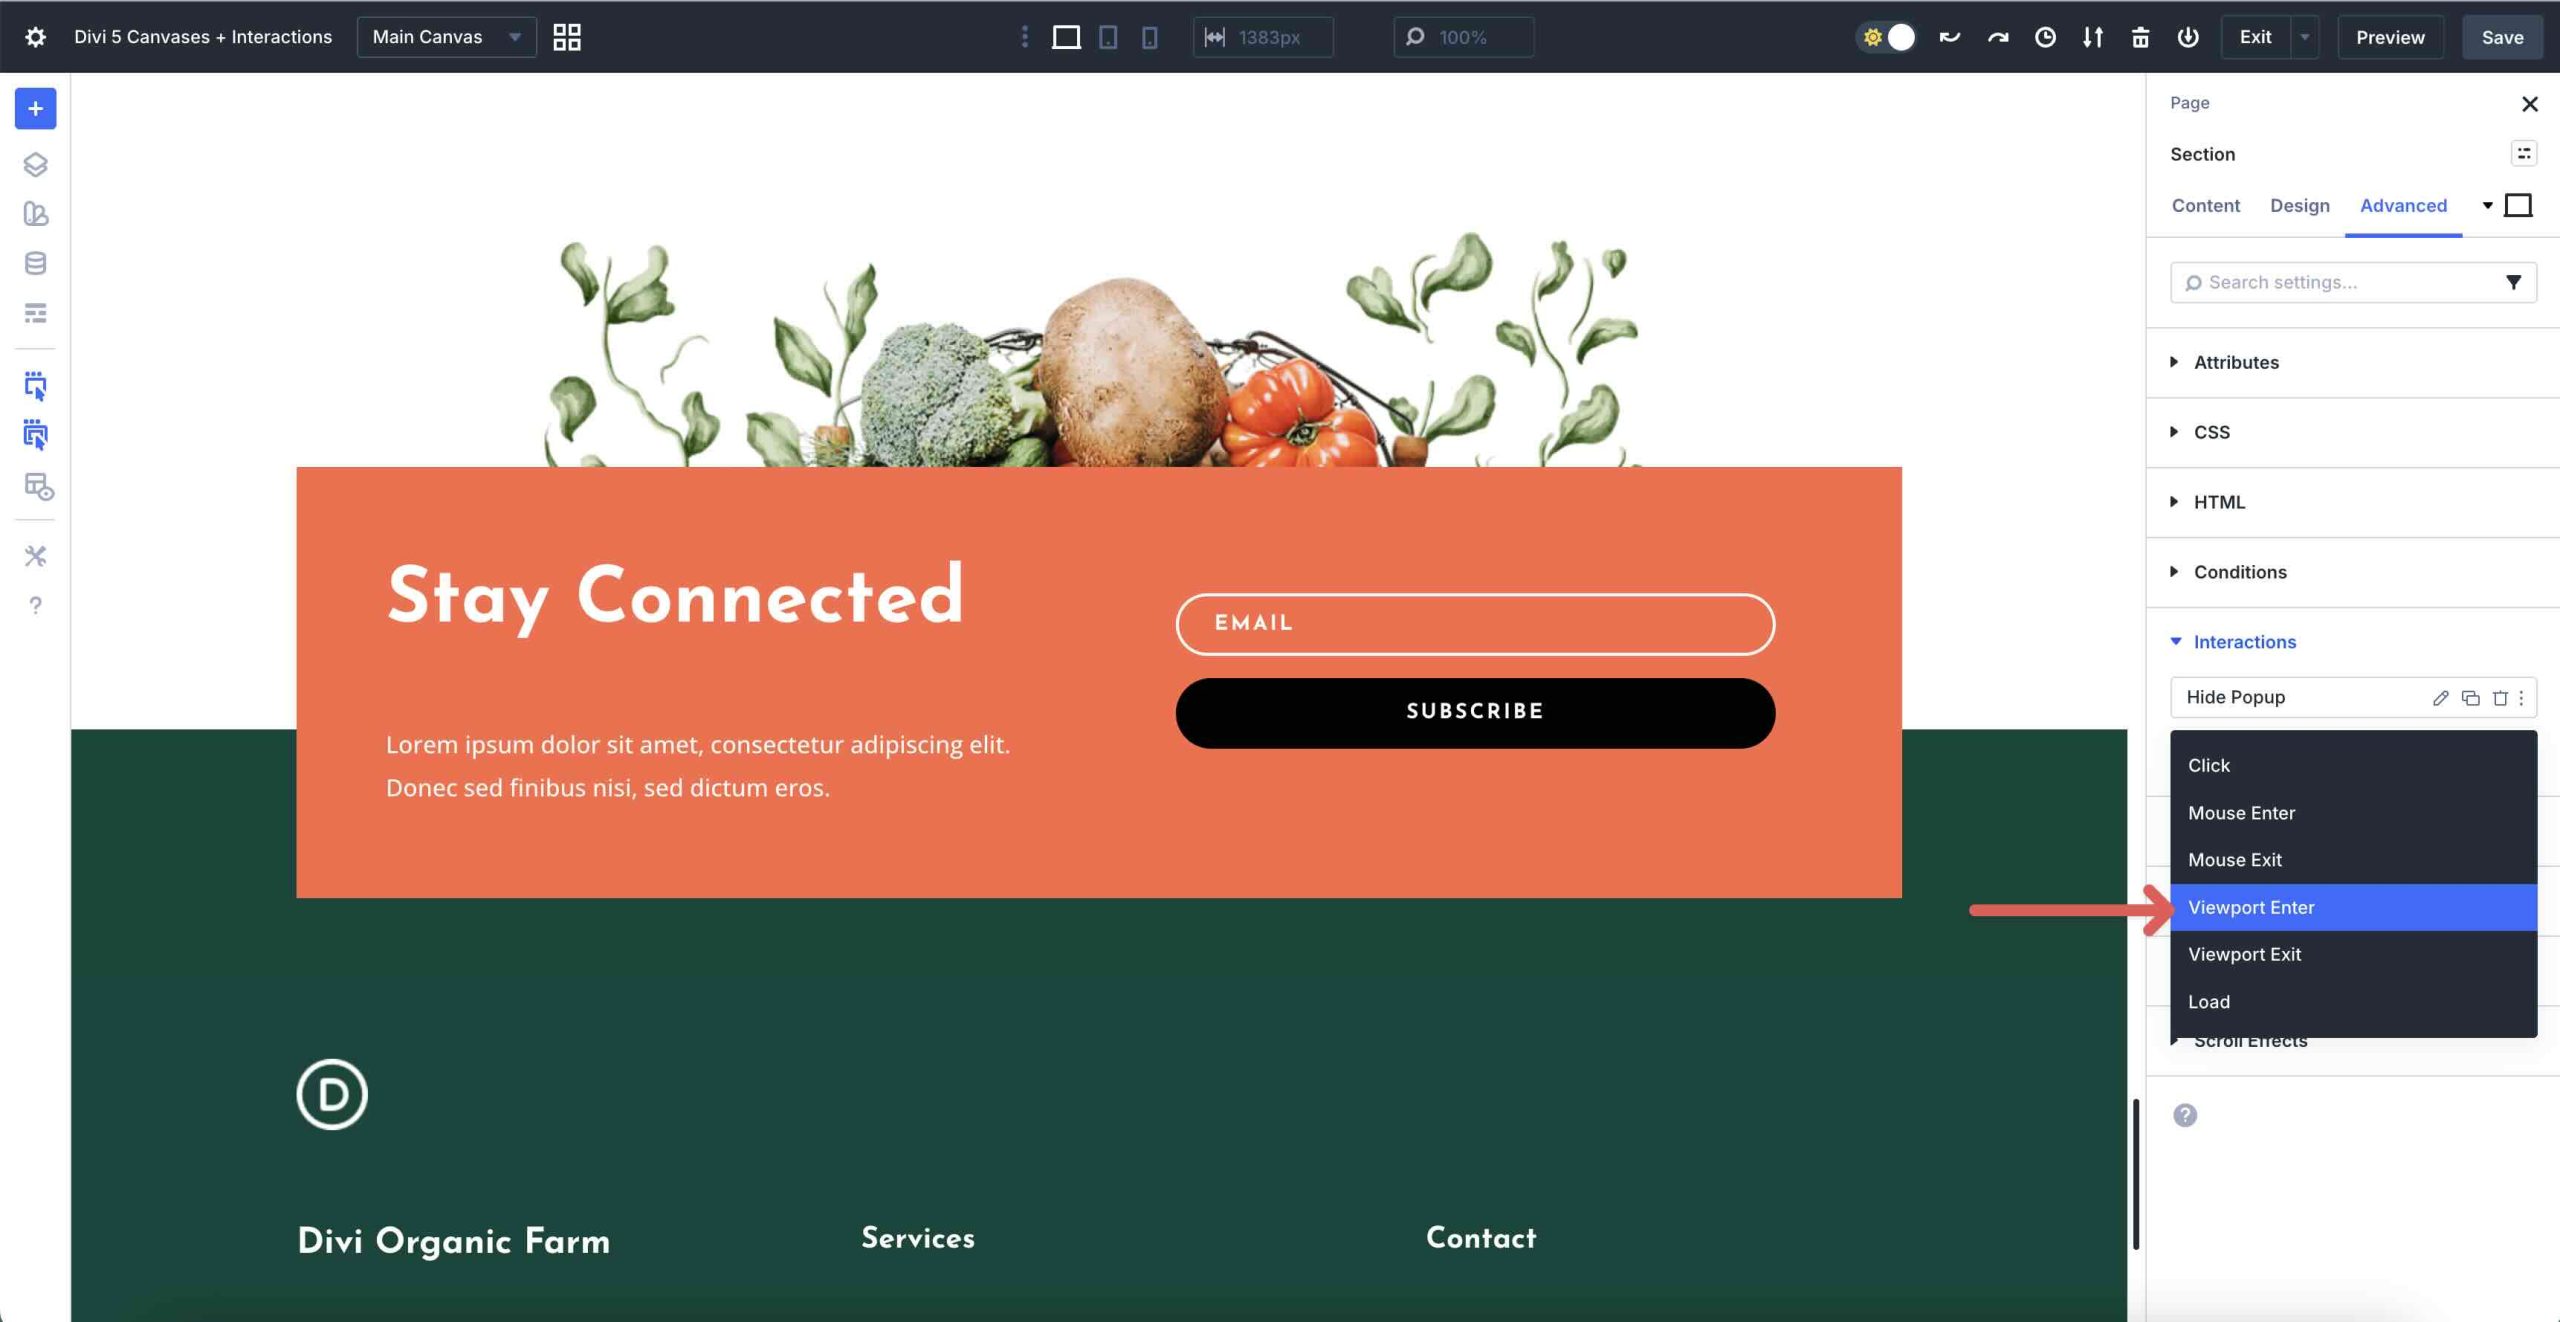
Add an Admin Label, choose Show Element as the Effect Action, and select the popup section as the Target Module.
Save the page and preview it by clicking the Preview button in the top-right corner of the Visual Builder.
Method 2: Divi 5 Interactions + Visibility Settings
Interactions is another powerful feature in Divi 5. We’ve already shown how to use it with Canvases, but you can also use it directly on the Main Canvas to create a popup. Interactions is more than a popup builder, though. With it, you can create hover tooltips, click-to-reveal accordions, scroll-triggered animations, mouseover effects, and more.
Key Strengths
This method is completely native to Divi 5, so you get powerful popup functionality with no extra plugins, very little overhead, and minimal impact on site performance. You also get full design freedom by using Divi’s styling settings and responsive controls to build popups that match your brand and layout. Interactions let you combine a wide range of triggers with flexible effects.
This approach is ideal for fast-loading, highly customizable on-page popups, including welcome modals, scroll-triggered discount offers, and more. Since everything lives directly inside the Visual Builder, maintenance and updates stay simple.
What This Method Is Best For
On-page popups using Interactions and Divi’s Visibility settings are great for designers and developers who want maximum control, no third-party dependencies, and smooth performance. This is the go-to method for most popups when you don’t need advanced email marketing features or built-in A/B testing.
Step-By-Step Tutorial
Similar to the last method, I’ll use a premade popup to speed up the process. Instead of using a separate Canvas, I’ll add a new section at the bottom of the Main Canvas. Since we are using Visibility settings with this method, placing the popup at the bottom of the page makes it easier to work with.
Add a new section at the bottom of the page.
Make any design changes you’d like and save your layout.
Next, set the Load Interaction you’ll use to launch the popup. Give it an Admin Label, choose Load as the Trigger Event, Show Element as the Effect Action, and choose the popup section as the Target Module. For this Interaction, set the Time Delay to 5 seconds.
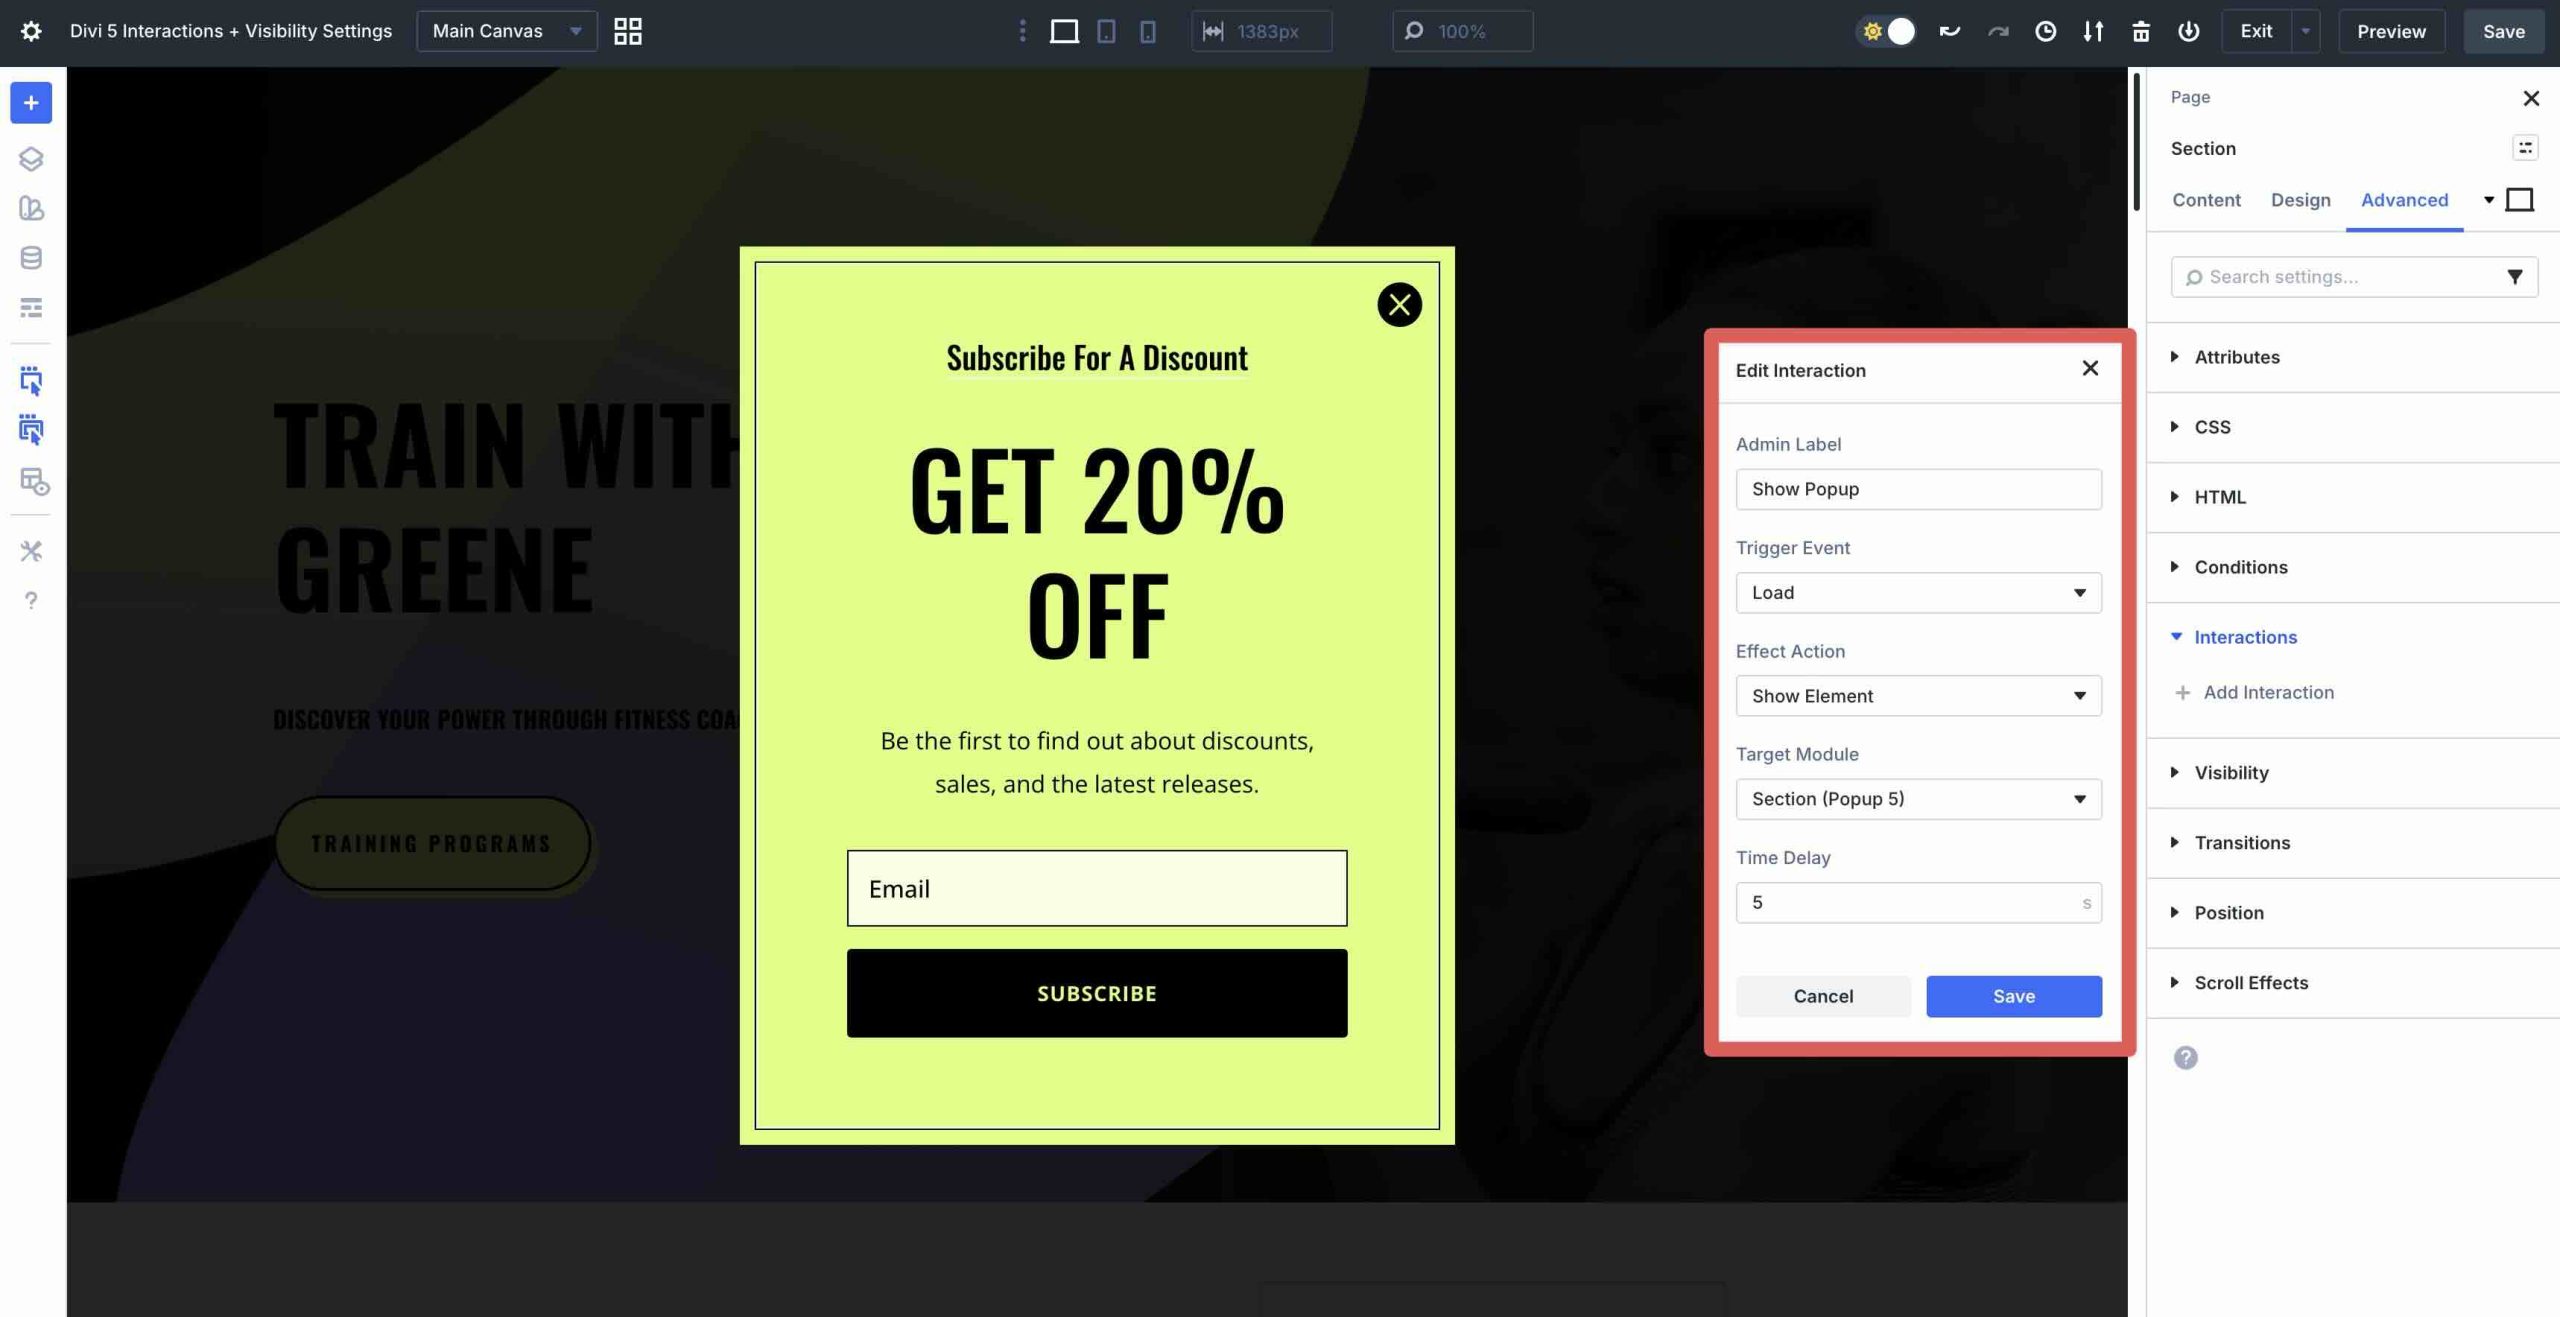
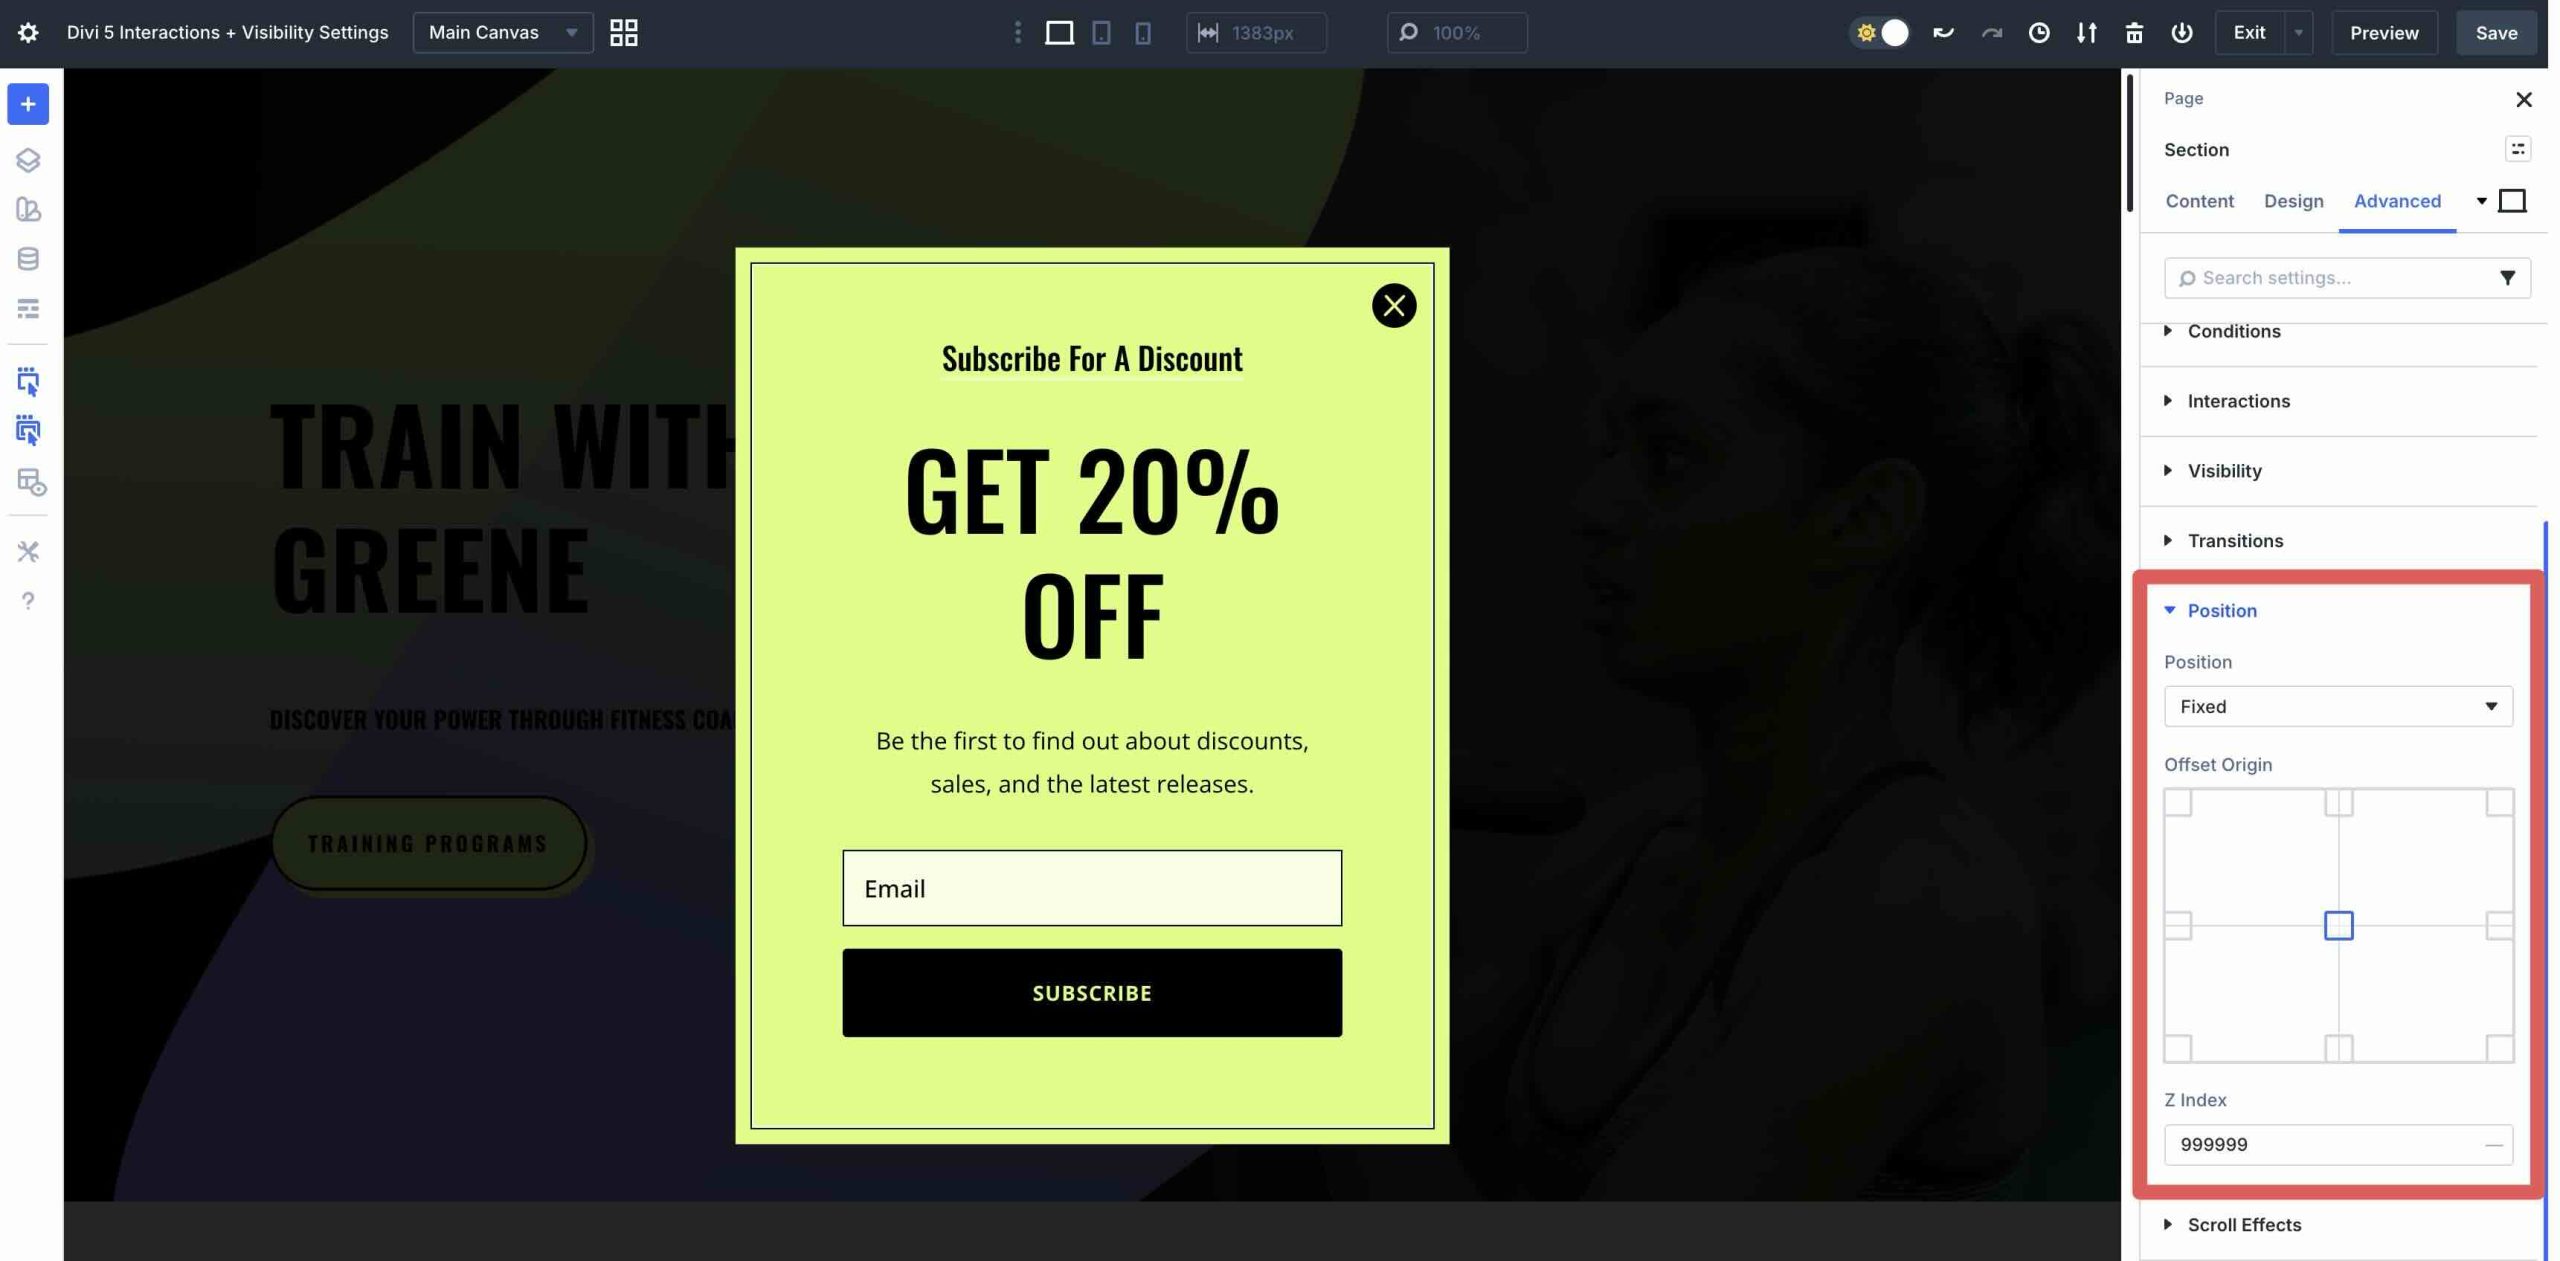
In most cases, when using a premade popup layout, positioning will already be set for you. If not, choose Fixed Center in the Position menu and set the Z Index to 999999 so it appears above the rest of the page content.
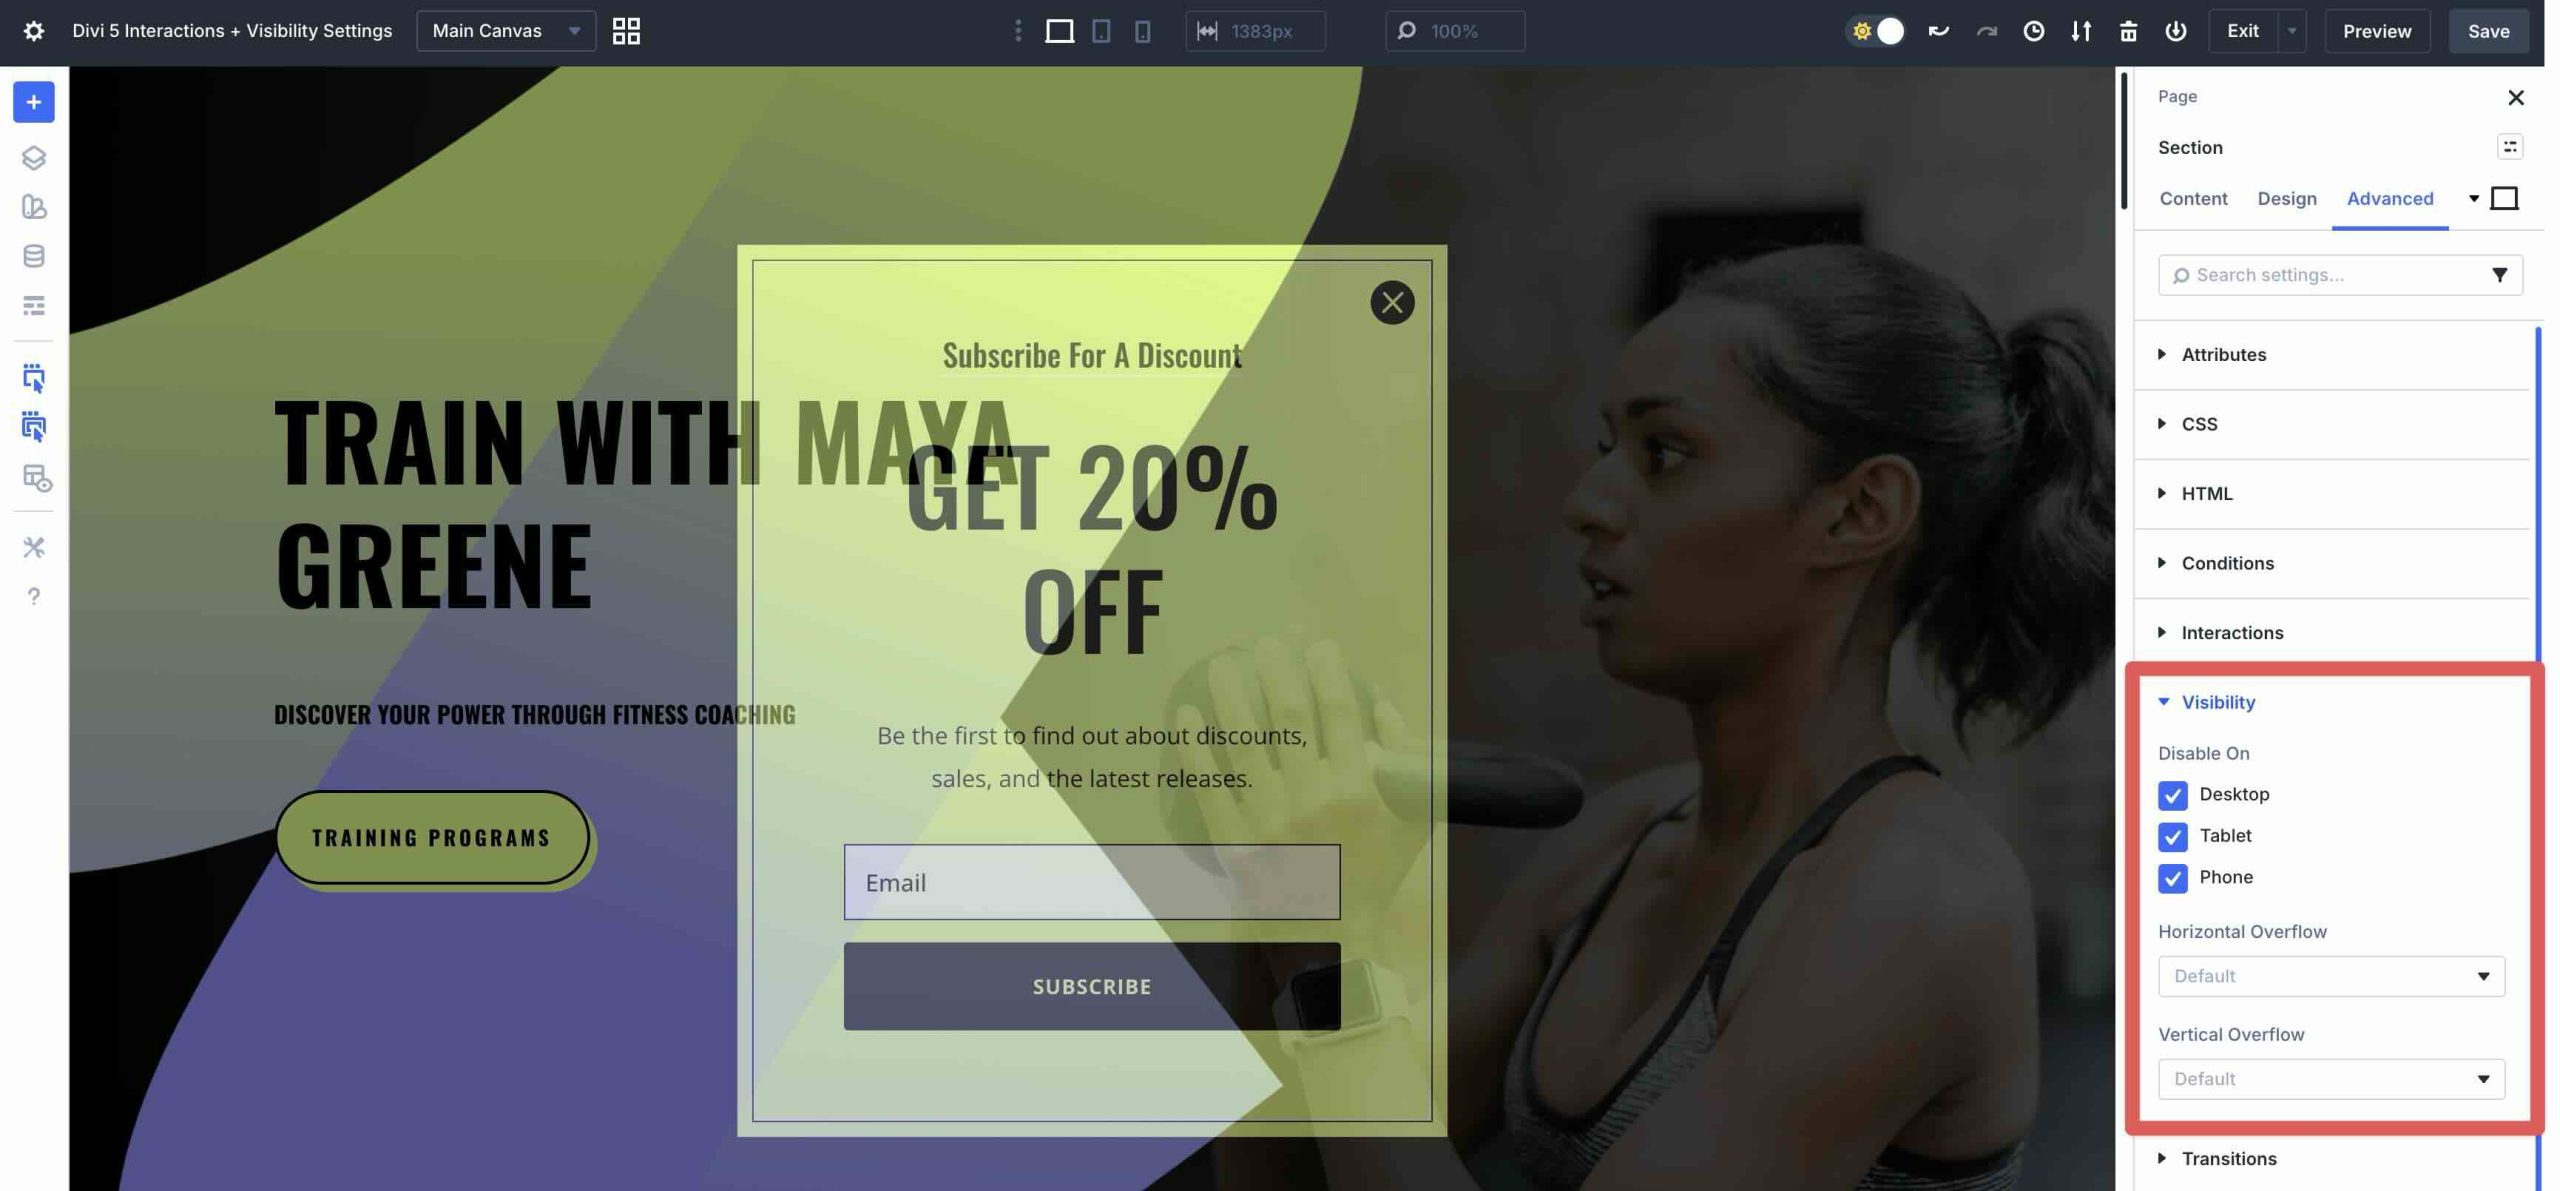
The last step is to hide the section. In the Advanced tab, locate and expand the Visibility menu. Select Desktop, Tablet, and Phone in the Disable On field.
Save your layout and preview it in another browser tab.
Method 3: The Bloom Plugin
Bloom excels at creating high-converting opt-in forms with minimal setup. While Divi 5’s native Interactions and Canvases offer excellent flexibility for general-purpose popups, Bloom remains the best choice when your primary focus is email marketing, newsletter signups, discount offers, or any campaign centered on building subscribers.
Bloom stands out because of its marketing-focused toolkit. It offers more than 100 pre-designed templates, seamless integration with major email providers, advanced display controls, and built-in performance tracking.
Key Strengths
Bloom is built for lead generation, delivering everything you need for high-performing email opt-ins right out of the box. You get A/B testing to experiment with variations, plus built-in analytics to track impressions, conversions, and overall performance directly in your WordPress dashboard.
With seamless integration with 19 email marketing services, adding new subscribers is straightforward. Bloom supports multiple display types like slide-ins, inline forms, below-post opt-ins, and more. With advanced triggers and targeted display settings, your forms can appear at the ideal moment for the right audience.
What This Method Is Best For
Marketers, bloggers, and site owners who prioritize email list growth and lead capture. Choose Bloom when your popup’s primary goal is collecting email addresses, when you need advanced triggers like after inactivity or post-purchase offers, or when built-in A/B testing and analytics will save time and improve results. It also pairs well with Divi 5 in hybrid workflows, such as using native Divi tools for page design and Bloom for opt-in delivery.
Step-By-Step Tutorial
The first step is to install and activate the Bloom plugin. If you need help installing a plugin, check out this article on our blog.
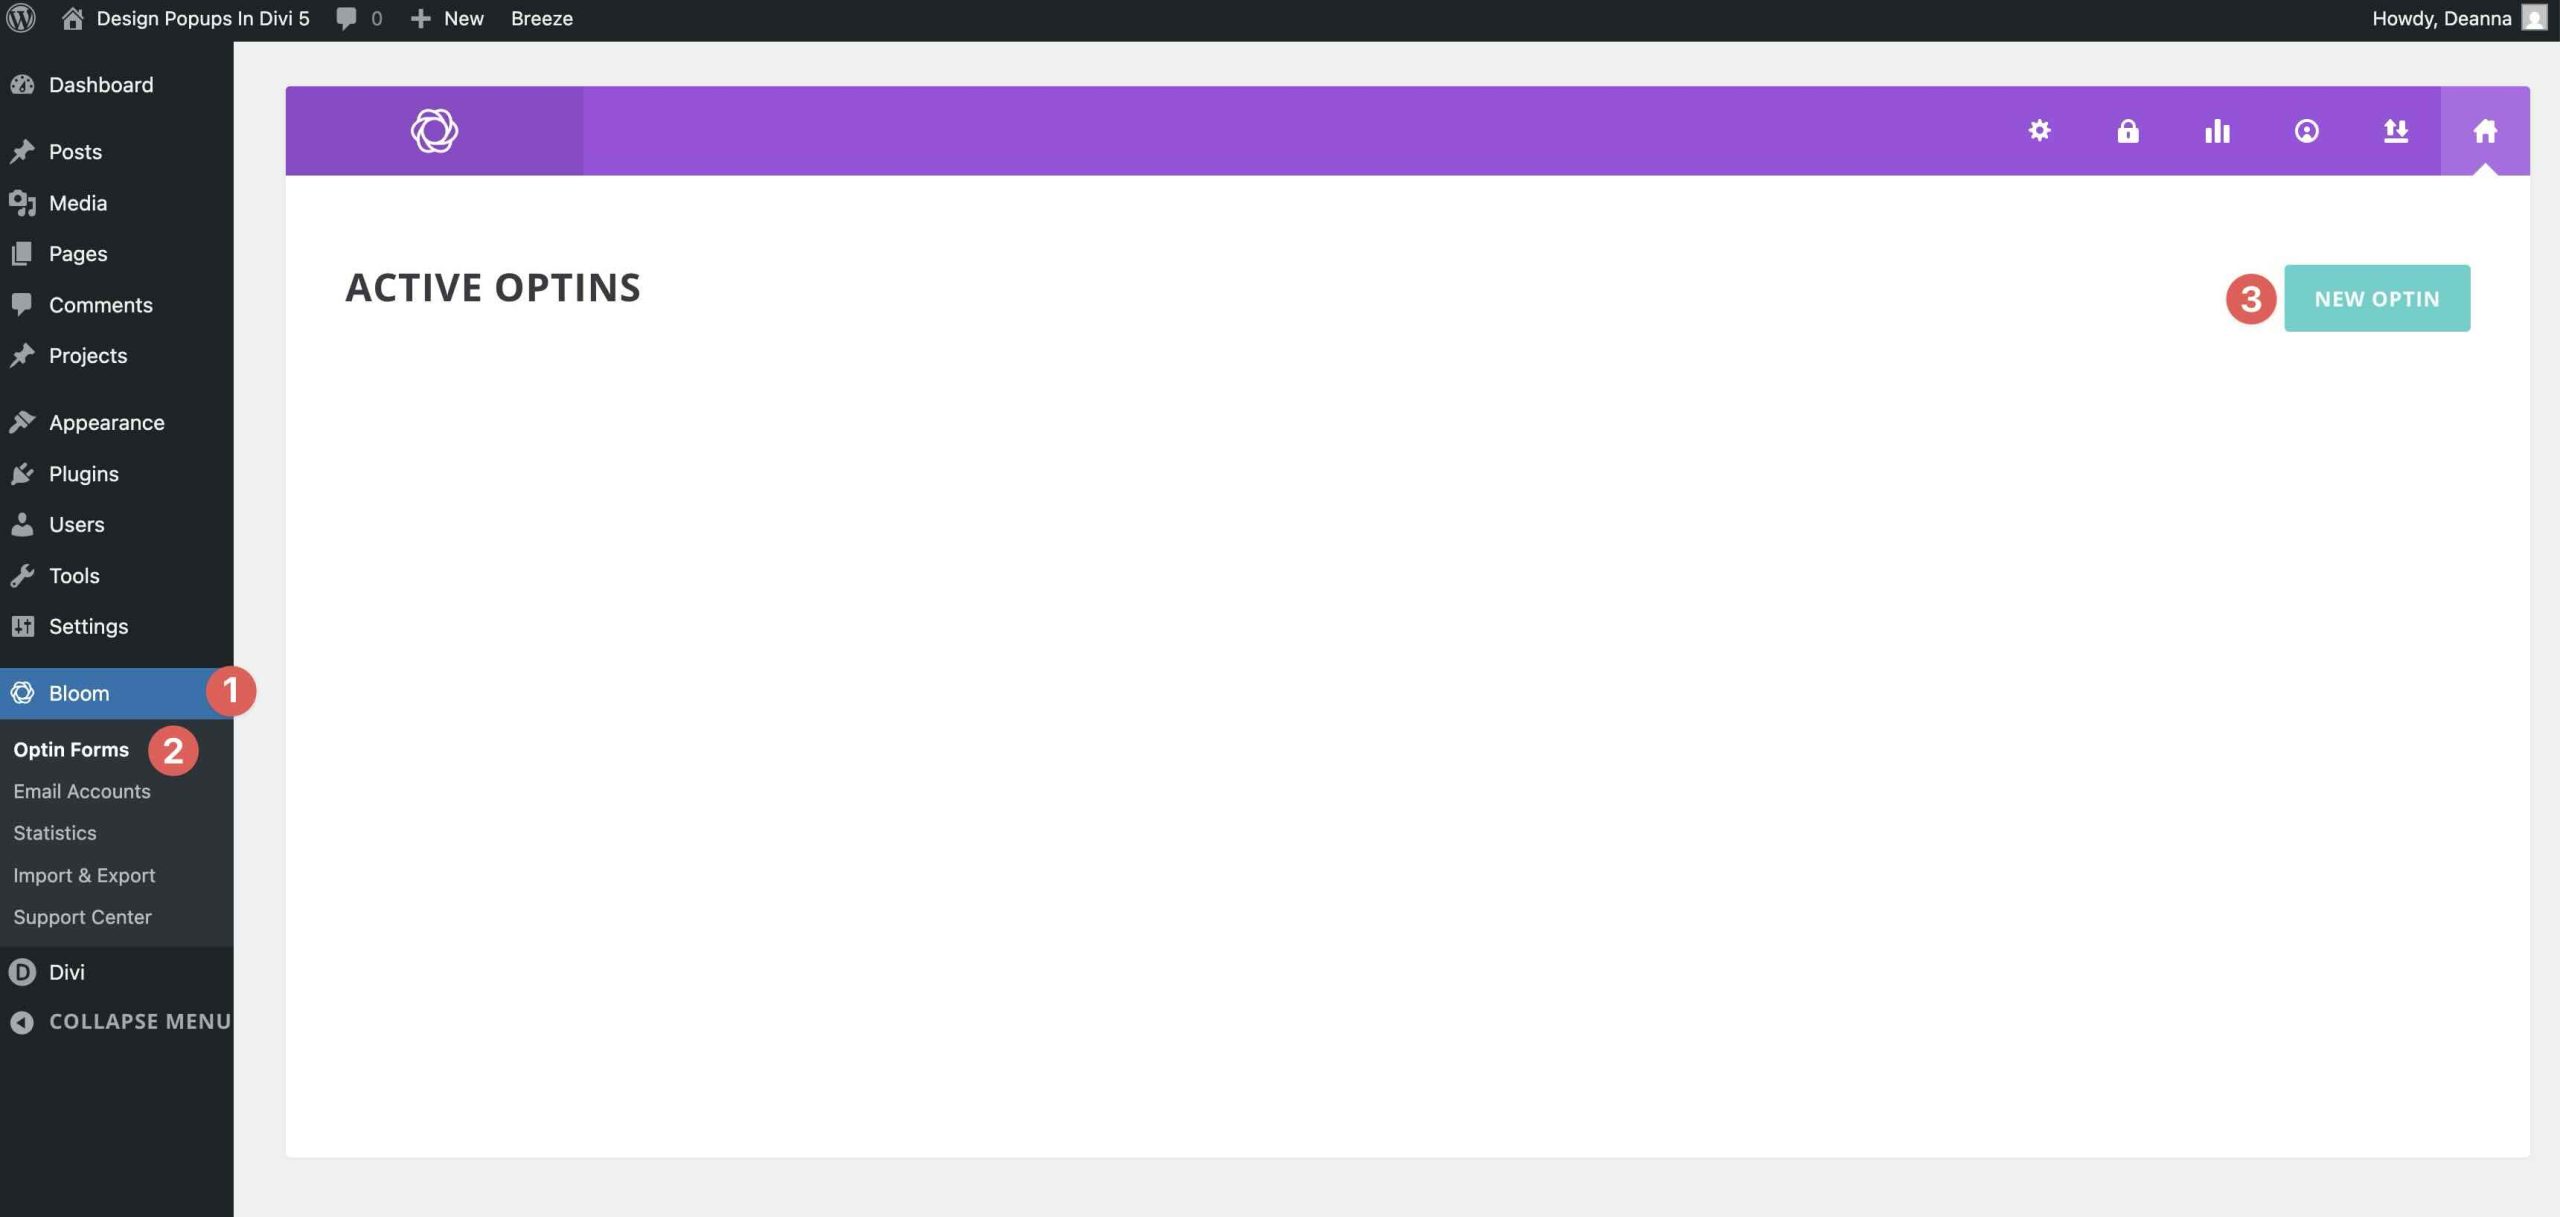
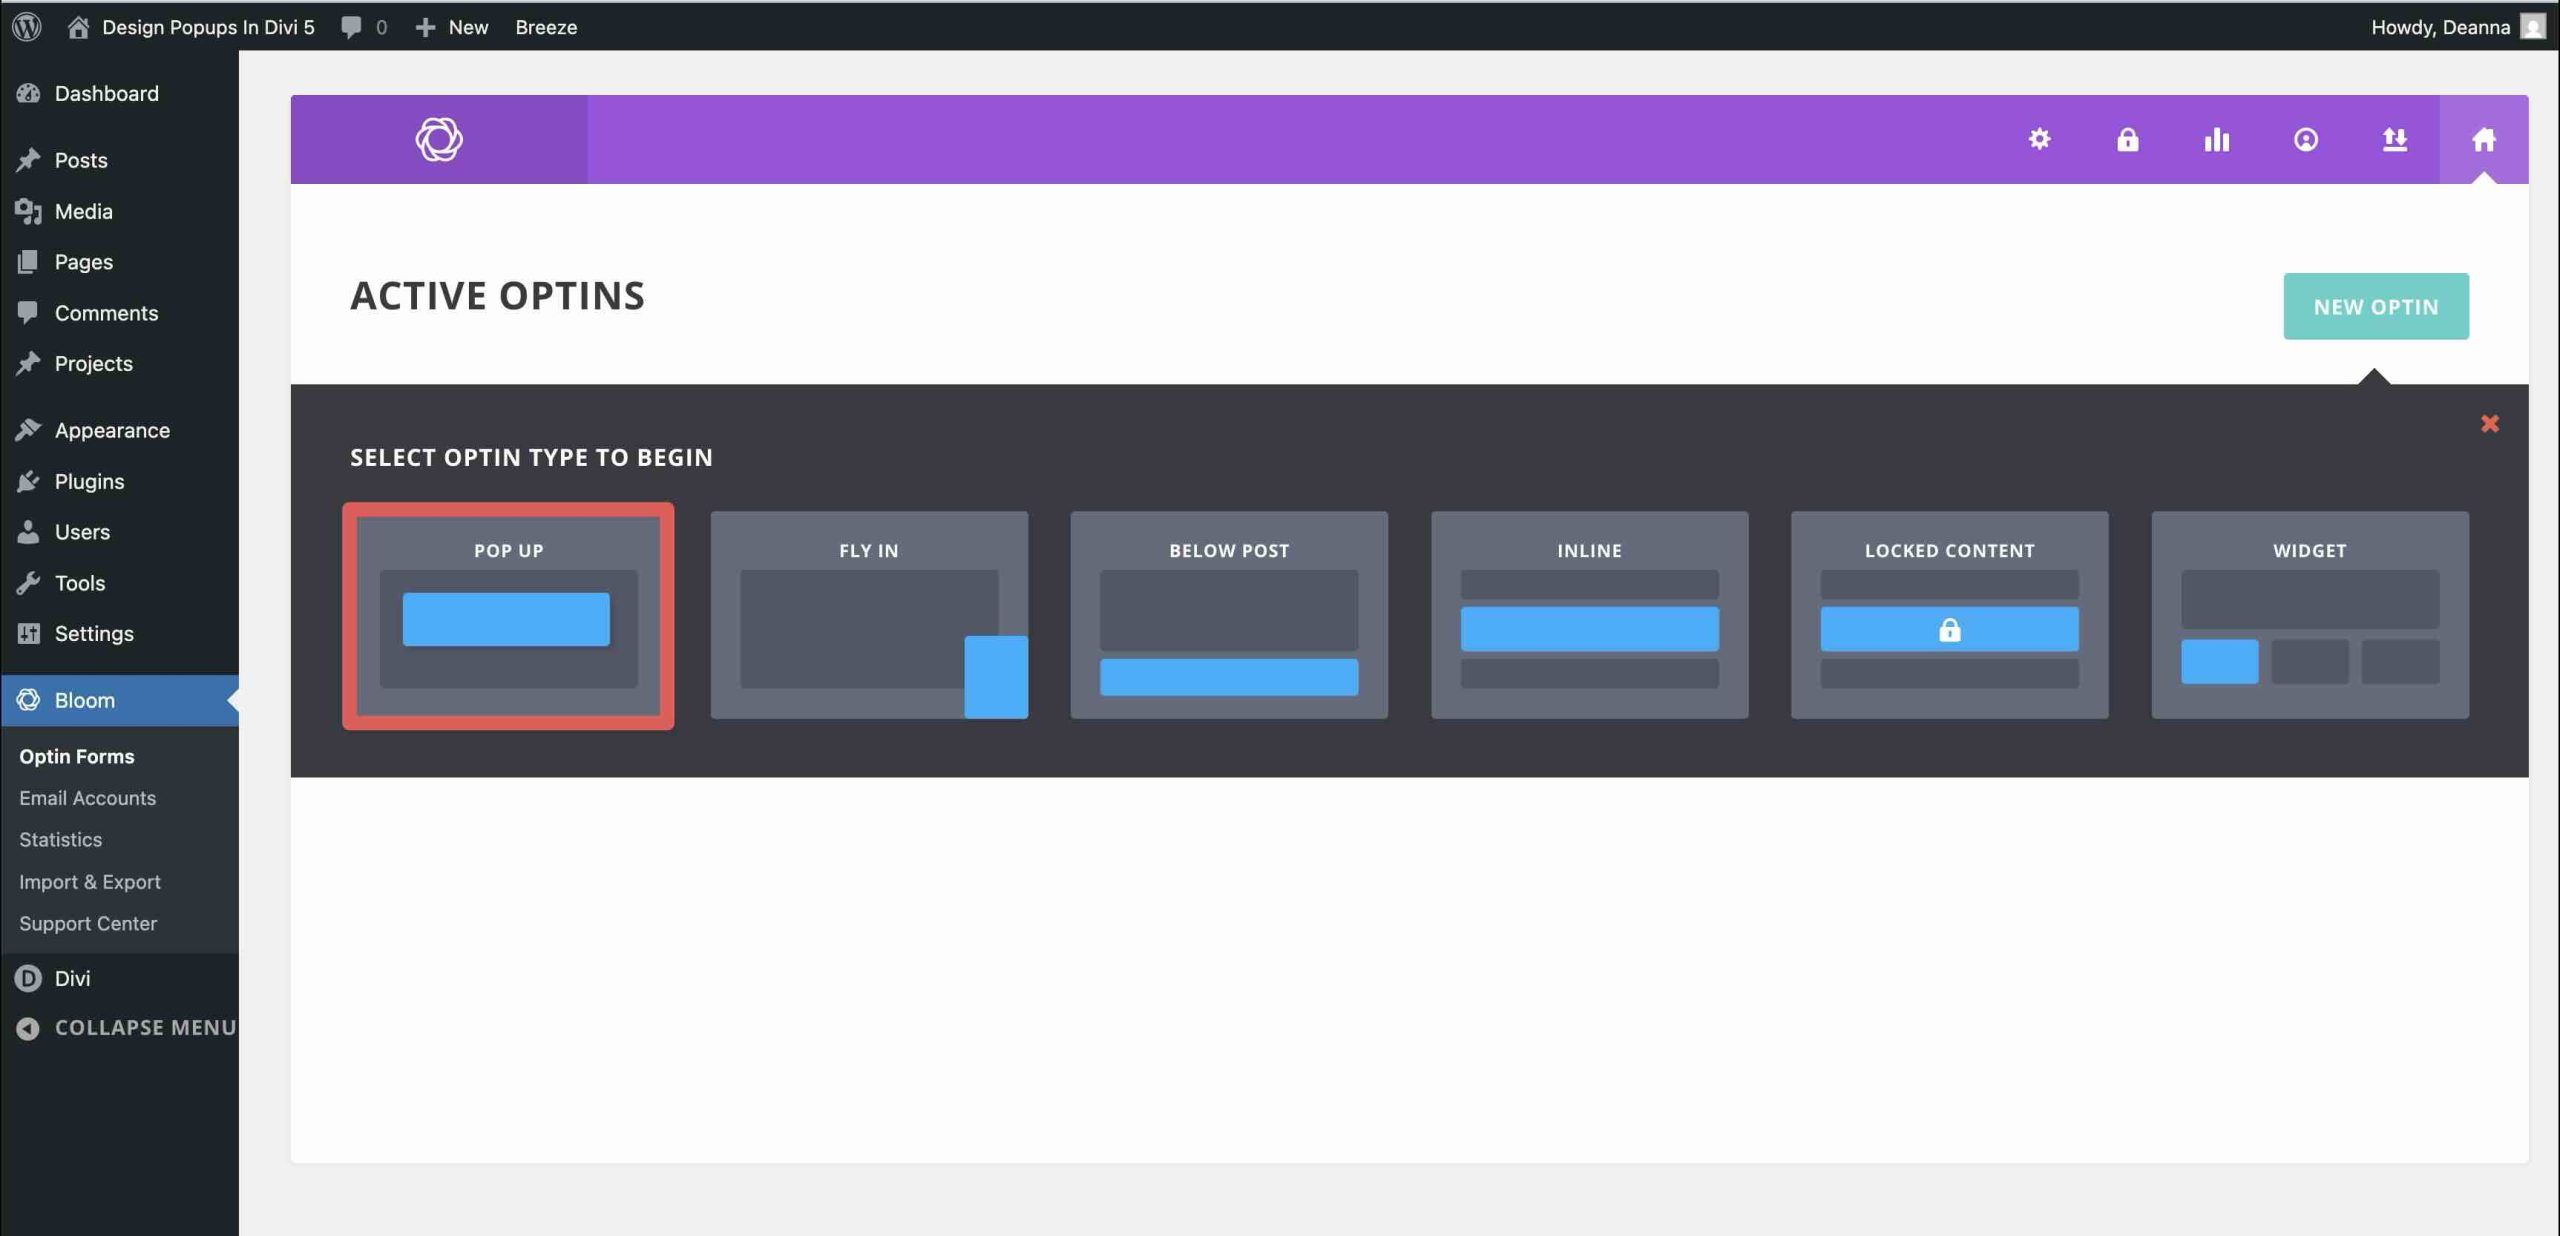
To create a new opt-in, navigate to Bloom > Optin Forms in the WordPress dashboard. From there, click the New Optin button.
Next, select Popup as the Optin Type.
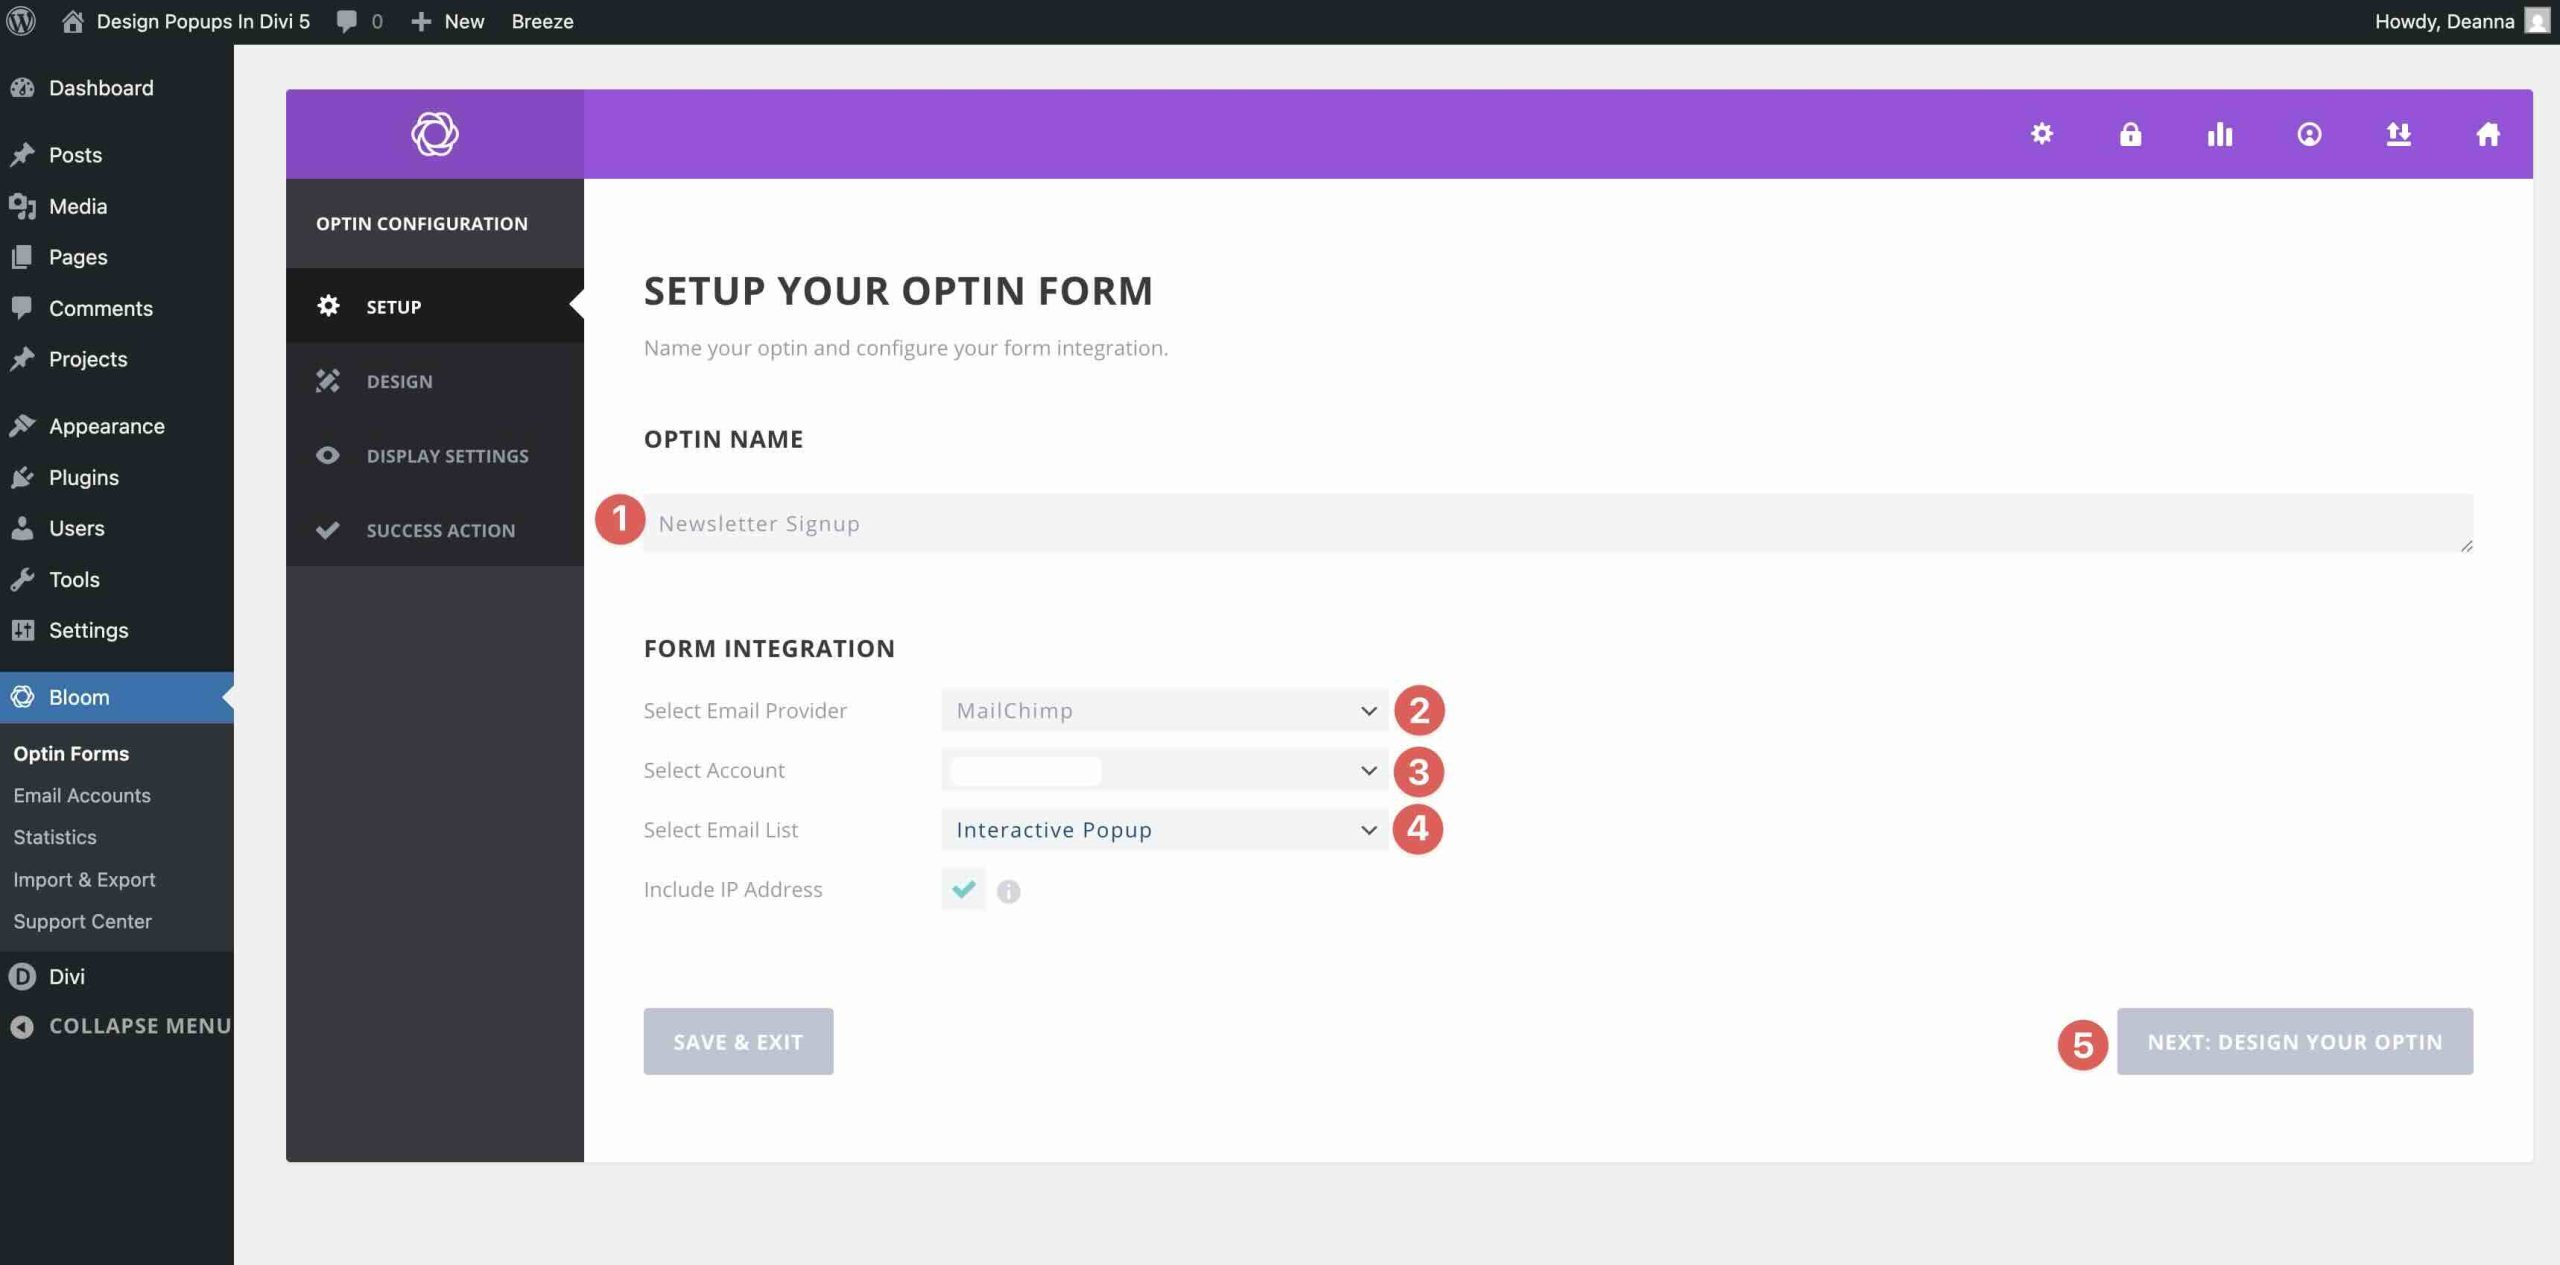
Give your opt-in a name, select an Email Provider (you’ll need an API key and account name to proceed), and click Next: Design Your Optin.
On the next page, you’ll choose a template. There are more than 100 designs available, making it easy to find the right starting point. Once you select one, click Next: Customize.
Here’s where you’ll design your popup. You can add a title and opt-in message, choose an image, select an animation, and adjust the styling to match your branding.
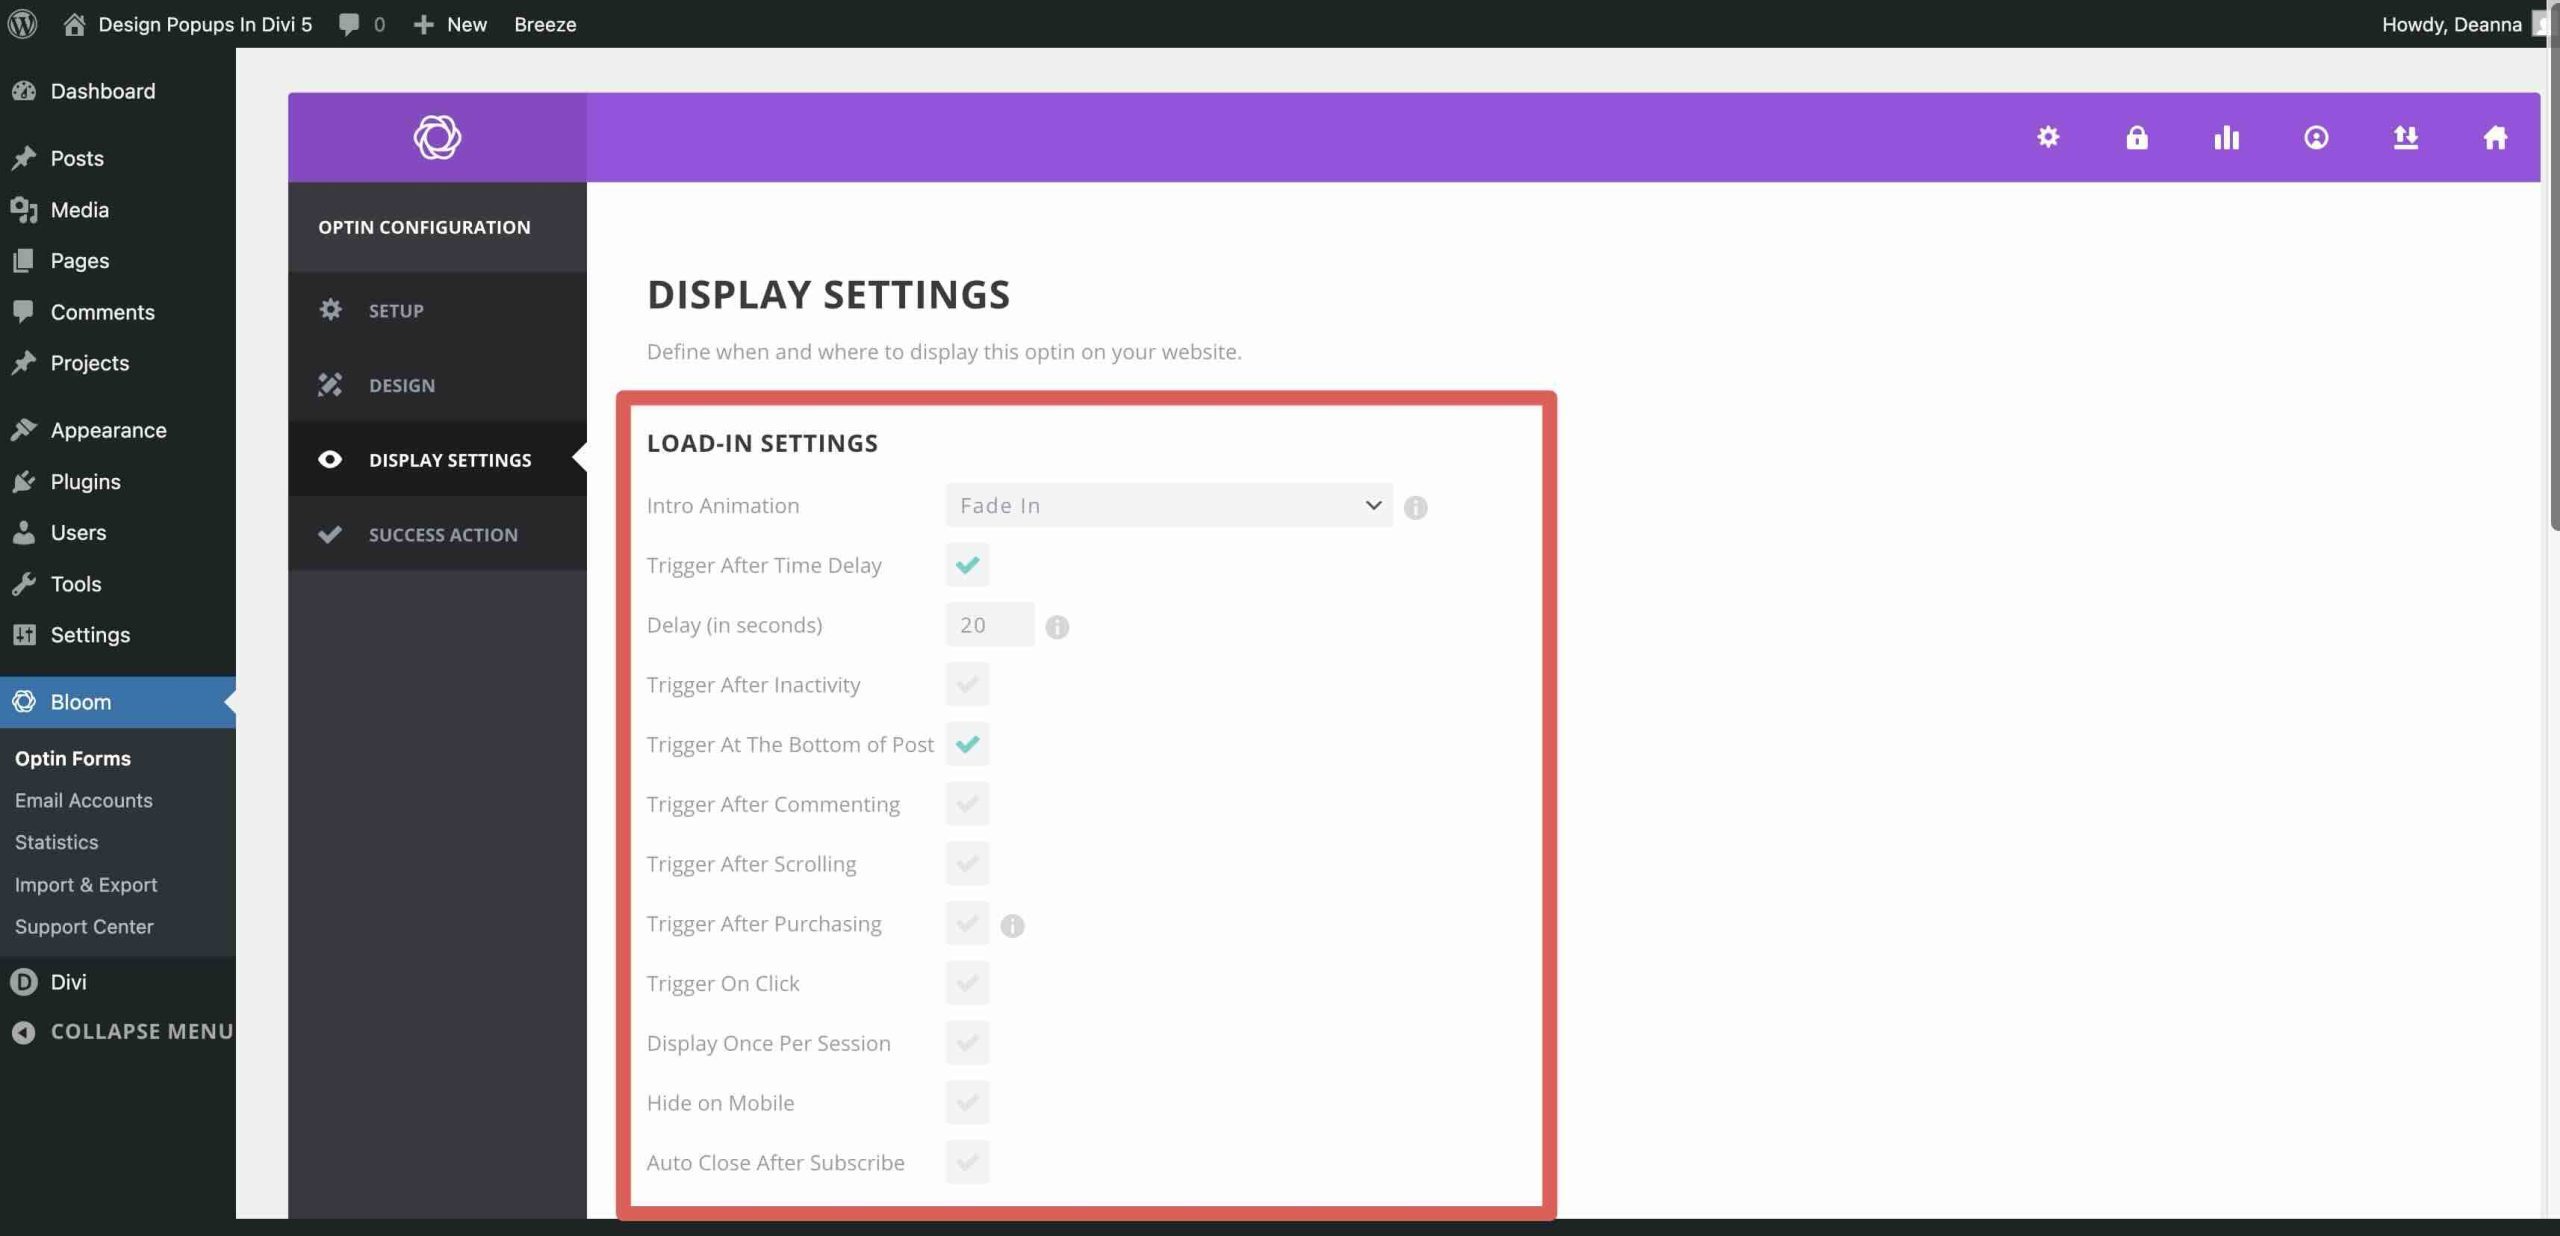
The next screen lets you configure your popup’s display settings. Choose the Load-In settings, including the intro animation and trigger settings.
You can also specify where your popup appears, whether across your entire site, on the home page, on posts, on projects, or on archive pages. Alternatively, you can use display rules to target a specific page or post.
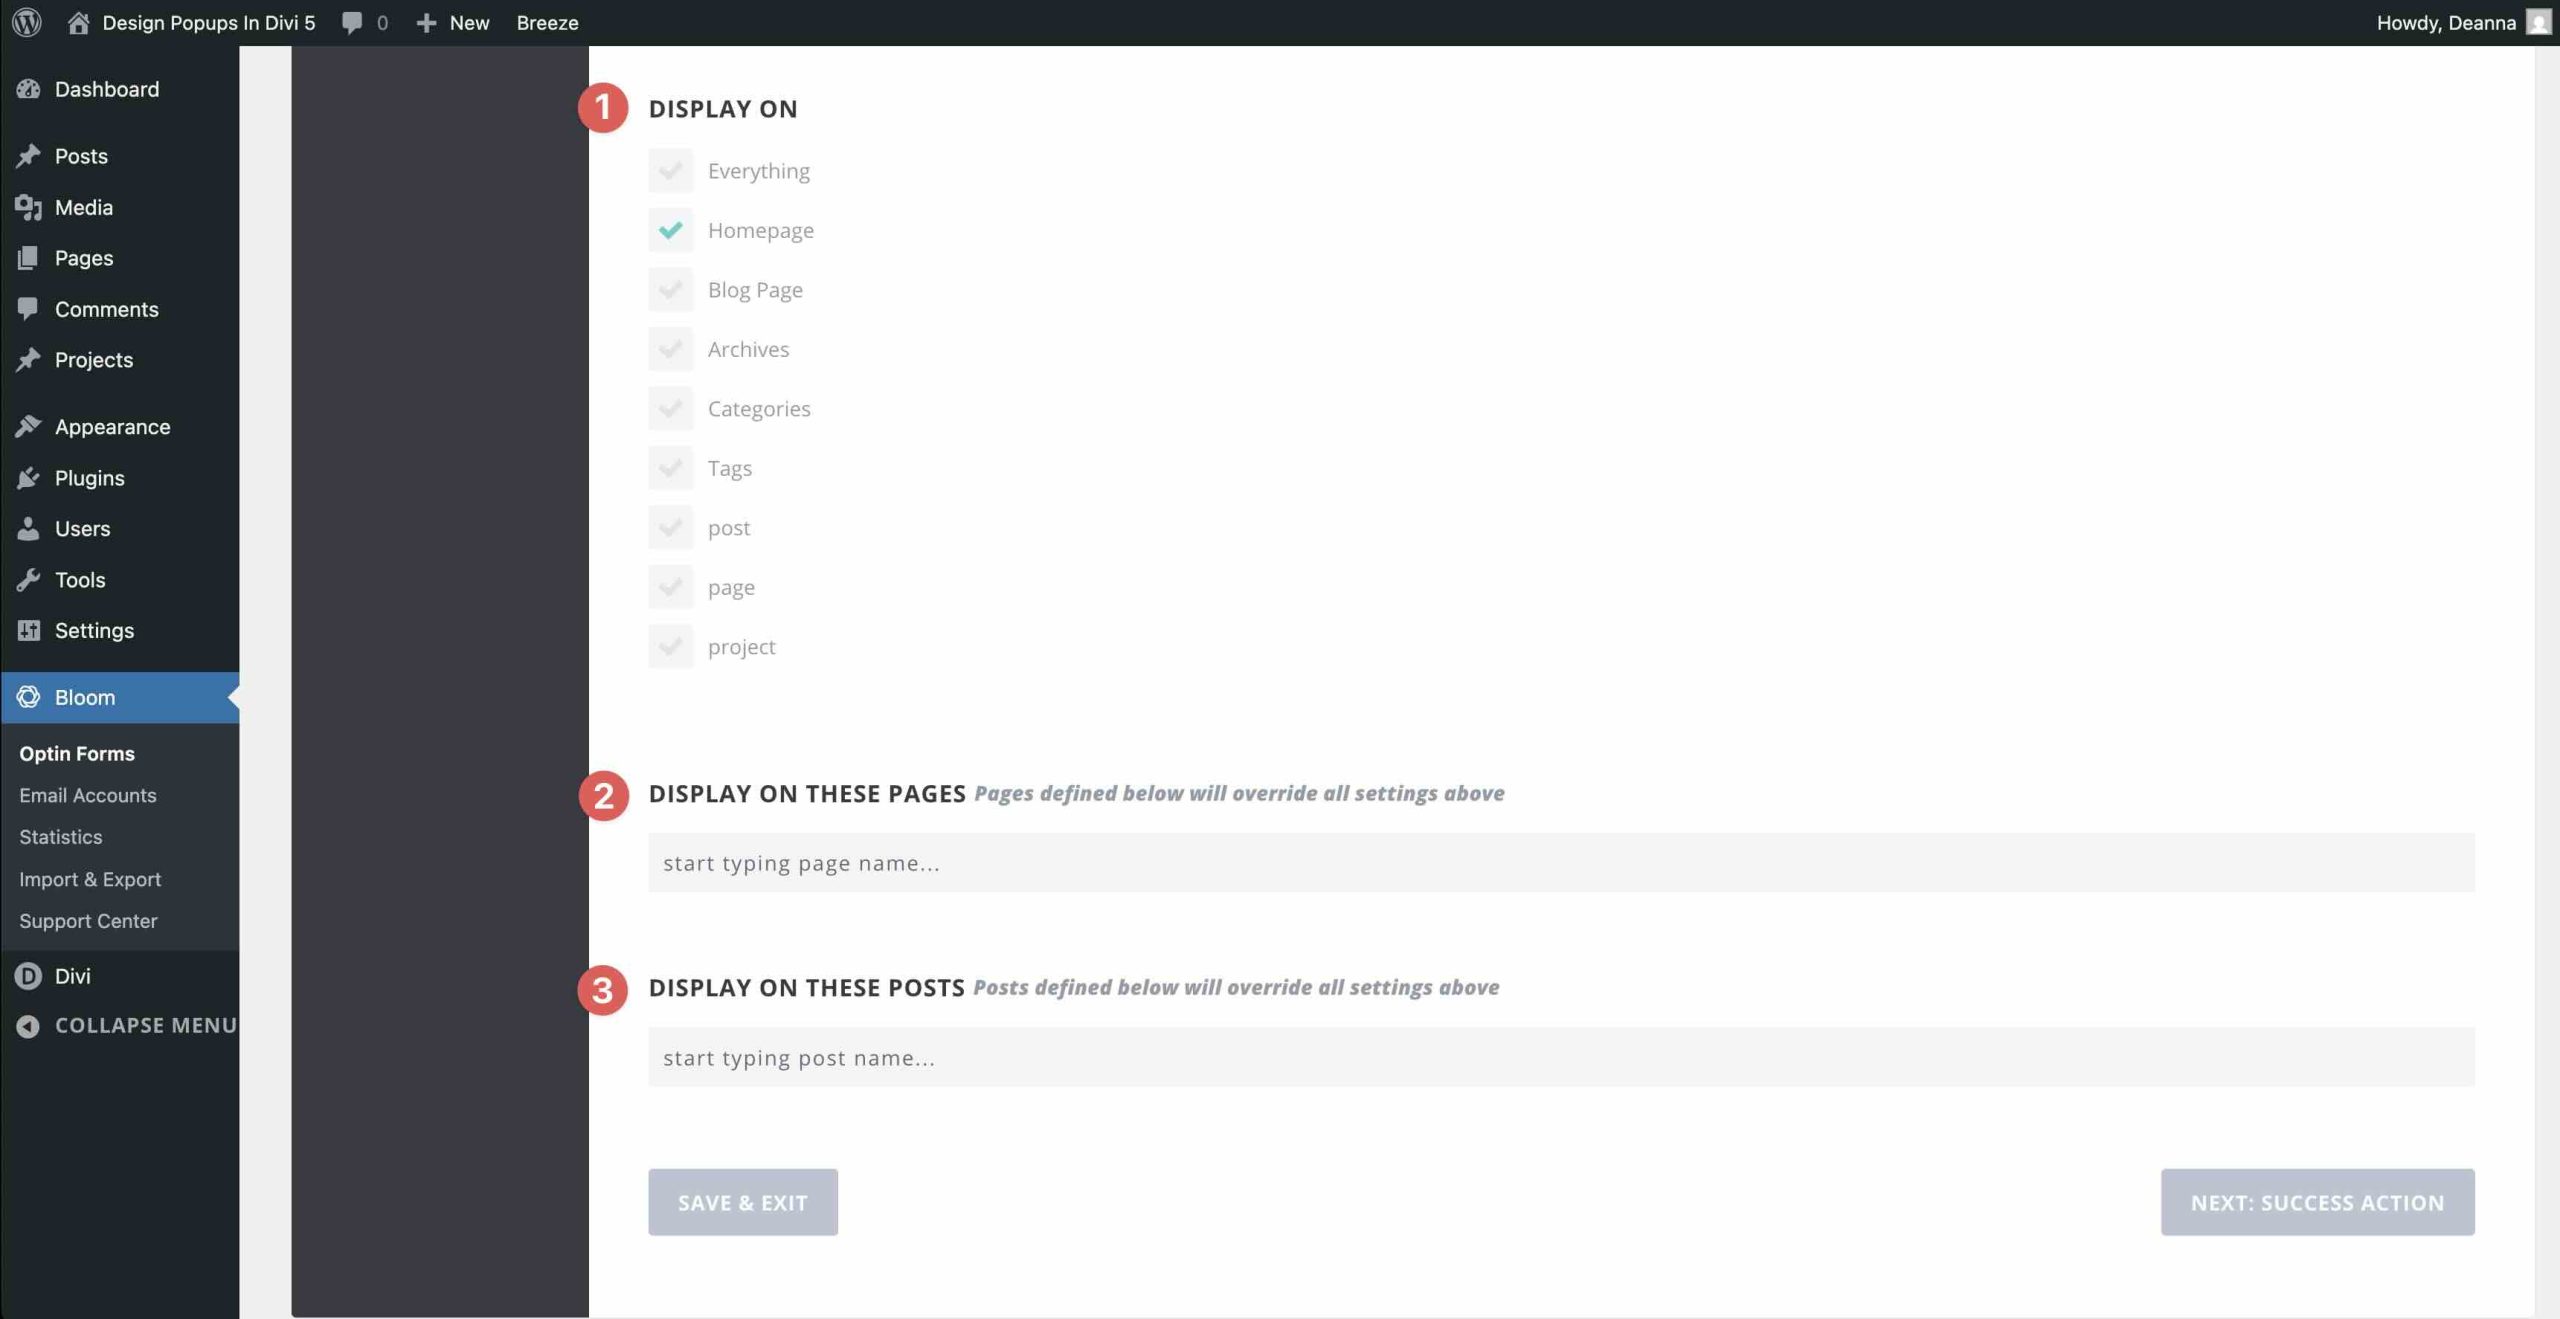
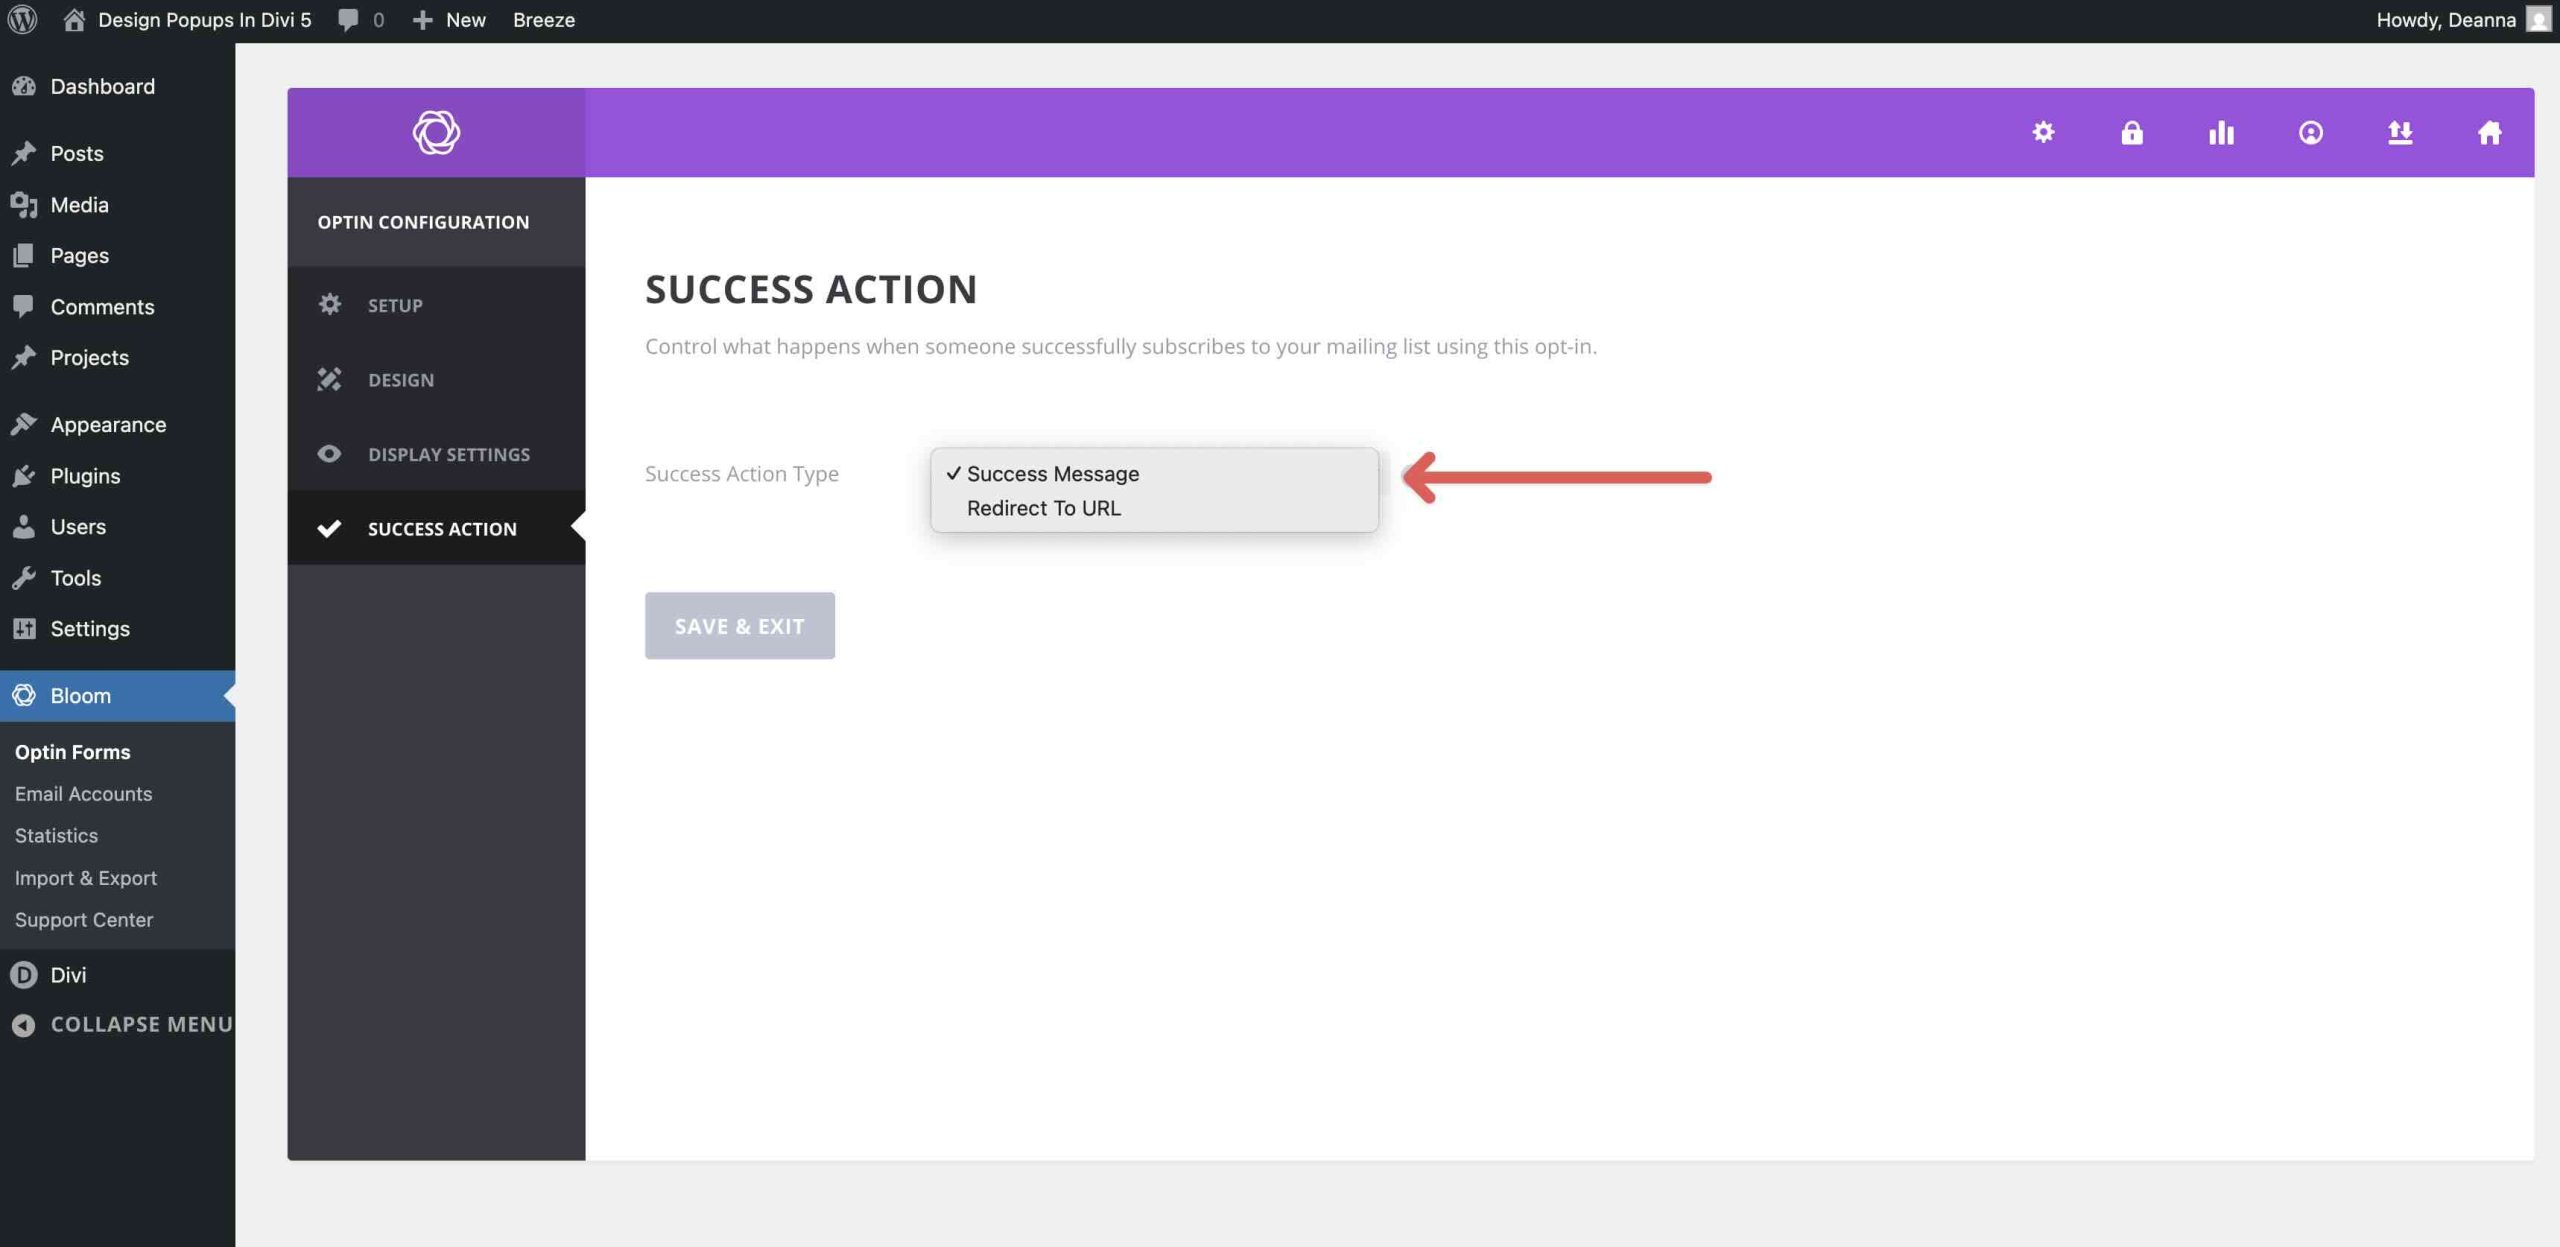
Once you’ve chosen the desired settings, click Next: Success Action to continue.
Finally, choose a success action for your popup from the dropdown menu. Select either Success Message or Redirect To URL.
Save the popup and preview it on the frontend.
Which Method Should You Choose?
Each approach has a clear best use case:
- Use Canvases + Interactions when you want reusable, organized, off-canvas popups that stay separate from your main layout.
- Use Interactions + Visibility Settings when you want a lightweight, fully native popup built directly on the page.
- Use Bloom when your main goal is email opt-ins, targeting, testing, and built-in analytics.
Tips And Best Practices
Creating effective popups goes beyond the technical setup. User experience, timing, and value matter just as much. Poorly implemented popups can frustrate visitors and increase bounce rates, while thoughtful ones can improve conversions. Here are a few ways to make your Divi 5 popups more effective:
Provide Real Value First
Never interrupt users without a compelling reason. Offer something genuinely useful, whether that’s an exclusive discount, a helpful free resource, early access to content, or a personalized recommendation. Popups that feel helpful rather than purely promotional tend to convert better.
Time Them Strategically
Avoid showing popups immediately on page load unless it’s a critical message, such as a cookie consent prompt. Instead, use smart triggers:
- Use Timed Delays: Set welcome popups to appear 5–15 seconds after page load.
- Use Scroll Triggers: For content-based offers, trigger popups after visitors have viewed roughly 30–50% of the page.
- Consider Exit-Intent-Style Behavior: Bloom includes advanced trigger options out of the box. In Divi 5, you can combine Interactions, conditions, and cookies to control when offers appear.
Make Them Mobile-Friendly And Responsive
Test thoroughly on phones and tablets. Use Divi’s responsive design tools to adjust sizing, padding, and positioning. Make sure buttons and close icons are large enough for touch, and avoid covering too much of the screen. Fixed or absolute positioning works especially well in Canvases for clean mobile overlays.
Include Clear, Prominent Close Options
Always include an obvious close button or icon. For native Divi 5 methods, set up a Click trigger on the close element to hide the popup. An overlay click-to-close behavior can also improve usability.
Focus On Strong, Action-Oriented CTAs
Use benefit-driven copy that makes the value clear. Avoid generic CTAs like Submit or Send. Pair your CTA with strong contrast, urgency where appropriate, and supporting proof when possible.
Keep Accessibility In Mind
Make sure popup copy is easy to read, color contrast is strong, and keyboard users can close the popup without friction. Accessibility improvements make popups easier for everyone to use and usually improve conversion clarity too.
Start Using Interactions In Divi 5 Today!
Divi 5 gives you powerful native tools to create popups without relying on extra plugins or custom code. Whether you choose the lightweight precision of Interactions for simple custom modals, the advanced organization and reusability of Canvases, or the marketing power of Bloom for email-focused campaigns, there’s a strong option for every goal.
The beauty of Divi 5 lies in its flexibility. You can build once, style freely with Divi’s design options, trigger elements dynamically, and keep your site lean. I encourage you to explore Divi 5, experiment with these approaches, and let us know what you think in the comments.
The post How To Design Popups In Divi 5 (Three Different Ways) appeared first on Elegant Themes Blog.