I was looking for a fresh way to grow my email list in WordPress, and personality quizzes caught my attention right away. They’re engaging, fun to take, and feel personal to each visitor.
The challenge is that many quiz tools can feel complicated or require extra platforms to set up.
Since I already use WPForms for forms across my websites, I decided to try its Quiz Mode. After turning it on, I was surprised by how easy it was to build a personality quiz without writing a single line of code.
In this article, I’ll show you how to build your own quiz and use the results to grow your email list automatically. You can turn a simple WordPress quiz into a lead-generation machine that feels like a conversation, not a sales pitch.

📕 TL;DR: I recommend using WPForms Pro and its Quiz Addon to automatically turn quiz takers into segmented email leads. This setup lets you build a personality quiz in minutes, and the results can automatically sort new subscribers into different email lists based on their answers.
Why Create a Personality Quiz in WordPress?
A personality quiz in WordPress is one of the most effective ways to engage visitors and grow your email list at the same time by collecting the user’s email address before they can see the result.
I’ve found that quizzes tend to perform better than traditional lead magnets because they give visitors something in return right away: a result that feels tailor-made for them.
The main benefit? Capturing leads without it feeling forced. Instead of asking visitors to sign up for a generic newsletter, you offer something fun and valuable first. Many people are happy to share their email addresses to see their quiz results.
From there, the quiz can become the starting point of a larger marketing funnel.
For example, a travel website might begin with a quiz like “What’s Your Travel Style?” to help visitors discover whether they’re an Adventurer, Relaxation Seeker, or Culture Explorer. This first step builds awareness and helps segment the audience based on their interests.
Once visitors know their travel style, you can continue the conversation through targeted email newsletters.
For example, if someone gets the Adventurer result, you might send them emails featuring hiking destinations, adventure travel guides, or packing tips for outdoor trips. This helps move subscribers into the consideration stage by showing them options that match their interests.
Later, you can send more specific recommendations, such as curated travel itineraries or vacation packages that match their preferences. At this point, the goal is to help them choose a destination or book a trip.
Other benefits include:
- 📈 Boost engagement with interactive content. Quizzes encourage visitors to actively participate instead of just reading or scrolling, which can keep them on your site longer.
- 🪁 Learn what your audience actually cares about. Each answer provides insight into your visitors’ preferences, interests, or goals. This helps you understand what type of content or products they’re looking for.
- 📨 Segment users for more personalized follow-ups. Quiz results let you send the right tips, offers, or recommendations, which keeps your emails helpful instead of promotional.
Here is how to build a personality quiz that engages visitors and turns results into a natural next step (like a tailored resource, recommendation, or optin):
- Step 1: Install WPForms and the Quiz Addon
- Step 2: Enable Quiz Mode to Create Your Personality Quiz
- Step 3: Choose Your Quiz Type
- Step 4: Define Your Personality Types for the Quiz Outcomes
- Step 5: Add Questions and Map Answers
- Step 6: Add an Email Field for Lead Generation (Optional)
- Step 7: Set Up Quiz Outcome Messages
- Step 8: Publish and Share Your Personality Quiz
- Bonus Tips for Promoting Your Quiz
- Frequently Asked Questions About Personality Quizzes
- Next Steps for Using WordPress Forms
💡 Note: To make this guide easier to follow, I’ll show you how to build a simple personality quiz for a travel website. The quiz helps visitors discover their travel style, with results like Adventurer, Relaxation Seeker, or Culture Explorer.
You can use the same steps to create quizzes for other types of websites, too. For example, a boutique shop might use results such as “Minimalist,” “Chic,” or “Bold Trendsetter.”
You can even create fun quizzes for entertainment, like “What Type of Cheese Are You?” or “What Kind of Bread Matches Your Personality?”
Step 1: Install WPForms and the Quiz Addon
The best way to create a personality quiz in WordPress is with WPForms. It’s one of the best survey and quiz plugins available, and it comes with a built-in Quiz Mode that makes the whole process simple.
At WPBeginner, we actually use WPForms to create and display our contact form, annual readers’ survey, and more. You can learn more about the plugin in our detailed WPForms review.
To start, you can create a WPForms account. On the WPForms website, click ‘Get WPForms Now,’ pick a plan, and complete the checkout process.
💡 Note: You’ll need the WPForms Pro plan or higher, since the Quiz Addon is included with those licenses. There’s also a free WPForms version you can try before committing.
Upon signup, you’ll be redirected to your own account area, where you can download your WPForms zip file and access your license key.
Now, you can install and activate the WPForms plugin in your WordPress site.
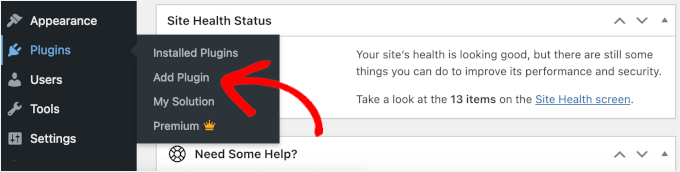
To do this, go to Plugins » Add Plugin from your WordPress admin area.
On the next screen, click on ‘Upload Plugin’ to open the file uploader.
Click the ‘Choose File’ button and upload your WPForms zip file from your local computer.
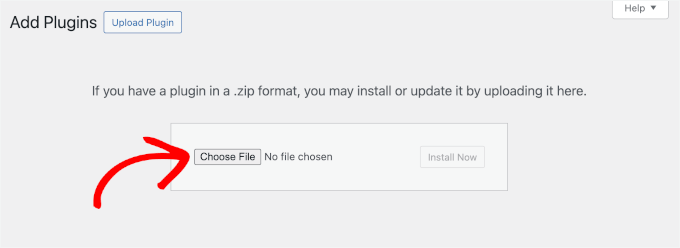
After uploading, click ‘Install Now’ and then ‘Activate’ to enable it. See our guide on how to install a WordPress plugin for details.
Next, you’ll need to verify your license key to unlock all the Pro features.
To do this, go to WPForms » Settings from your WordPress dashboard. Then, paste your license key into the ‘License Key’ field and click the ‘Verify Key’ button.
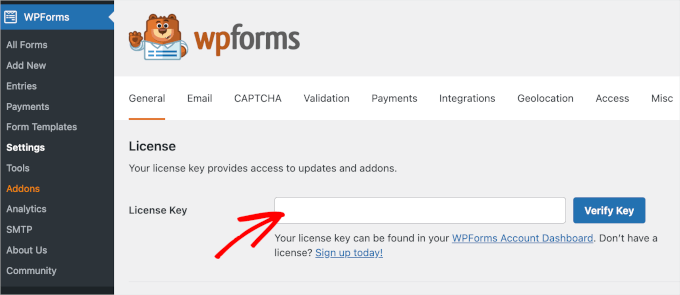
Once verified, WPForms will confirm that your license is active and ready to use.
Next, you’ll need to activate the Quiz Addon.
Switch to the ‘Addons’ menu and use the search box to quickly find the Quiz Addon. When you see it in the search results, click ‘Install Addon.’
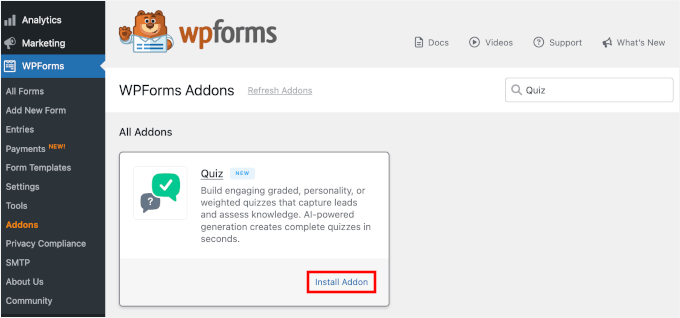
The installation should take a few seconds.
🧑💻 Pro Tip: Before creating your quiz, make sure you have an account set up with an email marketing service like Constant Contact. Later in this tutorial, I’ll show you how to capture emails directly inside your quiz and send them straight to your email list.
If you don’t want to collect emails, that’s okay, too. You can move on to the next step.
Step 2: Enable Quiz Mode to Create Your Personality Quiz
With the Quiz Addon activated, it’s time to start creating your quiz.
From your WordPress dashboard, navigate to WPForms » Add New.
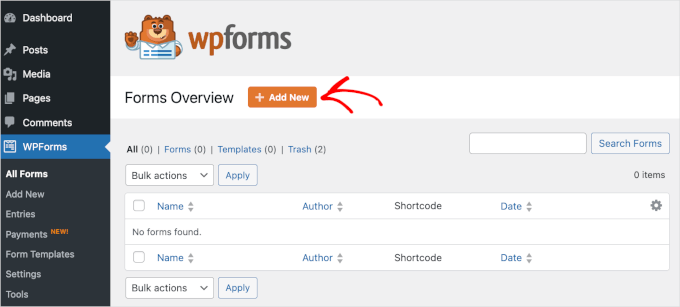
This will take you to the ‘Setup’ page.
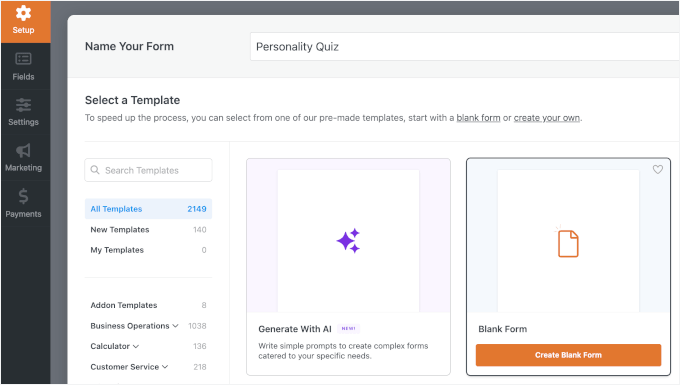
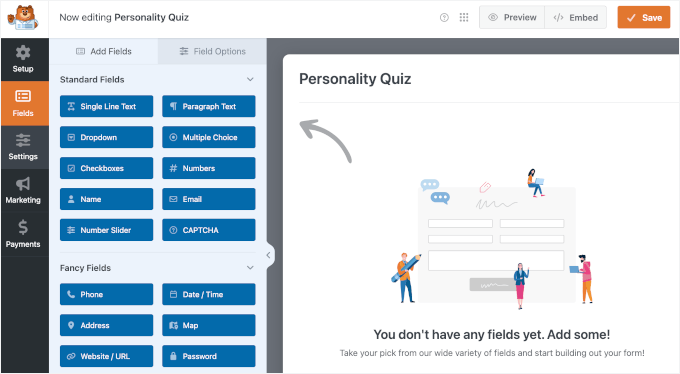
For a personality quiz, you can start with the blank form template because you’ll be building out the structure using Quiz Mode.
💡 Note: WPForms Pro also includes an AI-powered form builder, so you can generate a form in seconds using a prompt. Alternatively, you can use a pre-made template. There are 2,100+ options available, which makes it easy to find one that fits your needs.
Let’s give your form a name at the top of the screen. Then, hover over the ‘Create Blank Form’ box and click ‘Create’ to open the form builder.
You should now see the WPForms drag-and-drop form builder.
On the left, you’ll find all the fields you can add as well as the customization options. On the right, you’ll see a live preview of your form as you edit it.
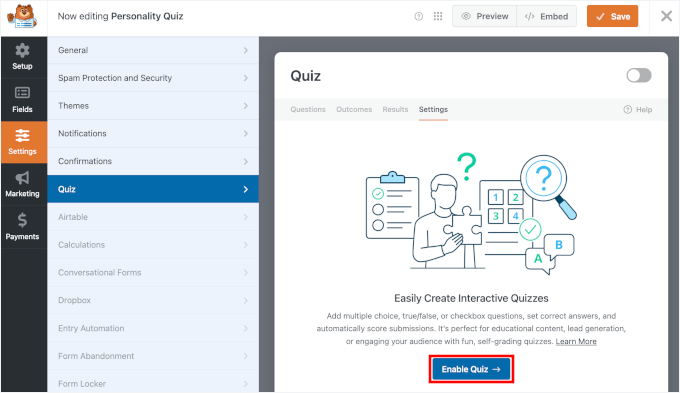
From here, let’s navigate to Settings » Quiz from the left-hand panel, and you’ll see an option to enable quiz functionality.
Click the ‘Enable Quiz’ toggle to turn it on.
I recommend saving your form right after enabling Quiz Mode so you don’t lose your progress. You’ll find the ‘Save’ button in the top right corner of the form builder.
Step 3: Choose Your Quiz Type
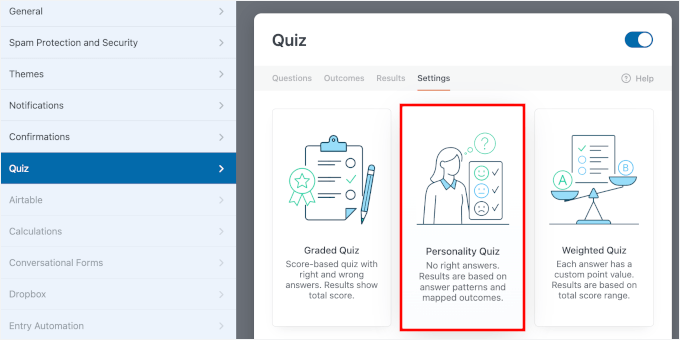
With Quiz Mode enabled, WPForms will prompt you to choose a quiz type.
You’ll see three options: Graded Quiz, Personality Quiz, and Weighted Quiz.
| Quiz Type | What It Does | Common Use Case |
|---|---|---|
| Graded Quiz | Calculates a score based on right and wrong answers. | Trivia quizzes, knowledge tests, or online course exams. |
| Weighted Quiz | Each answer choice has a point value, and the total score determines the result. | Product recommendation quizzes or assessments. |
| Personality Quiz | Calculates results based on answer patterns rather than points or correct answers. | Personality quizzes like “What’s Your Travel Style?” |
For this tutorial, let’s select ‘Personality Quiz.’
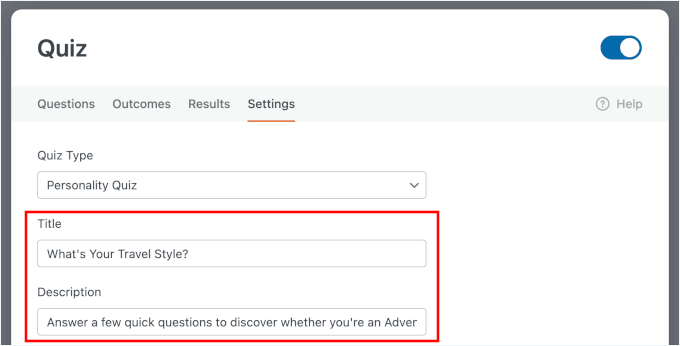
Next, you’ll see the option to add a title and description for your quiz:
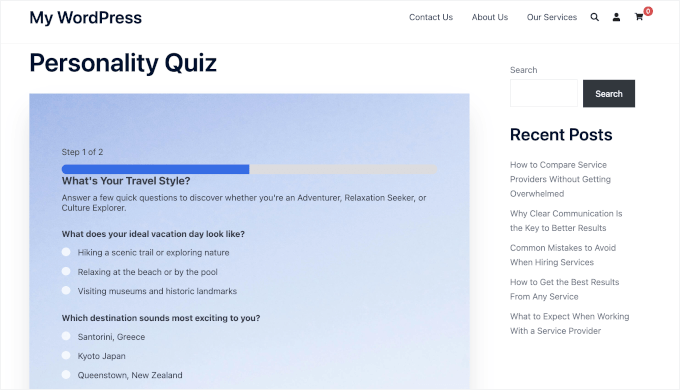
- Title – displayed at the top of the quiz, so make it engaging and clear. For my use case, something like “What’s Your Travel Style?” works perfectly. It’s simple, curiosity-driven, and tells visitors exactly what to expect.
- Description – optional, but it’s a great place to add a short intro that encourages visitors to start the quiz. For example, you might write: “Answer a few quick questions to discover whether you’re an Adventurer, Relaxation Seeker, or Culture Explorer.”
🧑💻 Pro Tip: Keeping the description to one or two sentences is usually enough. You want to spark interest without overwhelming visitors before they’ve even begun.
Step 4: Define Your Personality Types for the Quiz Outcomes
Before adding questions, you’ll need to define the personality types that visitors can get as their quiz results.
To do this, look for the ‘Personality Types’ section in the ‘Quiz’ settings. This is where you’ll list the possible outcomes for your quiz.
For my travel quiz example, here are the personality types I’m using:
- Adventurer — for visitors who love active, outdoor, off-the-beaten-path experiences
- Relaxation Seeker — for visitors who prefer slow-paced, peaceful getaways
- Culture Explorer — for visitors who are drawn to history, food, art, and local experiences
The names you choose matter more than you might think. When visitors see their result, you want them to feel excited and understood, not confused or put off.
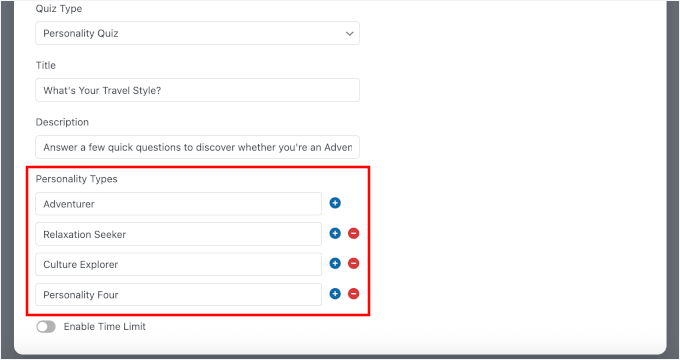
I recommend adding between 3 and 5 personality types. This keeps the results distinct, makes answer mapping easier, and helps you create a clear “next step” for each type.
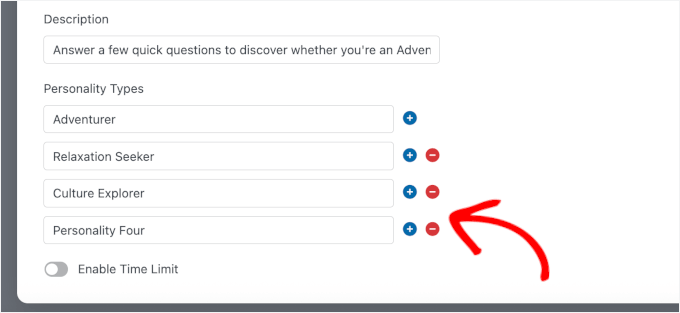
You can use the ‘–’ or ‘+’ buttons to remove or add personality types.
Once you’ve added all your personality types, click ‘Save’ before moving on to the next step. This way, your types will be ready to assign when you start building your questions.
Step 5: Add Questions and Map Answers
With your personality types in place, it’s time to build the heart of your quiz: the questions.
Go ahead and open the ‘Questions’ tab inside the WPForms quiz builder to get started.
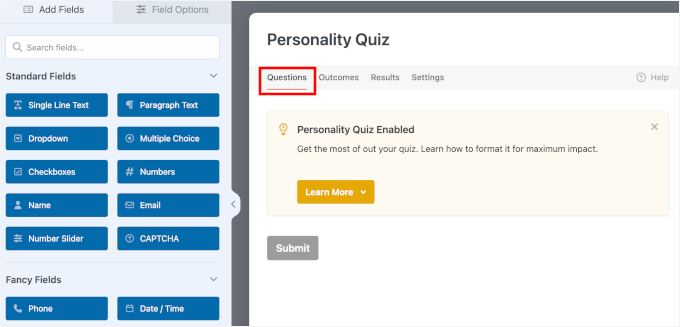
To add a new question, simply click the question type you want from the left-hand panel and drag it into the form.
WPForms supports a few different question formats that work well for personality quizzes:
- Multiple Choice — lets visitors pick one answer from a list, which is the most common format for personality quizzes
- Dropdown — displays answers using a dropdown field, which is a cleaner option if you have longer answer choices.
- Checkboxes — allows visitors to select more than one answer, which works well for questions like “Which of these destinations appeal to you?”
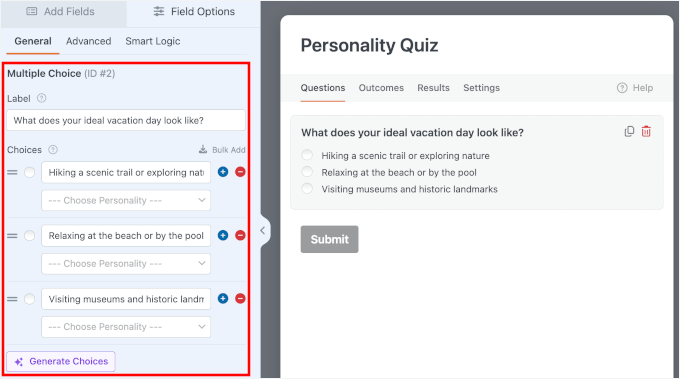
For a smooth quiz experience, I recommend sticking with ‘Multiple Choice’ for most of your questions. Drag the field from the left-hand panel to the right.
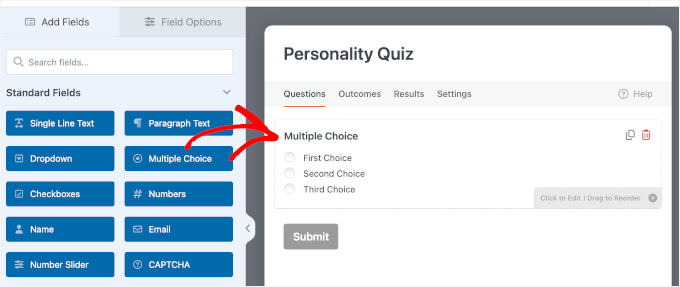
Now, click on the ‘Multiple Choice’ field.
Then add your question and answer options using the customization panel on the left.
If you’re not sure what answer options to include, WPForms has a handy built-in feature called AI Choices.
Simply click the ‘Generate Choices’ button inside a question field, write a simple prompt, and WPForms will suggest relevant answer options based on your question.
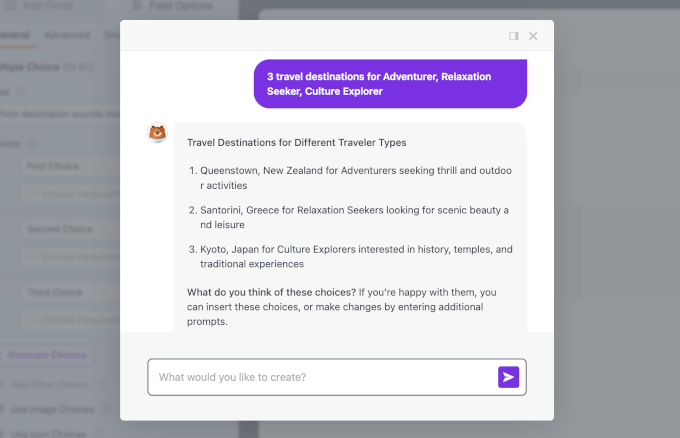
This is a great time-saver, especially if you’re building a quiz with several questions and want a starting point to work from. You can always edit or replace the suggestions to better match your target audience.
Make sure to review the AI’s suggestions carefully so they easily map back to the 3 to 5 personality types you defined in the previous step.

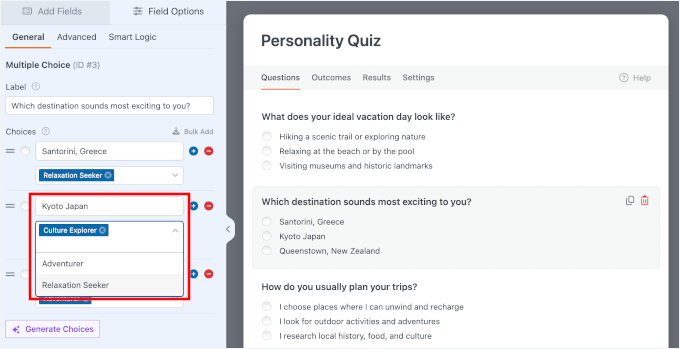
Now, for every answer choice you add, you’ll need to assign it to one of the personality types you created in the previous step.
To do this, look for the personality type dropdown selector next to your options. Then, click on the personality type that best matches what that answer reveals about the visitor.
For example, if your question is “What destination sounds most exciting to you?” your answer mapping might look something like this:
- ⛱️ “Santorini, Greece” → Relaxation Seeker
- 🎭 “Kyoto, Japan” → Culture Explorer
- 🥾 “Queenstown, New Zealand” → Adventurer
The way you phrase your answer choices can make a big difference in how engaged visitors feel, and whether the call to opt-in later feels like a natural follow-up or an abrupt pitch.
When you’re done, it’s worth double-checking that every answer choice has been assigned to a specific personality type. WPForms calculates the final result by tallying which personality type received the most answer mappings.
If you leave even one option unmapped, the final calculation could be off, and your visitors might get the wrong result.
Once you’ve made sure all your questions are mapped to a personality type, hit ‘Save.’
Expert Tip: This is the most important step to double-check. A single unmapped answer choice can cause the quiz logic to fail and show visitors the wrong personality type. I recommend going through each question one last time to make sure every single answer is correctly assigned to a personality.
Step 6: Add an Email Field for Lead Generation (Optional)
If you want to collect leads from your quiz, the perfect place to do it is right before users see their results. The goal is to keep the experience smooth, so it feels like a natural final step, not an interruption.
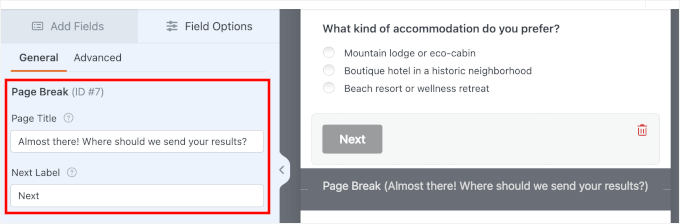
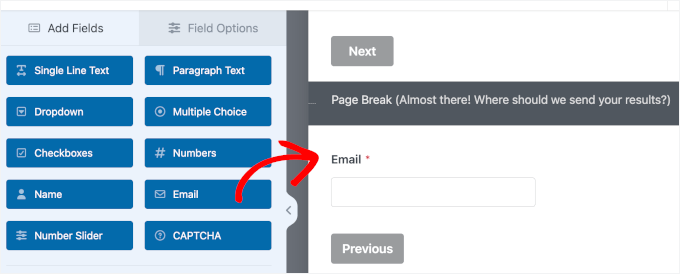
Start by adding a page break to separate the quiz questions from the results step. You can simply drag and drop the Page Break field from the left panel into the preview area on the right.

From here, let’s click on the field to open the customization options.
For this quiz, you could write something like ‘Almost there! Where should we send your results?’
You’ll also notice that there’s a customizable Next button. Go ahead and edit the text if necessary. I’m leaving this as is, as it creates a clear transition for quiz takers.
You can also enable a Previous button so quiz takers can go back to the previous page.
To do this, click below the Page Break field and click the ‘Display Previous’ checkbox. Plus, you can edit the label if you want to.

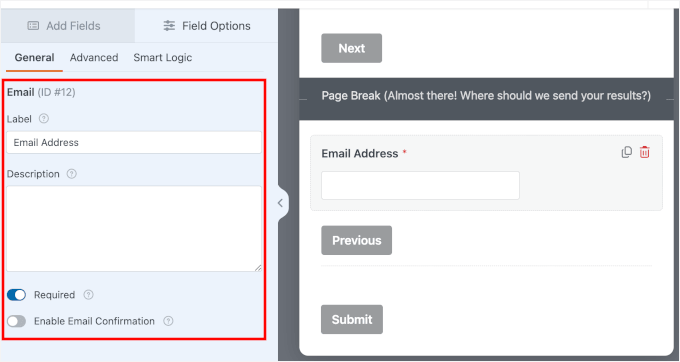
Next, let’s add an Email field right below that page break.
Drag and drop the field from the left-hand panel to the right like before.
Once it’s in place, you can click on it to open the customization options.
Then, feel free to customize the field label. Don’t forget to turn on the Required option to make sure users enter their email address before they can continue to their results.
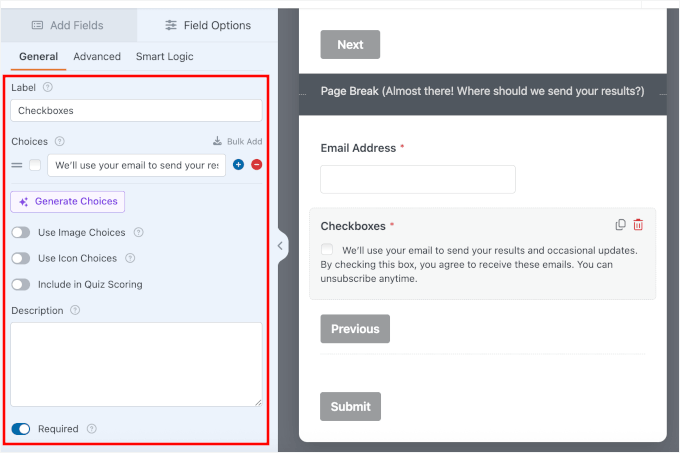
After that, it’s a good idea to add a consent checkbox for transparency.
To do this, insert a Checkboxes field under the email field.

Next, you can open the customization options and remove the additional choices using the ‘-‘ icon.
With that done, let’s update the text to briefly explain how you’ll use their email, like sending their results or occasional email updates.
You should also turn off the ‘Include in Quiz Scoring’ switch so that this field doesn’t affect the user’s quiz results. If left on, WPForms will try to assign a personality trait to the act of checking the consent box, which will completely skew your final results.
If you want a cleaner look, you can hide the field label and show the consent message.
Go to the Advanced tab and switch the ‘Hide Label’ option on.
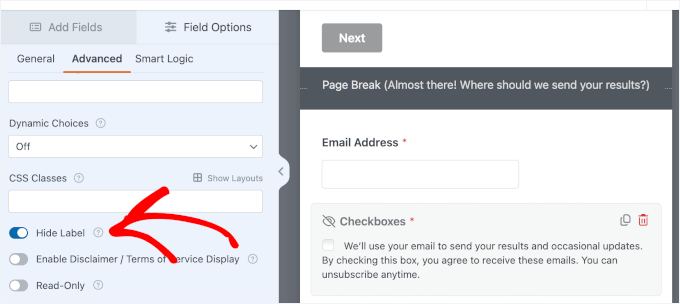
🛑 Important: Adding a consent checkbox like this is a simple way to be more aligned with privacy best practices like GDPR. That said, we’re not legal professionals, so you may want to review your specific requirements if you’re collecting personal data.
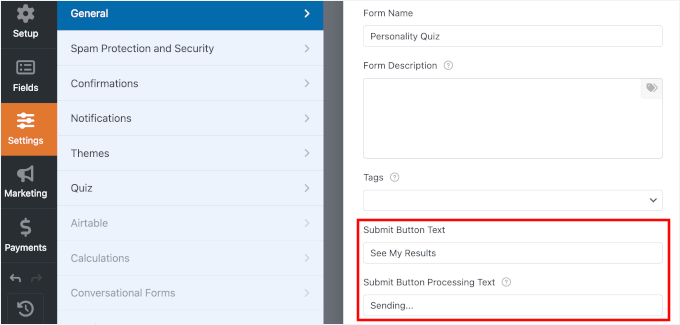
Finally, head over to Settings » General and update the submit button text to something more specific, like “See My Results.”
This small change makes a big difference because it clearly tells users what will happen next.
With this setup, you’re not only collecting emails – you’re doing it in a way that feels natural and user-friendly.
To automatically add these new leads to your newsletter, you’ll need to connect WPForms to your email marketing service.
Simply click on the Marketing tab on the left-hand panel of the form builder, select your provider, such as Constant Contact, and follow the prompts to link your account.
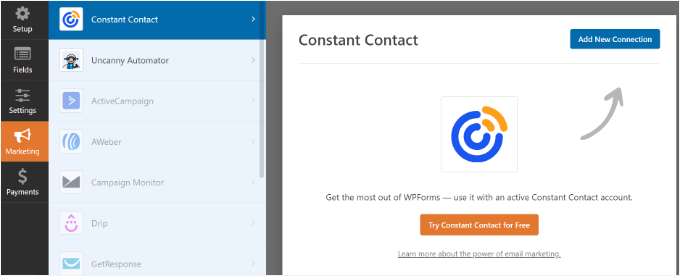
For details, see our guide on how to connect Constant Contact to WordPress.
Step 7: Set Up Quiz Outcome Messages
Now that your quiz form is ready, it’s time to set up what visitors will see after they complete the quiz. These are called ‘Outcomes,’ and they’re the personalized result messages that make a personality quiz feel fun and rewarding.
You’ll need to create one outcome for every personality type you defined in Step 3. For my travel quiz example, that means creating three separate outcomes: one for Adventurer, one for Relaxation Seeker, and one for Culture Explorer.
To get started, navigate to the ‘Outcomes’ tab inside the WPForms quiz builder.
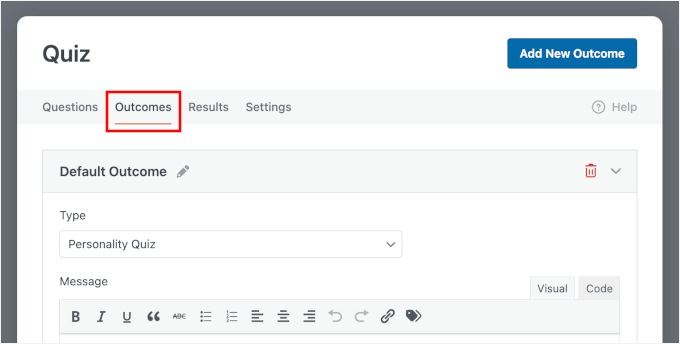
Next, you’ll want to rename the ‘Default Outcome’ to match one of your personality types.
To do this, click the pencil icon next to the outcome name. In my example, I’m starting with ‘Adventurer.’
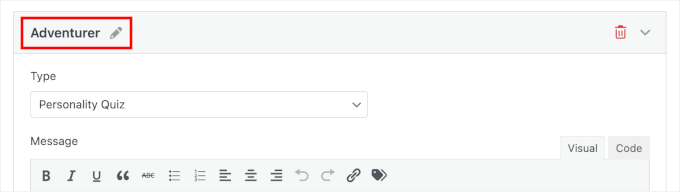
In the Visual editor, you can rewrite the placeholder with your outcome message.
A good outcome message should do four things:
| Outcome Message Element | What to Include |
|---|---|
| Celebrate the Result | Start by confirming the visitor’s personality type in a positive and encouraging way so the result feels rewarding. |
| Explain What It Means | Add 2–3 short lines describing the traits of this personality so readers feel the result matches them. |
| Recommend Something Relevant | Suggest helpful, related products, content, tips, or offers that fit their personality type. |
| Suggest a Next Step | Guide them toward an action, such as downloading an eBook, exploring a product, or reading a specific blog post tailored to their results. |
My tip is to use the WPForms{quiz_personality_type} smart tag inside your outcome messages. Smart tags automatically insert the visitor’s result, which makes the message feel more personal even though you only write it once.
For example, if you write: “Congratulations! You are an {quiz_personality_type}!” A visitor who scores Adventurer will see: “Congratulations! You are an Adventurer!”
It’s also great for tailoring a “next step” call to action, like “Get tips for {quiz_personality_type} travelers”.
Visitors are most engaged right after they see their result. They are curious about what their personality type means and usually want to learn more. This makes it the perfect time for a call-to-action.
Because you already captured their email in the previous step, this is the perfect time to point them toward a highly relevant resource or product on your site. This keeps them engaged with your brand.
Plus, I’ve found that lead magnets tied to quiz results convert much better than generic signup forms because the offer feels personally relevant to the visitor.
To make the next step feel connected to the quiz result, pair it with a short, personalized call-to-action pointing to your content. Here are a few examples you can adapt:
- “Want travel tips tailored for your {quiz_personality_type} style? Read our ultimate guide here.”
- “Get destination ideas picked just for {quiz_personality_type} travelers — check out our top 10 list.”
- “Love your result? Browse our top recommended gear for every {quiz_personality_type} out there.”
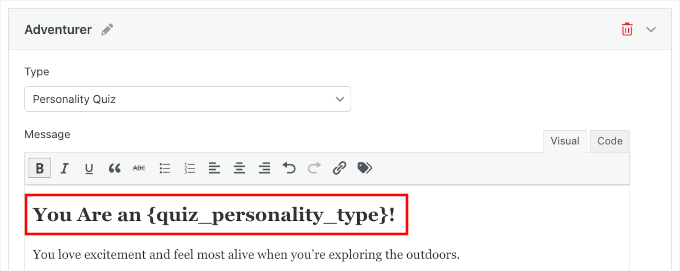
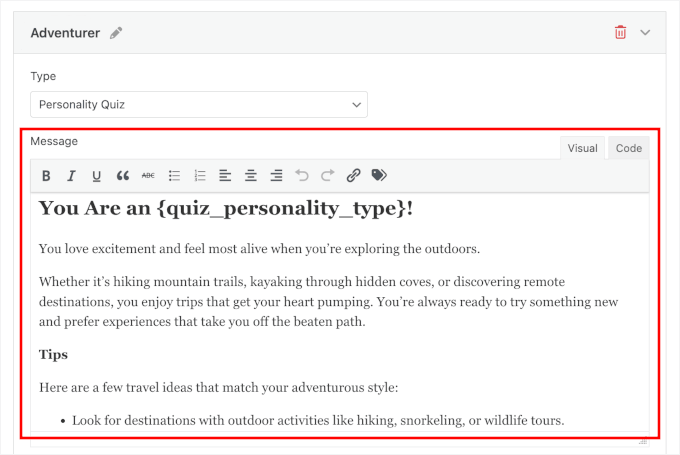
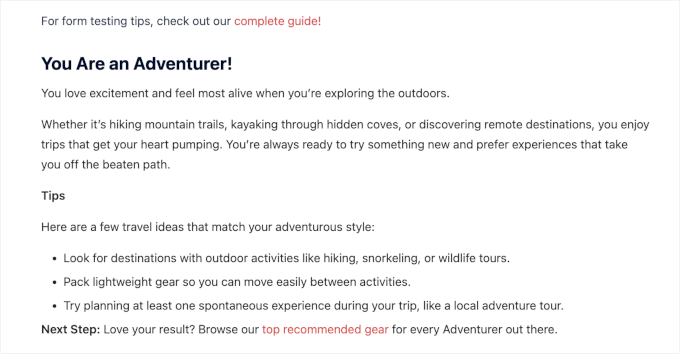
For example, the Adventurer personality outcome message might read something like:
"You Are an {quiz_personality_type}!

You love excitement and feel most alive when you’re exploring the outdoors.

Whether it’s hiking mountain trails, kayaking through hidden coves, or discovering remote destinations, you enjoy trips that get your heart pumping. You’re always ready to try something new and prefer experiences that take you off the beaten path.

Tips

Here are a few travel ideas that match your adventurous style:

Look for destinations with outdoor activities like hiking, snorkeling, or wildlife tours.
Pack lightweight gear so you can move easily between activities.
Try planning at least one spontaneous experience during your trip, like a local adventure tour.

Next Step: Love your result? Browse our top recommended gear for every {quiz_personality_type} out there."
Here’s what you might see on your screen:
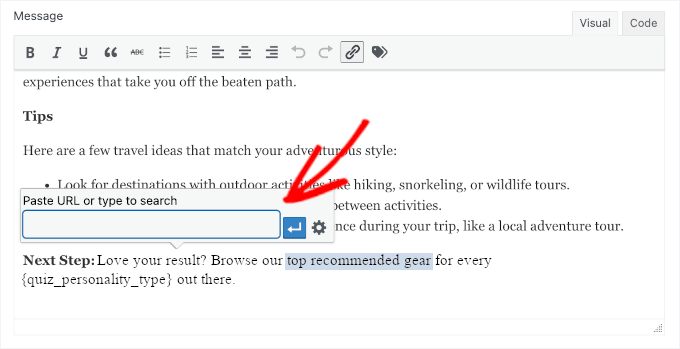
For the CTA, you can add a link to your relevant blog post or landing page.
In the Message field, simply highlight the text you want to link, then click the link icon in the toolbar. After that, paste the page URL.
Next, you’ll want to make sure this is the outcome that appears for specific personality types.
This is where conditional logic comes in. For each outcome, you’ll need to enable a condition that says: show this outcome when the Quiz Personality Type matches the corresponding type.
For example, to set up the Adventurer outcome, you would create a rule: ‘Show this outcome if Quiz Personality Type is Adventurer.’ You then repeat this simple rule for your other personality types.
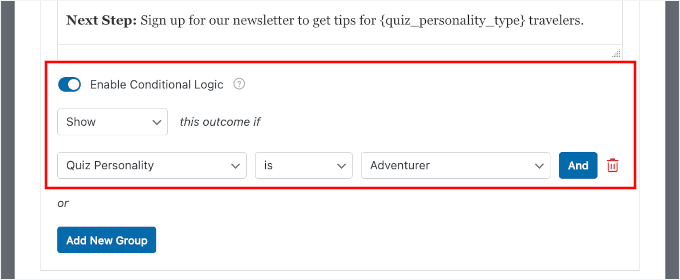
🧑💻 Pro Tip: Conditional logic is what makes the quiz feel smart and personalized. It’s what lets you show the right “next step” for each personality type. If you’d like to learn more about it, see our guide on ways to use conditional logic in WordPress forms.
To add an outcome, click the ‘Add New Outcome’ button and give it a name that matches your personality type.
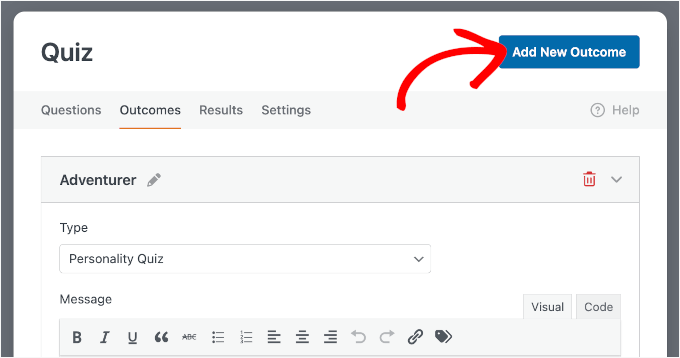
You’ll then need to write your outcome message and set up a condition that tells WPForms when to display this outcome.
Step 8: Publish and Share Your Personality Quiz
You’ve built your quiz — now it’s time to test it, embed it on your WordPress website, and share it with the world. Before you hit publish, though, it’s worth taking a few minutes to make sure everything works exactly as expected.
I always recommend testing a form or quiz before making it live. It takes a few minutes and can save you from an awkward experience where visitors encounter broken logic or unexpected results.
To test your quiz, click the ‘Preview’ button at the top of the WPForms form builder.
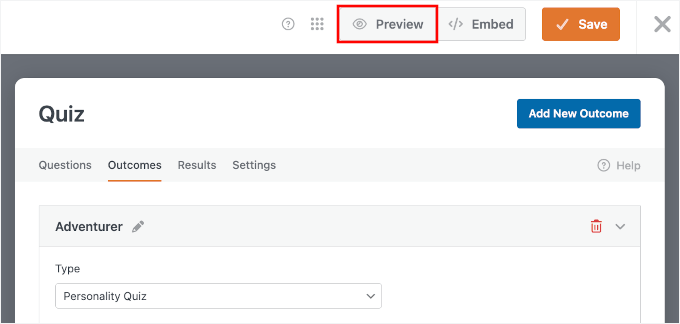
This opens a live preview of your quiz where you can go through each question as a real visitor would.
Here are a few things to check during your test run:
- Validation — make sure each required field is filled out before the user can move forward.
- Answer mappings — go through the quiz multiple times, selecting different answer combinations to confirm each personality type is triggered correctly.
- Outcome messages — verify that the right result message appears for each personality type and that the
{quiz_personality_type}tag displays correctly.
You can also enter an invalid email address to test the validation, like this:
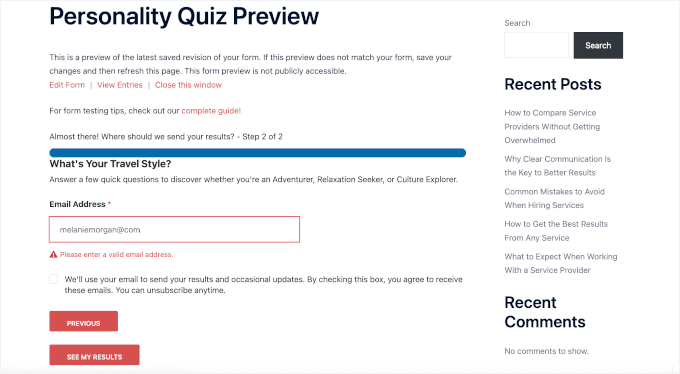
Then, you can hit the ‘See My Results’ button as a quiz taker would.
For reference, here’s what my personality quiz outcome looks like during a test submission:
Make sure to also preview your quiz on your smartphone to ensure the quiz buttons and text are easy to read and tap on mobile devices. If anything looks off, you can head back into the form builder to make adjustments before moving on.
But if you’re happy with how everything looks and works, it’s time to save your quiz and add it to a page on your WordPress site.
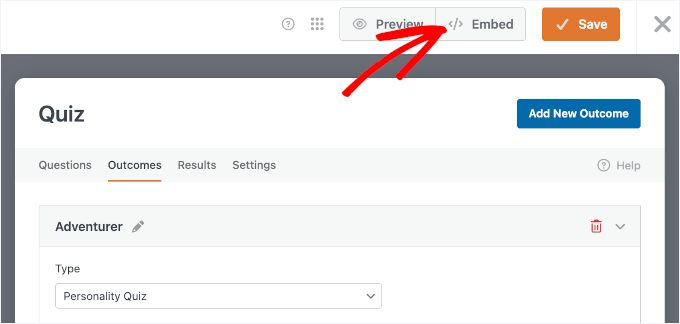
WPForms makes embedding forms in WordPress straightforward with the embed wizard right inside the quiz builder. To launch this wizard, click the ‘Embed’ button next to ‘Preview.’
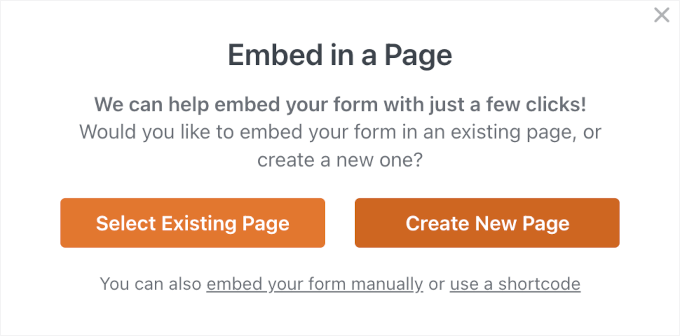
You should now see a popup asking where you’d like to embed the quiz. You can either add it to an existing page or create a new one.
If you choose Select Existing Page, you’ll be able to pick a page that’s already on your site, like a homepage or a landing page, and insert the quiz there. If you go with Create New Page, WPForms will create a brand-new page for you and automatically add the quiz.
For this tutorial, let’s click ‘Create New Page’ — it’s the more effective option, since a dedicated page helps visitors focus on the quiz without distractions.
In the next popup, WPForms will prompt you to name your new page.
Give it a clear name and hit ‘Let’s Go!’

This will take you to the WordPress block editor with your quiz already embedded.
From here, you can look for the ‘Form Settings’ on the right-hand panel to show or hide the quiz title and description you created earlier.
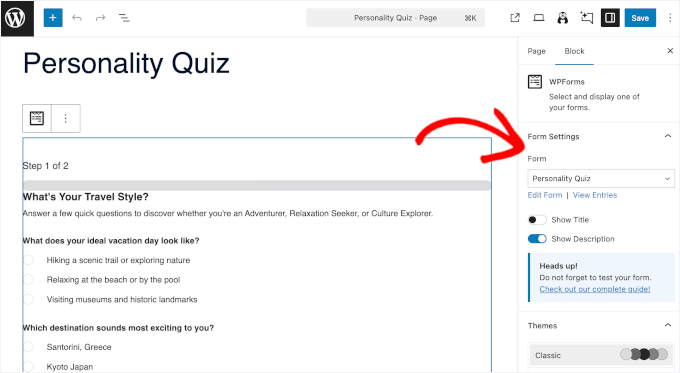
If you scroll down this panel, you’ll find more customization options.
For example, you can apply a theme to style your quiz form. This makes it easier to make your quiz form match your site design.

When everything looks good, you can click the ‘Publish’ button.
Now, if you visit your WordPress site, you’ll see your personality quiz in action.
For details, see our guide on how to embed forms in WordPress.
💡 Note: If you prefer to use a shortcode instead, you can find your quiz’s shortcode in WPForms » All Forms. It will look something like . Paste this shortcode into any page, post, or widget area where you’d like the quiz to appear.
However, while shortcodes are handy for classic widgets, we highly recommend using the built-in WPForms block in the content editor for the easiest setup.
Bonus Tips for Promoting Your Quiz
Publishing your quiz is just the beginning. To get the most out of it, you’ll want to actively promote it so visitors actually find and take it.
Here are a few effective ways to get your quiz in front of more people:
- 📱 Share it on social media — quizzes are highly shareable content, especially when the results feel personal and fun. Check out our social media cheat sheet for WordPress for platform-specific tips.
- 📑 Link to it from relevant blog posts — if you have existing content related to your quiz topic, add a natural call-to-action that invites readers to take the quiz.
- 🌟 Feature it on your homepage or sidebar — placing your quiz in a high-visibility spot on your site gives it the best chance of being seen by new visitors.
The more places your quiz appears, the more opportunities you have to engage visitors and grow your list.
Frequently Asked Questions About Personality Quizzes
Let’s answer a few common questions people have when building personality quizzes for lead generation.
How many questions should a personality quiz have?
I find that 5 to 10 questions is ideal for a personality quiz. This is long enough to get meaningful results but short enough that visitors won’t get bored and leave before finishing. The key is to keep questions focused and engaging.
How long does it take to build a personality quiz?
With WPForms Pro and the Quiz Addon, you can usually build a personality quiz in 10–15 minutes once you know your quiz topic and results. AI Choices can also help you generate options for your list of questions.
That said, if you spend extra time refining questions and writing more personalized outcome messages, it may take a bit longer. Still, most people can have a working quiz live on their site within the same session.
What’s the difference between a personality quiz and a graded quiz?
A graded quiz scores answers as right or wrong and gives the visitor a final score or percentage. These are commonly used for trivia, knowledge tests, or assessments.
A personality quiz, on the other hand, maps answers to different personality types. The result is based on which type receives the most matches, so there are no right or wrong answers.
Can personality quizzes be used for lead generation?
Yes. Personality quizzes are a great tool for lead generation because they feel fun and personal rather than promotional.
Visitors are often happy to share their email address to see their results or get more tips related to their personality type. When paired with a targeted optin and a personalized call-to-action, quizzes can become a powerful way to grow your email list.
How many personality types should a quiz have?
Most personality quizzes work best with 3 to 5 personality types. Three types keep things simple and easy to map, while five allow for more variety in the results. Adding more than five can make the quiz harder to build and understand.
For most websites, starting with 3 well-defined types is ideal.
Next Steps for Using WordPress Forms
Now that your personality quiz is live, here are some more ways to get even more out of the forms on your WordPress site:
- How to Create Conversational Forms in WordPress (Typeform Alternative)
- How to Create a Survey in WordPress (with Beautiful Reports)
- How to Add Image Choices in WordPress Forms (Boost Engagement)
- How to Set Up WordPress Form Tracking in Google Analytics
- How to Track and Reduce Form Abandonment in WordPress
If you liked this article, then please subscribe to our YouTube Channel for WordPress video tutorials. You can also find us on Twitter and Facebook.
The post How I Built a WordPress Personality Quiz to Turn Visitors into Subscribers first appeared on WPBeginner.