For years, mastering Gutenberg block development required an in-depth understanding of technologies such as React and Node.js, as well as complex build steps and JavaScript tools.
However, WordPress development is evolving, and you can now build and manage Gutenberg blocks entirely in PHP.
This is especially beneficial for developers who prefer to avoid React and server-side JavaScript (JS) development. It lowers the learning curve, streamlines the developer experience, and enables higher performance by removing unnecessary front-end script overhead.
In the following sections, you’ll learn how to take advantage of these new features to build PHP-only Gutenberg blocks. Along the way, you’ll learn to create leaner, faster, and easier-to-maintain WordPress websites.
Quite exciting, right? Let’s get started.
What are PHP-only blocks and why do they matter?
Creating a Gutenberg block traditionally required advanced server-side JavaScript and React coding skills. This acted as a barrier to the adoption of the block editor by longtime WordPress developers who might not have the necessary React and Node.js knowledge.
Things are changing now. Starting with Gutenberg 21.8, you can register Gutenberg blocks using nothing but PHP. This avoids the complexities of setting up a Node.js environment for those who don’t work with server-side JavaScript.
With PHP-only block registration, you can register and display blocks in both the editor and frontend using the same PHP code. This encourages sites using hybrid themes or traditional PHP functions and shortcodes to adopt and develop on the block editor.
For those who want to learn more, here are the main GitHub PRs dedicated to PHP-only blocks.
- Allow registering PHP-only blocks: This PR implements automatic server-side block registration and renames the
auto_ssrsupport toauto_register. - PHP-only blocks: Pass all metadata from PHP registration to the client: PHP-only blocks with
auto_registersupport now pass all metadata to the client from the PHP registration. - PHP-only blocks: Generate inspector controls from attributes: This PR introduces automatic generation of the UI (Inspector Controls) based on the attributes declared on the server.
How to build your first PHP-only Gutenberg block
When a block is registered only on the server side — without JS files — and the new auto_register support flag is set to true, the editor automatically uses the ServerSideRender component to register the block on the client side and display the block preview. In essence, the block’s content is now generated directly from the PHP code in both the editor and the frontend.
To illustrate, here is a simple PHP example that registers a block using the PHP-only method.
/**
 * Render callback (frontend and editor)
 */
function my_php_only_block_render( $attributes ) {
	return '<div>
		<h3>🚀 PHP-only Block</h3>
		<p>This block was created with only PHP!</p>
	</div>';
}

/**
 * Register the block on the 'init' hook.
 */
add_action( 'init', function() {
	register_block_type( 'my-plugin/php-only-test-block', array(
		'title'           => 'My PHP-only Block',
		'icon'            => 'welcome-learn-more',
		'category'        => 'text',
		'render_callback' => 'my_php_only_block_render',
		'supports'        => array(
			// Automatically registers the block in the Editor JS (previously auto_ssr)
			'auto_register' => true,
		),
	) );
});
You can try out this code by copying and pasting it into the main file of a custom plugin. After activating the plugin, you should see the “My PHP-Only Block” in the block inserter.
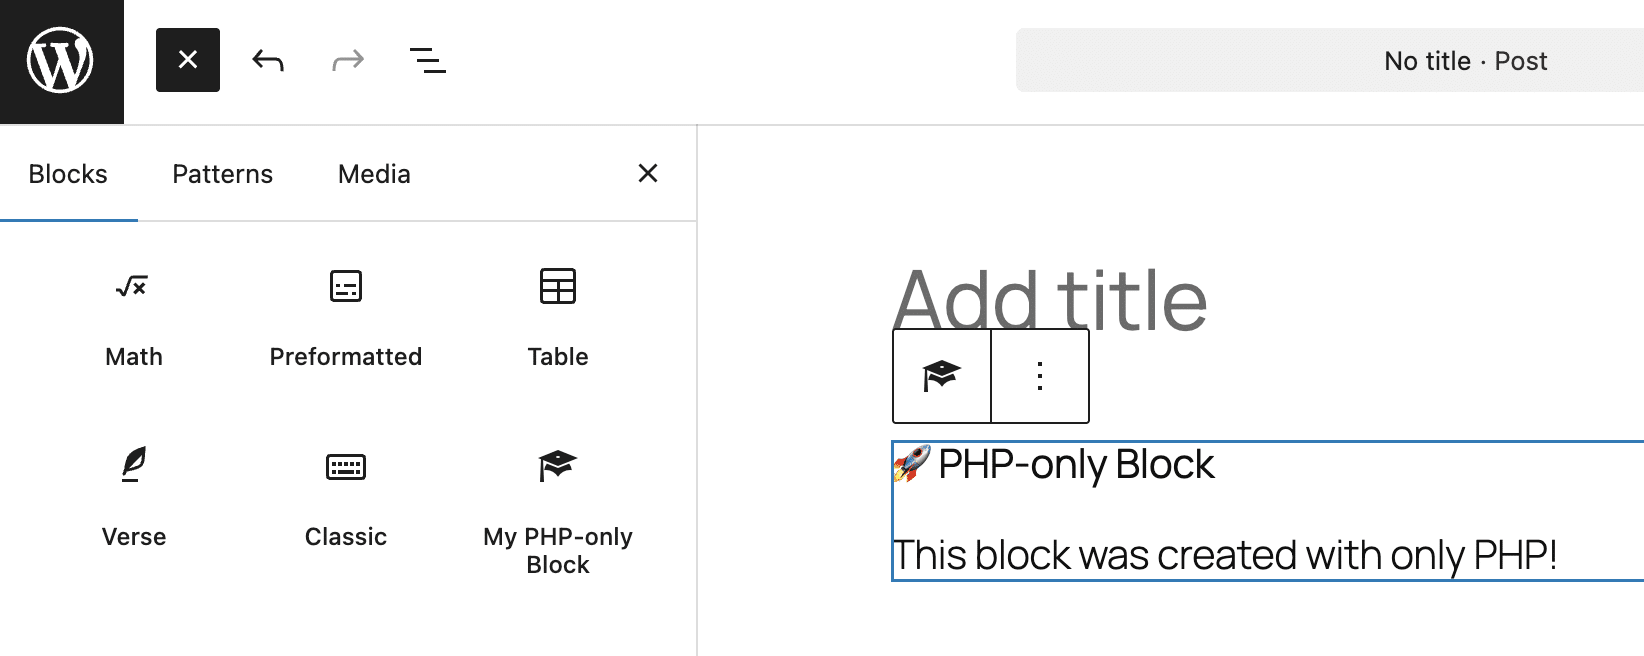
The register_block_type function registers a block type on the server. It now includes the new auto_register support, instructing Gutenberg to pass metadata from the PHP registration.
The function accepts two arguments:
- The name of the block type, including the namespace. In this example, the block name is
my-plugin/php-only-test-block. - An array of arguments for the block type. In the code above, we set
title,icon,category,render_callback, andsupports. Again, for PHP-only block types, thesupportsarray must include'auto_register' => true.
In addition to simplifying the creation of custom block types and making them easy to integrate into hybrid themes, PHP-only blocks can be used as wrappers for legacy PHP functions and shortcodes. Moreover, using PHP-only blocks opens the door to new opportunities for custom integrations and server-side functionality.
According to Héctor Priethor,
A pure-PHP registration model would simplify the minimum requirements for block development, making them available to a wider developer audience, and help grow the block ecosystem beyond advanced JavaScript usage.
Using attributes to build the block settings UI
PR 74102 enables the automatic generation of inspector controls from block attribute definitions. This allows users to configure the appearance and functionality of your PHP-only blocks like any Gutenberg block registered via JavaScript.
Previously, you had to manually create an edit.js file in React and define various setting controls using React components.
Now, Gutenberg reads the attribute definitions and automatically generates the corresponding input fields in the WordPress editor.
The system maps the data types defined in the attributes array to DataForm field definitions.
'type' => 'string'generates a text field.'type' => 'number'generates a number field.'type' => 'integer'generates an integer field.'type' => 'boolean'generates a checkbox.'type' => 'string'with'enum' => array()generates a select field.
You will realize that you can only use a few controls. If you need specific controls, such as RichText, RangeControl, or ToggleControl, you will still need to opt for the JS/React approach.
However, this addition has considerable advantages. Barriers to entry are lowered further, and you won’t need to learn React, Webpack, or NPM to create custom blocks with simple editable options.
In the following example, we extend the sample block shown in the previous section by adding some attributes.
/**
 * 1. Define the block's HTML output.
 */
function my_php_only_block_render( $attributes ) {
	// Extract attributes
	$title   = esc_html( $attributes['blockTitle'] );
	$count   = intval( $attributes['itemCount'] );
	$enabled = $attributes['isEnabled']; // Boolean from the ToggleControl
	$size    = esc_attr( $attributes['displaySize'] );

	// Start building the output
	$output = sprintf( '<div class="my-php-block" style="font-size: %s; border: 1px solid #ccc; padding: 15px;">',
		$size === 'large' ? '20px' : ($size === 'small' ? '12px' : '16px')
	);

	$output .= sprintf( '<h3>🚀 %s</h3>', $title );

	// If the toggle is ON, show the list. If OFF, show a fallback message.
	if ( $enabled ) {
		$output .= '<ul>';
		for ( $i = 1; $i <= $count; $i++ ) {
			$output .= sprintf( '<li>Item %d</li>', $i );
		}
		$output .= '</ul>';
	} else {
		$output .= '<p><em>The list is currently disabled.</em></p>';
	}

	$output .= '</div>';
	return $output;
}

/**
 * 2. Register the block on 'init'.
 */
add_action( 'init', function() {
	register_block_type( 'my-plugin/php-only-test-block', array(
		'title'           => 'My PHP-only Block',
		'icon'            => 'welcome-learn-more',
		'category'        => 'text',
		'render_callback' => 'my_php_only_block_render',

		// Attributes used to generate the Inspector UI
		'attributes'      => array(
			'blockTitle'  => array(
				'type'    => 'string',
				'default' => 'PHP-only Block',
			),
			'itemCount'   => array(
				'type'    => 'integer',
				'default' => 3,
			),
			'isEnabled'   => array(
				'type'    => 'boolean',
				'default' => true,
			),
			'displaySize' => array(
				'type'    => 'string',
				'enum'    => array( 'small', 'medium', 'large' ),
				'default' => 'medium',
			),
		),

		'supports'        => array(
			'auto_register' => true,
		),
	) );
});
A quick look at this code reveals how easy it is to register a custom block with all its configuration settings using the new API. Attributes are now used not only to store user-entered data but also to define the UI schema. The code above does the following:
- The
register_block_typefunction registers the block typemy-plugin/php-only-test-block. - The second argument passed to the function is an array containing the following elements:
title,icon,category,render_callback,attributes, andsupports. - The
attributesarray contains the block’s attributes. In the above example, the array includes the elementsblockTitle,itemCount,isEnabled, anddisplaySize. 'auto_register' => trueenables server-side automatic registration.
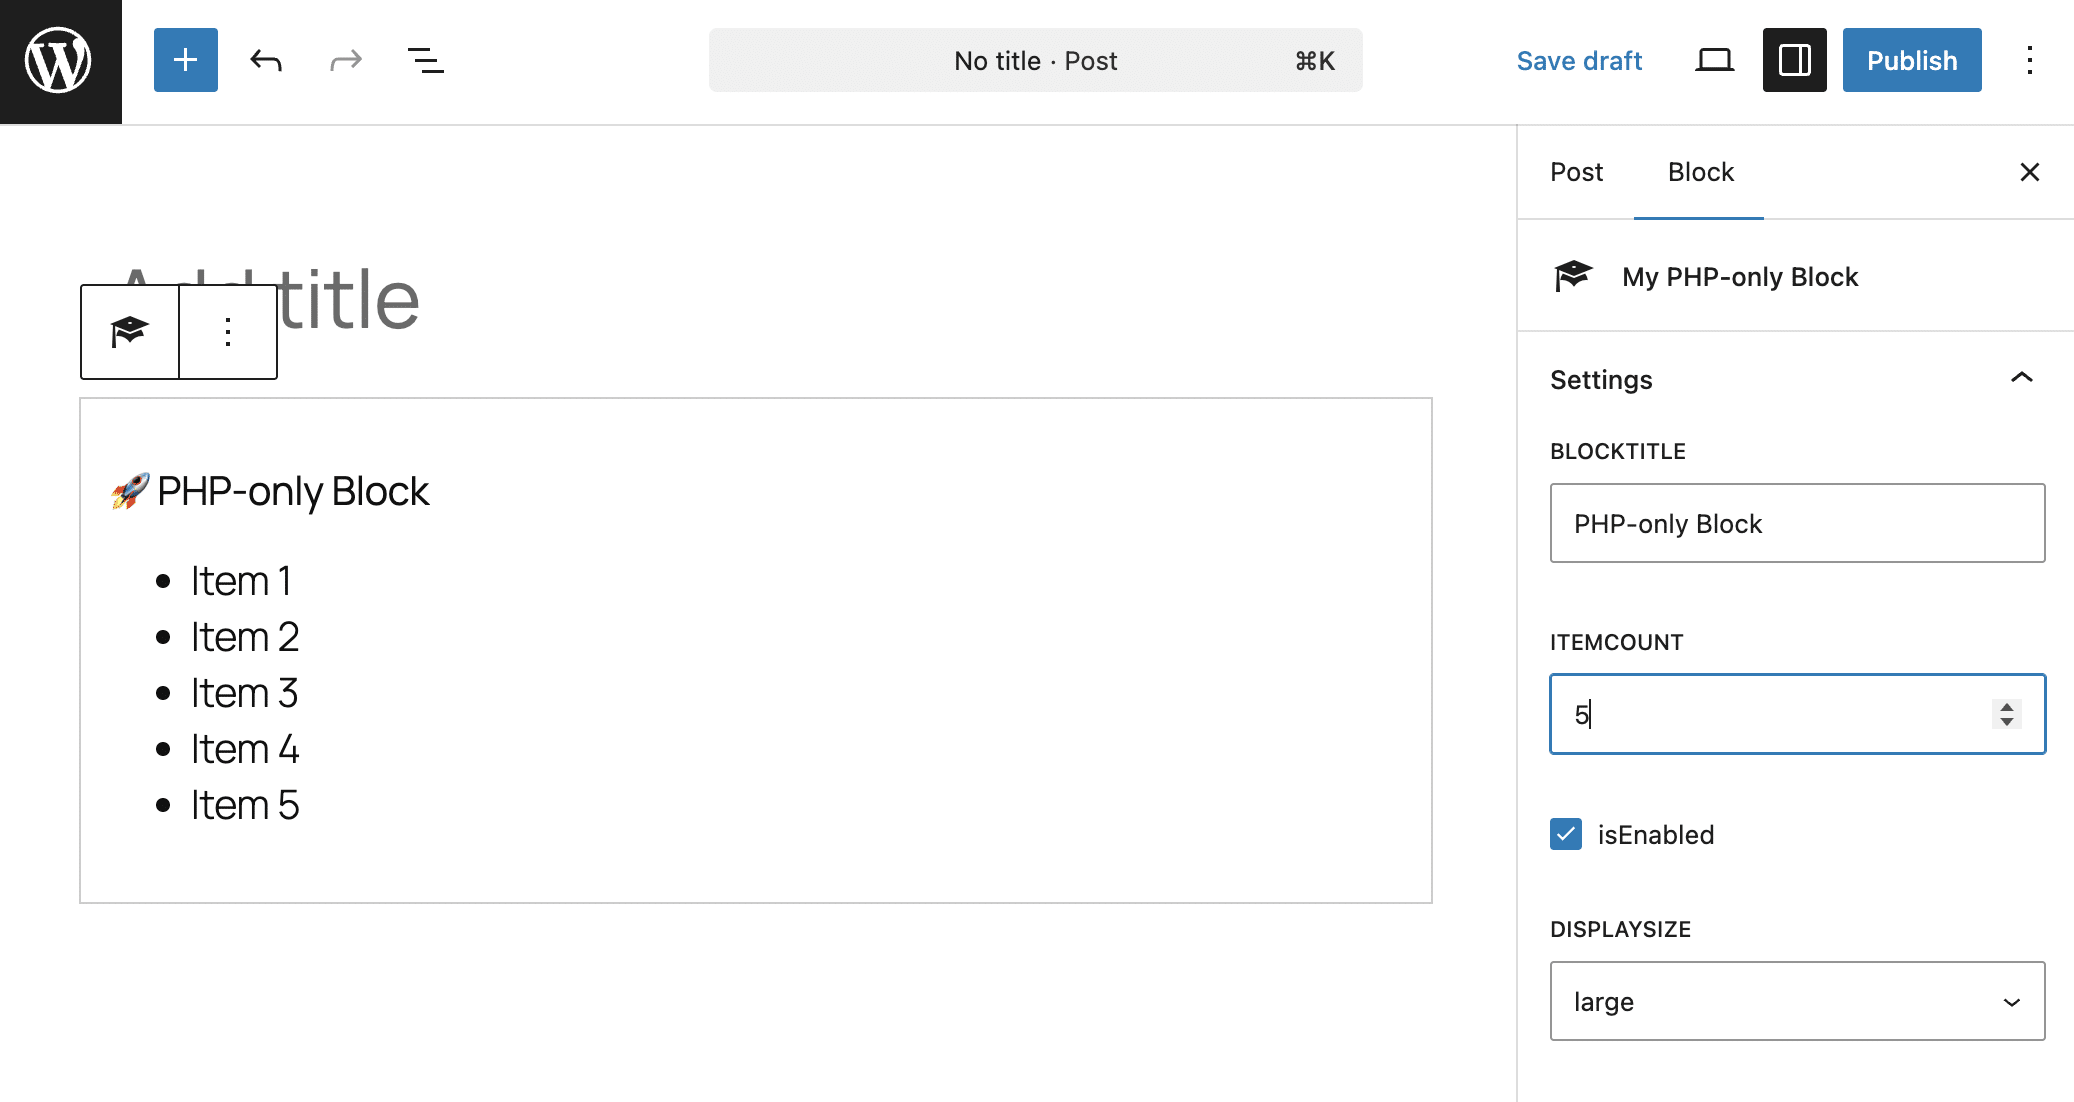
Here is what the callback function my_php_only_block_render does:
- First, the function extracts the attribute values from the
$attributesarray and assigns them to the$title,$count,$enabled, and$sizevariables. - Then, it generates the block’s content.
Here’s the result on screen:
A real-world example of PHP-only blocks
While there are many scenarios where JavaScript is still required, you can already do a lot with PHP-only blocks, especially when used with block props.
In the following example, we use the get_block_wrapper_attributes() function, which generates a string of attributes to the current block being rendered. The block will automatically receive the user-set colors, borders, and shadows, and apply the corresponding styles to the main container. This way, the block is customizable through Gutenberg’s native tools, just like a React-based block.
To see it at work, create a smart-pricing-widget folder on your computer. In this folder, create a style.css file with the following CSS code:
/* style.css */
.pricing-card {
	display: flex;
	flex-direction: column;
	align-items: center;
	text-align: center;
	box-sizing: border-box;
}

.pricing-card h3 {
	margin: 0;
	font-size: 1.5rem;
}

.pricing-card .price-value {
	font-size: 3.5rem;
	font-weight: 800;
	margin: 15px 0;
}

.pricing-card ul {
	list-style: none;
	padding: 25px 0;
	margin: 20px 0;
	width: 100%;
	border-top: 1px solid rgba(128,128,128,0.3);
	display: flex;
	flex-direction: column;
	gap: 12px;
}

.pricing-card li {
	display: flex;
	align-items: center;
	justify-content: center;
	gap: 10px;
}

.pricing-card .cta-button {
	margin-top: auto;
	padding: 15px 25px;
	border-radius: 8px;
	text-decoration: none;
	font-weight: bold;
	transition: opacity 0.2s;
}

.pricing-card .cta-button:hover {
	opacity: 0.8;
}

/* Theme Variations */
.pricing-card.theme-light { background-color: #ffffff; color: #000000; }
.pricing-card.theme-light .cta-button { background-color: #21759b; color: #ffffff; }

.pricing-card.theme-dark { background-color: #1a1a1a; color: #ffffff; }
.pricing-card.theme-dark .cta-button { background-color: #ffffff; color: #1a1a1a; }

.pricing-card.theme-blue { background-color: #21759b; color: #ffffff; }
.pricing-card.theme-blue .cta-button { background-color: #000000; color: #ffffff; }

/* Utility Classes */
.pricing-card .is-full-width {
	width: 100%;
	display: block;
	align-self: stretch;
}
We will not comment on this code as it is a simple stylesheet for your widget block.
Now, create the main file for your plugin, name it smart-pricing-widget.php, and paste the following code:
<?php
/**
 * Plugin Name: Smart Pricing Widget
 * Plugin URI:  https://example.com/
 * Description: PHP-only Pricing Table block
 * Version:     1.2.0
 * Author:      Your Name
 * Text Domain: smart-pricing-widget
 */

if ( ! defined( 'ABSPATH' ) ) exit;

/**
 * Render callback
 */
function render_smart_pricing_block( $attributes ) {
	$plan_name = esc_html( $attributes['planName'] );
	$price     = intval( $attributes['price'] );
	$theme     = $attributes['blockTheme'];
	$btn_text  = esc_html( $attributes['buttonText'] );
	$btn_size  = $attributes['buttonSize'];

	$features_raw = $attributes['featuresList'];
	$features_array = array_filter( array_map( 'trim', explode( ',', $features_raw ) ) );

	$wrapper_attributes = wp_kses_data( get_block_wrapper_attributes( array(
		'class' => "pricing-card theme-{$theme}",
	) ) );

	$output = sprintf( '<div %s>', $wrapper_attributes );
	$output .= sprintf( '<h3>%s</h3>', $plan_name );
	$output .= sprintf( '<div class="price-value">€%d</div>', $price );

	if ( ! empty( $features_array ) ) {
		$output .= '<ul>';
		foreach ( $features_array as $feature ) {
			$is_checked = strpos( $feature, '+' ) === 0;
			$clean_text = esc_html( ltrim( $feature, '+- ' ) );
			$icon       = $is_checked ? '✅' : '❌';
			$style      = $is_checked ? '' : 'style="opacity: 0.6;"';

			$output .= sprintf( '<li %s><span>%s</span> %s</li>', $style, $icon, $clean_text );
		}
		$output .= '</ul>';
	}

	$btn_class = 'cta-button' . ( $btn_size === 'full' ? ' is-full-width' : '' );
	$output .= sprintf( '<a href="#" class="%s">%s</a>', esc_attr( $btn_class ), $btn_text );
	$output .= '</div>';

	return $output;
}

/**
 * Register Assets and Block
 */
add_action( 'init', function() {
	// 1. Register the CSS file
	wp_register_style(
		'smart-pricing-style',
		plugins_url( 'style.css', __FILE__ ),
		array(),
		'1.2.0'
	);

	// 2. Register the Block
	register_block_type( 'tutorial/smart-pricing', array(
		'api_version'     => 3,
		'title'           => 'Pricing Card',
		'icon'            => 'cart',
		'category'        => 'widgets',
		'render_callback' => 'render_smart_pricing_block',
		// Link the registered style handle here
		'style'           => 'smart-pricing-style',
		'attributes'      => array(
			'planName'     => array( 'type' => 'string', 'default' => 'Professional' ),
			'price'        => array( 'type' => 'integer', 'default' => 49 ),
			'buttonText'   => array( 'type' => 'string', 'default' => 'Choose Plan' ),
			'buttonSize'   => array( 'type' => 'string', 'enum' => array( 'auto', 'full' ), 'default' => 'auto' ),
			'blockTheme'   => array( 'type' => 'string', 'enum' => array( 'light', 'dark', 'blue' ), 'default' => 'light' ),
			'featuresList' => array( 'type' => 'string', 'default' => "+ Support, + Updates, - Domain" ),
		),
		'supports'        => array(
			'auto_register' => true,
			'color'         => array( 'background' => true, 'text' => true ),
			'spacing'       => array( 'margin' => true, 'padding' => true ),
			'typography'    => array( 'fontSize' => true ),
			'shadow'        => true,
			'__experimentalBorder' => array( 'color' => true, 'radius' => true, 'style' => true, 'width' => true ),
			'border'        => array( 'color' => true, 'radius' => true, 'style' => true, 'width' => true ),
		),
	) );
});
This script includes two functions. The register_block_type() function is the engine of your plugin. Here are its main elements:
- The first argument is the block identifier, including the namespace (
tutorial/smart-pricing). - The second argument is an array of arguments. In the code above, we have set the API version, title, icon, category, render callback, style, attributes, and supports.
- The attributes in the array generate the controls that users will use to add content and configure the block. The
typeelement specifies the type of control to add to the block inspector. In this example, these are text fields ('type’ => 'string’), an integer ('type’ => 'integer’), and a couple of drop-down menus ('type’ => 'string’, 'enum’ => array()). - The
supportsarray items add features that make the block style customizable. As we mentioned earlier, the only support required in a PHP-only block isauto_register, which enables automatic UI generation for custom attributes. The other supports declared above include color, spacing, typography, shadow, and border.
The callback function render_smart_pricing_block() generates the block’s HTML. Here is a detailed description of what this function does:
- It extracts and sanitizes the block attributes, then adds the CSS code that generates the block’s appearance in the frontend and editor.
- The features to be displayed in the block (
$attributes['featuresList'];) are handled separately. Currently, it is not possible to add advanced controls to the block settings sidebar. To create a list, such as a list of features, you can only use a simple text field. In this example, you must manually enter the product features, separated by commas. - The
$wrapper_attributesvariable is a container for the wrapper attributes provided by theget_block_wrapper_attributesfunction. This function does not just add the classes specified in the code (pricing-card theme-{$theme}), but automatically retrieves all the style customizations that the user sets in the block inspector, including colors, borders, padding, margin, shadow, typography, and the standard block classes (wp-block-tutorial-smart-pricing). wp_kses_dataensures there are no malicious tags or scripts (XSS) in the string.- The rest of the code generates the block content.
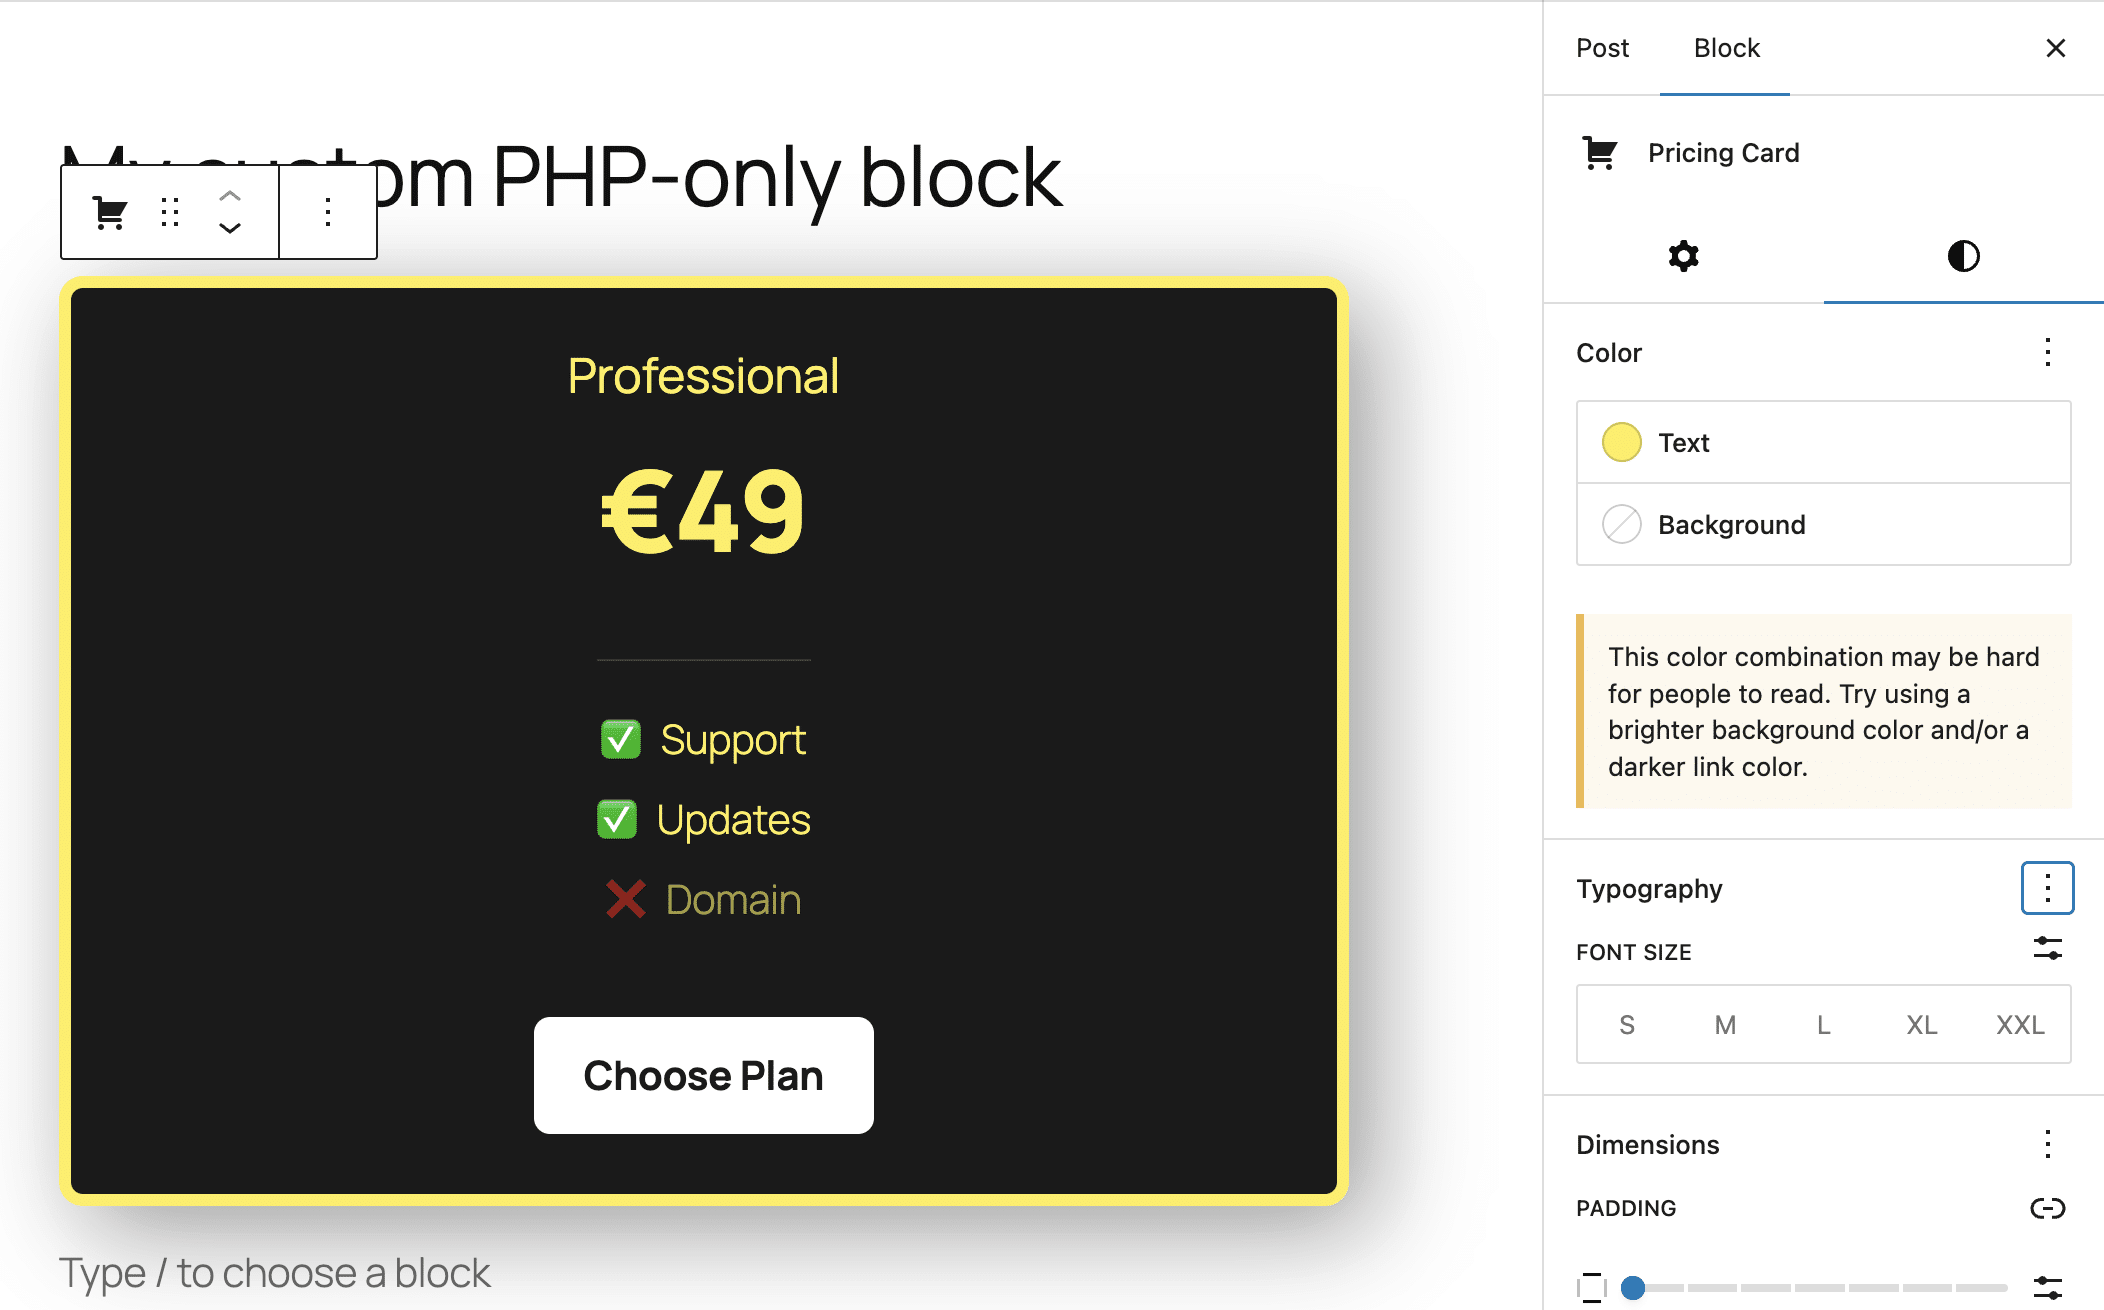
Activate the plugin and create a new post or page. Open the block inserter and scroll down to the Widgets section. Here, you should see your “Pricing Card” block identified by a shopping cart icon.
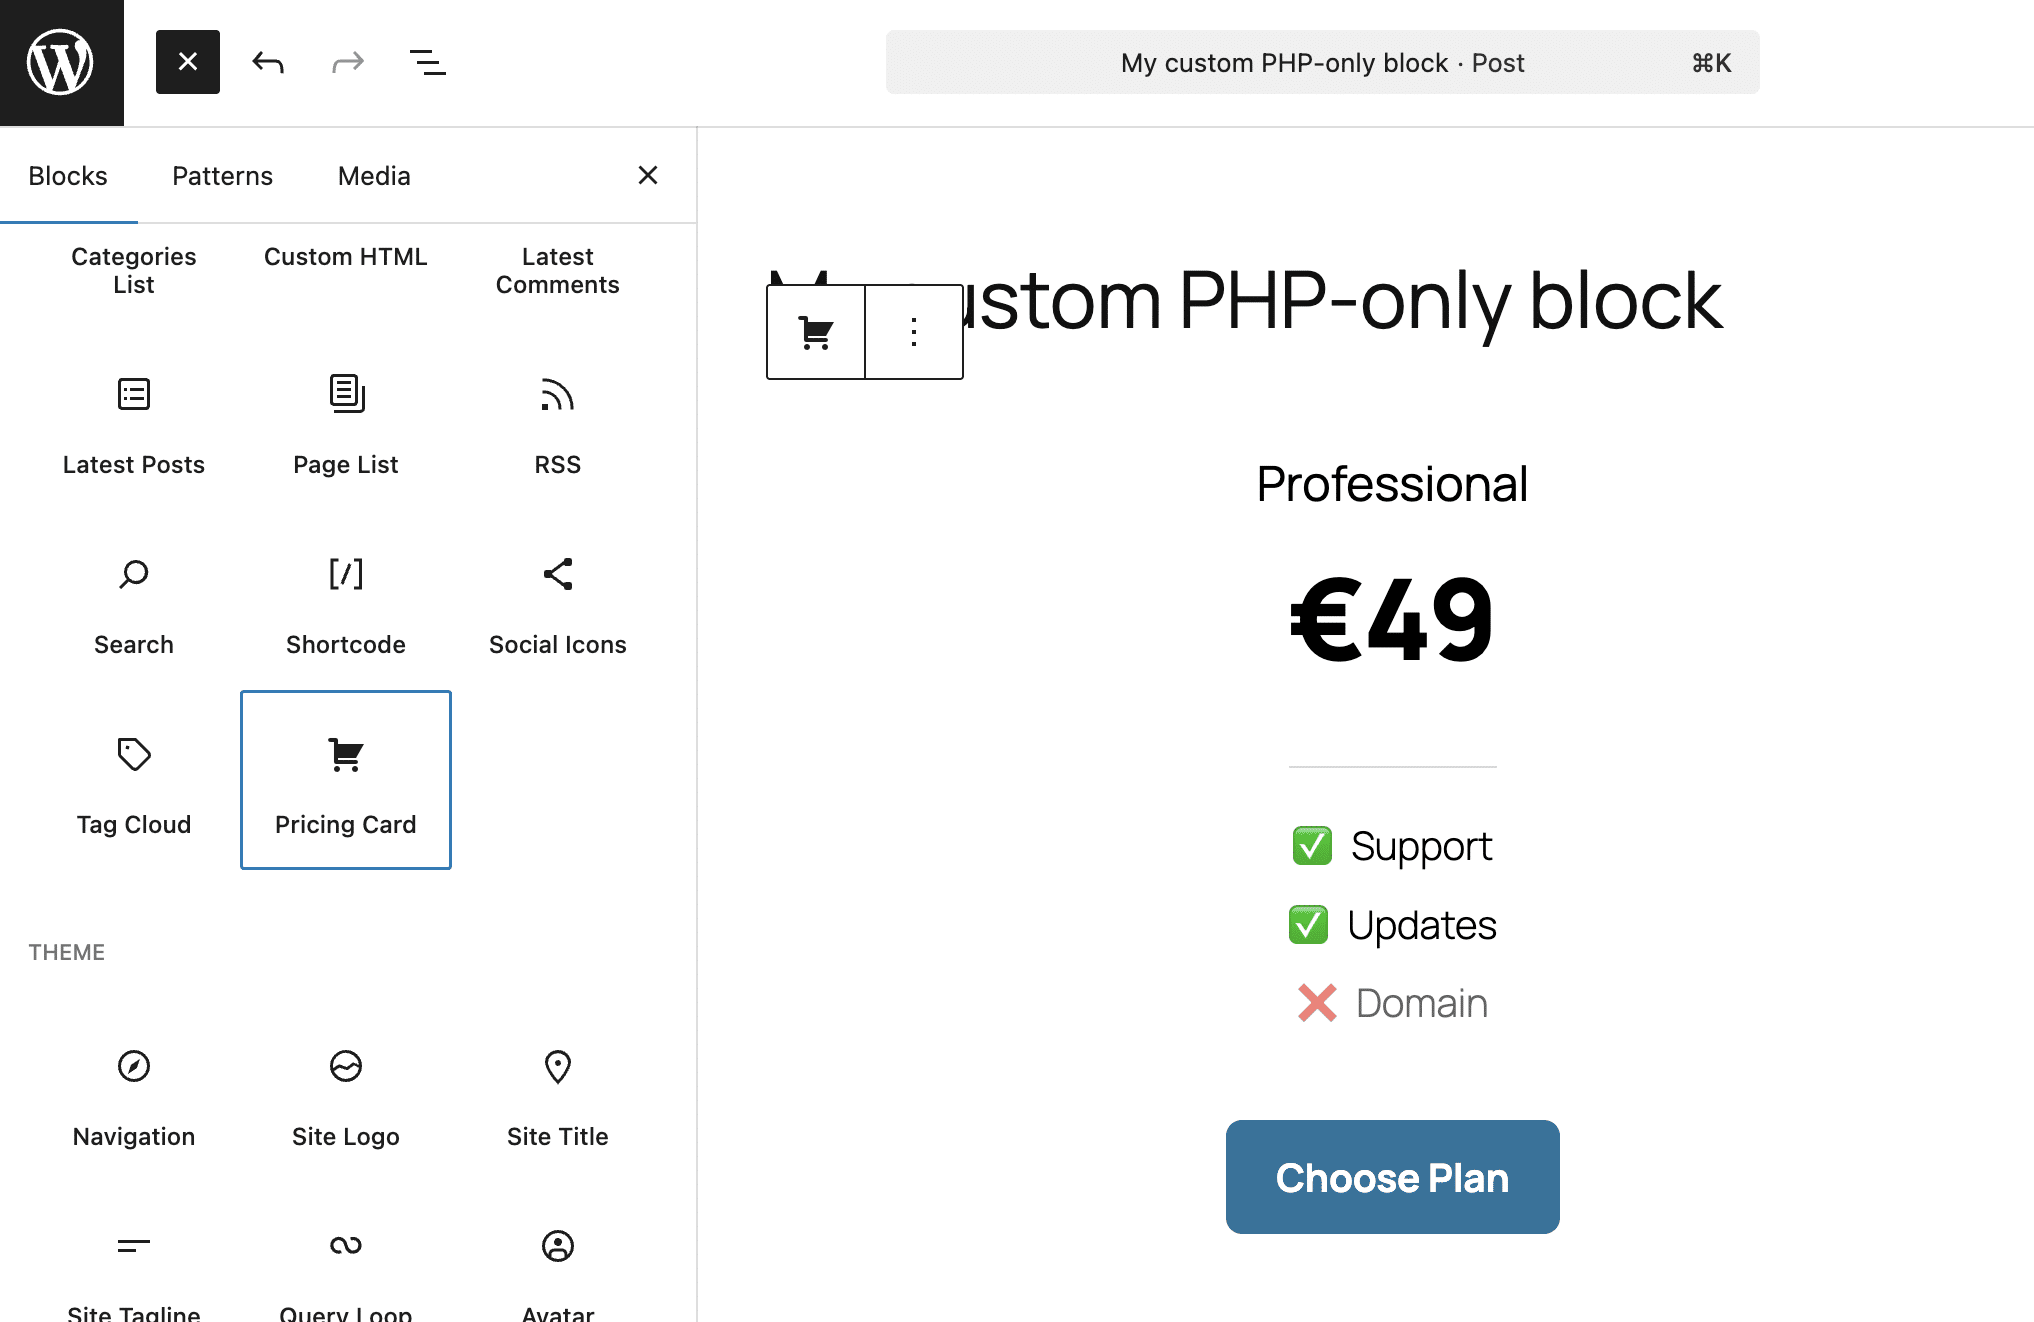
The image above shows the block with the default light theme.
In the image below, you can see the dark version of the block and the settings you declared in your plugin.
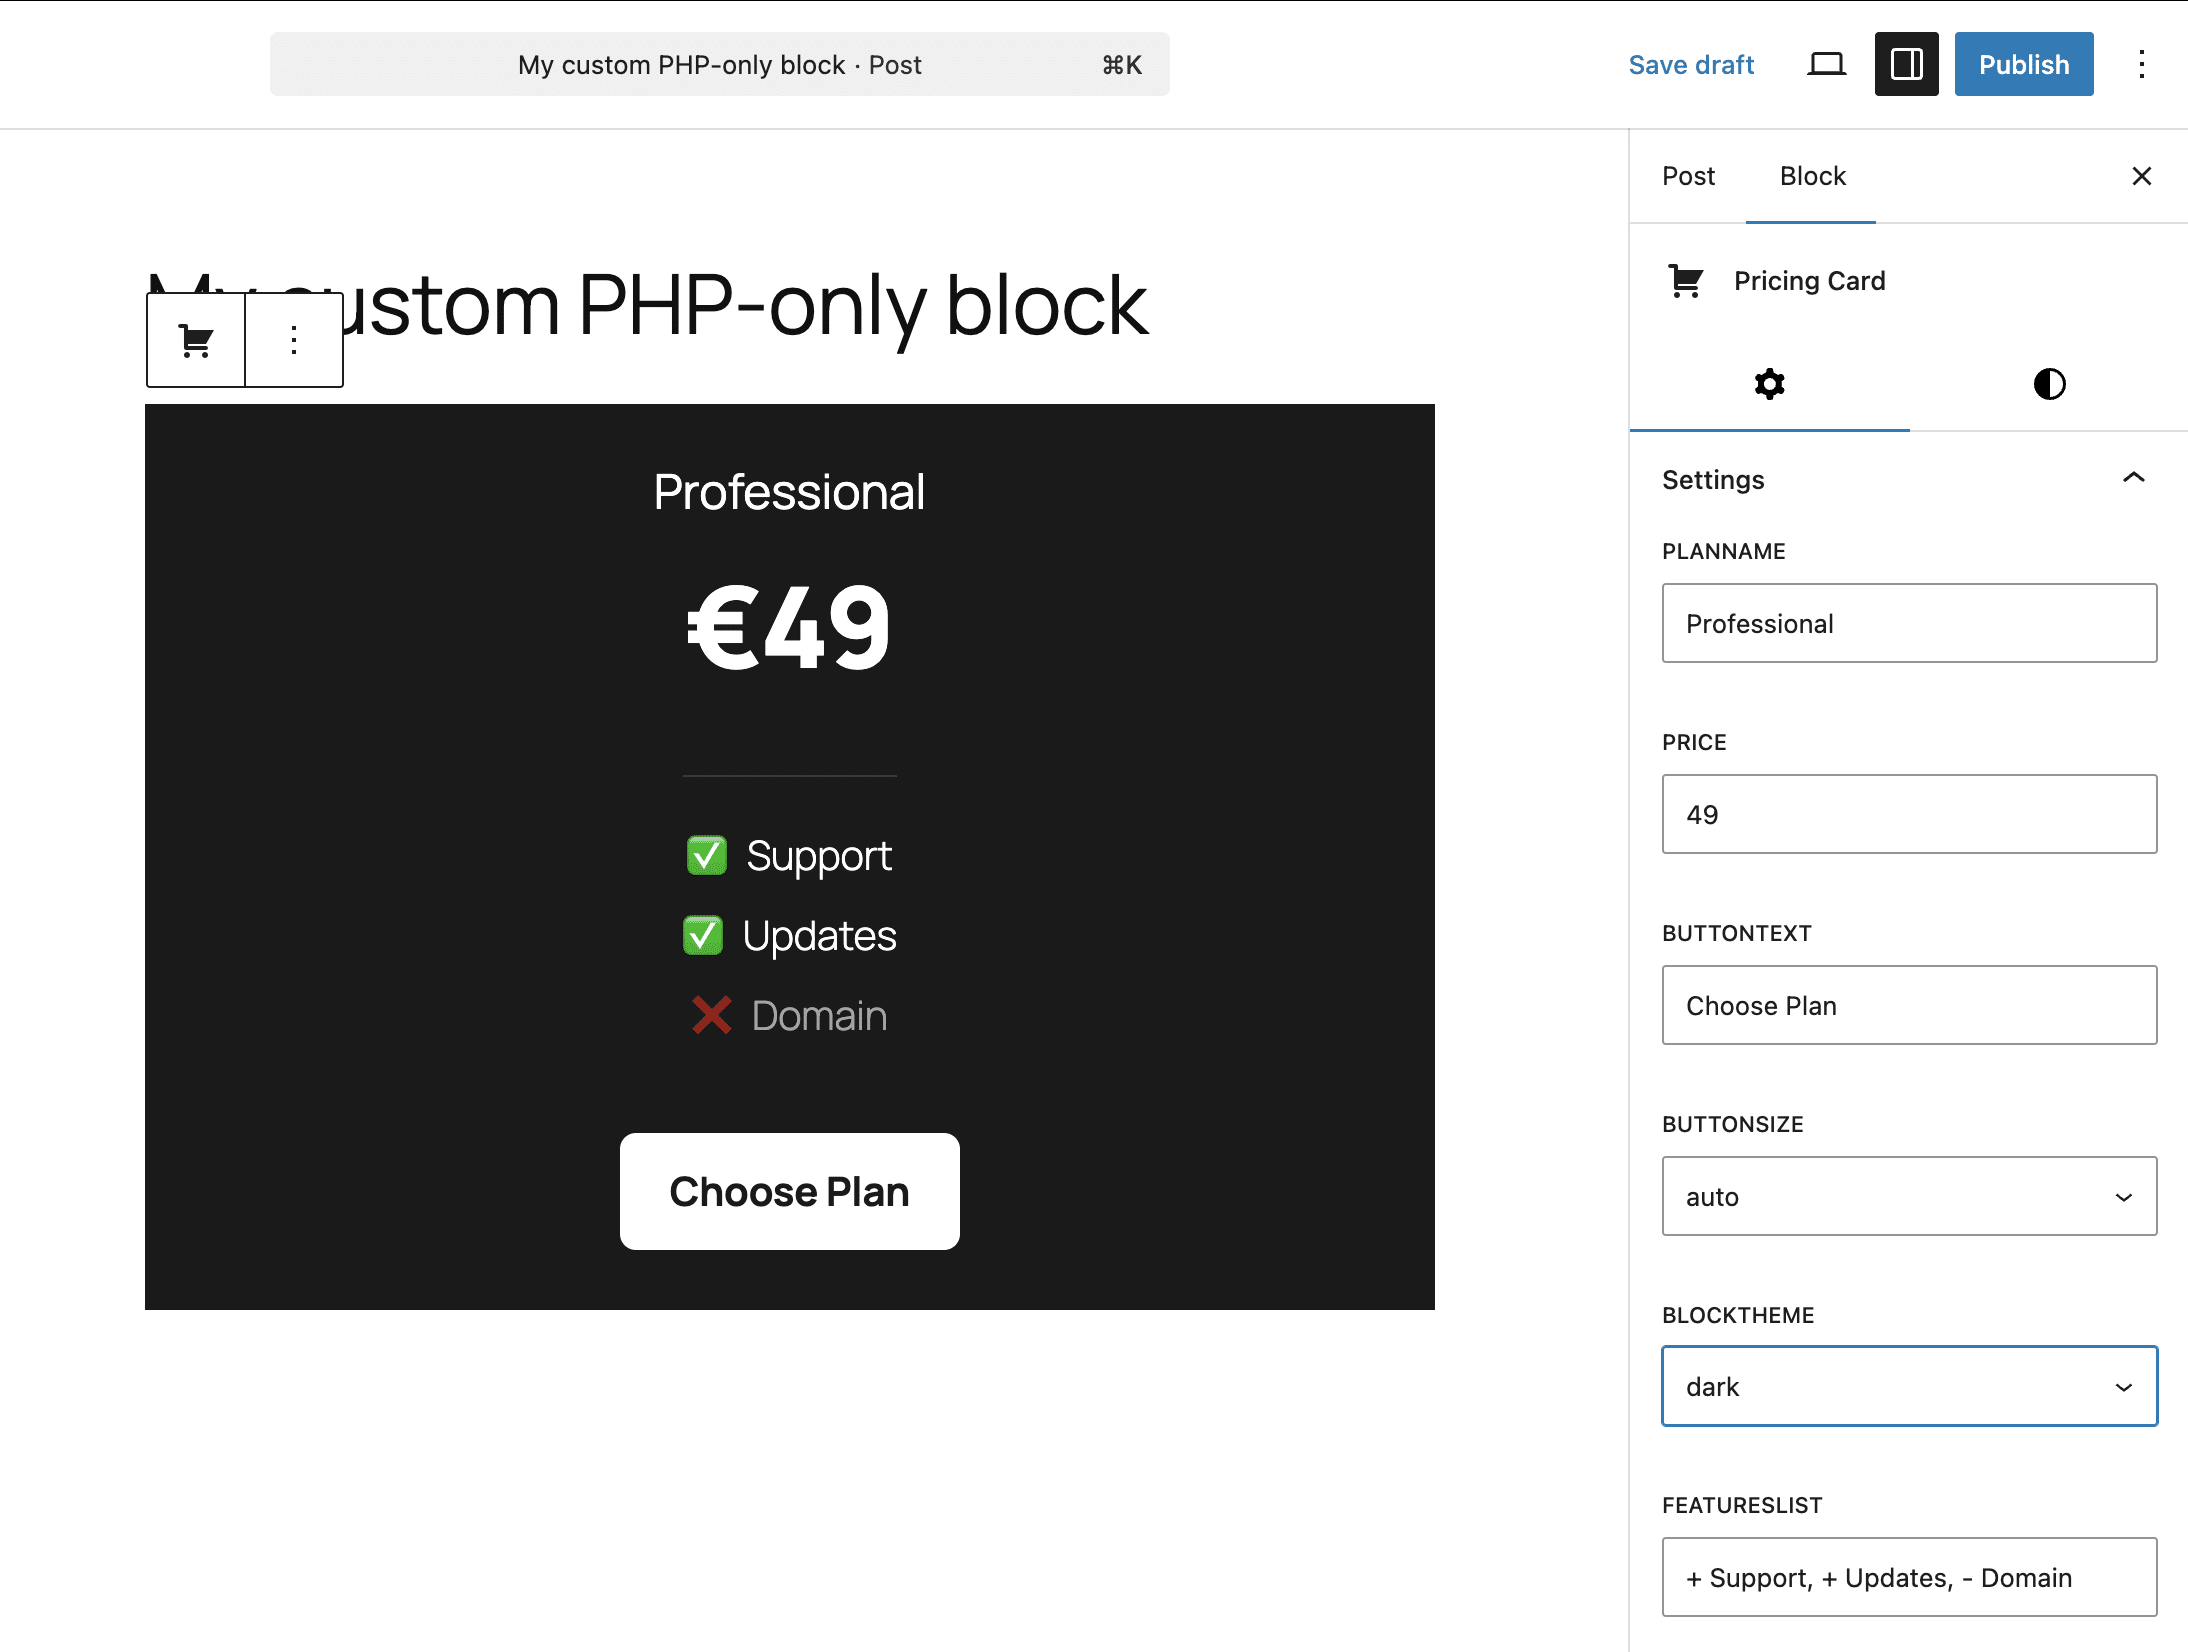
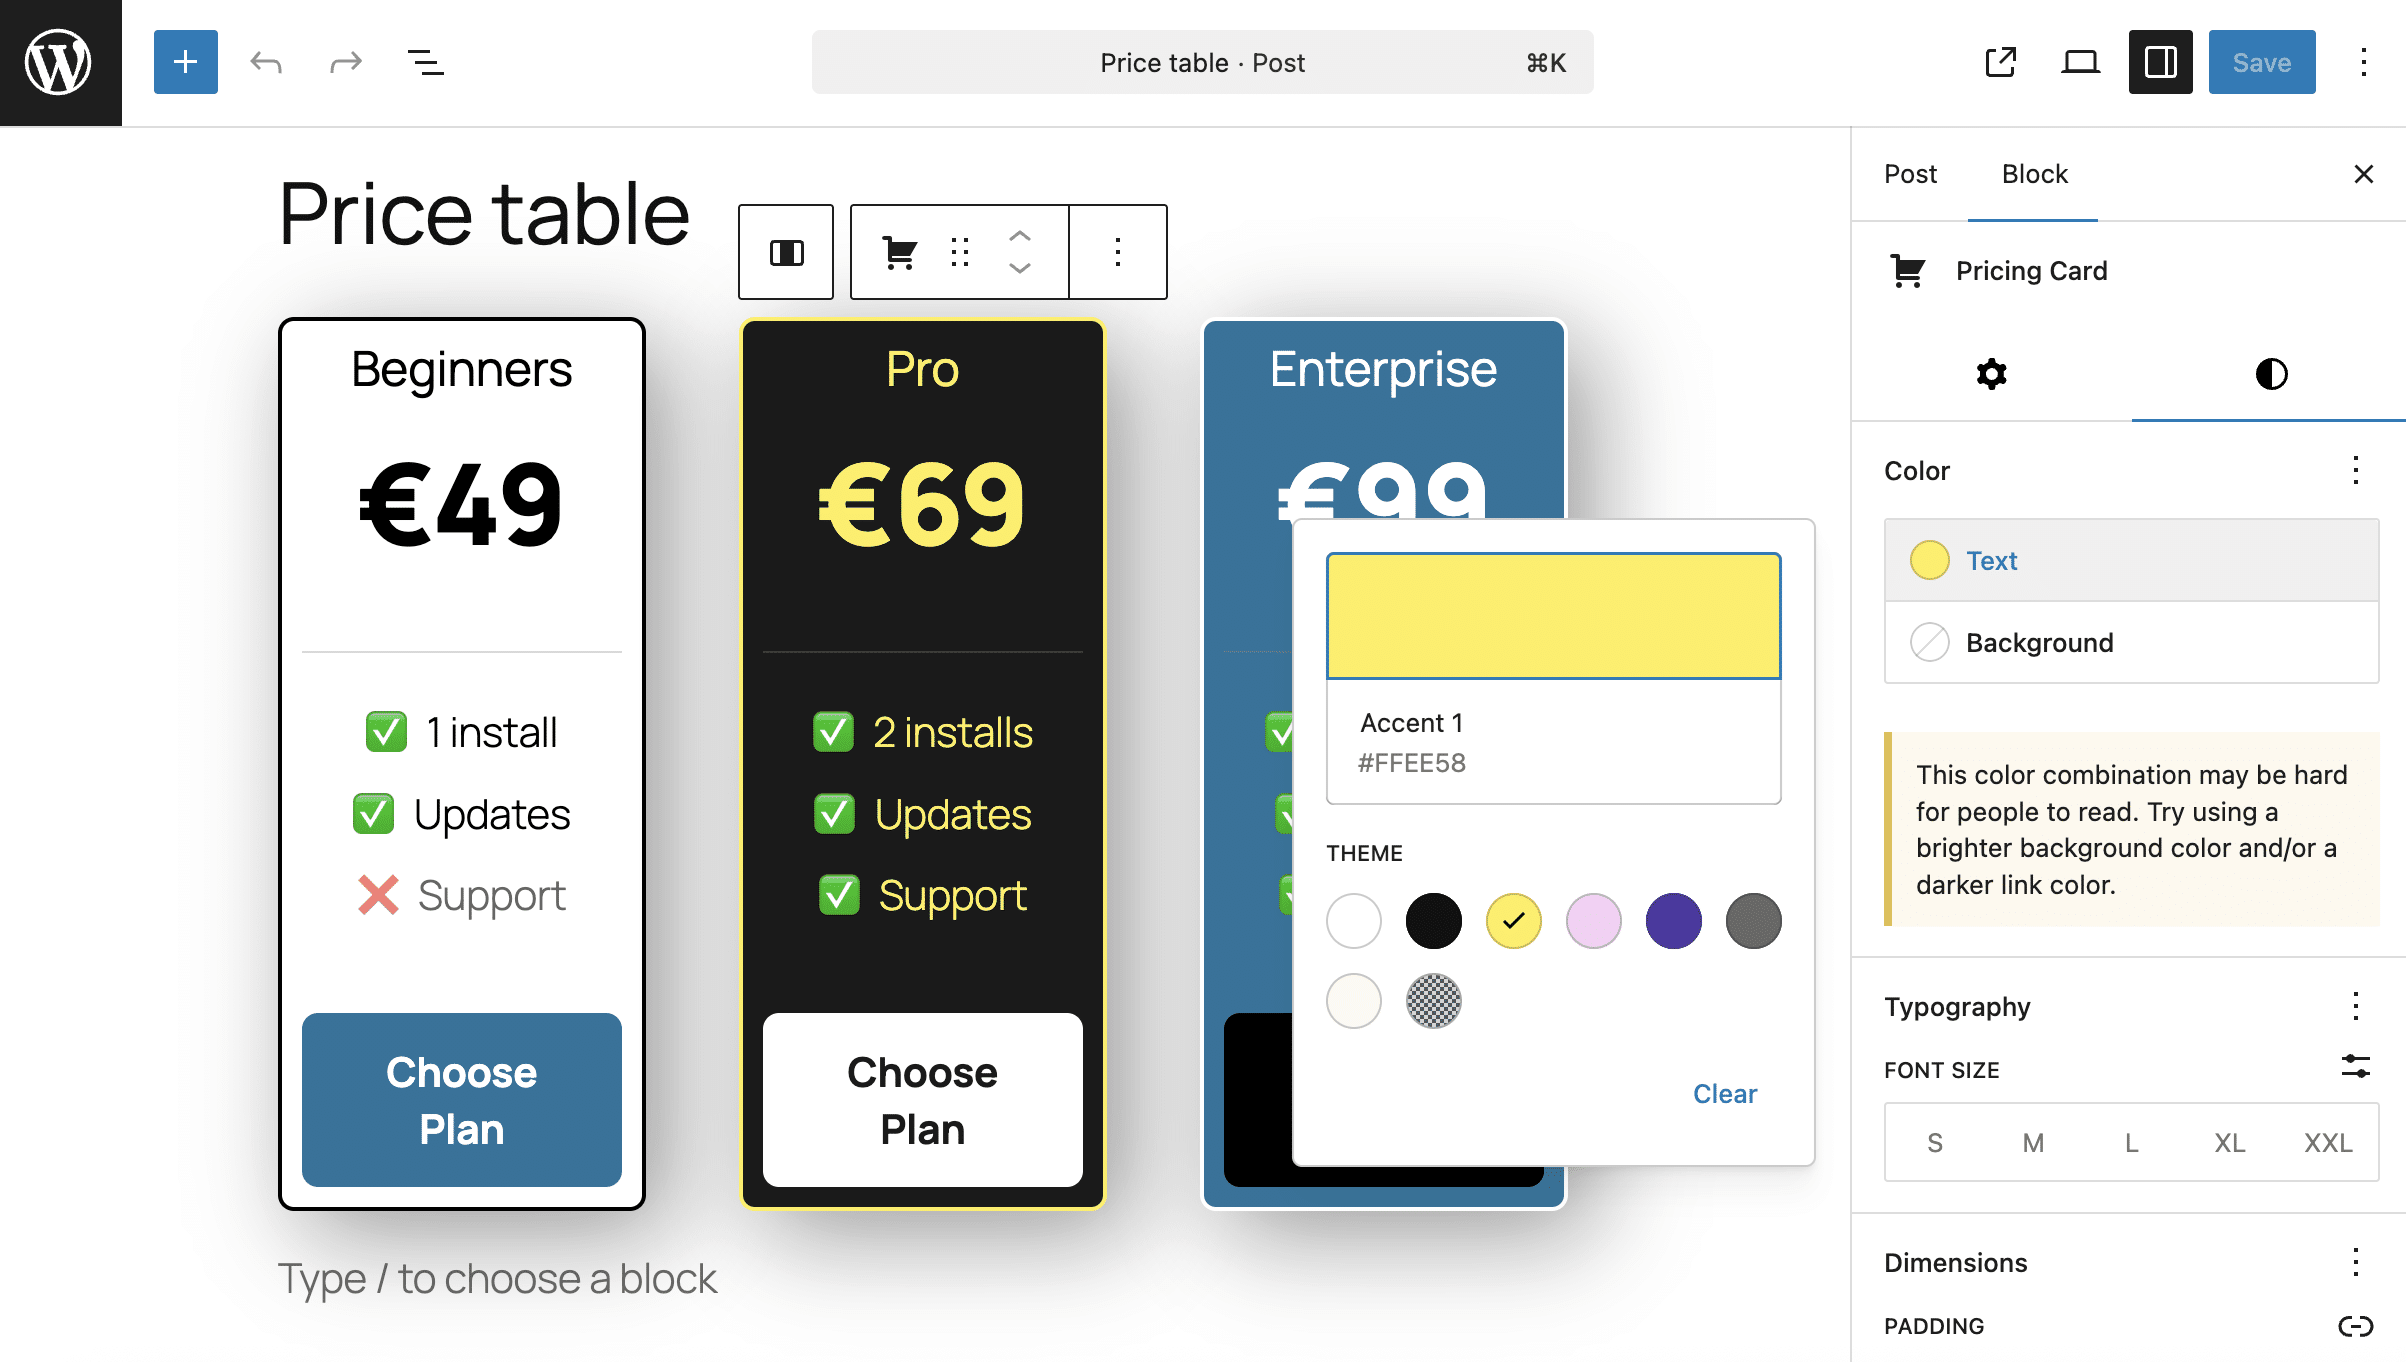
The following image shows the style controls you added with the block supports.
It is also worth noting that styles added by supports override the block theme styles. This allows for greater customization of the block’s appearance, as shown in the following image:
Convert legacy shortcodes to Gutenberg blocks with pure PHP
One of the most direct uses of PHP blocks is as shortcode wrappers. With Gutenberg, you can still use shortcodes in your content, but you have to manually insert your shortcode into a Shortcode block, which isn’t the most enjoyable experience.
Suppose you have the following shortcode:
function my_custom_alert_shortcode( $atts ) {
$options = shortcode_atts( array(
'type' => 'info',
'message' => 'Default alert message',
), $atts );
$styles = array(
'info' => 'background: #d1ecf1; color: #0c5460; border-color: #bee5eb;',
'warning' => 'background: #fff3cd; color: #856404; border-color: #ffeeba;',
'error' => 'background: #f8d7da; color: #721c24; border-color: #f5c6cb;'
);
$style = $styles[ $options['type'] ] ?? $styles['info'];
return sprintf(
'<div class="sc-alert-box" style="%s padding: 20px; border: 1px solid; border-radius: 6px; margin: 10px 0;">
<strong style="text-transform: uppercase;">%s:</strong> %s
</div>',
esc_attr( $style ),
esc_html( $options['type'] ),
esc_html( $options['message'] )
);
}
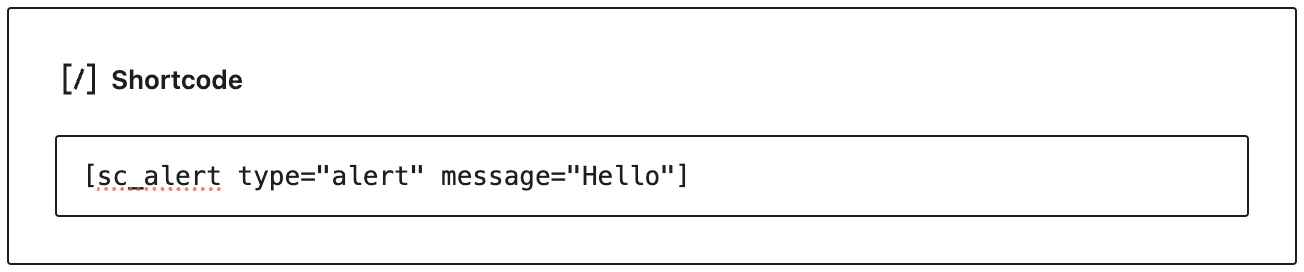
add_shortcode( 'sc_alert', 'my_custom_alert_shortcode' );This code generates a simple box that you can insert into your content with the following shortcode:
[sc_alert type="alert" message="Hello"]In Gutenberg, you will use a Shortcode block to insert the box into your content, as shown in the following image:
The scenario changes completely with PHP-only blocks. Now you can wrap your shortcode in a PHP-only Gutenberg block and configure it through the UI controls. Here is the code to add to your plugin:
/**
 * Rendering callback
 */
function render_shortcode_alert_wrapper_block( $attributes ) {

	$type    = esc_attr( $attributes['alertType'] );
	$message = esc_attr( $attributes['alertMessage'] );

	$shortcode_string = sprintf( '[sc_alert type="%s" message="%s"]', $type, $message );

	$wrapper_attributes = wp_kses_data( get_block_wrapper_attributes( array(
		'class' => 'wp-block-shortcode-alert-wrapper',
	) ) );

	return sprintf(
		'<div %s>%s</div>',
		$wrapper_attributes,
		do_shortcode( $shortcode_string )
	);
}

/**
 * Register the block type on the server
 */
add_action( 'init', function() {
	register_block_type( 'tutorial/alert-wrapper', array(
		'api_version'     => 3,
		'title'           => 'Alert (Shortcode wrapper)',
		'icon'            => 'feedback',
		'category'        => 'widgets',
		'render_callback' => 'render_shortcode_alert_wrapper_block',

		'attributes'      => array(
			'alertType' => array(
				'type'    => 'string',
				'enum'    => array( 'info', 'warning', 'error' ),
				'default' => 'info',
			),
			'alertMessage' => array(
				'type'    => 'string',
				'default' => 'Type your alert message here...',
			),
		),

		'supports'        => array(
			'auto_register' => true,
			'spacing'       => array( 'margin' => true, 'padding' => true ),
			'typography'    => array( 'fontSize' => true ),
		),
	) );
});
The code above is similar to the code in the previous section. What changes here is the rendering callback.
$shortcode_stringstores the shortcode string ([sc_alert type="%s" message="%s"]).- The function returns the HTML of the block container and the included shortcode (
do_shortcode( $shortcode_string )).
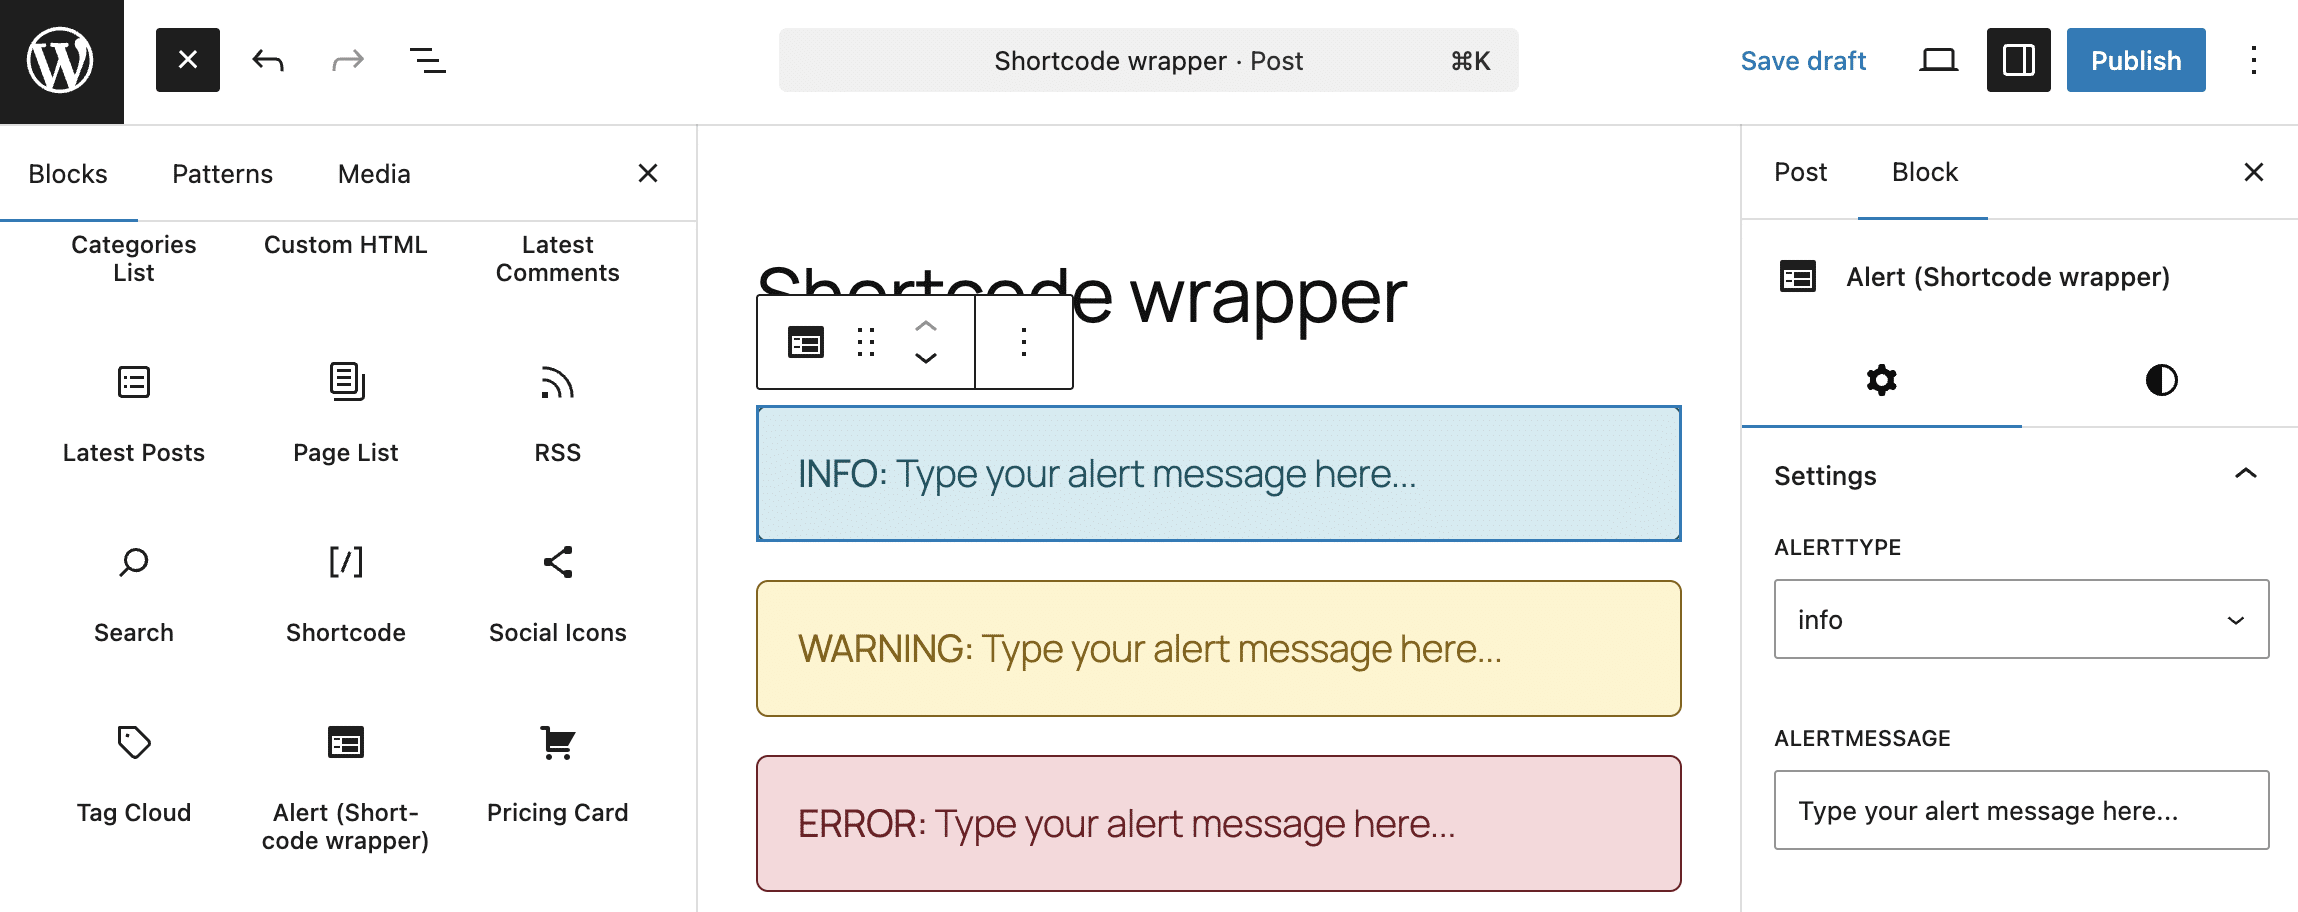
Now, open the block inserter and look for the “Shortcode wrapper” block among the widgets. Insert it into your content and configure it from the block settings bar. The block will appear identical in both the editor and the frontend.
How is WordPress development changing with PHP-only blocks?
As things stand, pure PHP blocks are in an experimental phase and still have limited capabilities. Gutenberg offers more powerful features, such as block patterns and block variations, which provide all the editing features of native Gutenberg blocks and custom blocks built in JavaScript. Yet there are scenarios where PHP blocks offer significant opportunities.
First, PHP-only blocks should encourage wider adoption of the block editor, especially among WordPress developers who are less oriented towards server-side JavaScript development.
Furthermore, they are ideal wrappers for custom functions and shortcodes, as shown in the example in this article. In addition, they allow for easy integration with external services.
And we can also reasonably expect future improvements and feature additions, more configuration controls, and integrations with existing Gutenberg tools.
One thing is for sure: with PHP-only blocks, building Gutenberg blocks has become much easier.
If WordPress development is your job, Kinsta provides the developer tools you need, enabling you to focus on WordPress development, removing the need for complex configurations and tedious maintenance tasks: SSH, SFTP, Git integration, automatic updates, one-click staging, a built-in local development tool, and much more. Try it out firsthand with your first month free.
The post How to build PHP-only Gutenberg blocks appeared first on Kinsta®.